Behavioral Cloning Project
The goals / steps of this project are the following:
- Use the simulator to collect data of good driving behavior
- Build, a convolution neural network in Keras that predicts steering angles from images
- Train and validate the model with a training and validation set
- Test that the model successfully drives around track one without leaving the road
- Summarize the results with a written report
Here I will consider the rubric points individually and describe how I addressed each point in my implementation.
My project includes the following files:
- model.py containing the script to create and train the model
- drive.py for driving the car in autonomous mode
- model.h5 containing a trained convolution neural network
- video.mp4 containing a video of a lap of self-driving
- README.md summarizing the results
Using the Udacity provided simulator and my drive.py file, the car can be driven autonomously around the track by executing
python drive.py model.h5The model.py file contains the code for training and saving the convolution neural network. The file shows the pipeline I used for training and validating the model, and it contains comments to explain how the code works.
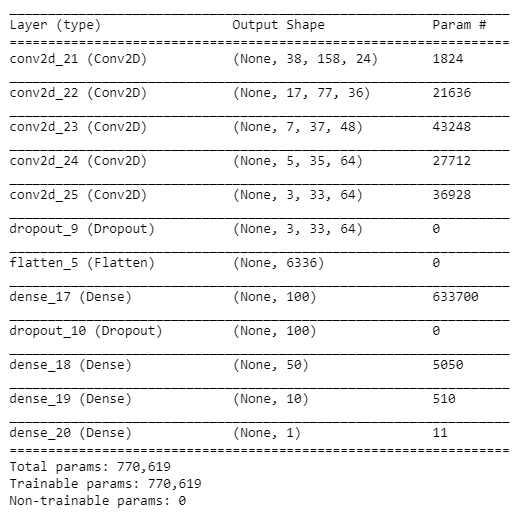
My model is inpired by the Nvidia model published in their paper. It consists of a convolution neural network with 4 convolutionnal layers with 5x5 filter sizes followed by dense layers with a depth from 100 to 10. The last layer ends with a relu activation to predict a number between -0.5 and 0.5. I added 2 dropout layers to avoid overfitting. The loss is calculated with mean squared error since it's a regression case.
I normalized the data outside of the network with a preprocessing phase. The data is preprocessed accordingly in the drive.py file.
The model contains dropout layers in order to reduce overfitting. (code line 82-85)
The model was trained and validated on different data sets to ensure that the model was not overfitting, I split the data using scikit learn's bultin function (code line 63). The model was tested by running it through the simulator and ensuring that the vehicle could stay on the track.
The model used an adam optimizer, so the learning rate was not tuned manually.
Training data was chosen to keep the vehicle driving on the center of the road. I drove the car using the mouse on my personal computer to get more precise steering data. Doing so in the cloud was too laggy to drive properly. I used the 3 camera to train the network. The side camera were used to create "recovery" images to help the car get back to the center of the road when it's drifting to the side. I added or substracted 0.1 to the steering to the data associated to the side images (code line 34).
The adding of the side cameras was key, this is what helped the model perform to its best. Before using them, the car was unable to recover from bad positionning and would get off the road on certain turns.
I derived my model from this Nvidia paper (https://images.nvidia.com/content/tegra/automotive/images/2016/solutions/pdf/end-to-end-dl-using-px.pdf). I fine tuned the kernel size of convolution, number of filters and depth of the layers.
From the begining I added 2 dropout layers, and it already gave results that were not overfitting so I kept them in the modeL.
To combat the overfitting, I made sur I took enough training data, running through the lap 3 times one way, and 3 times the other way.
The final step was to run the simulator to see how well the car was driving around track one. There were a few spots where the vehicle fell off the track, to improve the driving behavior I added the side cameras to the training data. At the end of the process, the vehicle is able to drive autonomously around the track without leaving the road.
To capture good driving behavior, I first recorded 3 laps on track going one way and 3 laps going the other way. Doing so help the model generalise to all kinf of turn (since it's a round track, it is left turn heavy going one way)
After the collection process, I had 22 185 number of data points. I then preprocessed this data by converting to the YUV color space, cropping the image to remove the sky and the hood of the car, blurring it a little to smooth it out and finaly normalized it by dividing the pixels value by 255.
I finally randomly shuffled the data set and put 20% of the data into a validation set.
I used this training data for training the model. The validation set helped determine if the model was over or under fitting. The ideal number of epochs was 20 as evidenced by the training graph. I used an adam optimizer so that manually training the learning rate wasn't necessary.


