Hadoop log aggregation, alerting, and lifecycle management
Table of Contents
- Running the Cloudera Distribution of Hadoop
- Orchestrating the cluster with Cloudera Manager
- Comfortable with CSD's
- Support applications on the cluster
- Desire aggregate logging solution for applications
- Turn application logs into actionable data points
- Build application dashboards
- Enable custom log search
- Alert when critical criteria is met
- Comfortable applying Log4j components
Log Aggregation and Search
- Add log aggregation, search, and alerts to your Java, Scala, Bash, or Python programs and scripts
Alerting
- Flexible alerting using the Pulse Alert Engine
- Write alerts using the full solr query syntax. Example alerts:
- There was an appliction Error in the last 5 minutes
- My application has stopped logging messages
- Email and web hook integrations
Log Lifecycle Management
- Built in rotation of logs.
- Keep logs for as long as you need them
- Automatically rotate new log indexes after a configured time period
- Easily search all logs
Dashboarding
- Integration with existing dashboards for rich UIs.
Visualization and search works with:
- Hue Search
- Arcadia Data
- Banana
Hadoop Native
- Pulse uses Solr for document indexing and search and can be deployed on your Hadoop cluster
- Use existing Sentry roles to control access to log data
Cloudera Manager Integration
- Simple deployment using CSDs and Parcels
- Manage and monitor Pulse from within Cloudera Manager
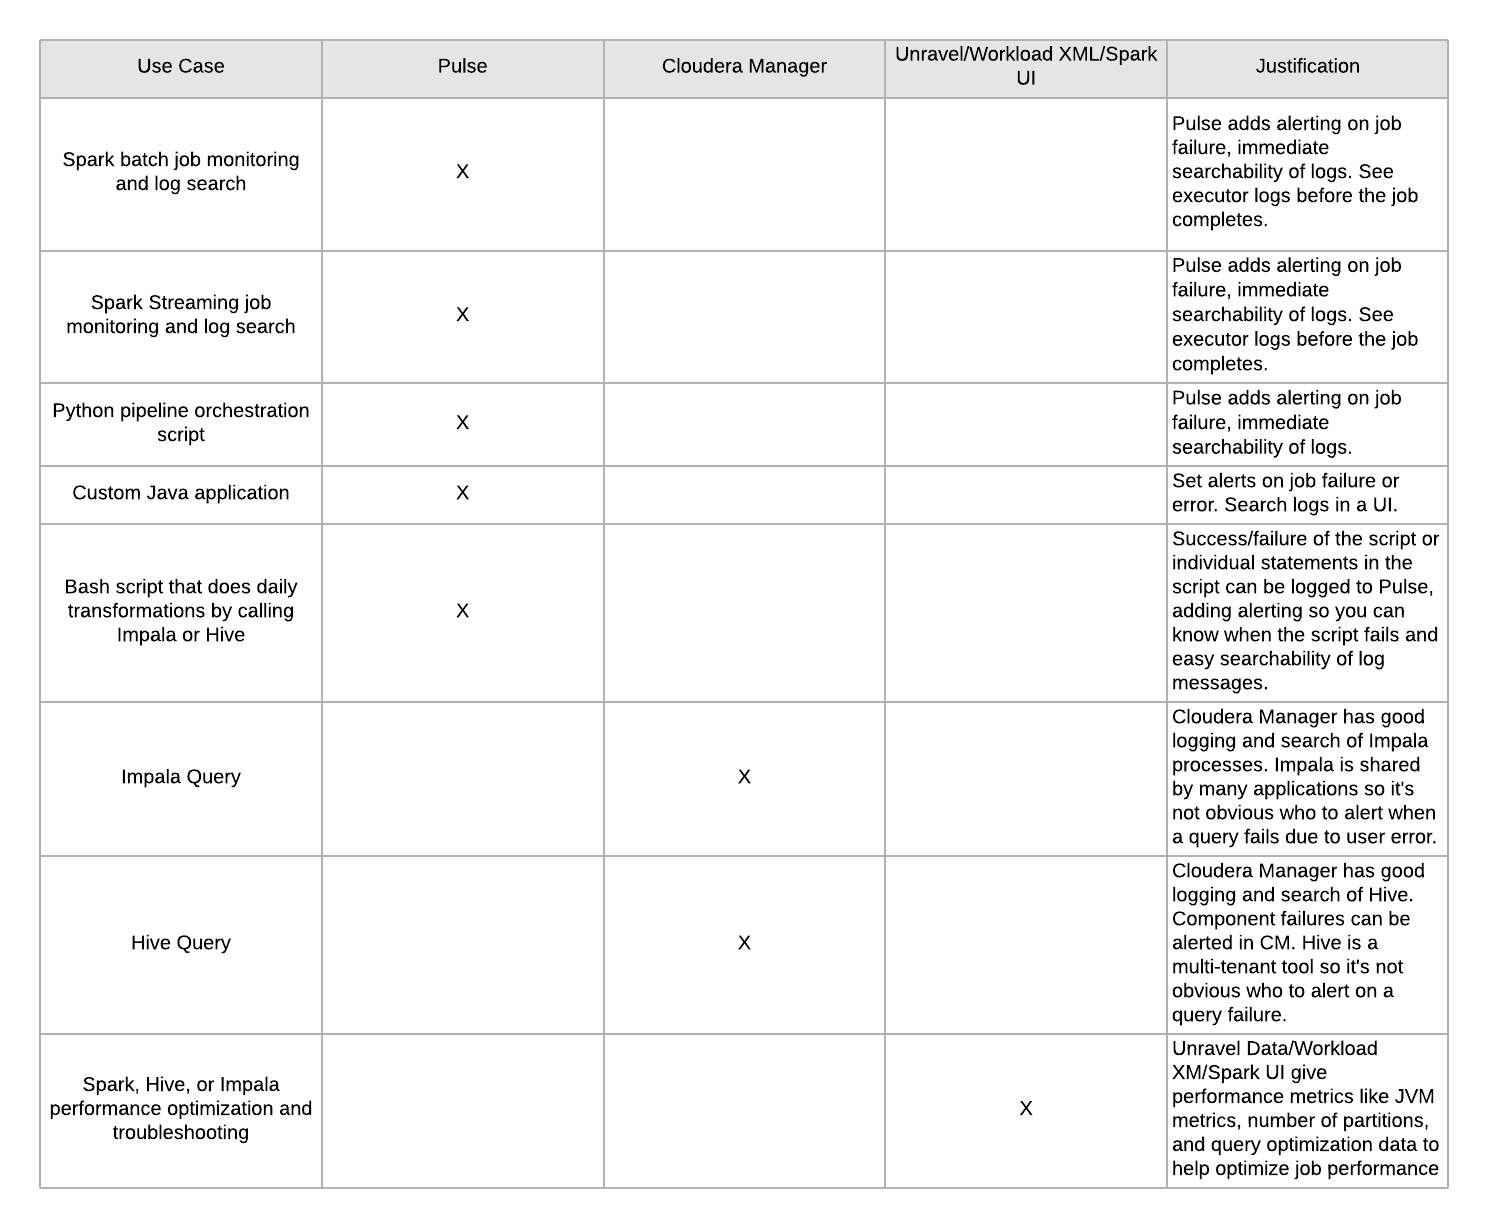
Pulse is used for centralized logging. This diagram compares Pulse to other tools given use cases:
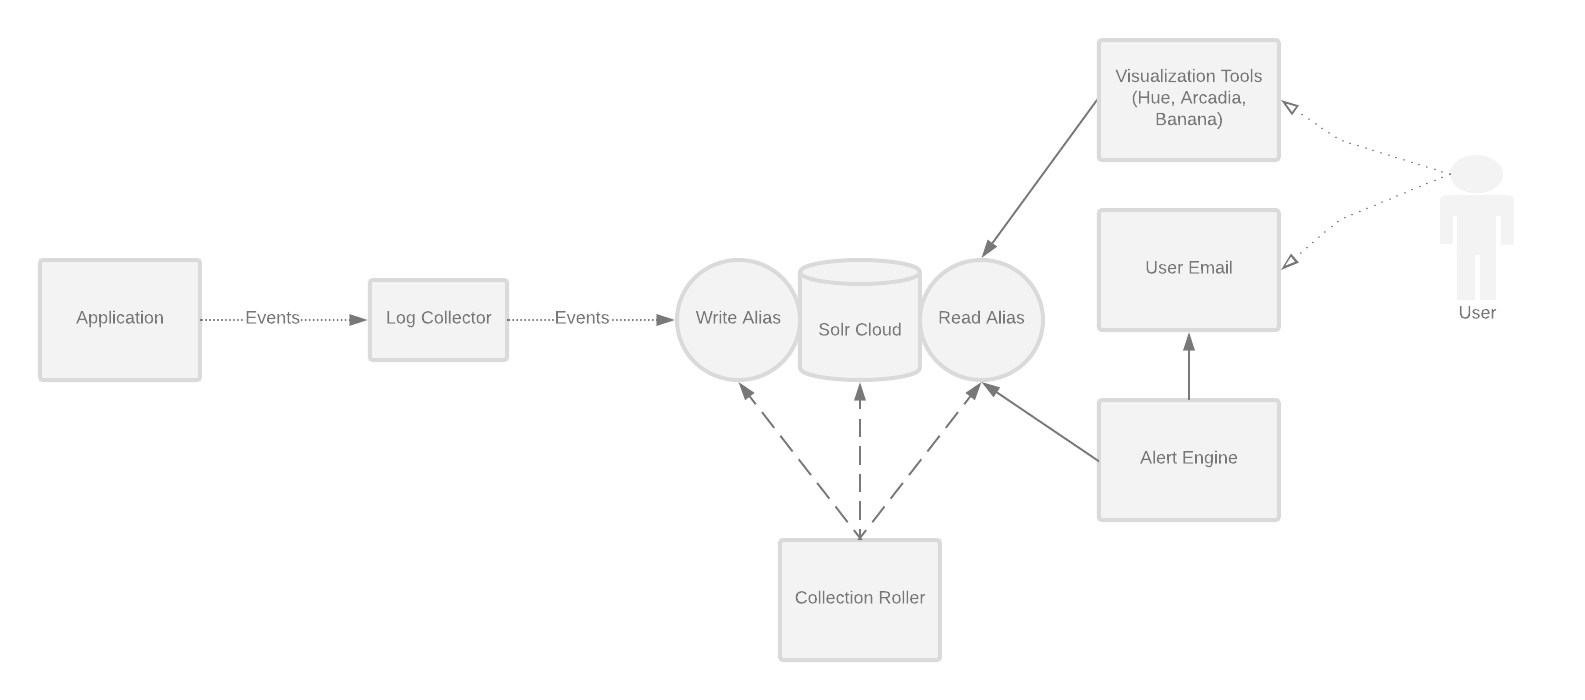
If a new application wants to use Pulse, a block should be created in the Collection Roller config.yml file and the Alert Engine config.yml file. See the Alert Engine readme and Collection Roller readme for more details.
Collection Roller The collection roller is responsible for creating solr indexes for new applications in Pulse and deleting old or expired log collections.
Alert Engine
The Alert Engine is a daemon process with a set of alertRules. Alert rules can be configured
to notify developers and application users when an event happens.
See the Alerting Engine README for more details and configuration options.
Log Collector The Log Collector is an HTTP server that receives log messages as JSON and puts them into SOLR collections.
See the Log Collector README for more details and configuration options. Log Appender An HTTP log appender for log4j 1.x that will post json messages to the log collector.
See the Log Appender README for more details.
There are also log appenders for Bash and Python in the 'appenders' folder
Pulse can be installed as a Cloudera CSD (Custom Service Descriptor). See CSD and PARCEL READMEs for details.
- Download the latest CSD jar from http://downloads.phdata.io/cdh5/csd/
- Place the jar in your Cloudera Manager CSD directory, usually
/opt/cloudera/csd - Modify the ownership of the jar
chown cloudera-scm:cloudera-scm /opt/cloudera/csd/pulse-<version>.jar - Restart Cloudera Manager to install the jar
- The parcel repo should be automatically added with the CSD. The url to add it manually: downloads.phdata.io/cdh5/parcels/
- Download, distribute, activate the parcel
Pulse can be installed through the "Add New Service" button for your cluster.
The wizard will ask you for:
smtp user: This will be the 'from' address for alertssmtp password: This is only necessary if your smtp server uses authenticationsmtp address: The hostname of your smtp serversmtp port: The port of your smtp server
Pulse has two configuration files, collection-roller.yml and alert-engine.yml
Both of these configs are deployed via safety valves. Alert Engine Example and Collection Roller Example
Place collection-roller.yml in Collection Roller Advanced Configuration Snippet (Safety Valve) for collection-roller.yml
Place the alert-engine.yml in Alert Engine Advanced Configuration Snippet (Safety Valve) for alert-engine.yml
If Sentry is enabled for Solr, roles and grants will need to be configured for Pulse and for each Pulse application.
Add the pulse group to the Solr admin role. This assumes Sentry for Solr has been configured with an admin role. This step only needs to be done once after install. The example below assumes your admin role is named solradmin.
solrctl sentry --add-role-group solradmin pulse
Create the role and grant for each application. In this example, sample_role is the name of the Solr role granting query privileges to the collection sample-app_all for the Pulse application sample-app. The sample-group group is added to that role.
solrctl sentry --create-role sample_rolesolrctl sentry --grant-privilege sample_role 'collection=sample-app_all->action=Query'solrctl sentry --add-role-group sample_role sample_group
Run make package which will collect all the jars into target/lib.
Remove the .template suffix from these two files under the bin directory.
cp env.sh.template env.sh
Change the kerberos keyTab and principal in jaas.conf to your own (you need to create one if you don't have it already)
Run individual components:
$ bin/collection-roller
$ bin/log-collector
$ bin/alert-engineRun all tests from the project root:
$ make testSbt is used for building scala, and Make is added to simplify building tasks.
Makefile targets are run with make <target-name>, some target examples are like this:
dist: create a distribution (parcel and csd)test: run all testspackage: create jars from sourceinstall: install parcel and CSD. This is only valid on a node running Cloudera Manager and will install the csd/parcel to /opt/cloudera/csd and /opt/cloudera/parcel-repo. It will not distribute/activate the parcel or refresh/install the CSD in Cloudera Manager
Before submitting a pull request, please make sure make test and make dist both pass successfully.


