Algotech is a website that host the technical blog of Algoritma. To serve the website locally, use the following R command:
blogdown::serve_site()
Please follow the submission guidelines below:
- Fork the repository.
- Make a development version and add your article.
- Submit a pull request.
If the project owner agrees with your work, they will merge your request into the original repository.
Step-1:
- On github, navigate to the teamalgoritma/algoritmablog repository.
- On the top-right corner of the page, click fork.
Step-2: Keep your fork synced using Git. If you haven't yet, you should first set up Git.
- On github, click fork on the algoritmablog repository.
- Open Git Bash
- Type
git clone, and then paste the URL of repository. It will look like this, with your GitHub username instead ofYOUR-USERNAME:
$ git clone https://github.com/YOUR-USERNAME/algoritmablog
- Press Enter. Your local clone will be created.
$ git clone https://github.com/YOUR-USERNAME/algoritmablog
Cloning into 'algoritmablog'...
remote: Enumerating objects: 1592, done.
remote: Counting objects: 100% (1592/1592), done.
remote: Compressing objects: 100% (731/731), done.
remote: Total 1592 (delta 770), reused 1495 (delta 679), pack-reused 0
Receiving objects: 100% (1592/1592), 13.38 MiB | 1.05 MiB/s, done.
Resolving deltas: 100% (770/770), done.
- Type
git remote -vand press Enter. You'll see the current configured remote repository for your fork.
$ git remote -v
> origin  https://github.com/YOUR_USERNAME/algoritmablog.git (fetch)
> origin  https://github.com/YOUR_USERNAME/algoritmablog.git (push)
Use the following template:
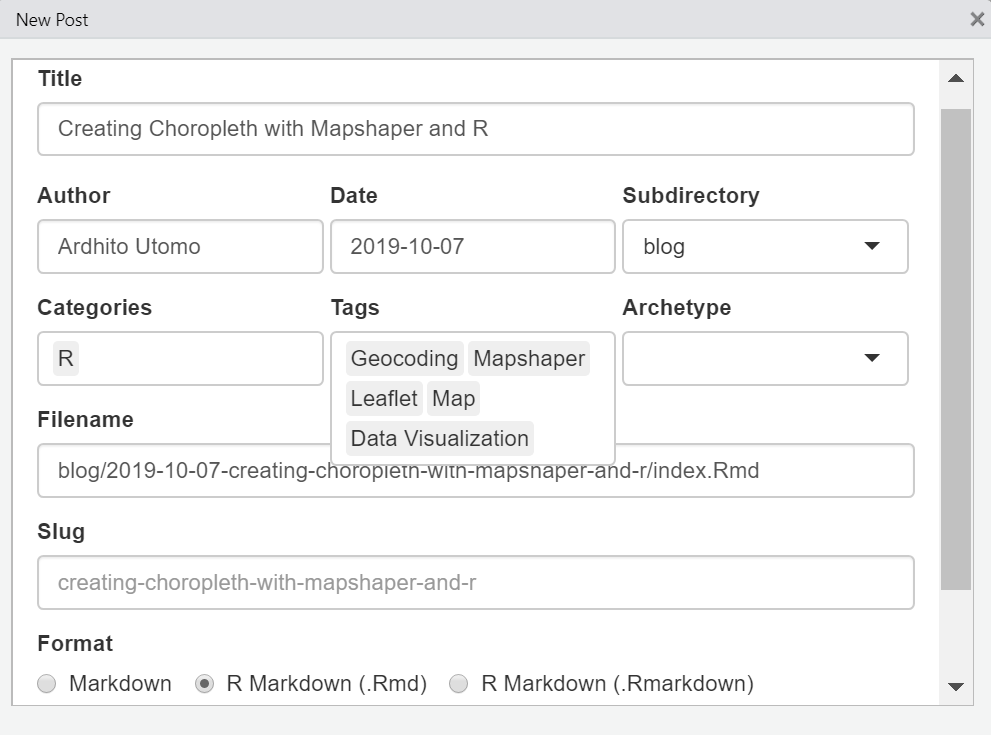
title: Creating Choropleth with Mapshaper and R
author: Ardhito Utomo
github: https://github.com/ardhitoutomo
date: '2019-08-18'
slug: creating-choropleth-with-mapshaper-and-r
categories:
  - R
tags:
  - Geocoding
  - Mapshaper
  - Leaflet
  - Map
  - Data Visualization
description: ''
featured: ''
featuredalt: ''
featuredpath: ''
linktitle: ''
type: post
OR:
Create a new article by using the New Post addins on Rstudio (make sure you have already installed the blogdown package first).
Tags are keywords or terms that describe your article. Here are some tags that already exist:
tidyversetidymodelsData VisualizationMachine LearningData ManipulationCapstone ML
Note: Please add Capstone ML tags on your YAML options, if you are making an article that aims to help students on their capstone project.
Use the following setup chunk options on your Rmd files.
# clean up the environment
rm(list = ls())

# setup chunk options
knitr::opts_chunk$set(
  message = FALSE,
  warning = FALSE,
  fig.align = "center",
  comment = "#>"
)
- Make sure your article' rmd is in accordance with the settings in the previous step
- Move your article to
/content/blog/ - Create a new folder and save your data input onto the path: `/content/blog/data_input/your topic article
some_object <- read.csv("data_input/article-topic/filename.csv")
- Create a new folder with your topic article in this directory:
/public/img/. - Save your images in
/public/img/ARTICLE-TOPICwith the following name:imgname.png. - Embed the images with the following command, and options
echo = FALSE.
knitr::include_graphics('/img/article-topic/imgname.png')
- If the images does not appear, remove the code chunk above and replace it with:
<center> {width="60%"} </center>
- Convert your RMarkdown to html by running
blogdown::serve_site(). The HTML need to be saved in the same directory as where your RMarkdown file is.
- Save your article
- To test whether your article was successfully created or not, serve the website locally with
blogdown::serve_site. - Open git bash
git add .git commit -m 'your message'git push
- then submit a pull request to algoritma blog repository.
This project follows the all-contributors specification. Contributions of any kind welcome!


