Welcome to the serverless workshop. Herer we will practice some common concepts of serverless architecture as well as review some of the common use cases
Core of serverless architectures is so called FaaS (Function as a Servie). Which is a lightweight container that contains OS and Runtime and has been attached to the code baseline (FaaS code). Main benefit: it is only takes few milliseconds to spin up a new contaner instance that will execute code functioun attached to it. If it only takes few milliseconds why should we run it all the time? What if Cloud Provider will keep container disabled (you will not pay) and only spin it when certain event will happen and let the code inside of the container to react (be executed, triggered by event).
So, in difference to VMs you pay only for every 100milliseconds of execution instead of paying by hour. Sounds great, isn't it? Where is the catch?
And yes there is a catch. Serverless Architecture comes with some limitations. So you need to think on architecture design how to dodge it. But, if ycan get savings up to 100 and more times if you design properly.
This workshop will highlight some of the AWS (They far are leading in serverless computing) Lamba service specifics and will give you possibility to try by yourself what works good what for you.
More details about Serverless you will get in the first Lab
We need to have a comprehensive toolset of the tools to do development for serverless. We will use the following:
-
AWS: cloud native services of Amazon Web Services. They are far behind of Google and Microsoft (in terms of maturity of cloud services for serverless )
-
CloudFormation: This is an AWS service that can deploy whole stack as a single unit. In case of failure it should be able to roll it back as well.
-
Python 2.7: You don't need to be an expert of Python to complete this workshop however some programming experience (any language is good) can be be efitial. We have choisen Python because it is easier to illustrate some of the FaaS concepts rather than other language runtimes (such as: nodejs or Java)
http://akranga.signin.aws.amazon.com/console?region=eu-west-1
There are two options how to use this workshop.
-
Bring your own AWS. This will not going to cost you much. We estimate the whole workhop will cost less than 1USD. Your own cloud environment will guarantee that you are working on isolated from the other users environment wihtout risk of interference
-
User shared environment provided by us. Please be respectful to tother colleagues, don't kill other's stuff... Be careful to your's and it's all going to be just fine
If you use your own cloud then many steps from this tutororial can be skipped.
-
With your Internet Browser. Connect to AWS Web Console here or to your own Cloud Account.
-
Switch to the region Ireland (eu-west-1). Since now we will presume you are located in the Ireland region. All links will be to this region. If you decided to go to the other region, you might want to adjust direct links to your desired region.
-
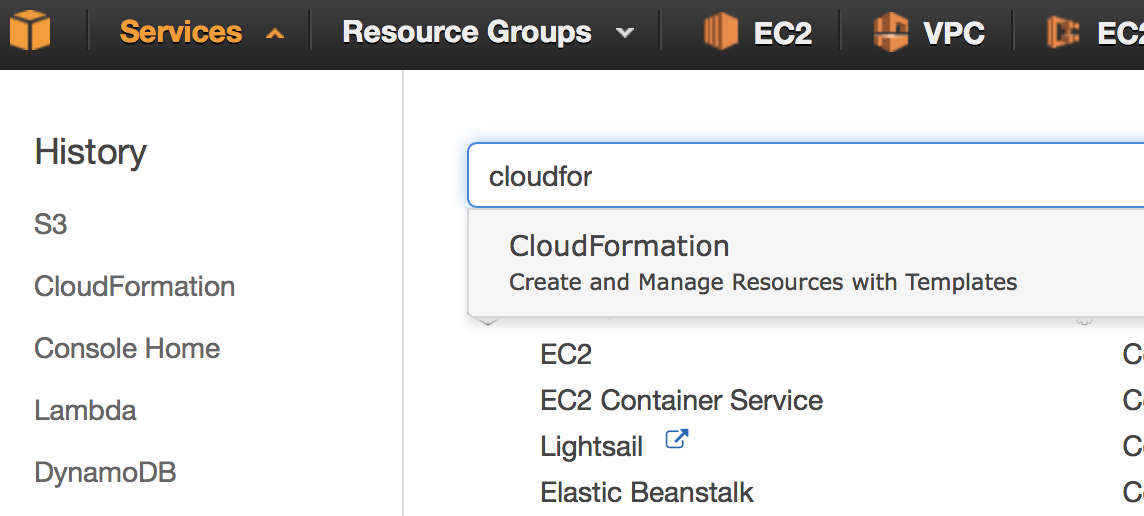
Select CloudFormation Service. The easiest is to do to click on "Services" menu and enter in the search field "CloudFormation"
-
Click "CreateStack" big blue button
-
Next select "Upload a template to Amazon S3". To do this you need to clone current repository or store this CloudFormation template in your workstation and upload it with the browser. Template File


-
Then please choose "Stack name" It must be unique per region. However you should be able to identify your stack later. Other parameters can be left unchanged
-
On the next pate, please check "Advanced" button. And Rollback on failure set to No
-
On the last screen please check I acknowledge that AWS CloudFormation might create IAM resources. Then you should be able to see how your stack has been progressing
-
Validate: your stack should become from CREATE_IN_PROGRESS to CREATE_COMPLETE. Then feel free to proceed to the Lab 01
-
With your Internet Browser. Connect to AWS Web Console here or to your own Cloud Account.
-
Switch to the region Ireland (eu-west-1). Since now we will presume you are located in the Ireland region. All links will be to this region. If you decided to go to the other region, you might want to adjust direct links to your desired region.
-
Switch to AWS Lambda service: direct link

- Select lambda function that has been tagged as
your-environment-name-01-new-game

You will see several tabs. Let me guide through these it:
-
Code: this tab shall be used to modify the code. Configuration management parameters can be injected via Environment Variables (scroll down)
-
Configuration: This tab has been used to customize this Lambda function. Probably ost importaant text field is: Handler. It looks like the following:
main.new_game_handler. Where, first part corresponds to the source code file name and second part is the name of the function to be executed.
Advanced settings also contains: RAM and Timeout constraints for this lambda function
-
Triggers: here you can customize event source for the Lambda function (we will come back here in further Labs)
-
Monitoring: contains reference to the LambdaFunction CloudWatch Logs. AWS Lmbda has no remote debugger functionality. So, logs become vitally important
On top left you will also find few buttons. Click on blue Test button. For the first time you should be able to see dialog to configure test event. It must be expressed in valid JSON format. Empty event looks like on the picture ({}) below. And then click "Save and Test" button (bottom right corner).

If execution has been completed successfully you shouls see. Result message, and function logs as well as used RAM and Function time statistics

Knowing how to change code and test it, let's implement new.handler function. We should be able to create create a new game (gererate Players and assign Mafia identities to them). Because we don't want to reveal players identity to the User (remember Lambda is stateless) we are going to add backend database table to our AWS Lambda. We shall use it as cache to make sure our data survive Lambda container restart. But first let's start with the behavour of the hanlder function.
Before we start to do any changes let's add some code outside of handler function
# all player names has been written in the text file
# we read all of them into list so later we can pick random
# to name our Players
with open('names.txt', 'r') as f:
  all_names = f.read().splitlines()
To begin game we need to choose some of the players names. These names has been written in the text file and names.txt code above will read them into the list
Because we will generate players for the game and write them into the databae (DynamoDB) we need to write a couple of functions for storage
# deleate all records in the table
def clear_all():
  for i in table.scan()['Items']:
    table.delete_item(Key={'Name': i['Name']})

# save one record in the dynamo table
def save(player):
  table.put_item(Item=player)
Now is the most important. We need to write implementation of the so called hamdler funtion. This exactly function will be executed by lambda. Logic is quite sophisticated. Let me try to explain the algorithm
- We pick number of players and number of mafia players from the environment variables (injected by CloudFormation)
- We pick several (number of players) of random names from the
names.txtfile. - We at random we choose (number of mafia) players and assign this identity as
TrueIdentityattribute of the player - Other players will be
Innocent - Attribute
Identitywill be by defaultUncovered - We store everything in DynamoDB
def handler(event, context):
  num_of_players = int(os.environ['NUMBER_OF_PLAYERS'])
  num_of_mafia   = int(os.environ['NUMBER_OF_MAFIA'])
  clear_all()

  names  = random.sample(all_names, num_of_players)
  mafia  = random.sample(range(0, num_of_players), num_of_mafia)

  for i in range(num_of_players):
    player = {
      'Name': names[i],
      'TrueIdentity': 'Mafia' if i in mafia else 'Innocent',
      'Identity':     'Uncovered'
    }
    save(player)

  message = "New game started with {}".format(', '.join(names))
  return response( {"message": message}, event )
Click Save button and then click Test button.
You should bet something like:
{
  "message": "New game started with Christopher, Adam, Kevin, Brenda, Nicholas"
}
Where names are randomly selected player names. Few of them are innocent others hide mafia identity.
Let's add a database. If you will scroll down, you will find that Environment Variable dynamo_table has been set to the DynamoDB table name (that happend during provisioning with Terraform).
Let's initialize this table by placing code (just below log inicialization).
log = logging.getLogger()
log.setLevel(logging.DEBUG)

dynamodb = boto3.resource('dynamodb')
table = dynamodb.Table(os.environ['DYNAMO_TABLE'])
Checking the data. We can switch to the DynamoDB service by following this link
You can select DynamoDB service to check content of your table. Please be aware there might be other tables.

You can drill down to the data

In a similar manner let's come back to our lambda functions link
Now let's select function your-environment-name-02-game-state
Before we try to modify this function, let's make shure it works. Click "Test"button and end "empty" ({}) as Test Input Message. If you see the same as on the screenshot below...
...then you feel free to proceed with this activity. Otherwise you might want to correct error first.
!!! Please apply same modifications as they were for for LAB 01.1 and then add the following
# Scan and return all records of the game however hides true identity attribute
def handler(event, context):
  return table.scan()['Items']
This is probably the easiest modification. We need to scan all items in the table.
Then click "Test". You shuld see function execution successfull otherwise you might want to correct an error.
 {
    "TrueIdentity": "Innocent",
    "Name": "Michelle",
    "Identity": "Uncovered"
  },
  {
    "TrueIdentity": "Mafia",
    "Name": "Christine",
    "Identity": "Uncovered"
  },
  ...
]
Oops we accidentally leaked identity of the players. This makes this game pointless. However we do have a projection with the Secondary Index called Masked. You can test it in DynamoDB service
See screenshot:

Let's modify our lambda code so it would like the following
# Scan and return all records of the game however hides true identity attribute
def handler(event, context):
  return table.scan(IndexName='Masked')['Items']
Then we should have no issues anymore. Click test to see:
[
  {
    "Name": "Michelle",
    "Identity": "Uncovered"
  },
  {
    "Name": "Christine",
    "Identity": "Uncovered"
  },
  ...
]Based on what you learned in LAB 01.1 and LAB 01.2 let's modify all other functions. (!!! Don't forget to propogate DB shared functions).
Do you remember game rules? During the night Mafia chooses victim among the innocent people and kills one of them. Mafia never kills their kind. Only innocent people.
So, to start we need to write query to the dynamo
def find_by_identity(identity):
  return table.scan(
           FilterExpression=Attr('TrueIdentity').eq(identity) &
                            Attr('Identity').eq('Uncovered')
          )['Items']
Let's also add save to database method
def save(player):
  table.put_item(Item=player)
To remember result of mafia deeds.
Now we should be ready to apply our handler code
And Lambda implementation code:
def handler(event, context):
  players = find_by_identity('Innocent')
  if len(players) == 0:
    return response( mafia_win_message(), event)

  victim  = random.choice(players)
  victim['Identity'] = 'Killed by mafia'

  save(victim)
  return response( {"Message": [
      "Night, time to sleep",
      "Mafia awakes",
      "Mafia kills {}".format(victim['Name']),
      "Mafia sleeps"
    ]}, event)
Upon successful execution you should see something like this
{
  "Message": [
    "Night, time to sleep",
    "Mafia awakes",
    "Mafia kills Carol",
    "Mafia sleeps"
  ]
}During the day. Everybody makes a hypotesys who is the Mafia and makes accusations. Here are the rules:
- Mafia knows true identities of each other and not accuse themselves. They point to Innocent
- Innocent people don't know who is the Mafia and try to identify it
- Players should agree about player to sentence. This will happen in the next turn.
Code of the function your-environment-04-day-turn looks very similar to previous one. As usual we start with the backend code
Very similar to previous ones:
def find_all_uncovered():
  return table.scan(
           FilterExpression=Attr('Identity').eq('Uncovered')
          )['Items']


def find_by_identity(identity):
  return table.scan(
           FilterExpression=Attr('TrueIdentity').eq(identity) &
                            Attr('Identity').eq('Uncovered')
          )['Items']
We need two function... That will fetch all 'Uncovered' or in the other words 'Living' players and another function to help mafia to filter Mafia and leave Innocent people. Please note we do not use secondary index. Otherwise our we cannot lookup by TrueIdentity attribute
And now the handler code. Here is the sequence:
- We lookup
Innocentplayers among the "living" - We lookup all players
- If
TrueIdentityof a player isMafiathen they choose random person amongInnocent. Otherwise amongEverybody - So you see that probabily that people will blame innocent is bigger. This is how players can guess the Mafia. They never blame their kind.
def handler(event, context):
  message = [
    "Day, time to wake up!",
    "Players see the dead body and makes their accusations"
  ]

  innocent = find_by_identity('Innocent')
  anybody  = find_all_uncovered()

  for player in anybody:
    if player['TrueIdentity'] == 'Mafia':
      accused = random.choice(innocent)
    else:
      accused = random.choice(anybody)
    message.append("{} blames on {}".format(player['Name'], accused['Name']))

  message.append("Who is the Mafia?")
  return response({"Message": message}, event)
And successful execution result should look like this
{
  "Message": [
    "Day, time to wake up!",
    "Players see the dead body and makes their accusations",
    "Michelle blames on Stephen",
    "Christine blames on Barbara",
    "Heather blames on Emily",
    "Stephen blames on Barbara",
    "Emily blames on Michael",
    "Michael blames on Stephen",
    "Barbara blames on Michelle",
    "Who is the Mafia?"
  ]
}Select your-environment-05-judgement lambda function'
Last but not least. User will make a sentence. Then the player should uncover her TrueIdentity and leave the game.
User will pass the name of the player to sentence as input parameter. So, we will need to lookup uncovered by it's name. We also write save function to persist results of the sentence.
def find_by_name(name):
  result = table.scan(
           FilterExpression=Attr('Identity').eq('Uncovered') &
                            Attr('Name').eq(name)
          )['Items']
  return result[0] if result else None

def save(player):
  table.put_item(Item=player)
User Parameter will come as user event a
def handler(event, context):
  log.debug(json.dumps(event, separators=(',', ':')))

  name      = event['Name']
  sentenced = find_by_name(name)
  ...
Now in the test event we myst pass name
{
  "Name": "John"
}
John might not be there... in this case we return 404 Not found
  ...
  sentenced = find_by_name(name)
  if sentenced == None:
    return response({
        "Message": "Player with name {} not found".format(name)
      }, event, 404
    )
Check out for method response. It will be important for API Gateway integration
And now let's write our judgment logic below. If Player has been found
  if sentenced['TrueIdentity'] == 'Mafia':
    sentenced['Identity'] = 'Correctly sentenced'
    message = [
        'Mafia has been uncovered!',
        'Guilty member of mafia {} has been sentenced!'.format(sentenced['Name'])
      ]
  else:
    sentenced['Identity'] = 'Incorrectly sentenced'
    message = [
        'Mafia has not been uncovered!',
        'Innocent {} has been sentenced unfairly'.format(sentenced['Name'])
      ]

  save(sentenced)
  return response({"Message": message}, event)
TODO... As the bonus you might want to add some more logic to finish the game. Because now Mafia or Innocent people can win the game (killing all Innocent people or identifying all Mafia)
Look at the night-turn function for inspiration
Result might look like the following
{
  "Message": [
    "Mafia has been uncovered!",
    "Guilty member of mafia Christine has been sentenced!"
  ]
}We created few AWS Lambdas now let's expose it to the users so they can access it. For this purpose we need an API Gateway Service that will encapsulate AWS lambdas behind REST interface and will privide convinient endpoints
With our terraform script. We already created an instance of AWS API Gateway
We will use only open (unsecured) endpoints today.
Before we start just check your API ednpoint name
Run following command
$ make out

Outputs:

api_gateway_name = api.devops-days
api_gateway_url = https://mzckcf11cd.execute-api.eu-west-1.amazonaws.com/prod
-
Go to AWS Lambda service: direct link
-
Select lambda function that has been tagged as
your-environment-name-01-new-game
-
Switch to 'Triggers' tab and press "Add new trigger"
-
Click on "dotted square" on the left from AWS Lambda icon (see screenshot below) and select API Gateway

- In the new dialog:
- API name: select your API gateway (terraform output should help to find your).
- Deployment stage: prod
- Security: open

- By the completion of this step you should see someting like below:

-
Now switch to API Gateway service: link
-
Select your API

- Then expand resources and click '/' -> GET ->
your-environment-01-new-game-> ANY (all http methods)

-
Click "Test" button near "Client" integration
-
Select GET method from the dropdown

And click 'Test button'. In the AWS Lambda you will find following code
def response(body, event, code=200):
    # ...
    return {
        'statusCode': code,
        'headers': {},
        'body': json.dumps(body, separators=(',', ':'))
      }
Let me explain this function. You probably noticed that AWS automatically generated LAMBDA-PROXY integration. This integration expects specific response. Otherwise API Gateway will throw a runtime error.
You must return:
- 'statuCode': integer value
- 'headers': or at least empty dictionary
- 'body': is a string (you your response to JSON and then convert it to the string)
At the same time. LAMBDA-PROXY integration also formalizes an incoming event format. It will always in the form
{
    "body": null,
    "resource": "/",
    "requestContext": {},
    "queryStringParameters": {},
    "httpMethod": "GET",
    "pathParameters": null,
    "headers": null,
    "stageVariables": null,
    "path": "/",
    "isBase64Encoded": false
}
Taking into account LAMBDA-PROXY integration limitations, it is still highly recommended if you stick with it. If you want more flexibility then you might want to revert to the LAMBDA integration. In this case you will need to specify itegration transformation template. For this purpose we recommend to use following template (or customize it if you want). This is most minimalistic form that will act like a LAMBDA-PROXY integration.
#set($allParams = $input.params())
{
"body-json" : $input.json('$'),
"base64-body": "$util.base64Encode($input.body)",
"params" : {
#foreach($type in $allParams.keySet())
  #set($params = $allParams.get($type))
"$type" : {
  #foreach($paramName in $params.keySet())
  "$paramName" : "$util.escapeJavaScript($params.get($paramName))"
      #if($foreach.hasNext),#end
  #end
}
  #if($foreach.hasNext),#end
#end
},
"stage-variables" : {
#foreach($key in $stageVariables.keySet())
"$key" : "$util.escapeJavaScript($stageVariables.get($key))"
  #if($foreach.hasNext),#end
#end
},
"context" : {
  "account-id": "$context.identity.accountId",
  "api-id": "$context.apiId",
  "api-key": "$context.identity.apiKey",
  "authorizer-principal-id": "$context.authorizer.principalId",
  "caller": "$context.identity.caller",
  "cognito-authentication-provider":     "$context.identity.cognitoAuthenticationProvider",
  "cognito-authentication-type": "$context.identity.cognitoAuthenticationType",
  "cognito-identity-id": "$context.identity.cognitoIdentityId",
  "cognito-identity-pool-id": "$context.identity.cognitoIdentityPoolId",
  "http-method": "$context.httpMethod",
  "stage": "$context.stage",
  "source-ip": "$context.identity.sourceIp",
  "user": "$context.identity.user",
  "user-agent": "$context.identity.userAgent",
  "user-arn": "$context.identity.userArn",
  "request-id": "$context.requestId",
  "resource-id": "$context.resourceId",
  "resource-path": "$context.resourcePath"
  }
}Now for this activity let's proceed with all other functions and expose. You can proceed from LAMBDA to API GATEWAY (as we previously have done) or API GATEWAY to LAMBDA for maximum flexibility
Go back to API Gateway and create a Resource and a GET method to it
- Select "Action" => "Create Resourse"

- Fill "game-state" resource

If you implement enpoint for AJAX request, then you might want to enable CORS (then don't forget to add OPTIONS method as per CORS specification). But we do not do it now
- Let's add a new method to our recently created resource

- Select GET method and click "OK" round button

- Select:
- Integration Type: Lambda Function
- Lambda Proxy Integration:
CHECKED(for yes) - Lambda Region:
eu-west-1(or your region) - Lambda Function:
your-environment-02-game-state

- You will be prompted to confirm security settings

This will add Lambda trust relationship between API Gateway and Lambda function
Now you should be able to complete integrations for all other functions at your pase
To destroy your cloud resources, please run: Go to CloudFormation service and delete your stack
Thank you!!!