mAP (mean Average Precision)

This code, in Python, will evaluate the performance of your object detector. All the documentation is in the docs/ directory and online at (TODO: add link to Read the Docs).

The advantage of this tool over the alternative ones is that it allows you to visualize your results. This allows you to better understand how good your object detector really is and when it is failing.
In practice, a higher mAP value indicates a better performance of your neural-network. In this repo we do not only calculate the mAP score but also other metrics like ROC curve, confusion matrix, log average miss-rate and others!
Latest Features
- Calculate the confusion matrix.
- Draw False Negatives.
- Feb 2019: allow multiple input formats!
- Jan 2019: added log-average miss ratio metric!
Table of contents
Theoretical Explanation
Currently the most used metric to evaluate an object detector in the literature is the mAP score. In specific, the mAP criterion defined in the PASCAL VOC 2012 competition. This project started from an adaptation of the official Matlab code into Python.
To calculate the mAP score, first (1.), we calculate the Average Precision (AP) for each of the classes. Then (2.), we obtain the final mAP score by merely calculating the arithmetic mean of the AP values of all the classes of objects.
1. Calculate AP
For each class (e.g. person, car):
First, your detection-results are sorted by decreasing confidence values.
(TODO: Add example image of objects sorted by decreasing confidence score)
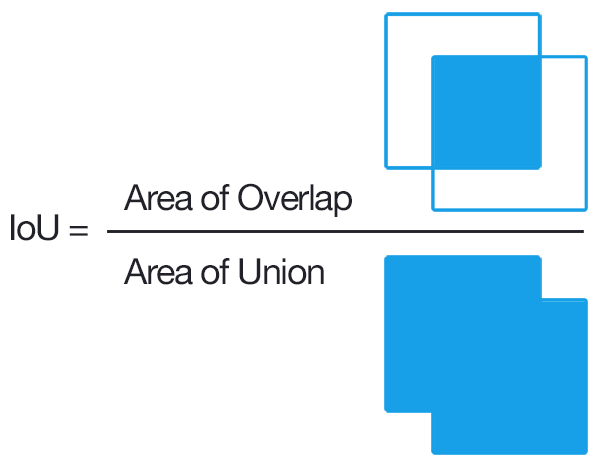
Then, each of these detections (from higher to lower confidence) is assigned to a ground-truth object. We have a true positive when they share the same label and a significant overlap IoU >= 0.5 (Intersection over Union greater than 50%).
(TODO: improve this image)
Note that we also want to avoid multiple detections of the same object. Therefore, a repeated detection of a ground-truth object is a false positive.
(TODO: add example image to assist explanation)
Using this criterion, we calculate the precision/recall curve. E.g.:
(TODO: improve this image)
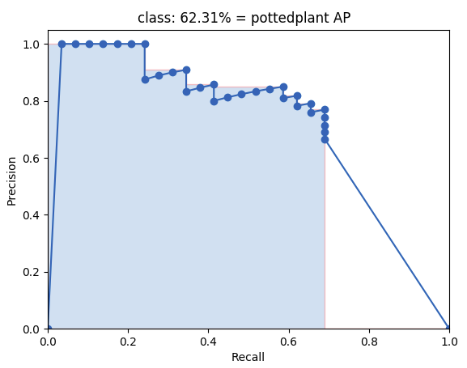
Then we compute a version of the measured precision/recall curve with precision monotonically decreasing (shown in light red), by setting the precision for recall r to the maximum precision obtained for any recall r' > r.
Finally, we compute the AP as the area under this curve (shown in light blue) by numerical integration. No approximation is involved since the curve is piecewise constant.
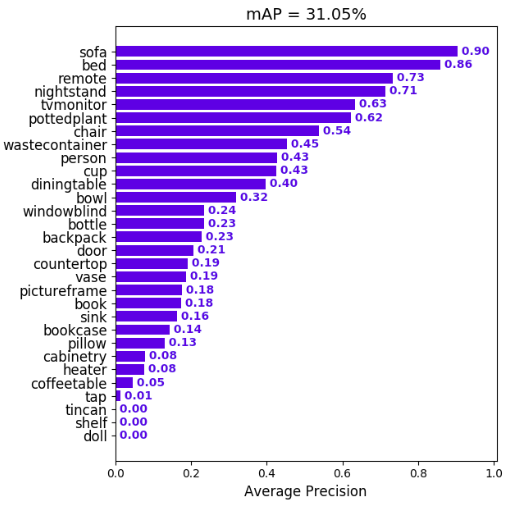
2. Calculate mAP
We calculate the mean of all the AP's, resulting in an mAP value from 0 to 100%. E.g:

Prerequisites
You need to install:
Optional:
- plot the results by installing Matplotlib - Linux, macOS and Windows:
python -mpip install -U pippython -mpip install -U matplotlib
- show animation by installing OpenCV:
python -mpip install -U pippython -mpip install -U opencv-python
TODO: add a quick way to install everything and add tqdm and numpy
Quick-start
(TODO: add a release version) To start using the mAP you need to clone the repo:
git clone https://github.com/Cartucho/mAP
Running the code
We made this code as flexible as possible for you, so for running the code it really depends on the object detector that you are using. Please select the object detector that you are using from one of the following options:
AlexeyAB/darknet
Step-by-step:
- Create a file
class.namesin the directorymAP/input/with your set of classes (one per line) - Create the
ground-truthfiles (explained below) - Copy the
ground-truthfiles (one per image) to the directorymAP/input/ground-truth/ - Create the
results.txtfile (explained below) - Copy the
resuts.txtfile to the directorymAP/input/detection-results/ - (optional) Copy the images (corresponding to each ground-truth file) to the directory
mAP/input/images-optional/ - Run the code:
python main.py
2. Create the ground-truth files
The AlexeyAB's training/test files are in the YOLO format (a format that we support). So you can jump to step 3. If you need to label a new set of pictures in the YOLO format, you can use this tool in Python: OpenLabeling.
4. Create the results.txt file
As explained in AlexeyAB repo's README you can run the detector on a list of images and save the detection-results to a single result.txt file. An example is shown below:
# Example: process a list of images `data/train.txt` using yolov3 COCO and save the results in a file: `result.txt`
    darknet.exe detector test cfg/coco.data yolov3.cfg yolov3.weights -dont_show -ext_output < data/train.txt > result.txt
Darkflow
Step-by-step:
- Create the
ground-truthfiles (explained below) - Copy the
ground-truthfiles (one per image) to the directorymAP/input/ground-truth/ - Create the
detection-resultsJSON files (explained below) - Copy the JSON files (one per image) to the directory
mAP/input/detection-results/ - (optional) Copy the relevant images to the directory
mAP/input/images-optional/ - Run the code:
python main.py
1. Create the ground-truth files
The Darkflow training/test files are already in the PASCAL VOC format (one of the formats that we support). So you can just jump to step 2. Additionally, if you need to label a new set of pictures in the PASCAL VOC format you can use this tool in Python: OpenLabeling.
3. Create the detection-results JSON files
As explained in the Darkflow repo's README you can run the detector on a set of images and save the detection-results to multiple JSON files (one of the formats that we support). So you can just jump to step 4 after running a command like:
    # Example: forward all images in sample_img/ using tiny yolo and JSON output
    flow --imgdir sample_img/ --model cfg/tiny-yolo.cfg --load bin/tiny-yolo.weights --json
PASCAL VOC
Step-by-step:
- Create the
ground-truthfiles (explained below) - Copy the
ground-truthfiles (one per image) to the directorymAP/input/ground-truth/ - Create the
detection-resultsfiles (explained below) - Copy the
detection-resultsfiles (one per image) to the directorymAP/input/detection-results/ - (optional) Copy the relevant images to the directory
mAP/input/images-optional/ - Run the code:
python main.py
To run the code you must have one (1) ground-truth and one (1) detection-results file for each picture. These files must all have the same basename when without the extension (.jpg, .txt). For example ground-truth/image_1.txt, detection-results/image_1.txt, image-optional/image_1.jpg all share the same basename image_1.
1. Create the ground-truth files
The PASCAL VOC format is one of the formats that we support. So you can just jump to step 2. Additionally, if you need to label a new set of pictures in the PASCAL VOC format you can use this tool in Python: OpenLabeling.
3. Create the detection-results files
The detection-results files can also be in the PASCAL VOC format.
pjreddie/darknet
Step-by-step:
- Edit the file
class.namesin the directorymAP/input/to your own set of classes (one per line) - Create the
ground-truthfiles (explained below) - Copy the
ground-truthfiles (one per image) to the directorymAP/input/ground-truth/ - Create the
detection-resultsfiles (explained below) - Copy the
detection-resultsfiles (one per image) to the directorymAP/input/detection-results/ - (optional) Copy the relevant images to the directory
mAP/input/images-optional/ - Run the code:
python main.py
2. Create the ground-truth files
The pjreddie's training/test files are already in the YOLO format (one of the formats that we support). So you can just jump to step 3. Additionally, if you need to label a new set of pictures in the YOLO format you can use this tool in Python: OpenLabeling.
4. Create the detection-results files
To store the detection-results files just copy the file save_darknet_detection_results.py in the directory mAP/scripts/create_input_files/ to the pjreddie/darknet/python directory.
Then just run that script inside the pjreddie/darknet directory:
    # Example: forward all images in data/image_folder/ using YOLOv2_VOC (you can also specify the --output folder, by default it will be darknet/results/)
    python python/save_darknet_detection_results.py --cfg 'cfg/yolov2-voc.cfg' --weights 'yolov2-voc.weights' --data 'cfg/voc.data' --input_dir data/image_folder
TODO: keras-yolo3
TODO If there is any keras-yolo3 user out there please open an issue and we will add this format! (:
Step-by-step:
- Edit the file
class.namesin the directorymAP/input/to your own set of classes (one per line) - Create the
ground-truthfiles (explained below) - Copy the
ground-truthfiles (one per image) to the directorymAP/input/ground-truth/ - Create the
detection-resultsfiles (explained below) - Copy the
detection-resultsfiles (one per image) to the directorymAP/input/detection-results/ - (optional) Copy the relevant images to the directory
mAP/input/images-optional/ - Run the code:
python main.py
other
To run the code you must have one (1) ground-truth and one (1) detection-results file for each picture. These files must all have the same basename when without the extension (.jpg, .txt). For example ground-truth/image_1.txt, detection-results/image_1.txt, image-optional/image_1.jpg all share the same basename image_1.
The ground-truth and the detection-results files can be in multiple formats. Here we will explain one of them, the YOLO format, in detail. In the YOLO format, inside each .txt file there is one line for each object in an image.
2. Create the ground-truth files
Darknet YOLO wants a .txt file for each image with a line for each ground-truth object in the image that looks like:
<class_index> <x_center> <y_center> <width> <height>, where <class_index> corresponds to index of the object's class from 0 to #classes - 1 (remember that you first need to edit the file input/class.names to your own set of classes). The other values <x_center> <y_center> <width> <height> correspond to the bounding box of each object. These dimensions are calculated relatively to the width and height of the image, so note that the values can range between 0 and 1.0. Also note that <x_center> <y_center> are the center of the bounding-box and not the top-left corner.
If you need a tool to create the ground-truth you can use OpenLabeling.
E.g. ground-truth/image_1.txt:
  19 0.504222905636 0.575432434082 0.376204467773 0.267504302979
  0  0.402410387993 0.424330688477 0.386157307943 0.353413604736
  1  0.413456357572 0.575212434082 0.376204467773 0.313203102979
4. Create the detection-results files
The detection-results files have 1 (one) additional parameter when compared to the ground-truth files: the <confidence> score. This value represents the confidence score for each of the detected objects, so note that the values can range between 0 and 1.0.
<class-index> <confidence> <x_center> <y_center> <width> <height>E.g. detection-results/image_1.txt:
      14 0.872790455818 0.325253814697 0.490553100586 0.421687042236 0.819358723958
      14 0.869335949421 0.499317230225 0.532302449544 0.2415572052 0.636518513997
Authors:
-
João Cartucho - Please give me your feedback via GitHub issues.
Feel free to contribute
