Access control (Arduino controled) with face recognition (On PC)
- Multi Platform
- MIT License
- LGPDP Brasil Safe (Lei Geral de Proteção de Dados Pessoais)
- Basic command line interface
- Face recogniton from Webcam
- Just use the photo once for register, after that discard. Save only a id on the local file database (LGPDP Brasil Safe).
- OneTimePassword with Google Authenticator
- Text to Speech for welcome audio message
- Arduino commands to open the door
- Qr-Code to easy registration and temporary access
- Audio code (CHIRP) to easy registration and temporary access
- Use requirements.txt to Easy Install
- Easy Install for Windows
- Multithread support
- GPU support
- Improve performance with Region Of Interest method (https://github.com/hrastnik/face_detect_n_track)
- Port to Raspberry Pi
- Refactoring (SOLID, and a good pattern at least)
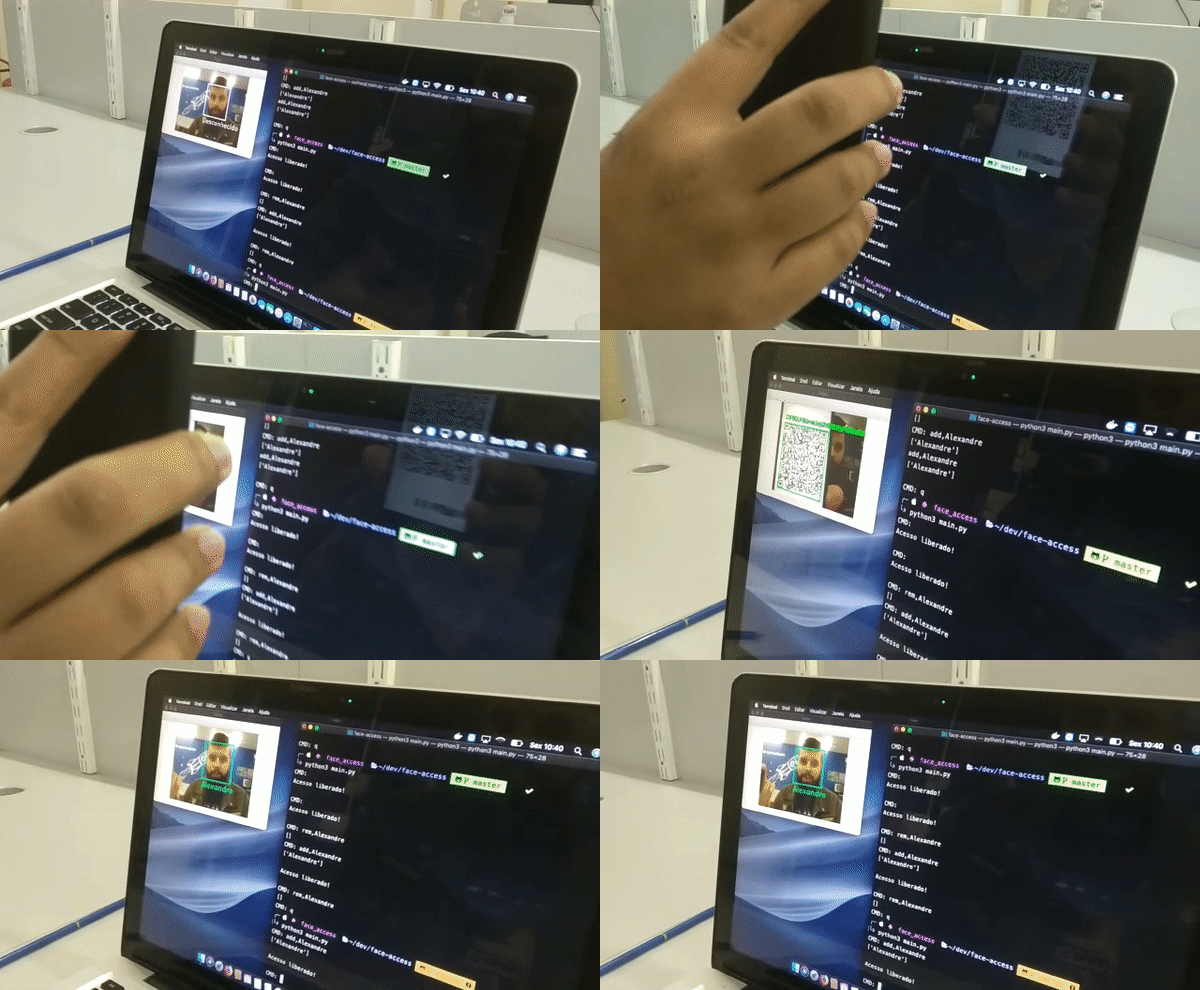
*Easy QR-Code face register demonstration
- Python 3
- OpenCV
- dlib
- Face Recognition (ageitgey)
- Arduino (pyfirmata2)
- Fernet Cryptography (cryptography)
- Google Text 2 Speech (gTTS)
- QR-Code (pyZbar, pyqrcode, pypng)
- Welcome synthesized audio (pygame mixer)
- Audio-Code (Chirp)
- Python 3.6+
- Cmake(Linux and Windows) or XCode (MacOS)
- MacOS or Linux (Tested with Ubuntu 18.04).
- Windows not officially supported by DLib and Face Recoginition library, but might work (slowly)
- I strongly recommend that you use a package manager like Homebrew (MacOS), apt-get (Ubuntu) and Chocolatey (Windows)
You can copy and paste these commands to install all dependencies or going step-by-step in this tutorial to understand each part or if something not working.
*if pip3 command not working use pip instead
**if something not work, try to reboot the terminal. :)
xcode-select --install/usr/bin/ruby -e "$(curl -fsSL https://raw.githubusercontent.com/Homebrew/install/master/install)"brew install git cmake python3 zbar portaudio libsndfilegit clone https://github.com/alexandremendoncaalvaro/face-access.git
cd face-accesspip3 install virtualenvvirtualenv cv
source cv/bin/activatepip3 install -r requirements.txtsudo apt update && sudo apt upgradesudo apt-get install git build-essential cmake python3 python3-pip libzbar-dev libzbar0 python3-dev python3-setuptools portaudio19-dev libffi-dev libsndfile1git clone https://github.com/alexandremendoncaalvaro/face-access.git
cd face-accesspip3 install virtualenvvirtualenv cv && source cv/bin/activatepip3 install -r requirements.txt@"%SystemRoot%\System32\WindowsPowerShell\v1.0\powershell.exe" -NoProfile -InputFormat None -ExecutionPolicy Bypass -Command "iex ((New-Object System.Net.WebClient).DownloadString('https://chocolatey.org/install.ps1'))" && SET "PATH=%PATH%;%ALLUSERSPROFILE%\chocolatey\bin"-
Install Visual Studio with Visual C++ Build Tools 2015
choco install git cmake python3 zbar -Ygit clone https://github.com/alexandremendoncaalvaro/face-access.git &&
cd face-accesspip3 install virtualenvvirtualenv cv &&
cv\Scripts\activate-
Download sounddevice from the link below https://www.lfd.uci.edu/~gohlke/pythonlibs/#sounddevice
-
Example: sounddevice‑0.3.13‑cp37‑cp37m‑win_amd64.whl: For Python 3.7 and Windows 64 bits
-
From the file path:
pip3 install sounddevice_file_name.whl- Replace the file name with the same of the downloaded file
pip3 install -r requirements.txt/usr/bin/ruby -e "$(curl -fsSL https://raw.githubusercontent.com/Homebrew/install/master/install)"sudo apt update
sudo apt upgrade@"%SystemRoot%\System32\WindowsPowerShell\v1.0\powershell.exe" -NoProfile -InputFormat None -ExecutionPolicy Bypass -Command "iex ((New-Object System.Net.WebClient).DownloadString('https://chocolatey.org/install.ps1'))" && SET "PATH=%PATH%;%ALLUSERSPROFILE%\chocolatey\bin"- Install XCode from App Store
then:
xcode-select --installbrew install cmakesudo apt install build-essential cmake-
Install Visual Studio with Visual C++ Build Tools 2015
-
install Cmake:
choco install cmake -YOr manually install from: https://cmake.org/download/
*Add Cmake installation directory path to System path.
*I strongly recomend you to know about (and maybe use) Virtual Enviroments
*if pip3 command not working use pip instead
brew install python3sudo apt install python3 python3-pipchoco install python3 -Y*It's optional, but I strongly recomend you to know about (and use) Virtual Enviroments
The virtualenv lib is a tool to create isolated Python environments. virtualenv creates a folder which contains all the necessary executables to use the packages that a Python project would need.
pip3 install virtualenvYou can create a virtualenv using the following command (*choose a name, I used cv):
virtualenv cvActivate it:
source cv/bin/activatecv\Scripts\activateNow ALL pip libraries will be installed isolated inside the environment. It'll look like this:
(cv)$ pip3 install ...
If you want to deactivate:
(cv)$ deactivate
Command:
deactivatepip3 install opencv-contrib-python*Complete Tutorial from pyimagesearch
pip3 install dlib*How to install dlib from source on macOS or Ubuntu
*How to install dlib from source on Windows: While Windows isn't officially supported, helpful users have posted instructions on how to install this library:
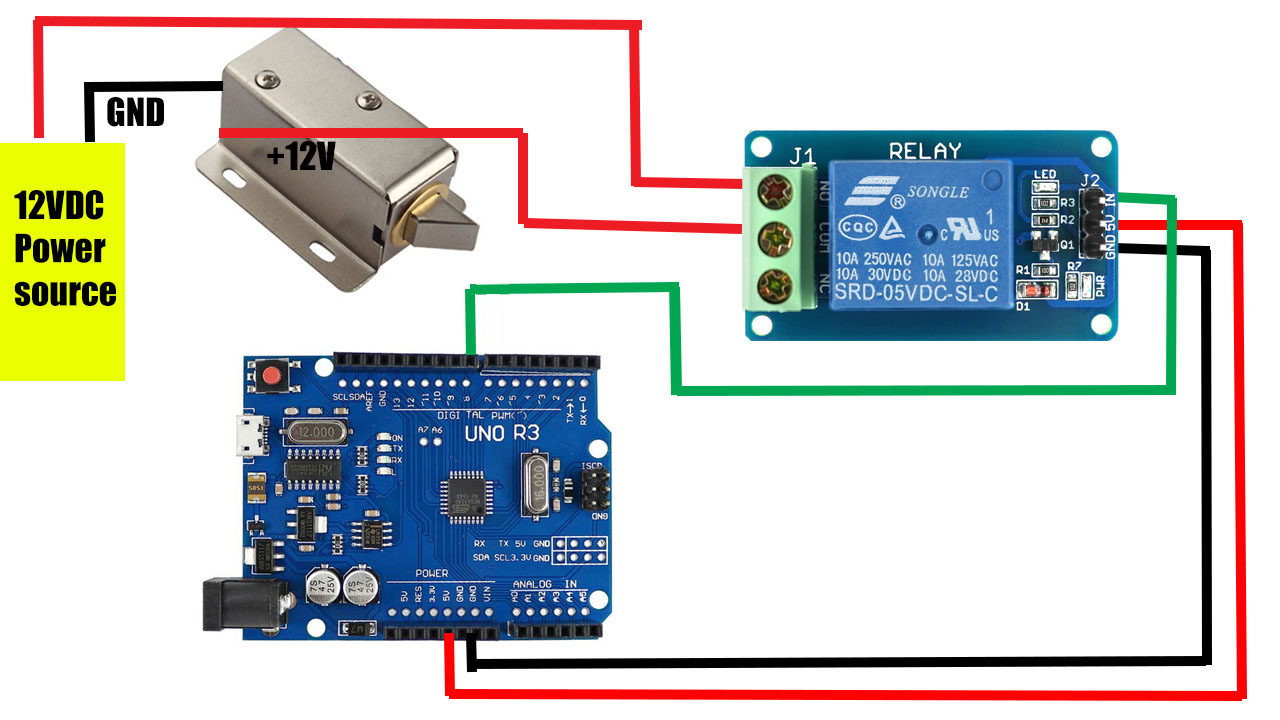
pip3 install face_recognitionYou will need an Arduino Board like Uno, Mega, Micro, Nano with a relay module and a solenoid Door lock to control the access.
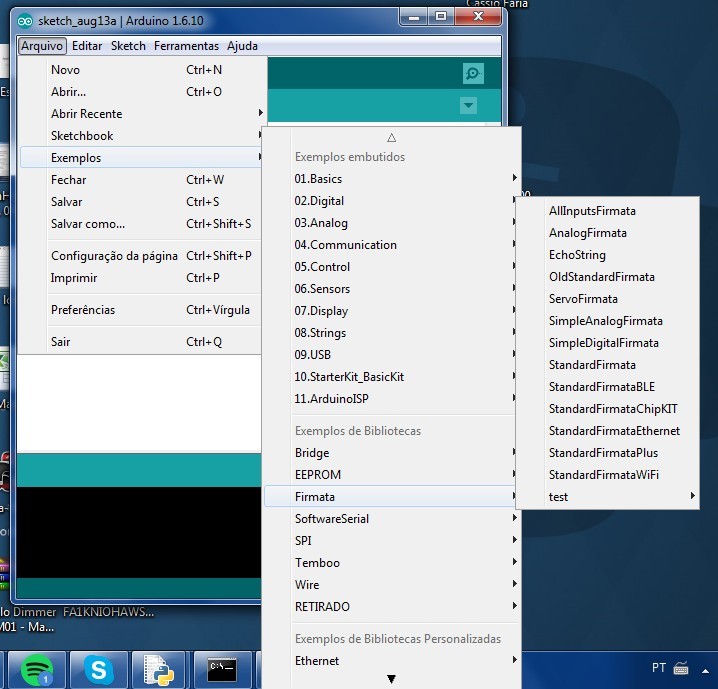
Install Arduino IDE and use the Example > Firmata > StandardFirmata on the board.
The board need to stay connected over USB. All the Arduino (GPIO) control will be done by the python code.
This algorithm automatically detects the serial port of the Arduino. If this fails you can also specify the serial port manually, for example: board = Arduino('COM4')
Under Linux this is usually /dev/ttyUSB0. Under Windows this is a COM port, for example COM4. On a MAC it’s /dev/ttys000, /dev/cu.usbmodem14101 or check for the latest addition: ls -l -t /dev/*.
pip3 install pyfirmata2pip3 install gTTSpip3 install pyotpbrew install zbarsudo apt-get install libzbar-dev libzbar0choco install zbar -Ypip3 install pyzbar pyqrcode pypngpip3 install pygameYou will need generate keys to use this lib. [Official instructions] (https://developers.chirp.io/docs/getting-started/python)
brew install portaudio libsndfilesudo apt-get install python3-dev python3-setuptools portaudio19-dev libffi-dev libsndfile1-
Download sounddevice from the link below https://www.lfd.uci.edu/~gohlke/pythonlibs/#sounddevice
-
Example: sounddevice‑0.3.13‑cp37‑cp37m‑win_amd64.whl: For Python 3.7 and Windows 64 bits
-
From the file path:
pip3 install sounddevice_file_name.whl*Replace the file name with the same of the downloaded file
pip3 install chirpsdkTo start, with terminal go to folder path and execute:
python main.pyYou can change a lot of configurations using config.py file
If everything is right, a new window with the webcam streaming and face recognition will start. In the terminal you should see somethong like:
CMD:
*Don't use spaces BETWEEN parameters, they are separated by comma (,). But you can use spaces IN parameter, like: Firstname Middlename Lastname..
Create a QR-Code to show to the camera and easelly register a new face:
qr,Joseph SmithAdd a new face id from a image file in the folder images:
add,Joseph Smith,images/joseph.jpgAdd a new face id from the current webcam capture:
add,Joseph SmithList the current face ids:
printRemove a face id:
del,Joseph SmithExit:
qor
quitNo, I am not. If you find typos, grammar errors or whatever please feel free to PR or tell me.


