This repository will attempt to explain and demonstrate how to set up a modding enviroment for the creation of mods for the block-based sandbox game Vintage Story using the .NET SDK and VS Code.
This how-to was last updated for Vintage Story version 1.14 but will hopefully continue working in the future.
Vintage Story is built against .NET Framework 4.5.2 and runs using Mono on platforms other than Windows. Why are we using .NET?
- It's cross-platform. With .NET 5, the successor of .NET Core, we don't need to change our tooling or commands to work on different platforms. I've moved from Windows to Linux while working on Vintage Story mods and only needed to make minor changes to also make it work on another platform.
- It's convenient. As the .NET SDK comes with the
dotnetcommand to manipulate, create and build project and solution files, we don't need to rely on IDEs. The newer.csprojfile format doesn't require referencing every single.csfile, either.
Despite what its name might imply, this has nothing to do with the overblown IDE that is Visual Studio. It's a relatively light-weight, cross-platform code editor that comes with syntax highlighting, code completion, source control integration, debugging tools, ...
Essentially you get most of the IDE features you're used without any of the bloat, in a modern look.
- Get the game.
- Install the .NET SDK.
- Install Visual Studio Code.
- Install the C# extension from the "Extensions" tab in VS Code.
- If you run on Mono, install the Mono Debug extension.
If you're on Arch Linux like me, you can get the game using the AUR package vintagestory (created by me), and the .NET SDK and VS Code by installing the official packages dotnet-sdk and code.
I also recommend setting up two environmental variables:
VINTAGE_STORY, which points to the where the game is installed.VINTAGE_STORY_DATA, pointing to the user data directory.
This is where world files go and also where we'll put our mods.
Since I'm on Linux, I just add the following lines to my ~/.xprofile (which takes effect after a restart). Of course, you have to adjust this depending on where you have installed the game.
export VINTAGE_STORY=/usr/share/vintagestory
export VINTAGE_STORY_DATA=$HOME/.config/VintagestoryData
If you're on another operating system, I suggest you search online how to set environment variables, as it's not straight forward. On Windows, the paths can be set to be %AppData%\Vintagestory and %AppData%\VintagestoryData.
This will just make things more consistent across different platforms and setups, and it's what I will use in this repository and how-to, but it's not required. However, if you decide to leave this out, do make sure to update any occurances in the .csproj and launch.json with absolute paths.
Now that we're done with that, it's time to set up the project structure. Create and open a new folder in VS Code!
OmniSharp gets a bit confused with Mono so if you see the following error, open your user or workspace settings (press F1 and search for "user / workspace settings") and set "Omnisharp: Use Global Mono" to "always".
The reference assemblies for .NETFramework,Version=v4.5.2 were not found. To resolve this, install the Developer Pack (SDK/Targeting Pack) for this framework version or retarget your application.
./: The root folder is mainly where our.csprojfile will reside, but other files are going to end up here, such as.gitignoreif you're using Git, the readme, license, ..../src/: Contains all source (.cs) files for our mod. This is what makes this a code mod over a simple content mod, which just contains assets. More on this destinction on the official wiki../resources/: This directory contains all files which will eventually be included in the release.zipfile such as themodinfo.json../resources/assets/: Contains all assets for our mod. Unlike some other games (cough Minecraft cough), a lot of the heavy lifting will already be done by the asset loading portion of the engine.
Copy the .csproj from this repository into your project folder, and rename it. It contains the minimum requirements for the project to build and a release to be created.
As for example seen in CarryCapacity's project file, there are more fields you can include for the sake of completion, but these are not strictly required.
<Reference Include="VintagestoryAPI">
  <HintPath>$(VINTAGE_STORY)/VintagestoryAPI.dll</HintPath>
  <Private>false</Private>
</Reference>
Here, we're adding a reference to the modding API .dll. In the example's .csproj you can see some additional commented-out references, which you can use to include the official base mods (essentials, survival and creative) if your code needs them.
Setting <Private>false</Private> means that this .dll will not be copied to the output folder, as we don't want them to be included in our releases.
<ItemGroup Condition="'$(Configuration)' == 'Release'">
  <None Include="UNLICENSE" CopyToOutputDirectory="PreserveNewest" />
  <None Include="resources/**">
    <Link>%(RecursiveDir)%(Filename)%(Extension)</Link>
    <CopyToOutputDirectory>PreserveNewest</CopyToOutputDirectory>
  </None>
</ItemGroup>
This causes additional files to be included in the output folder (bin/debug/net452/) when building the project in release configuration. As you can see, you can use this to include a license file as well - remove or change this as needed for your own project. Then, we also want to include the contents of the resources folder.
<Target Name="Package" AfterTargets="PostBuildEvent" Condition="'$(Configuration)' == 'Release'">
  <ZipDirectory DestinationFile="bin/$(TargetName).zip" SourceDirectory="$(TargetDir)" Overwrite="true" />
</Target>
This packs all the files in the output folder into a single .zip file for you to release.
To build the mod in release configuration, run dotnet build -c Release or the "Build (Release)" task that I show you how to set up further below.
At this point you have everything set up to start writing some code, so here are some basic things to get you set up.
First of all, one of the issues you might encounter is code completion not working properly. This is likely because you have created the project after
the C# extension has started up. To fix that, press F1 to open the Command Palette and enter "Reload Window".
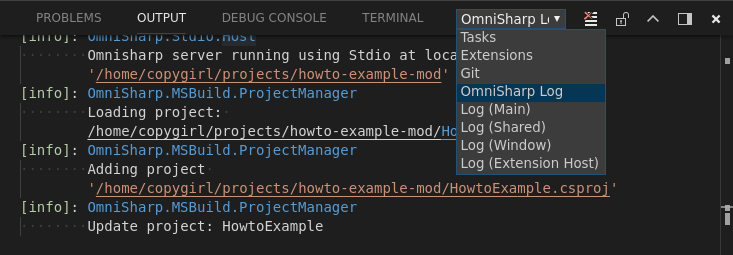
This time OmniSharp should recognize the project, and you can open the "Output" window to verify this. There's a lot of ways to get to it, including the command palette (search for "Toggle Output" this time), just make sure you have "OmniSharp Log" selected in the dropdown:
Next up, if you already know the type names you want to use, but not which namespace they're residing in, or you don't want to bother manually importing them, simply write the type name and pay attention to the Quick Fix bulb to the left, which you can either click or press Ctrl+.to get to:
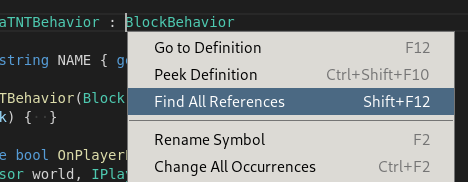
Also, on a right click you have the option of Go to Definiton (F12) and Rename Symbol (F2) which are two other things I end up using a lot. The former can also be used to see which methods are available on an API type to which you don't have source access to.
After you've gotten familiar with some resources on how to create your mod, either from looking at the Vintage Story Wiki or taking inspiration from other open source mods, it is time to actually build and launch it in the game.
For this we need two things: First, a .vscode/tasks.json file, in which we'll define a build task to compile our mod into a handy .dll file. The compilation step can be done by the game itself, which is explained on the wiki, but you lose out on the possibility of debbugging your code.
{
  "version": "2.0.0",
  "tasks": [{
    "label": "Build (Debug)",
    "group": { "kind": "build", "isDefault": true },
    "presentation": { "reveal": "silent" },
    "problemMatcher": "$msCompile",

    "type": "process",
    "command": "dotnet",
    "args": [ "build", "-c", "Debug" ]
  },{
    "label": "Build (Release)",
    "group": "build",
    "presentation": { "reveal": "silent" },
    "problemMatcher": "$msCompile",

    "type": "process",
    "command": "dotnet",
    "args": [ "build", "-c", "Release" ]
  }]
}
The default build task can be run by pressing Ctrl+Shift+B. Other tasks may be run by pressing F1 and typing "Run Task".
To run the game and make it load our new mod, we'll create a launcher. This way, we can also hook the debugger into the game, allowing us to use breakpoints and debug exceptions originating from our code.
{
  "version": "0.2.0",
  "configurations": [{
    "name": "Launch Client",
    "type": "mono",
    "request": "launch",
    "preLaunchTask": "Build (Debug)",
    "program": "${env:VINTAGE_STORY}/Vintagestory.exe",
    "args": [
      "--playStyle" , "preset-surviveandbuild",
      "--openWorld" , "modding test world",
      "--addModPath", "${workspaceFolder}/bin/Debug/net452",
      "--addOrigin" , "${workspaceFolder}/resources/assets",
    ],
    "console": "internalConsole",
    "internalConsoleOptions": "openOnSessionStart",
  }]
}
Note that if you're using .NET on Windows, you need to replace type with "clr". In this project's launch.json you'll find that I've created two launchers: One for .NET, and one for Mono. You may choose to do this as well to ensure your project can be run from multiple plaforms.
These are the arguments we're passing to the game:
--playStyle: The world configuration preset. Only used if it doesn't exist yet.
preset-surviveandbuild= normal / survival.creativebuilding= superflat / creative.--openWorld: Open or create a world with the specified name.--addModPath: Additional paths that the game will search for mods from.--addOrigin: Load assets from one or multiple directories.
You should now be able to run the game in debug mode with your mod by simply selecting the appropriate launcher by pressing on "Launch Client" to the left of the bottom status bar in VS Code. When you've done this once, you can also run the last used launcher by pressing F5.


