Automating GitOps and Continuous Delivery With DigitalOcean Kubernetes
In this tutorial, we provide developers a hands-on introduction on how to get started with an operations-ready Kubernetes cluster on DigitalOcean Kubernetes (DOKS). Kubernetes is easy to set up and developers can use identical tooling and configurations across any cloud. Making Kubernetes operationally ready requires a few more tools to be set up, which are described in this tutorial.
Resources used by the Starter Kit include the following:
-
DigitalOcean
Droplets(forDOKScluster). -
DigitalOcean
Load Balancer. -
DigitalOcean
Block Storagefor persistent storage. -
DigitalOcean
Spacesfor object storage. -
Kubernetes Helm Charts:
Notes:
- Main branch should generally work. Just note that it is being frequently updated. If you want to be safe, pick a specific tag version corresponding to DOKS release (eg. v1.21.3, v1.21.5).
- Tags specific points in a repository’s history when an important change applied.
Remember to verify and delete the resources at the end of the tutorial, if you no longer need those.
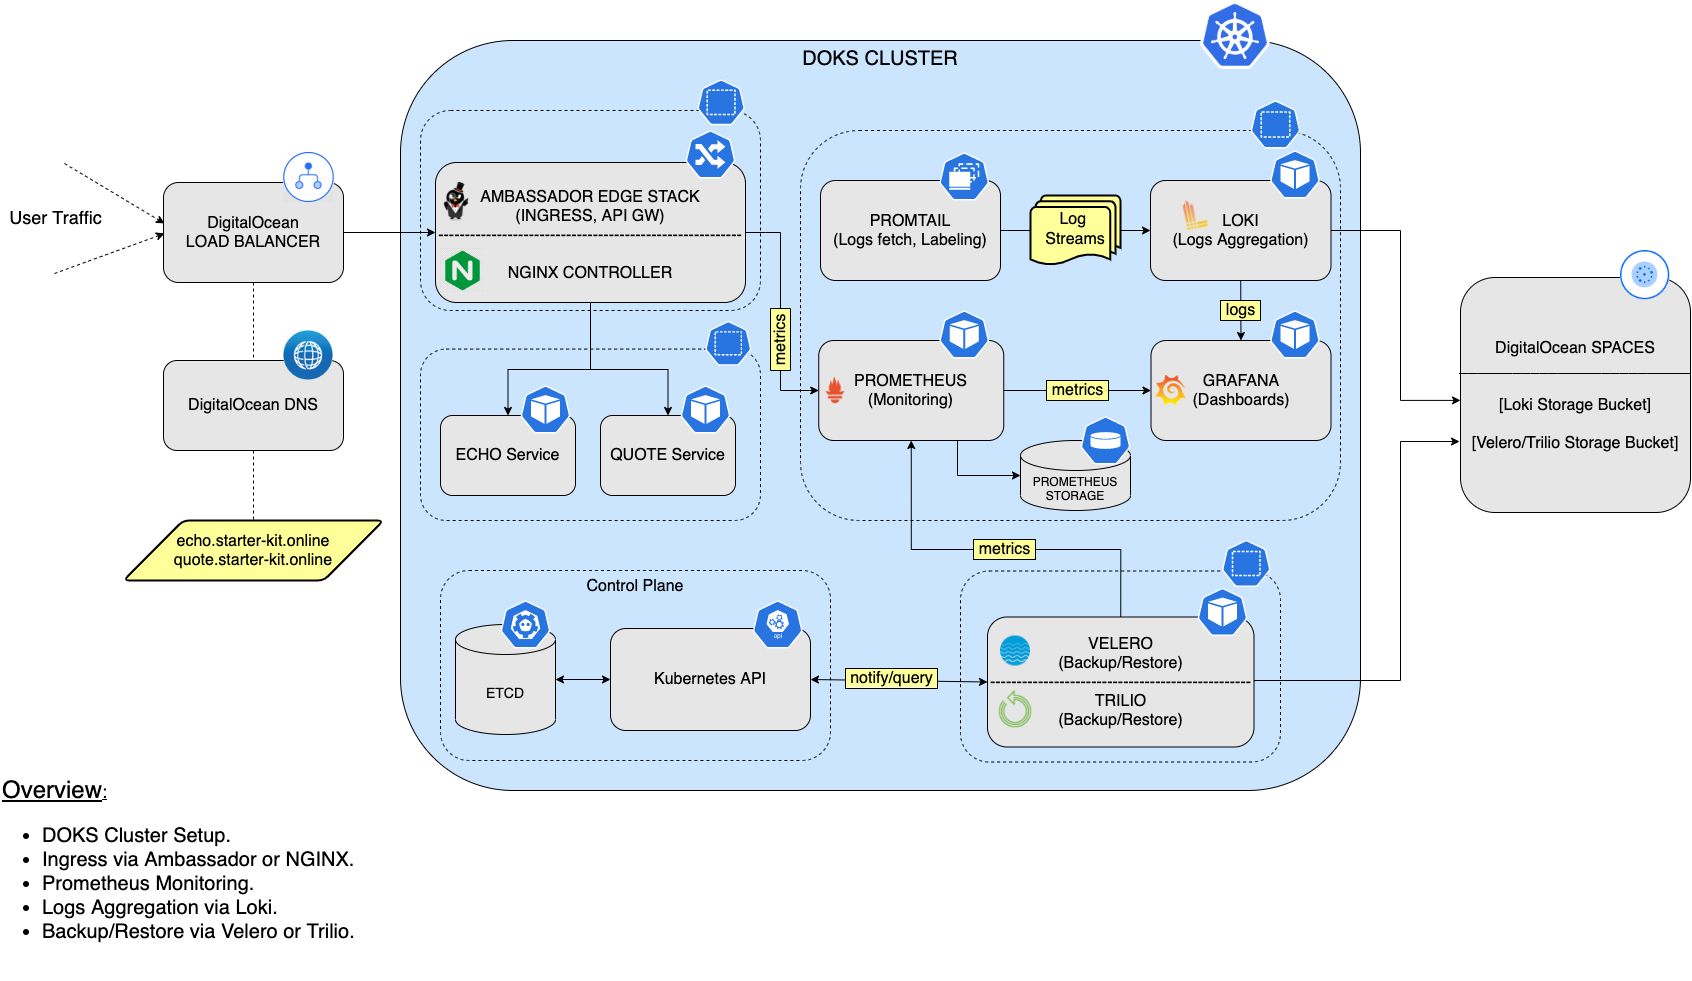
Below is a diagram that gives a high-level overview of the Starter Kit setup, as well as the main steps:
- Scope
- Set up DO Kubernetes
- Set up DO Container Registry
- Set up Ingress Controller
- Prometheus Monitoring Stack
- Logs Aggregation via Loki Stack
- Set up Backup and Restore
- Alerts and Notifications
- Kubernetes Sealed Secrets
- Scaling Application Workloads
- Estimate resource usage of starter kit
- Continuous Delivery using GitOps
This tutorial demonstrates the basic setup you need to be operations-ready.
All the steps are done manually using the command line interface (CLI). If you need end-to-end automation, refer to the last section.
None of the installed tools are exposed using Ingress or Load Balancer. To access the console for individual tools, we use kubectl port-forward.
We will use brew (on MacOS) to install the required command-line utilities on our local machine and use the command to work on a DOKS cluster.
For every service that gets deployed, we will enable metrics and logs. At the end, we will review the overhead from all these additional tools and services. That gives an idea of what it takes to be operations-ready after your first cluster install.
This tutorial will use manifest files from this repo. It is recommended to clone this repository to your local environment. The below command can be used to clone this repository.
git clone https://github.com/digitalocean/Kubernetes-Starter-Kit-Developers.git

git checkout <TAG>   # If you want to pick a tested tag corresponding to DOKS release, eg. v1.21.3
Notes:
- For this
Starter Kit, we recommend to start with a node pool of higher capacity nodes (say,4cpu/8gb RAM) and have at least2nodes. Otherwise, review and allocate node capacity if you run into pods inPENDINGstate. - We customize the value files for
Helminstalls of individual components. To get the original value file, usehelm show values. For example:helm show values prometheus-community/kube-prometheus-stack --version 30.0.1. - There are multiple places where you will change a manifest file to include a secret token for your cluster. Please be mindful of
handlingthesecrets, and do notcommittopublic Gitrepositories. A safer method to use isSealed Secrets, explained in Kubernetes Sealed Secrets. The sample manifests provided in the Section 15 - Continuous Delivery using GitOps section, shows you how to useSealed Secretsin combination withFlux CD, and referencesensitivedata in each manifest that require secrets. - To keep the components up to date, helm provides you the option to upgrade them to latest version or desired version. For example
helm upgrade kube-prom-stack prometheus-community/kube-prometheus-stack --version 30.0.0 --namespace monitoring -f "04-setup-prometheus-stack/assets/manifests/prom-stack-values-v30.0.1.yaml".
If you want to automate installation for all the components, refer to Section 15 - Continuous Delivery using GitOps.


