In this Code Pattern we will use R4ML, a scalable R package, running on IBM Watson Studio to perform various Machine Learning exercises. For those users who are unfamiliar with Watson Studio, it is an interactive, collaborative, cloud-based environment where data scientists, developers, and others interested in data science can use tools (e.g., RStudio, Jupyter Notebooks, Spark, etc.) to collaborate, share, and gather insight from their data.
When the reader has completed this Code Pattern, they will understand how to:
- Use Jupyter Notebooks to load, visualize, and analyze data.
- Run Notebooks in IBM Watson Studio.
- Leverage R4ML to conduct data preparation and exploratory analysis with big data.
The Intended audience for this Code Pattern is data scientists who wish to perform scalable feature engineering and data exploration.
R4ML provides various out-of-the-box tools, and a preprocessing utility for doing the feature engineering. It also provides utilities to sample data and do exploratory analysis. This specific Code Pattern will provide an end-to-end example to demonstate the ease and power of R4ML in implementing data preprocessing and data exploration. For more information about additional R4ML functionality, support, documentation, and roadmap, please vist R4ML
This Code Pattern will walk the user through the following conceptual steps:
- Large-scale exploratory analytics and data preparation.
- Dimensionality reduction.
- How to use your favorite R utilities on big data.
- Highlights the steps necessary to complete data preparation and exploration.
- We will use the Airline On-Time Statistics and Delay Causes from RITA. A 1% sample of the "airline" dataset is available here. All of the data is in the public domain.
- For this Code Pattern, we will use a subset of the above dataset, which is shipped with R4ML
- This Code Pattern can also work with the larger RITA dataset.
- Load the provided notebook into IBM Watson Studio.
- The notebook interacts with an Apache Spark instance.
- A sample big data dataset is loaded into a Jupyter Notebook.
- R4ML, running atop Apache Spark, is used to perform machine data preprocessing and exploratory analysis.
- IBM Watson Studio: Analyze data using RStudio, Jupyter, and Python in a configured, collaborative environment that includes IBM value-adds, such as managed Spark.
- IBM Analytics for Apache Spark: An open-source cluster computing framework optimized for extremely fast and large scale data processing.
- Jupyter Notebooks: An open-source web application that allows you to create and share documents that contain live code, equations, visualizations and explanatory text.
- Data Science: Systems and scientific methods to analyze structured and unstructured data in order to extract knowledge and insights.
- R4ML: R4ML is a scalable, hybrid approach to ML/Stats using R, Apache SystemML, and Apache Spark.
This Code Pattern consists of following activities:
- Sign up for the Watson Studio
- Create a new Watson Studio project
- Create the notebooks
- Run the notebooks
- Save and Share
Log in or sign up for IBM's Watson Studio.
Note: if you would prefer to skip the remaining Watson Studio set-up steps and just follow along by viewing the completed Notebook, simply:
- View the completed notebooks and its outputs, as is. In this Code Pattern, there are two notebooks. The first notebook is for exploring, and the second notebook performs data pre-processing and deminsion reduction analysis.
- While viewing the notebook, you can optionally download it to store for future use.
- When complete, continue this code pattern by jumping ahead to the Explore and Analyze the Data section.
- Select the
New Projectoption from the Watson Studio landing page and choose theData Scienceoption.
- To create a project in Watson Studio, give the project a name and either create a new
Cloud Object Storageservice or select an existing one from your IBM Cloud account.
- Upon a successful project creation, you are taken to a dashboard view of your project. Take note of the
AssetsandSettingstabs, we'll be using them to associate our project with any external assets (datasets and notebooks) and any IBM cloud services.
- From the project dashboard view, click the
Assetstab, click the+ New notebookbutton.
- Give your notebook a name and select your desired runtime, in this case we'll be using the associated Spark runtime.
Note: For this Code Pattern, set language to
RandSparkversion 2.1
- Now select the
From URLtab to specify the URL to the notebook in this repository.
- Enter this URL:
https://github.com/IBM/r4ml-on-watson-studio/tree/master/notebooks/R4ML_Introduction_Exploratory_DataAnalysis.ipynb
-
Click the
Createbutton. -
Repeat these steps for creating the second notebook, which has the URL:
https://github.com/IBM/r4ml-on-watson-studio/tree/master/notebooks/R4ML_Data_Preprocessing_and_Dimension_Reduction.ipynb
First run the exploratory nodebook first. Once Complete, run the data processing notebook.
When a notebook is executed, what is actually happening is that each code cell in the notebook is executed, in order, from top to bottom.
Each code cell is selectable and is preceded by a tag in the left margin. The tag
format is In [x]:. Depending on the state of the notebook, the x can be:
- A blank, this indicates that the cell has never been executed.
- A number, this number represents the relative order this code step was executed.
- A
*, this indicates that the cell is currently executing.
There are several ways to execute the code cells in your notebook:
- One cell at a time.
- Select the cell, and then press the
Playbutton in the toolbar.
- Select the cell, and then press the
- Batch mode, in sequential order.
- From the
Cellmenu bar, there are several options available. For example, you canRun Allcells in your notebook, or you canRun All Below, that will start executing from the first cell under the currently selected cell, and then continue executing all cells that follow.
- From the
- At a scheduled time.
- Press the
Schedulebutton located in the top right section of your notebook panel. Here you can schedule your notebook to be executed once at some future time, or repeatedly at your specified interval.
- Press the
Under the File menu, there are several ways to save your notebook:
Savewill simply save the current state of your notebook, without any version information.Save Versionwill save your current state of your notebook with a version tag that contains a date and time stamp. Up to 10 versions of your notebook can be saved, each one retrievable by selecting theRevert To Versionmenu item.
You can share your notebook by selecting the Share button located in the top
right section of your notebook panel. The end result of this action will be a URL
link that will display a “read-only” version of your notebook. You have several
options to specify exactly what you want shared from your notebook:
Only text and output: will remove all code cells from the notebook view.All content excluding sensitive code cells: will remove any code cells that contain a sensitive tag. For example,# @hidden_cellis used to protect your credentials from being shared.All content, including code: displays the notebook as is.- A variety of
download asoptions are also available in the menu.
-
R4ML is a git downloadable open-source R package from IBM
-
Created on top of SparkR and Apache SystemML (so it supports features from both)
-
Acts as a R bridge between SparkR and Apache SystemML
-
Provides a collection of canned algorithms
-
Provides the ability to create custom ML algorithms
-
Provides both SparkR and Apache SystemML functionality
-
APIs are friendlier to the R user
-
We will first load the package and data and do the initial transformation and various feature engineering
-
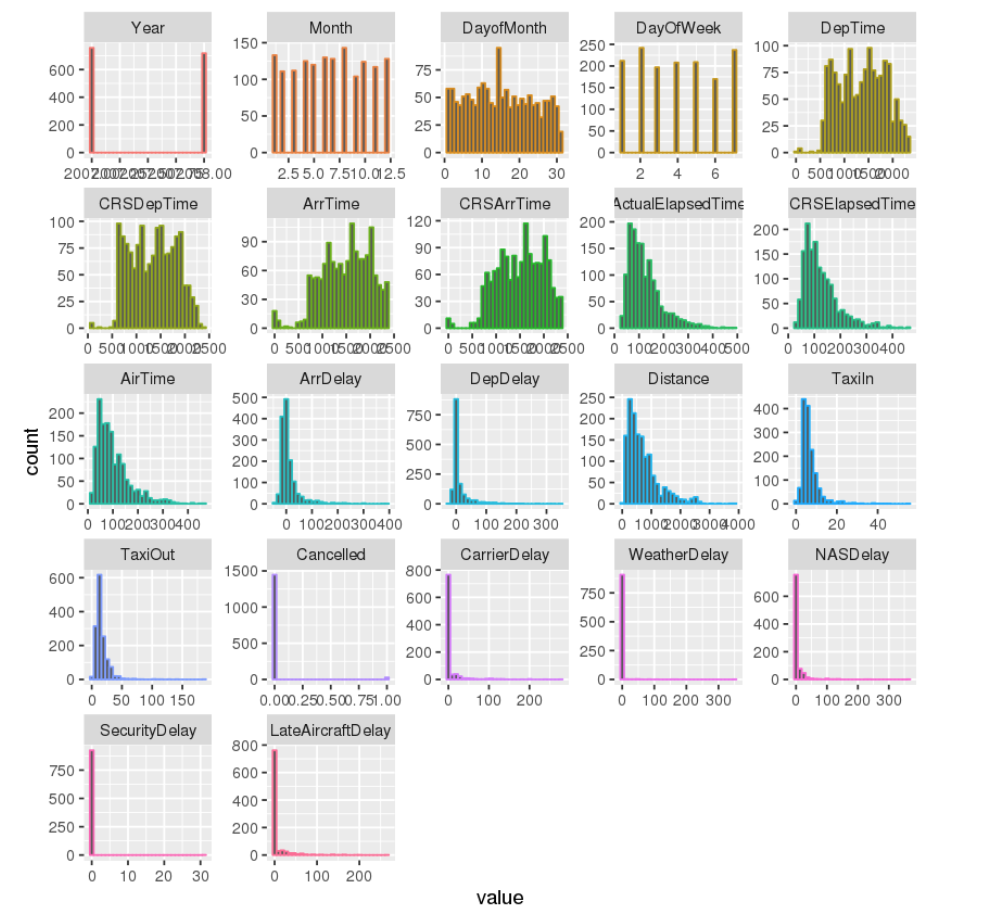
We will sample the dataset and use the powerful ggplot2 library from R to do various exploratory analysis in exploratory analysis notebook.
-
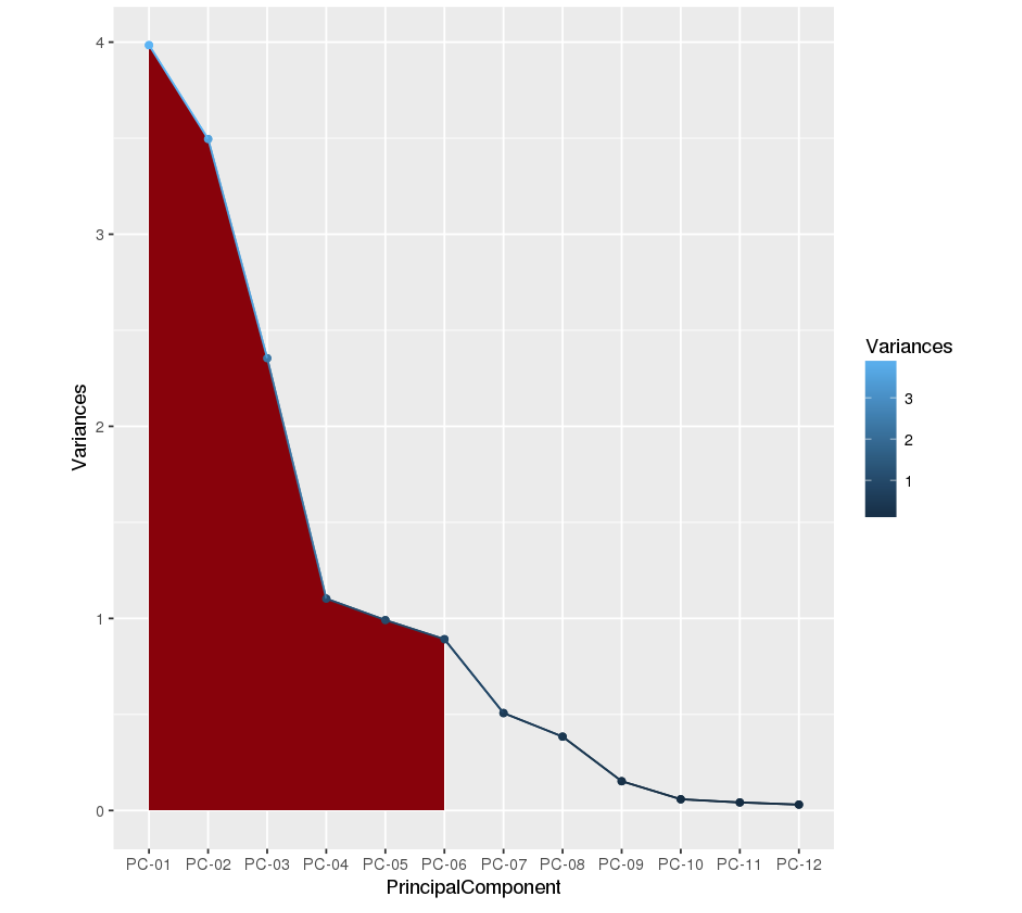
In the end, we will run PCA to reduce the dimension of the dataset and select the k components to cover 90% of variance in dimension reduction notebook.
-
More details are in the notebooks
The following screen-shots shows the histogram of the exploratory analysis .
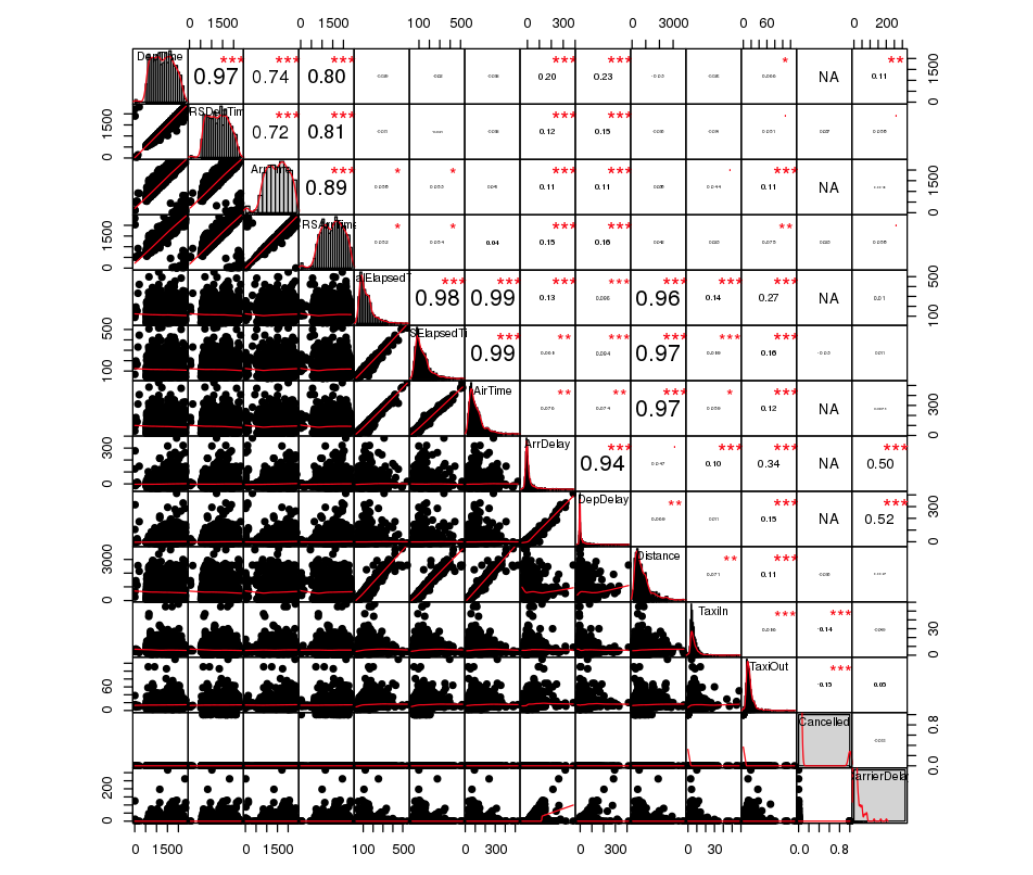
The following screen-shots shows the correlation between various features of the exploratory analysis .
The following screen-shots shows the output of the dimensionality reduction using PCA and how only 6 components of PCA carries 90% of information.
Awesome job following along! Now go try and take this further or apply it to a different use case!
- Watson Studio: https://datascience.ibm.com/docs/content/analyze-data/creating-notebooks.html.
- Data: http://stat-computing.org/dataexpo/2009/the-data.html
- Data Analytics Code Patterns: Enjoyed this Code Pattern? Check out our other Data Analytics Code Patterns
- AI and Data Code Pattern Playlist: Bookmark our playlist with all of our Code Pattern videos
- Watson Studio: Master the art of data science with IBM's Watson Studio
- Spark on IBM Cloud: Need a Spark cluster? Create up to 30 Spark executors on IBM Cloud with our Spark service


