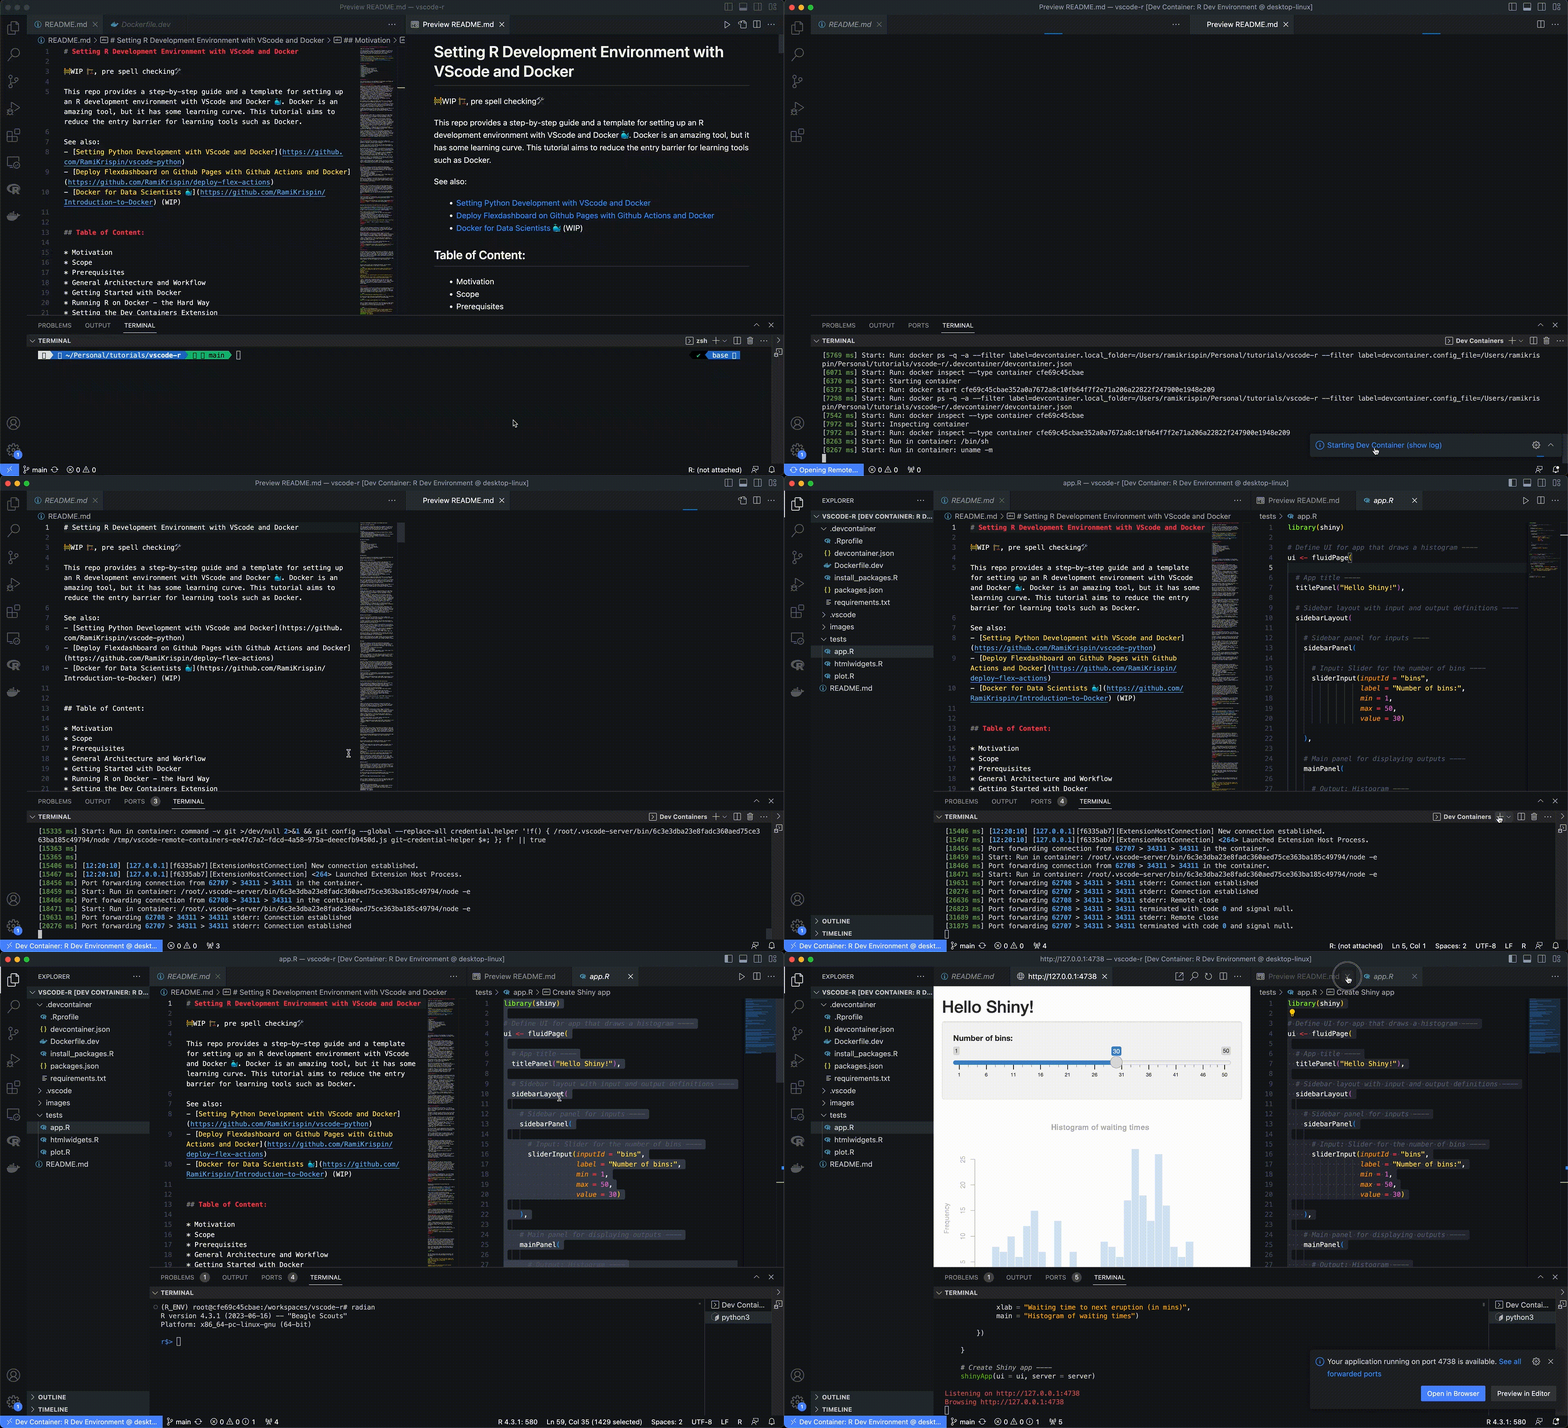
Setting R Development Environment with VScode and Docker
🚧WIP 🏗️, pre spell checking🛠️
This repo provides a step-by-step guide and a template for setting up an R development environment with VScode and Docker 🐳. Docker is an amazing tool, but it has some learning curve. This tutorial aims to reduce the entry barrier for learning tools such as Docker.
See also:
- Setting Python Development with VScode and Docker
- Deploy Flexdashboard on Github Pages with Github Actions and Docker
- Docker for Data Scientists 🐳 (WIP)
Table of Content:
- Motivation
- Scope
- Prerequisites
- General Architecture and Workflow
- Getting Started with Docker
- Running R on Docker - the Hard Way
- Setting the Dev Containers Extension
- Setting the R Environment
- Setting Plots window
- Setting Shiny
- Summary
- Resources
- License
Motivation
This section focuses on the advantages of using Docker with VScode and explains the motivation for using R with VScode.
Why develop with Docker 🐳?
Docker is a CI/CD tool that enables seamless code deployment from development to production environments. By creating OS-level virtualization, it can package an application and its dependencies in a virtual container and ship it between different environments. The main advantages of using Docker within your development environment are:
- Reproducibility - Docker enables you to seamlessly package your code and its dependencies into a single container and execute, test, share, and deploy it with a high level of consistency
- Collaboration - Docker solves the dependencies madness when a team of developers works together on a specific project. Having a unified environment saves a ton of time during the development step. For example, if one developer gets some error, it is easy for other developers to reproduce the error and help debug it
- Deployment - Docker simplifies the code shipment from the development environment to the production
While Docker usually rhymes with DevOps and CI/CD, it is a great tool for data science and engineering applications, in particular, MLOps.
One of the core foundations of data science is the ability to reproduce your work, regardless of the user or machine the job is running. This is where Docker is shining by solving the lack of consistency between environments that cause many of us pain and grief.
In addition, Docker as a CI/CD tool plays a pivotal role in MLOps as it enables seamless deployment of data science and engineering applications such as data pipelines and automation, model deployment, etc.
Why VScode 💻?
VScode (aka Visual Studio Code) is a general-purpose free code editor developed by Microsoft. It can be run locally on Windows, macOS, and Linux OSs or on a cloud environment. The main advantages of using VScode as your IDE are:
- Multi-languages - VScode supports out-of-the-box JavaScript, TypeScript, and Node.js, and has a variety of extensions that enable running other programming languages such as Python, C++, C#, Go, etc.
- Extensions - VScode has a large community support that builds and maintains a variety of extensions that extend the editor's capabilities and functionality. That includes extensions that support programming languages (such as Python, R, and Julia), plugs-in that enables connection with external applications (Docker, Postgres, etc.), and other applications
- Git integration - VScode has built-in integration with Git
- Docker integration - VScode supports natively Docker integration, which we will dive deep into in the coming sections
The main advantage of VScode is the native Docker integration, which enables the opening of a project in a containerized environment. In addition, in many senses, VScode is a DIY IDE that enables a high level of freedom of customization. On the other hand, the downside of VScode is that for most programming languages, VScode will not be an "out-of-box" IDE. It requires both knowledge and some level of effort to customize it to work with languages such as Python, R, etc.
Why R with VScode?!?
After we discussed Docker and VScode, it is time to address the elephant in the room - why use R with VScode when you have such a great IDE for R - RStudio? The short answer is Docker.
If Docker is not part of your workflow, you are more than welcome to continue reading this tutorial and learn how to run R with VScode, but RStudio would be the best IDE for you.
On the other hand, if Docker is part of your workflow (or you wish to adopt it), it is worth, in my opinion, the effort of customizing VScode to run R. Besides running your code inside a dockerized environment, VScode has additional advantages:
- A variety of extensions and add-ons, such as tools for documentation (Draw.io, Markdown, Quarto, etc.), databases (Postgres, Snowflake, etc.), and other utility tools (JSON, YAML viewers, etc.)
- Support for multiple languages such as JS, HTML, Python, Bash, etc.
Last but not least, to set expectations before starting, even with all the awesome extensions and customization we can use to set R, it won't feel as native as RStudio. It's just different.
Note: While RStudio does not support Docker, you can run an RStudio Server inside a dockerized environment. This approach required some level of customization, but the use of this is under the AGPL-3 license.
Scope
This tutorial focuses on setting up a dockerized R development environment with VScode. We will explore how to integrate VScode with Docker using Microsoft's Dev Container extensions and show various methods for configuring an R environment with Docker. That includes the following settings:
- Set a template for a dockerized R environment
- Define environment variables
- Set a code editor and debugger
- Set support for Shiny, Quarto, htmlwidgets, plots, table viewer, etc.
- Enable to launch multiple R sessions in parallel
- Set code snippet
However, it's important to note that while this tutorial covers some of the core Docker features, it is not a complete Docker guide. If you don't have previous experience with Docker, I highly recommend taking one of the Docker crash courses.
Prerequisites
Generally, this tutorial does not require previous experience with Docker and VScode. In line with the tutorial scope above, the goal is to teach you how to set up an R development environment using Docker and VScode. That being said, as mentioned above, you will benefit more from and highly utilize this tutorial if you take some Docker intro courses before starting this tutorial. The main requirements for this tutorial are setting VScode and Docker Desktop. In addition, you will need to set up an account with Docker Hub.
Installing VScode
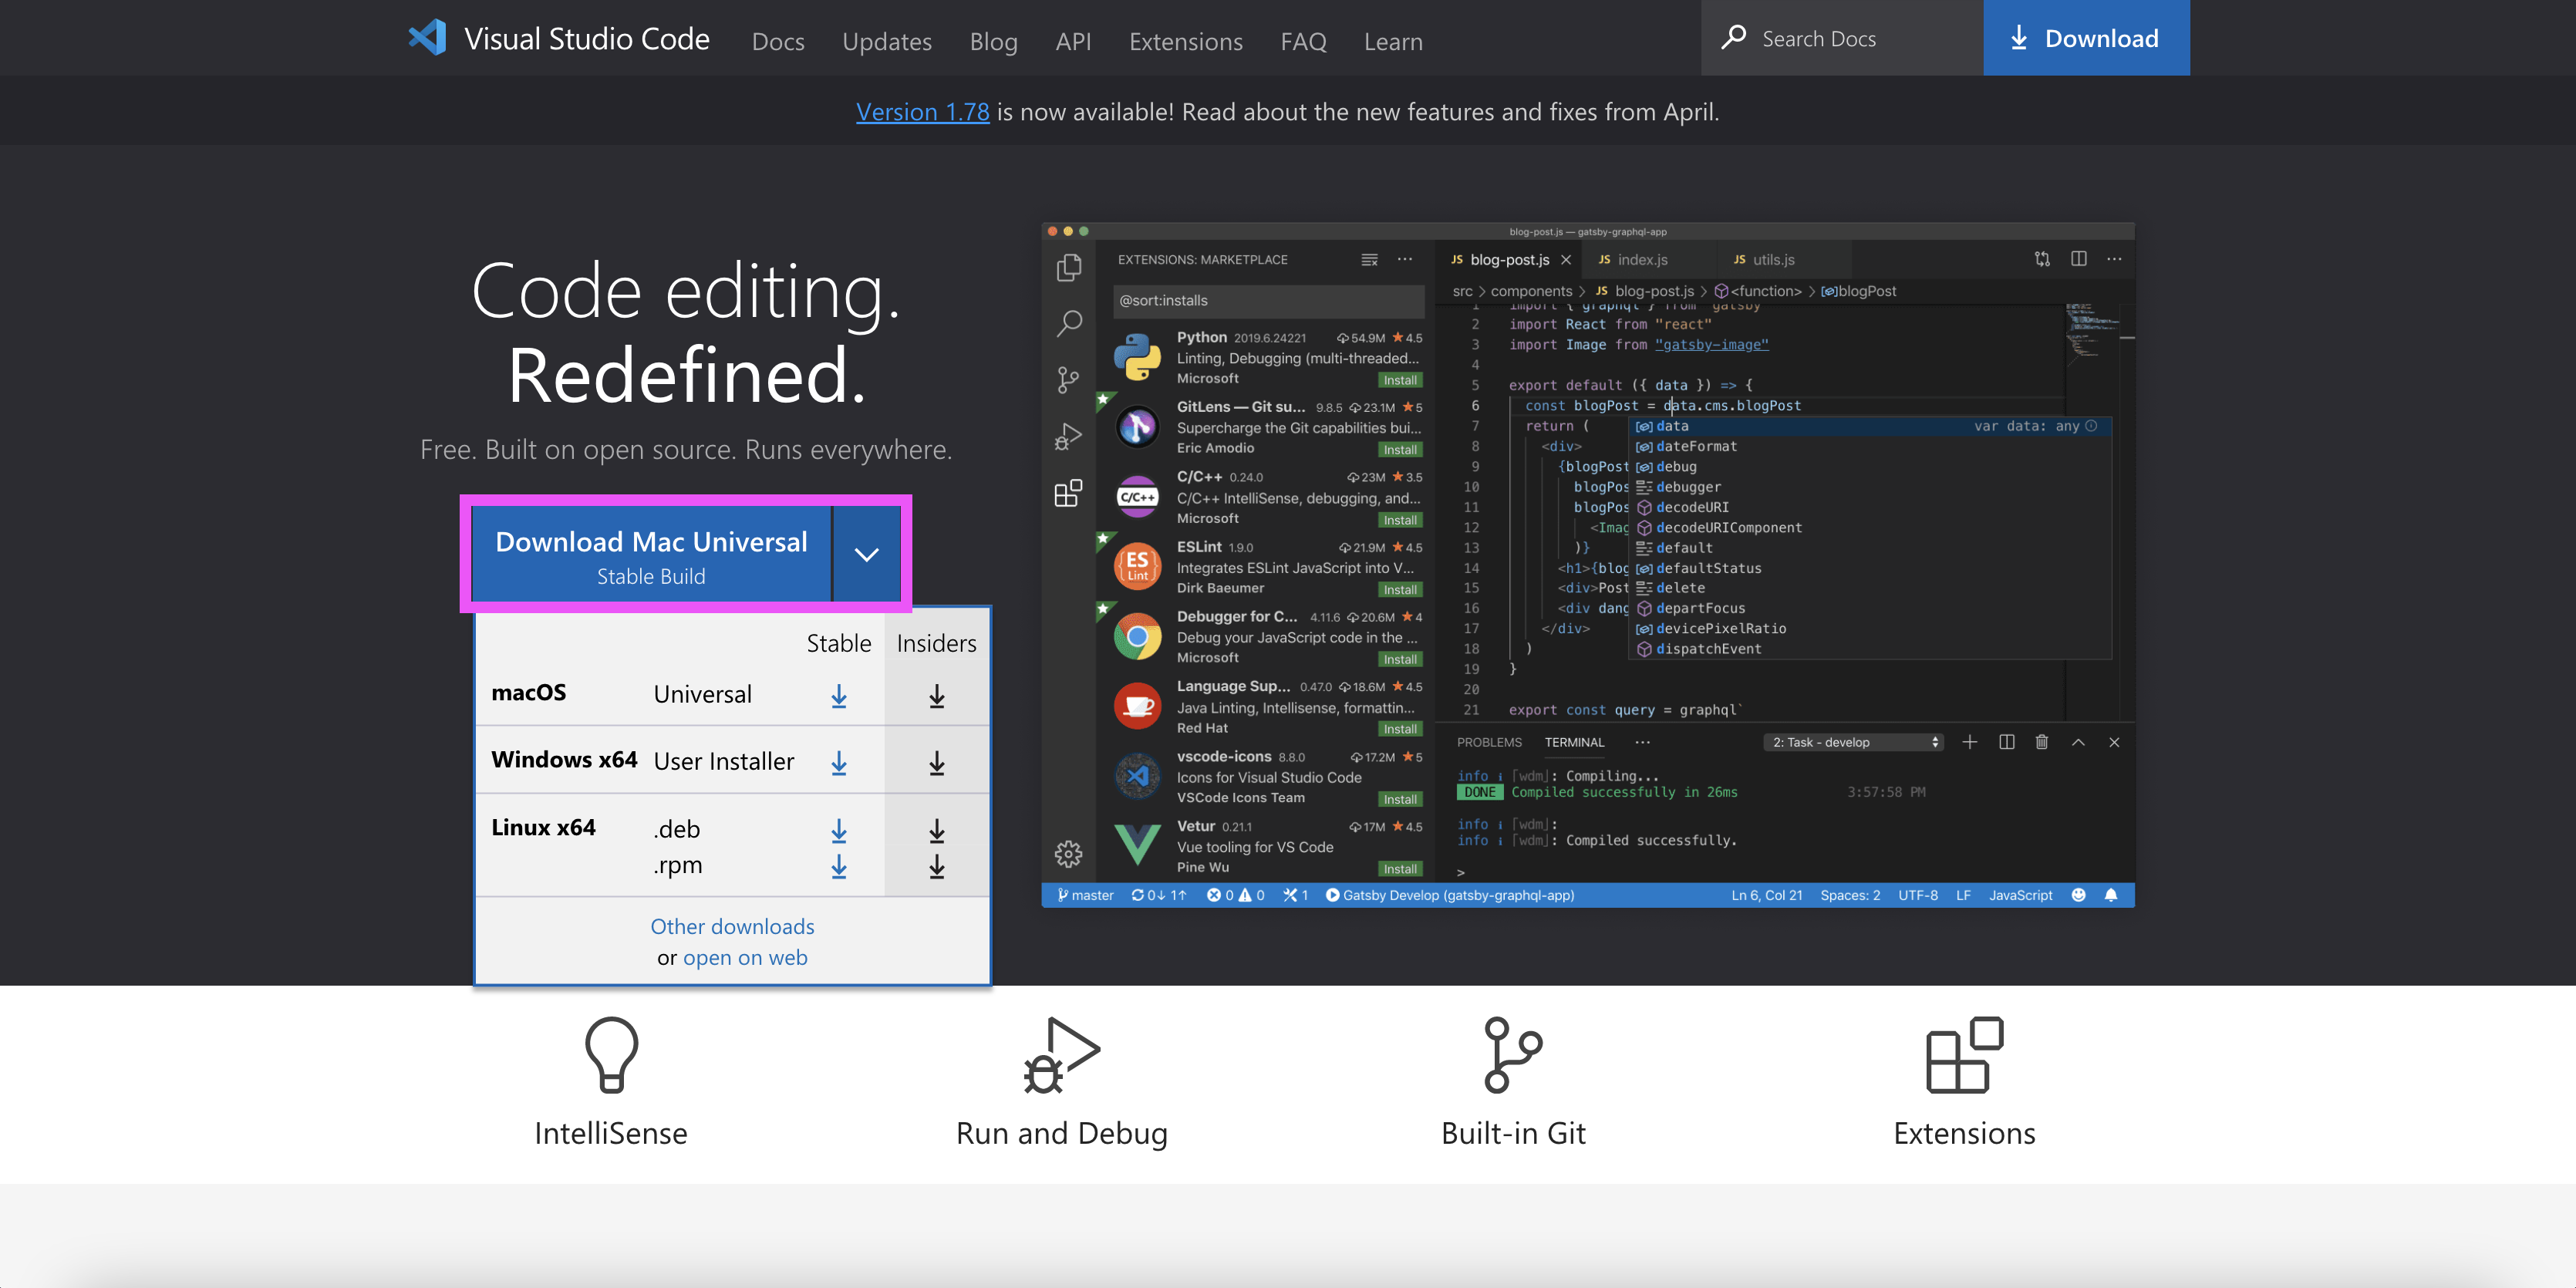
Installing VScode is straightforward - go to the VScode website https://code.visualstudio.com/ and click on the Download button (purple rectangle on the screenshot):
Figure 1 - Visual Studio Code download pageDownload the installation file and follow the instructions.
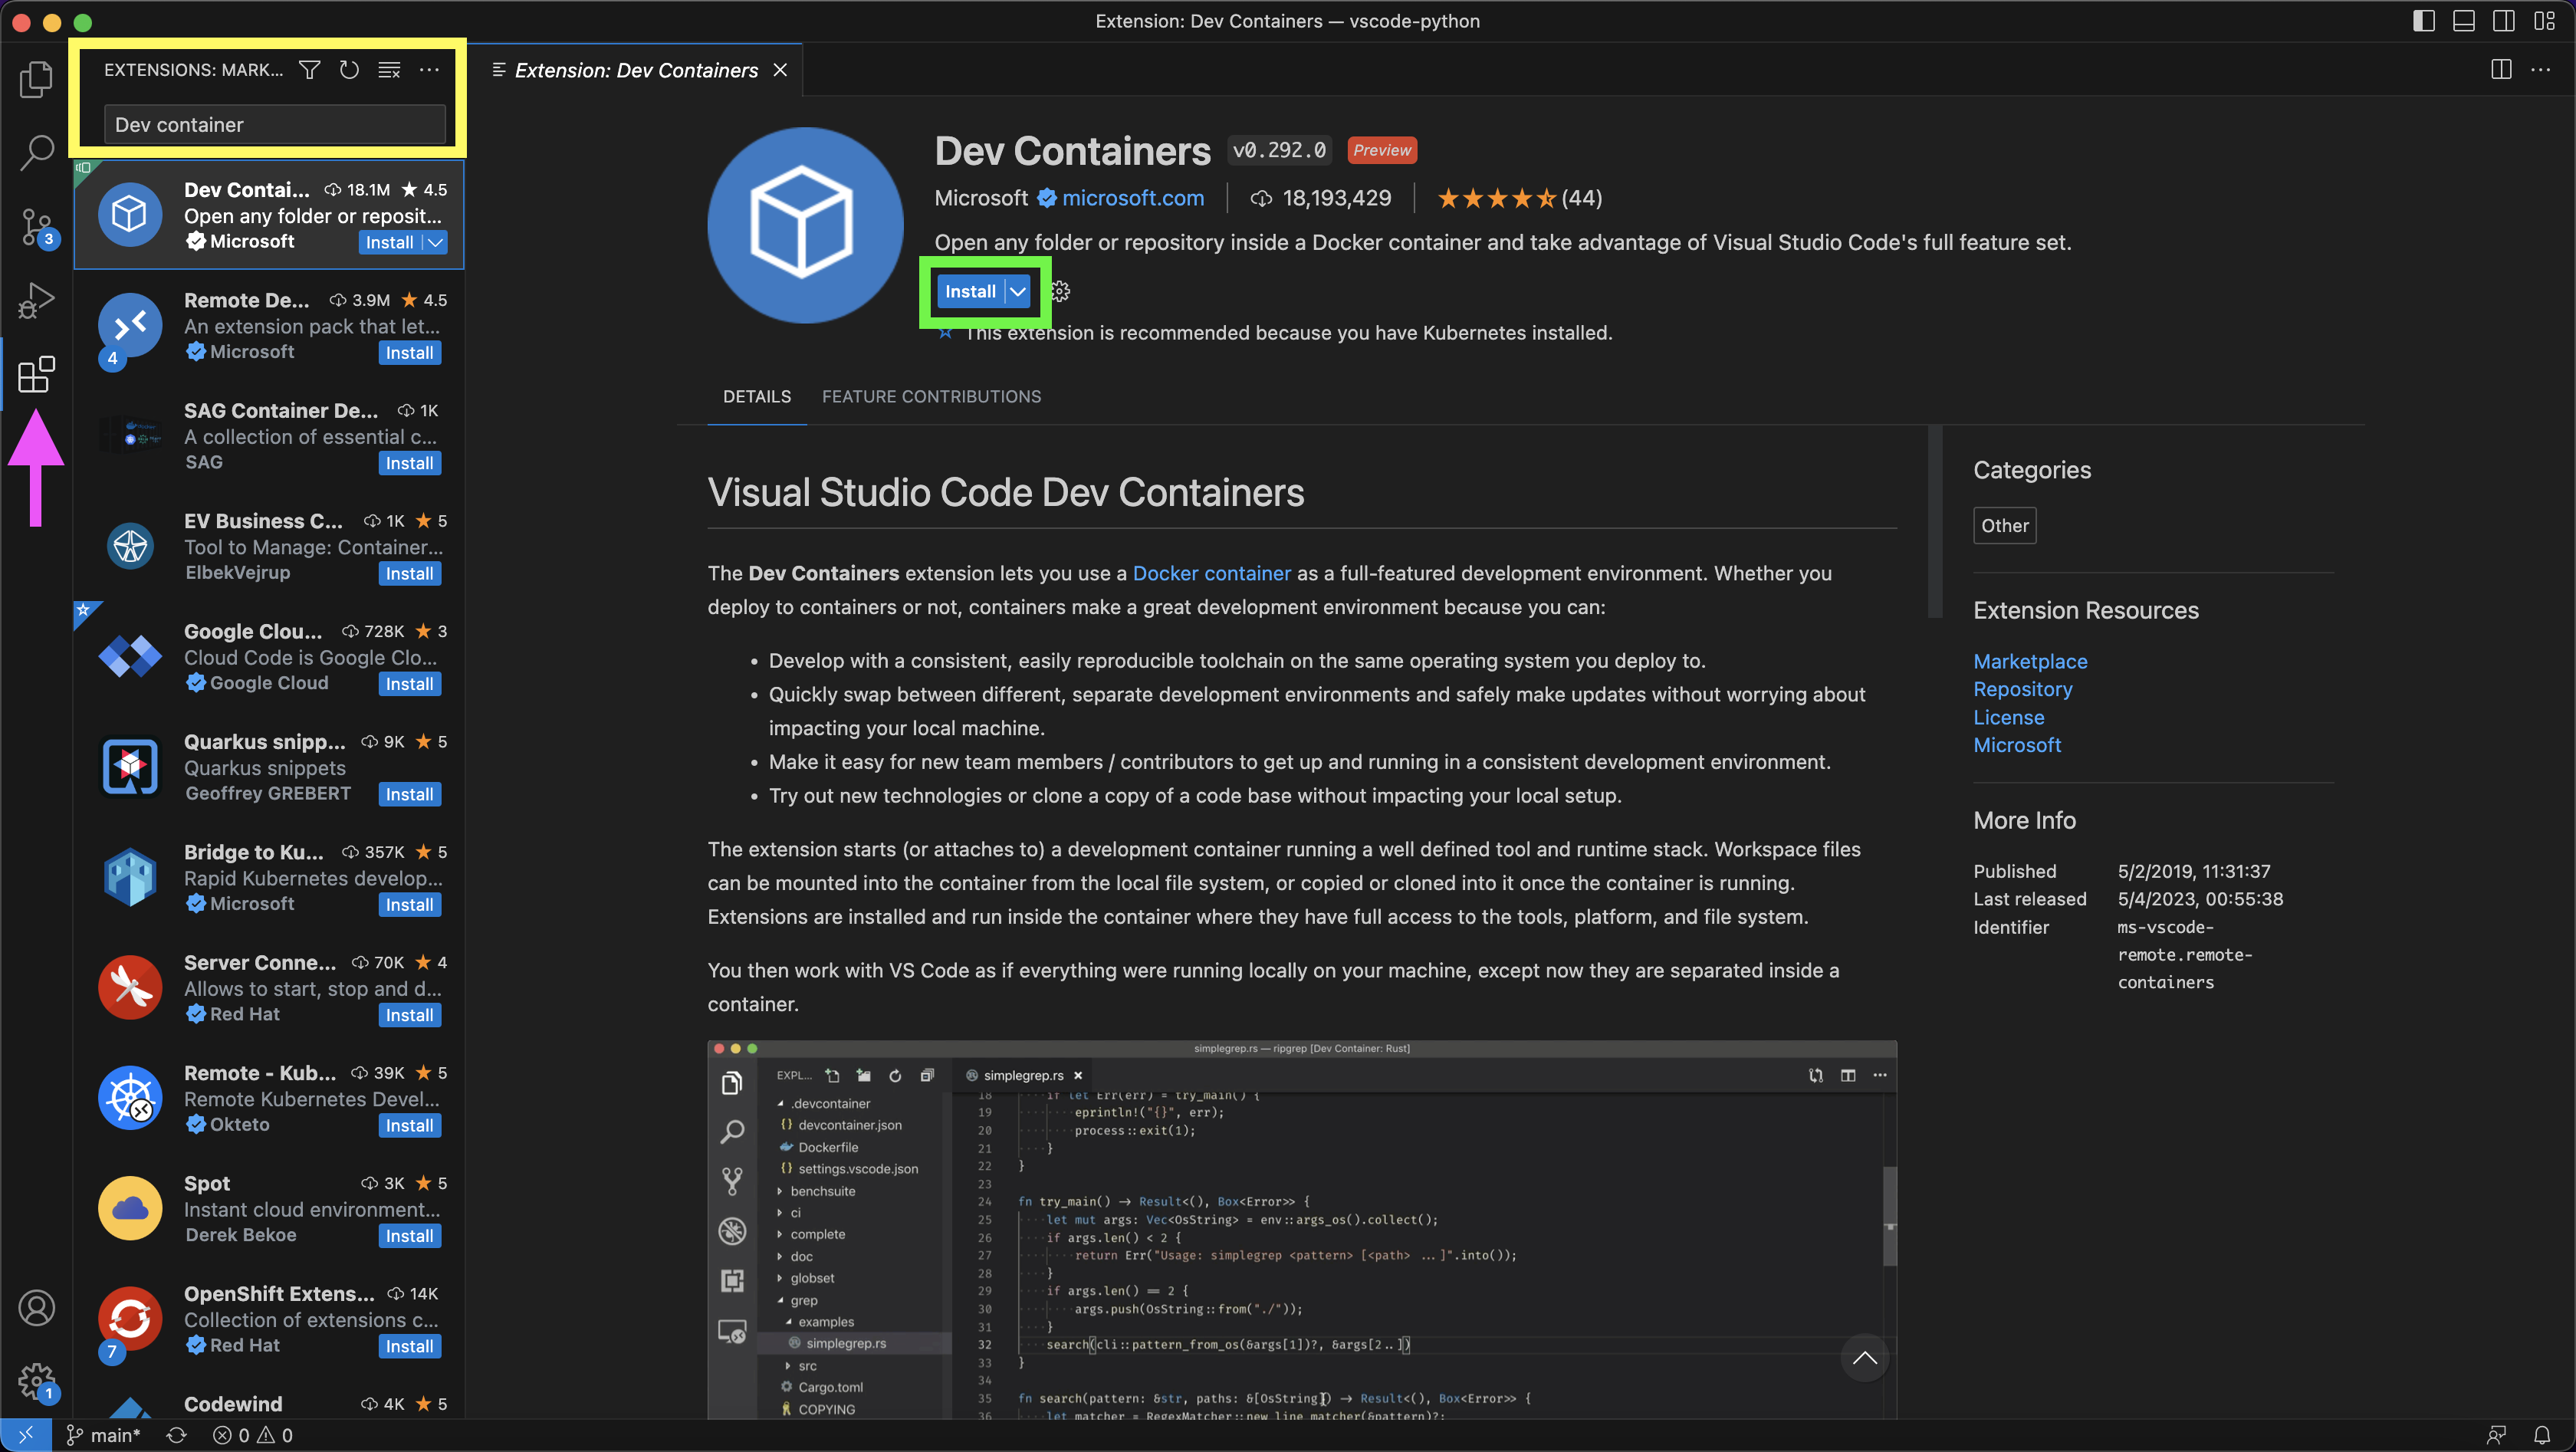
To set a dockerized environment in VScode we will need to install the Dev Containers extension, which enables to open a folder and execute a code inside a Docker container.
Here is how to install an extension on VScode:
- Click the Extensions button on the left menu (mark with a purple arrow on the screenshot below)
- Type the extension name on the search menu (see the yellow rectangular). You can see the search results below, and clicking on each extension will open a window with the extension details.
- Last but not least, Click the install button (see the green rectangular) to install the extension
Note: The Dev Containers extension is required to launch the dockerized environment. We will see later in this tutorial how to set and install the necessary extensions for your dockerized environment automatically with the devcontainer.json file.
Setting Docker
Various ways exist to build and run Docker images on different operations systems. For the purpose of this guide, we will be utilizing Docker Desktop. It is a user-friendly container management interface that is compatible with MacOS, Windows, and Linux operating systems.
Note: Docker Desktop is free for personal use but requires a license for commercial use. For further information, please refer to https://www.docker.com/pricing/.
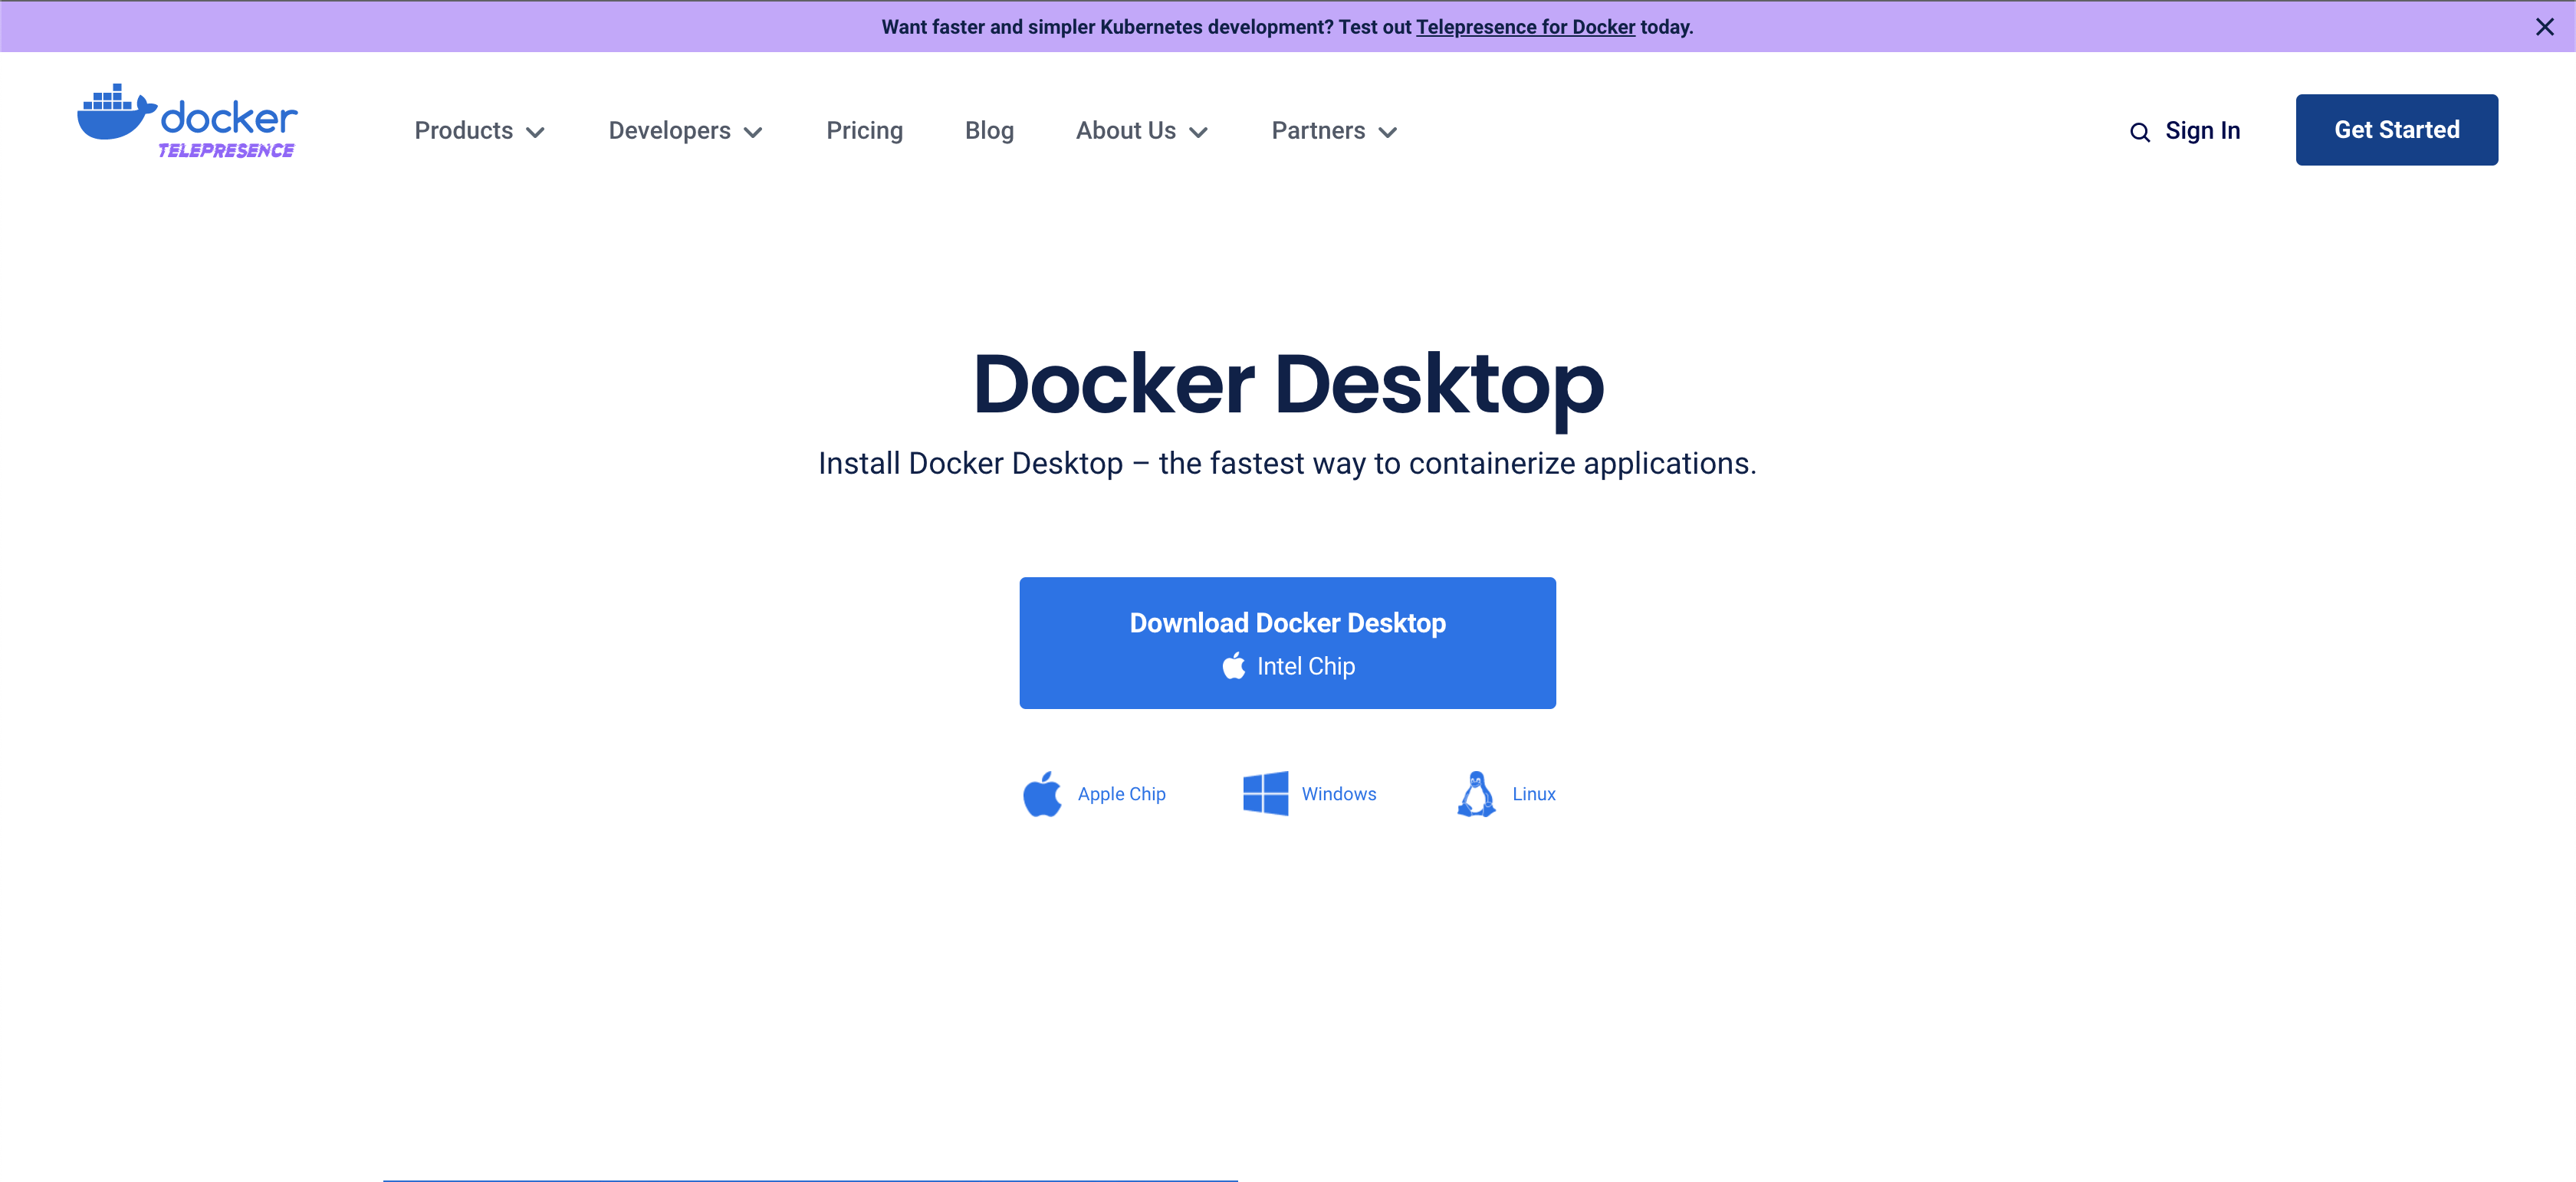
To install Docker Desktop, go to Docker website and follow the installation instructions according to your OS:
Figure 3 - Docker Desktop download pageDocker Hub
Container Registry has a similar functionality as Github for code, and it uses to store and share images. There are many container registries, and the most common is Docker Hub. We will use throughout the tutorial Docker Hub to pull different images, such as Python built-in images. To register and create an account go to https://hub.docker.com and follow the registration instructions.
After installing Docker Desktop and setting account on Docker Hub, open Docker Desktop, and from the command line, login to Docker Hub:
docker loginYou will have to enter your username and password, and you should expect the following output if the login is successful:
Login with your Docker ID to push and pull images from Docker Hub. If you don't have a Docker ID, head over to https://hub.docker.com to create one.
Username: rkrispin
Password:
Login Succeeded

Logging in with your password grants your terminal complete access to your account.
For better security, log in with a limited-privilege personal access token. Learn more at https://docs.docker.com/go/access-tokens/
Note: Docker Hub is completely public (for the free tier). Any image you push and store there will be available for all other users. Regardless if your container registry is public or not, NEVER store credentials, passwords, or any other sensitive information on your Docker images.
Hello World!
There is no better way to test if Docker was installed properly than by running whalesay (or 🐳 say) Docker's most Hello World! common example. The whalesay is an adaption of the Linux cowsay (🐮 say) game using a whale instead of a cow to print some text. Let's run the below code from the terminal to print Hello R Users! 👋 😎:
docker run docker/whalesay cowsay Hello R Users! 👋 😎If this is the first time you are using Docker or your first time using the whalesay image you should expect the following message:
Unable to find image 'docker/whalesay:latest' locallyThat is a generic message that notifies that the requested image cannot be found locally, and Docker will try to pull the image from the hub (if specified) and follow by downloading the image:
latest: Pulling from docker/whalesay
Image docker.io/docker/whalesay:latest uses outdated schema1 manifest format. Please upgrade to a schema2 image for better future compatibility. More information at https://docs.docker.com/registry/spec/deprecated-schema-v1/
e190868d63f8: Pull complete
909cd34c6fd7: Pull complete
0b9bfabab7c1: Pull complete
a3ed95caeb02: Pull complete
00bf65475aba: Pull complete
c57b6bcc83e3: Pull complete
8978f6879e2f: Pull complete
8eed3712d2cf: Pull complete
Digest: sha256:178598e51a26abbc958b8a2e48825c90bc22e641de3d31e18aaf55f3258ba93b
Status: Downloaded newer image for docker/whalesay:latest
And this is the expected output:
__________________________
< Hello R Users! 👋 😎 >
 --------------------------
    \
     \
      \
                    ##        .
              ## ## ##       ==
           ## ## ## ##      ===
       /""""""""""""""""___/ ===
  ~~~ {~~ ~~~~ ~~~ ~~~~ ~~ ~ /  ===- ~~~
       \______ o          __/
        \    \        __/
          \____\______/
If you are able to run the whalesay app you are ready to get started with Docker.
General Architecture and Workflow
Summary
Resources
License
This tutorial is licensed under a Creative Commons Attribution-NonCommercial-ShareAlike 4.0 International License.


