The project report can be viewed here.
VueJS is the framework used to build our Single-Page Application. It uses v2.5.2 of vue.
The following commands are used for the build set up for JavaScript. For development purposes, go to the root folder and type in npm run dev.
# install dependencies
npm install

# serve with hot reload at localhost:8080
npm run dev

# build for production with minification
npm run build

# build for production and view the bundle analyzer report
npm run build --report

# run unit tests
npm run unit

# run e2e tests
npm run e2e

# run all tests
npm test
The following commands are used for the build set up for the Python Django server.
# install dependencies (after navigating to the /backend directory)
python2 -m pip install -r requirements.txt

# start the django server
python2 manage.py runserver
For a detailed explanation on how things work, check out the guide and docs for vue-loader.
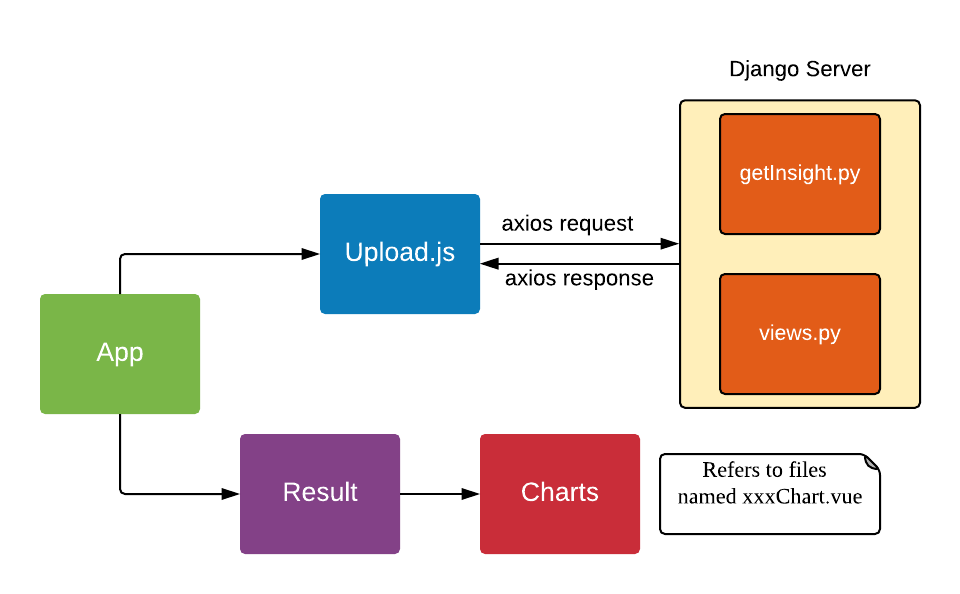
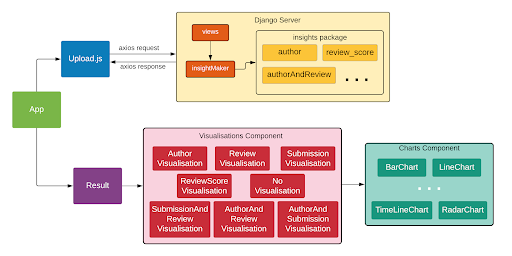
The existing version of the ChairVise application uses Vue.js and charts.js for the front end web pages and visualisations. It is powered by a backend Django server that generates insights from the uploaded files.+ These two high level components communicate via axios requests and responses.
The system is built using VueJS framework using the Single Page Application pattern. Vue is for the View Layer of our application. It works with the virtual DOM to give it the better performance and render what is required.
When started, App.vue instantiate a new Vue app. It then render components, which are reusuable Vue instances with a name. Components are organised as Single File Components in ChairVisE. Most of the subcomponents are reusable by parent nodes.
The structure of the system is maintained by the index.js file stored in the router folder. Vue uses the router to achieve the goal of Single Page Application(SPA). The existing implementation has 3 different router views: home('/'), TE('/te') and result('/result).
To add a new router view, create a vue file and add it to the index.js file. To use external libraries, add it inside the main.js file to use it globally and use import statements to use locally within a component. Appearances are built mainly using the Element UI build for Vue.js ( https://github.com/ElemeFE/element ).
A typical vue file consists of 3 attributes.
-
<template> where the HTML code resides</template>
-
<script> where the Vue logic resides</script>
-
<style> where the CSS code resides</style>
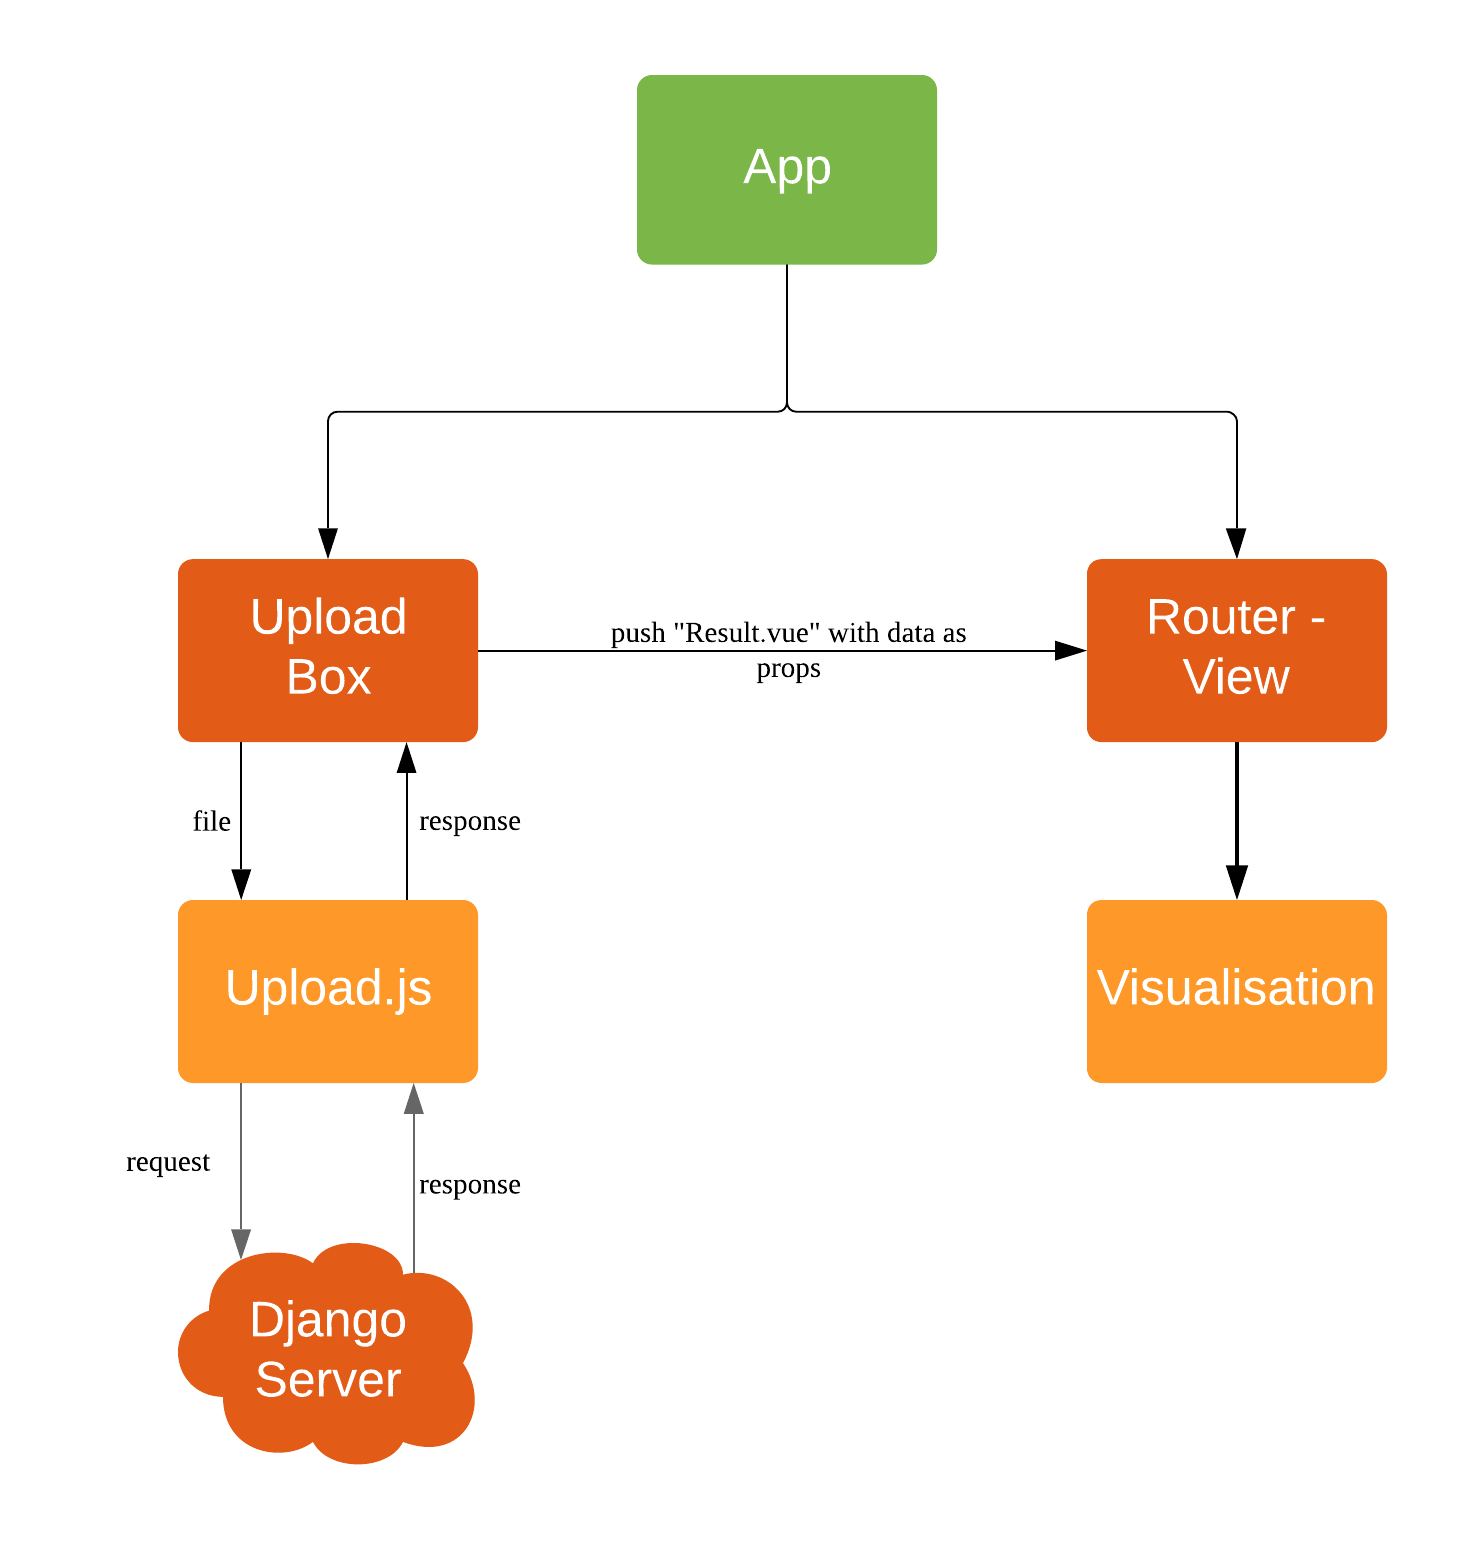
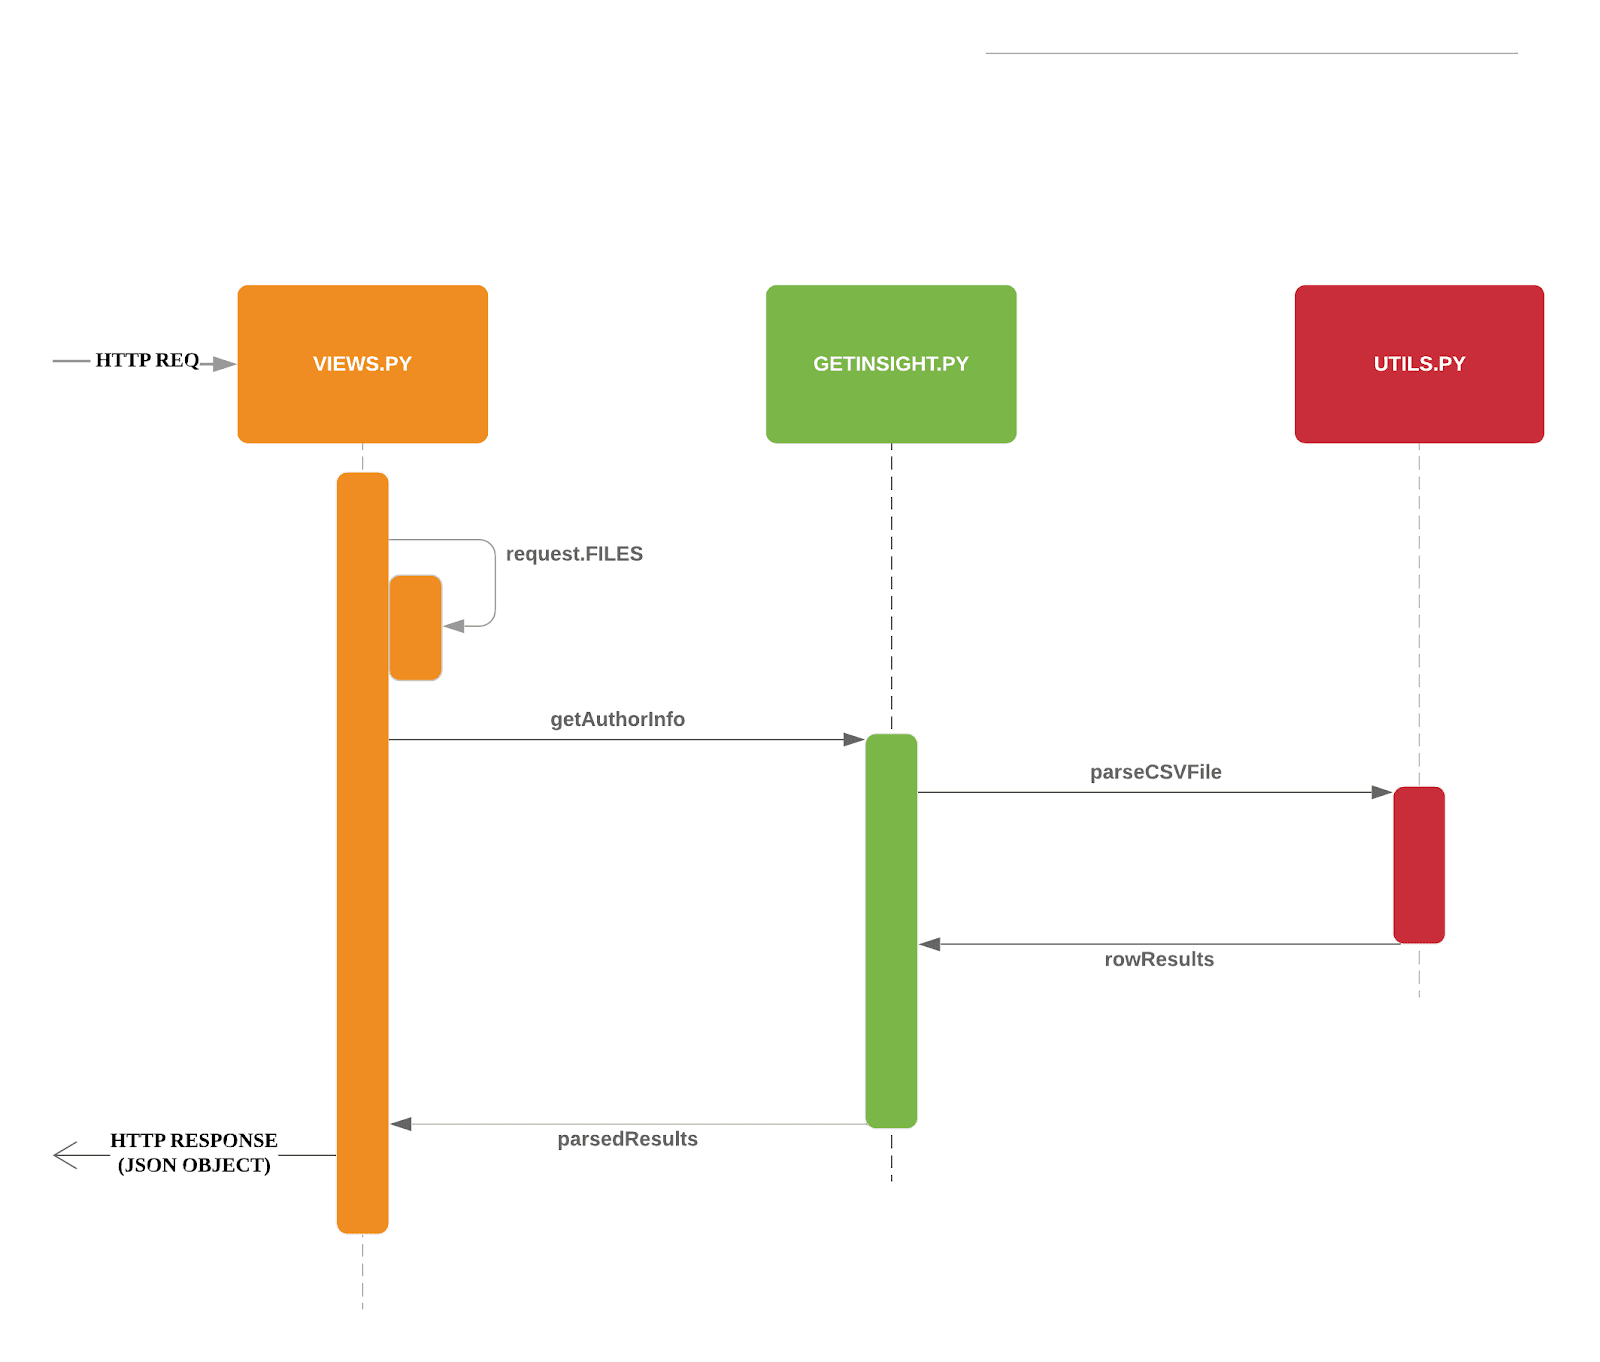
When a user uploads a file, an Axios HTTP request will be made ( https://github.com/axios/axios ), and the file will be posted to the backend Django server. The URL pattern of the request is analysed first by be/urls.py. As per the code, the upload command made through: www.chairviz.herokuapp.com/upload/, and it’ll be directed to function uploadCSV() in polls/views.py. This file will decide the action to take, depending on the request. In the existing implementation, helper functions are defined in polls/utils.py and polls/getInsight.py/. The type of the CSV file is determined and functions are called accordingly to parse and return the data as a JSON object.
When the response is received, the returned data will be parsed and the infoType (author,submission,review) will be determined and the data will be pushed to Result.vue and displayed by the router view.
The parameters passed to result.vue is : InputFileName, infoData and infoType. Some of the data still requires calculation and are computed and return to the data section. When data is ready, the components are added to the HTML code.
Result then pass the data to the subcomponents to render the charts and word cloud. When changes are made by the users, data that is "watched" will be trimmed accordingly and automatically updated.
To save the charts and text to a pdf file, html2canvas and jsPDF are the libraries used. html2canvas traverse through the DOM of the page and gathers information on all the elements. It then uses it to build a representation of the page, based on the properties it reads from the DOM. Refer to the documentation (https://html2canvas.hertzen.com/documentation).
The existing implementation assumes that each page will only contain 2 charts, so a counter is used. When counter%2 == 1, it will use the same page, otherwise there is a need to use the doc.addPage() and also reset the starting top margin.
We have improved upon the existing implementation and added new features to the application. == Implementation
Improvements to the user interface were mainly done using Bootstrap for vue (https://bootstrap-vue.js.org/).
Area of improvement |
Details |
Navigation bar |
Added navigation bar to navigate between pages |
Home page |
Added home page with instructions on how to use ChairVizE |
Error message |
Show error message when unsupported CSV are uploaded |
Organise visulisation into cards |
Increased comprehensibility and more distinct charts |
Login Page |
User login implemented using Firebase, with option to login using google account |
Dropbox |
Increased the size of dropbox |
To allow user to save their previous sessions, we need to differentiate between the different users. Thus we implemented a login/logout function and user authentication is done using the Firebase Authentication API.
Knowing a user’s identity allows us to securely save user data in Firebase and provide a personalized experience by saving sessions.
Firebase Authentication supports authentication using passwords, phone numbers, popular federated identity providers like Google, Facebook and Twitter, and more.
Firebase would return a unique UID upon successful login. The UID is stored in the store using VueX to maintain a "single source of truth".
In Main.js , Firebase let’s us set an observer on the Auth object, so we can ensure that the Auth object isn’t in an intermediate state — such as initialization — when you get the current user. In short, the observer handle page reloads, ensures that firebase initialises before loading the app when a user refreshes a page.
To prevent unauthorised users from accessing pages before they are logged in, we use navigation guard implemented in the index.js file. First, before routing the user to a view, we check if the route exists and requires authentication. Each view has a meta option that indicates if it requiresAuth to access.
Session Management is implemented using the Database Session State pattern. In using this pattern. we store the session data as committed data in Firebase database.
Session state is stored upon the user’s request. There is a unique session for every file that is uploaded, even with files with the same name. Previous sessions could be accessed from the History Tab in the navigation bar.
When a call goes out from the client to the server, the server object first pulls the data required for the request from the database. The user then does the work it needs to do and saves back to the database the required data.
In order to pull information specific to a user from the database, the Firebase server differentiate the users according to the his unique User ID (UID), which is generated during login. The data saved are chartData and other text information and are parsed using JSON.stringify before storing in the server.
As opposed to using other state storage patterns such as server/client session state, using database session state allows us to store different sessions for the same file name.
To illustrate what happens during user sign in and retrival of session,
Priorities: High (must have) - * * *, Medium (nice to have) - * *, Low (unlikely to have) - *
| Priority | As a/an … | I want to … | So that I can… |
|---|---|---|---|
|
New user |
see usage instructions |
refer to instructions when I forget how to use the spp |
|
User |
upload a csv file containing conference data |
view insights from the data |
|
New user |
register for an account |
store data that only I can access |
|
User |
log in to my account |
access my data |
|
Logged in user |
log out from my account |
prevent others from accessing my data |
|
Logged in user |
save my state |
view past insights without needing to reupload |
|
User |
view my submission history |
track my submissions |
|
User |
get analytics from multiple files together |
get deeper insights |
|
User |
exit the app |
leave once I am done seeing visualisations |
|
User |
upload csv files with custom named columns |
do not need to name them according to application format |
|
User |
see score distribution |
know the reviews for that year |
|
User |
search for a specific author or keyword |
find out more about them |
|
Logged In user |
change password |
set a new password if I forget it |
|
Administrator |
get usage statistics |
manage resources |
|
Administrator |
Look at data usage |
Monitor how much data is needed |
|
User |
view the key figures at a glance |
get a quick overview of the data |
|
User |
switch between visualisations of multiple files |
view analytics of different data without reuploading |
|
User |
export insights as a .doc file |
customise the content of the file easily |
|
Administrator |
Delete inactive users for 6 months |
increase storage space |
|
User |
contact top authors |
talk to them about their work |
|
User |
visualise links between different organisations |
see the state of collaborations |
|
User |
view top authors |
compare among authors |
|
User |
submit feedback to the developer |
suggest further improvements to the web app |
-
When users access website with stable internet connection, the system should response in 1 second
-
The system should be able to generate a report for the user within 3 seconds
-
The system should be online from 9 to 5.
-
Should be cross-browser and cross-platform compatible
-
The app should not crash when file uploaded files are invalid or too many users
-
The app should be maintainable and functionality can be added easily.
-
The app should support a minimum of 1000 concurrent users
-
The components should be reusable.
-
The app should have persistent storage.
-
The app UI should be pleasing to the eye.
-
The app UX should make the app easily usable and accessible.
-
Continuous Integration
We use Travis CI to perform Continuous Integration on ChairVisE. See UsingTravis.adoc for more details. -
Build Automation
We use Travis CI to perform Build automation. -
Managing Dependencies
Our project depends on third-party libraries. For example, ChairVisE uses the ECharts to display the graphs and Firebase for our state management. These dependencies are managed using the npm package manager. A package.json file make it easy to manage and install dependencies.
-
Author.csv
-
Top Authors
-
World Heat Map
-
Top Countries
-
Top Affiliation
-
-
Review.csv
-
Score Distribution
-
Recommendation Distribution
-
Mean Score and Mean Confidence Value
-
-
Submission.csv
-
Submission Time Series
-
Past Year Acceptance Rates
-
Acceptance Rate By Track
-
Top Accepted Authors/Contributors
-
Top Accepted Authors (Paper Count)
-
Word Cloud for all Submissions
-
Word Cloud for Accepted Papers
-
Word Cloud for Submission by Track
-
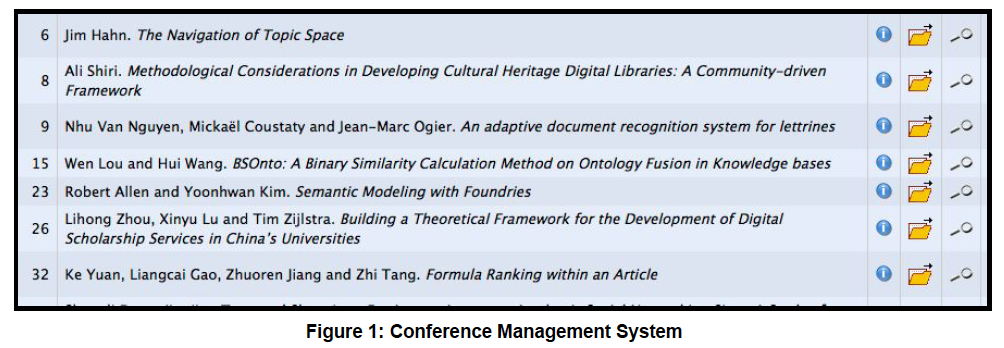
Figure 1 shows a snapshot of submitted papers with submission#, author name(s) followed by paper title. It shows only minimal required information and operations.
However, for each submission, there is multiple other data like author list with their affiliations, assigned reviewers for each submission, reviewers who many have conflict of interest with a submission.
The following structure of author.csv, review.csv and submission.csv are shown below.
-
submission#
-
first name
-
last name
-
email
-
country
-
organisation
-
webpage
-
person#
-
corresponding
-
submission#
-
track# (Paper or Poster)
-
track name
-
title of submission
-
authors
-
time submitted
-
last time updated
-
form fields
-
keywords
-
decision
-
notified
-
reviews
-
sent
-
abstract


