NOTE: This is a work in progress, and is mainly here as a Github Markdown test.
Blender has long been the go to 3d modelling and animation program for artists on a tight budget due to its free and open source license, but more recently, and especially with the release of Blender 2.80, it is becoming known not only for its price tag, but also for its power and flexibility.
Even though Blender is a tremendously powerful package out of the box, it has a rich Python 3 API, allowing users to create custom add-ons to tweak Blender's behaviour or even add entirely new features. With just a modicum of Python knowledge, you can start writing your own scripts and bending Blender to the needs of your project and personal workflow, and with this article I'm going to demonstrate how easy it is to get started.
One of the easiest ways to get up and running with Python in Blender is to use the built-in Python console to quickly test commands. Blender 2.80 has a default scripting workspace, where the Python console, text editor and info panel are all set up for you to begin playing around with.
First off, let's open Blender 2.80 and switch to the scripting workspace by clicking on the tab labelled 'Scripting' at the top of the window. For this exercise, you will only really need the 3d view, Python console, info window and outliner, which are shown below.
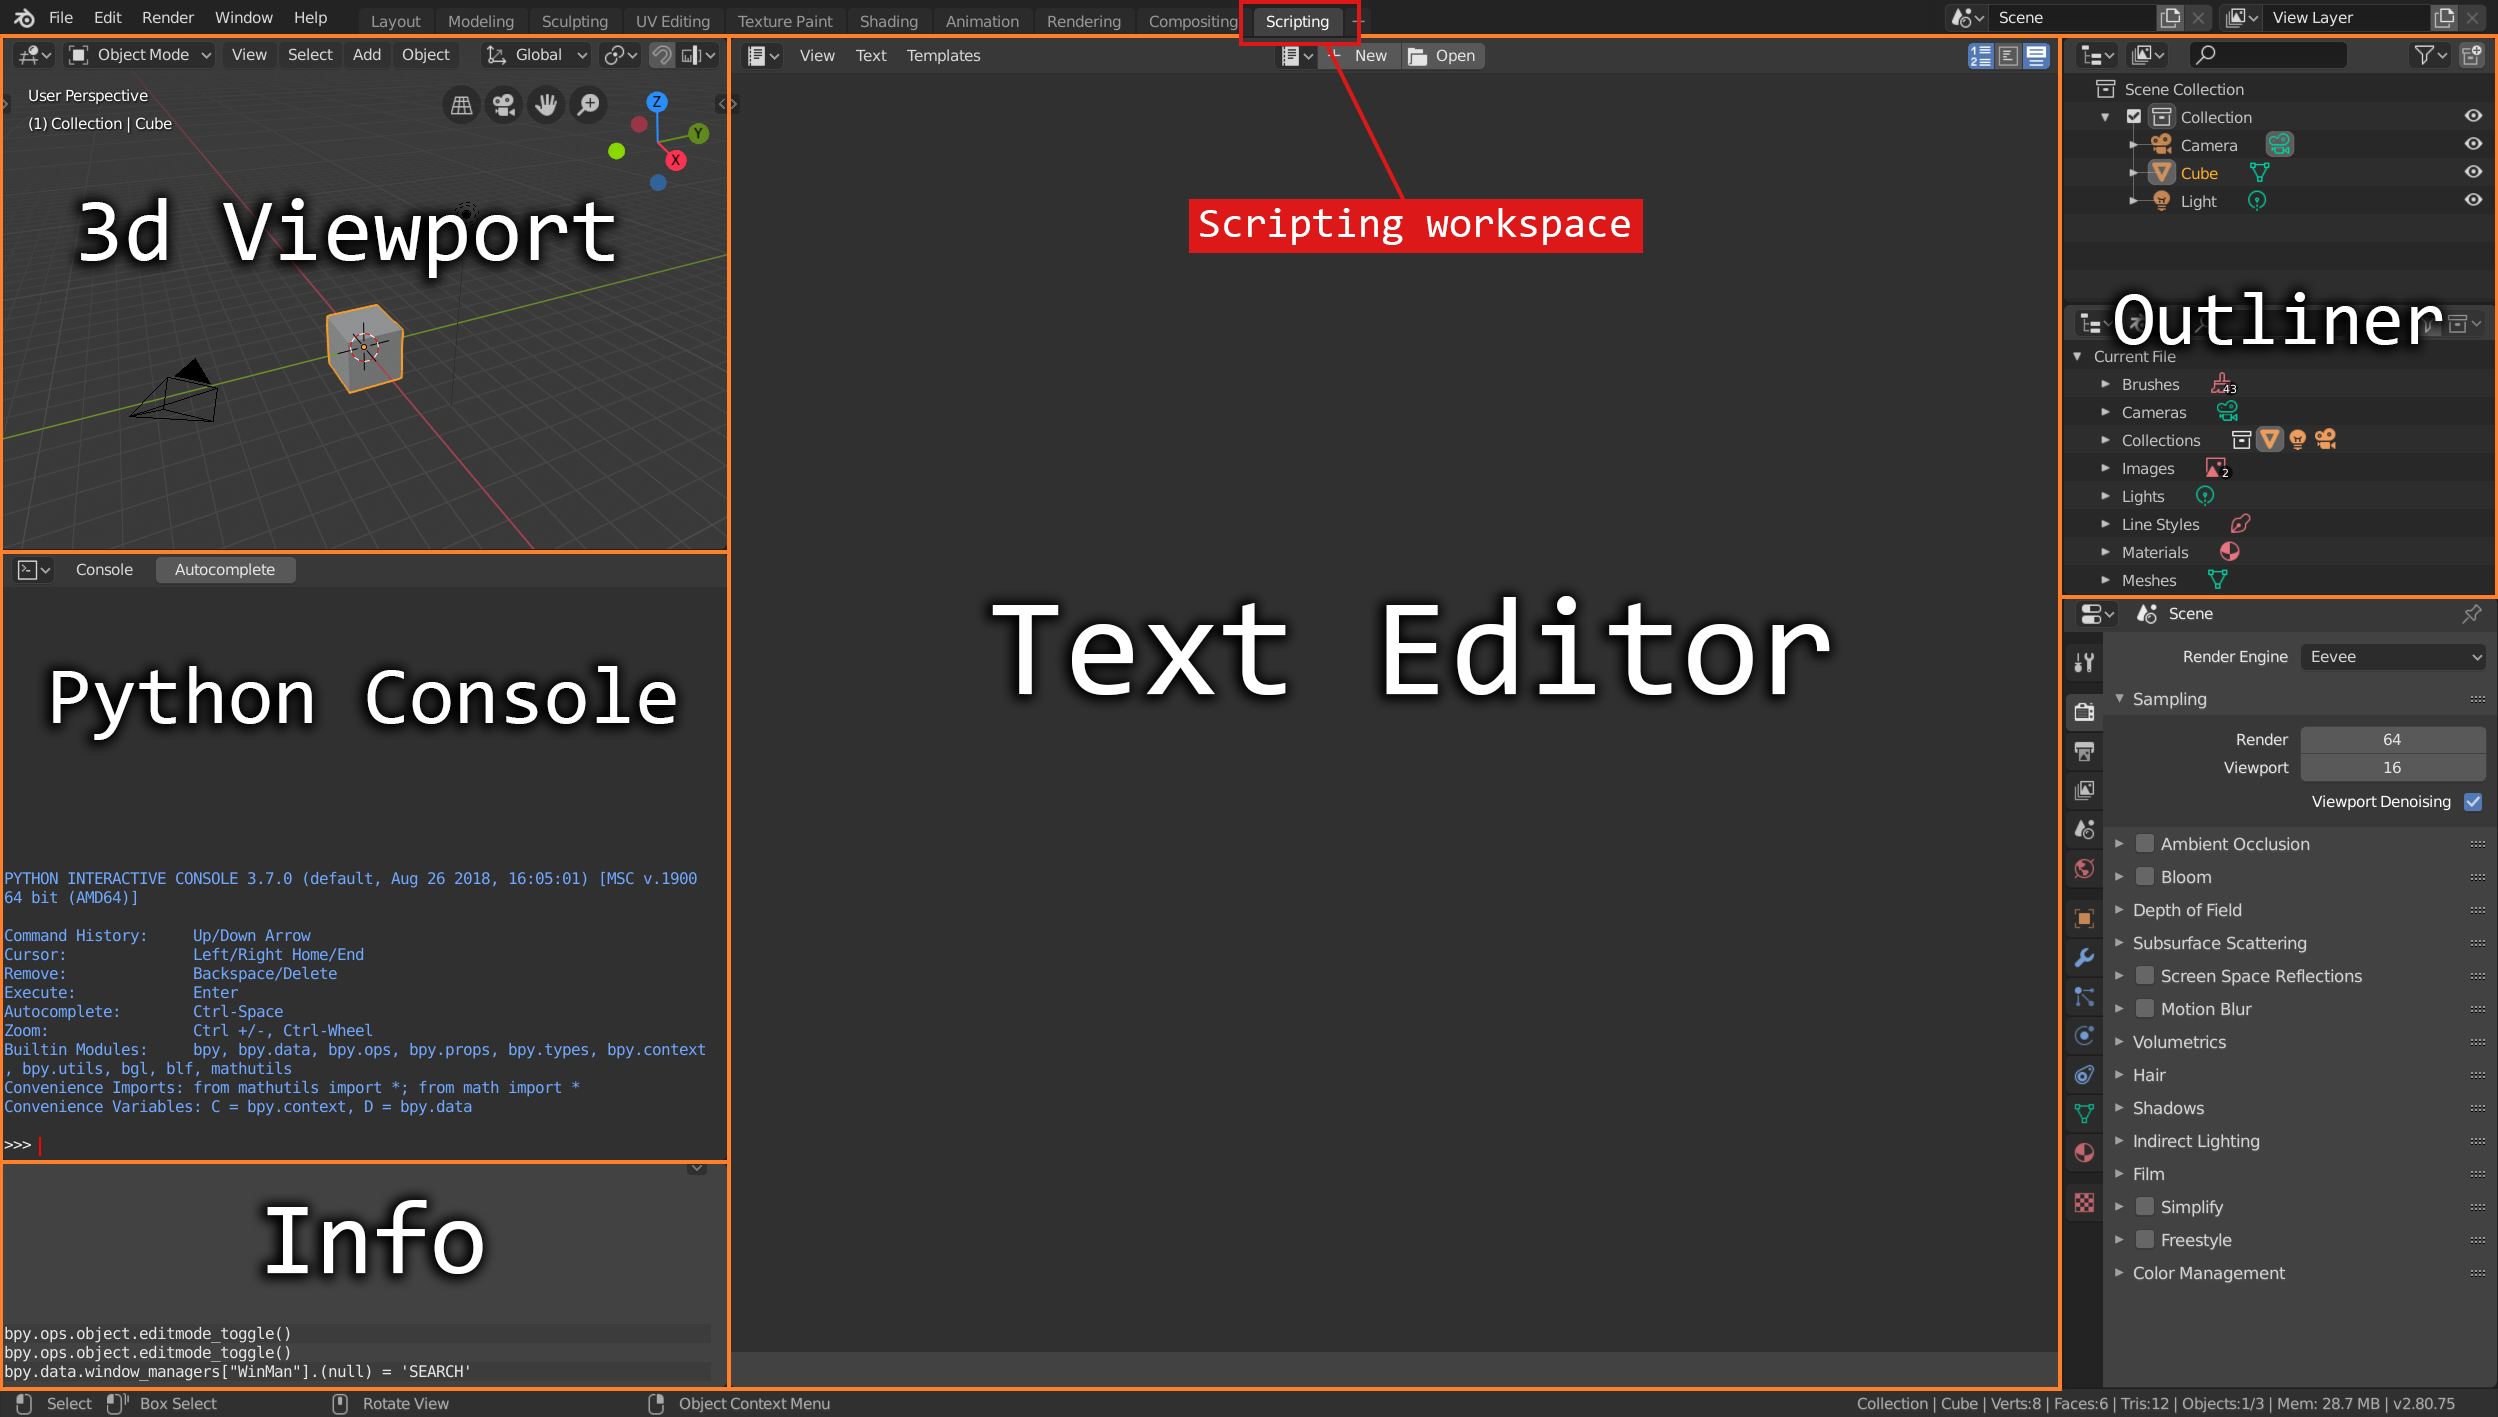
The 3d view should contain three objects; The default cube, a camera and a light. If your scene doesn't contain these, either reset the default settings from the menu ('File > Defaults > Load Factory Settings') or just add the objects manually.
Now let's try using the Python console to interact with the 3d view. Unlike most other applications, the active area is set by the mouse cursor being inside it, so before doing anything else, make sure the cursor is inside the console, or nothing will happen when you type.
There are two main ways to access objects; First by using the context to get objects that are active or selected, and second by using bpy.data to access objects by name or index. Most of the time, you will want to operate on something that is selected, so let's enter our first commands to investigate the selection.
# Objects can be accessed directly by name
# and referenced by local variables
>>> obj = bpy.data.objects['Cube']
# Select and deselect objects using select_set
>>> obj.select_set(True)
# The selection state can be accessed with select_get
>>> obj.select_get()
True
# All selected objects are stored in a list
>>> bpy.context.selected_objects
[bpy.data.objects['Cube']]
# The active object can be accessed directly
>>> bpy.context.object
bpy.data.objects['Cube']
# Because bpy.context.object is read-only, setting
# it requires setting a different variable.
>>> bpy.context.view_layer.objects.active = obj
The active object is usually the last object that was selected by the user, and will be highlighted in bright orange. When there are multiple objects selected, selected objects will have a dark orange outline, so the active object should stand out. Many operations in Blender will operate on the active object, whilst others will simply operate upon what is selected. Let’s continue…
# Now let's get some properties of this object.
>>> obj.name
'Cube'
# The object type tells us what is stored in obj.data.
# In this case, obj.data is a mesh.
>>> obj.type
'MESH'
>>> obj.location
Vector((0, 0, 0))
# We can set the position of the cube easily by modifying its location.
# Watch it move in the 3d view when you enter the commands.
>>> obj.location.z = 3
>>> obj.location.z = 0
As you can see, it’s easy to experiment with commands in the console. It’s also great for discovering the properties of different object types thanks to Blender’s Autocomplete function. Simply start typing and press ‘Ctrl+Space’ (or hit the ‘Autocomplete’ button at the top of the console) to see a list of possible completions. Try entering “obj.” and running autocomplete to see all the properties of the cube.
Now let’s try one last example in the console before we move to the script editor.
# This little snippet will create four copies
# of the cube (assuming it is still selected).
>>> for i in range(1,5):
...    bpy.ops.object.duplicate()
...    bpy.ops.transform.translate(value=(0, 2, 0))
That was easy! Now there should be five cubes in the scene. Both of these commands operate on the selection, so first the cube is duplicated and then moved. The selection then changes to the new cube, so each iteration of the loop creates a new cube and moves it 2 meters on the y axis. We are going to use these cubes in the next section, so don’t delete them!
The Python console is good for quickly testing commands and playing around, but once you begin to have an idea of what it is you want to do, it’s best to start working in Blender’s built-in text editor. This is a proper text editor, allowing you to modify files in much the same way you would in any other editor, but thanks to its integration, scripts can be conveniently tested at the click of a button.
Move over to the text editor and click on the ‘New’ button at the top. This will create an empty file for you to enter your code. While you are up at the top, make sure that line numbers and syntax highlighting are turned on, as it will make editing your code a much more pleasant experience.
Now let’s start writing some code and test our first script!
# Although it's already loaded in the Python console,
# Blender's bpy module must be imported manually in a script.
import bpy

# We can use a generator to get all selected mesh objects
selected_objects = [o for o in bpy.context.selected_objects if o.type == 'MESH']
# Alternatively, we can get all mesh objects in the scene
all_objects = [o for o in bpy.context.scene.objects if  o.type == 'MESH']

for i, obj in enumerate(all_objects):
    obj.name = 'Box_' + str(i+1)
    obj.location.z = i
This script can be run by pressing the button marked ‘Run Script’ in the top right of the text editor, or by pressing ‘ALT+P’. If you entered the code correctly, the cubes that were created previously should be renamed Box_1 to Box_5 and be arranged like a staircase. Although this is not exactly the most useful script ever written, it should give you an idea of how simple it is to batch operations in a script so that they can be run on multiple objects.
Now we’ve covered the basics, let’s try writing something a bit more useful. How about a modelling tool that makes it easy to create pipes and wires? It’s already fairly easy to create pipes and wires in Blender, but the workflow for doing so is not as smooth as it could be, so how about making a tube tool that creates a tube along a set of selected edges?
Now this may sound like a huge jump in difficulty over the previous example, and perhaps it is if we write all our own algorithms, but as I mentioned, Blender already has some tools to make pipes and wires, so we can just use the python commands these tools utilise behind the scenes to make our own tool!
As you’ve been working through the examples, you might have noticed that the info window has text printing in it each time you do something. This text is actually the Python commands to perform the last action, and we can copy it out of the info window to use in our own scripts. This means that if we manually perform the steps to create a tube along selected edges, most of the code we need to automate the process should be given to us in the info window! Let’s give it a try.
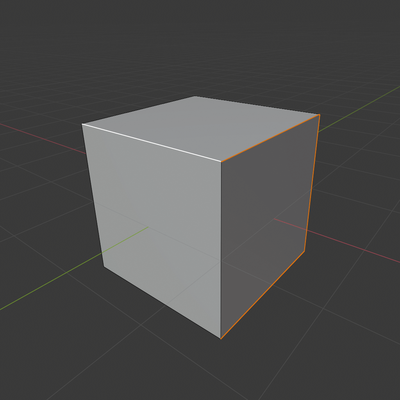
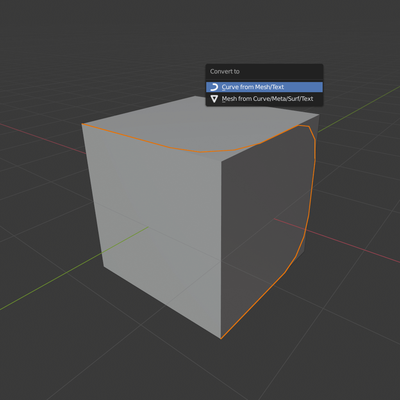
First start a new scene so that you just have the default cube, camera and light. Select the cube and enter edit mode. Select some edges as shown below. Now follow the rest of the steps and take note of the commands that appear in the info window. The actual commands needed for each step are shown below.
 |
 |
|---|---|
| Enter edit mode and select some edges | bpy.ops.mesh.separate(type='SELECTED') |
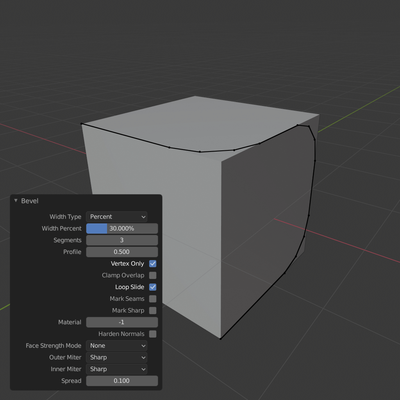
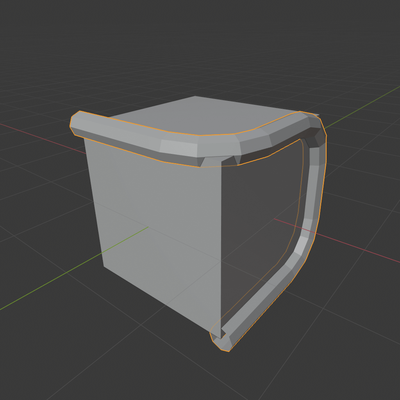
Once a selection is made, the next step is to separate the selection to a new object, so that we can smooth it out and turn it into a curve. The next two steps below show how the edge corners can be smoothed with the bevel operator (the ‘Vertex Only’ option is key), and the object converted to a curve.
 |
 |
|---|---|
| bpy.ops.mesh.select_all(action='SELECT') bpy.ops.mesh.bevel(offset_type='PERCENT', offset_pct=30.0, segments=4, vertex_only=True) |
bpy.ops.object.convert(target='CURVE') |
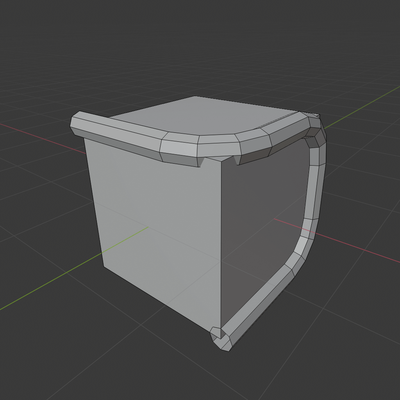
Once we have a curve object, it’s trivial to turn it into a 3d tube by changing the bevel_depth and bevel_resolution parameters, as shown below. The final step is to convert the curve back into a mesh and join it to the original object.
 |
 |
|---|---|
| bpy.context.object.data.bevel_depth = 0.1 bpy.context.object.data.bevel_resolution = 2 |
bpy.ops.object.convert(target='MESH') bpy.ops.object.join() |
One important thing to note is that some of the commands we need to call will only run in a specific editing context, which for this example will be either object or edit mode. If a command is called whilst in the wrong mode, Blender will report an error and the script will fail, so we will need to manually change the mode before calling the command.
# For object mode, use the following
bpy.ops.object.mode_set(mode='OBJECT')
# For edit mode, use this
bpy.ops.object.mode_set(mode='EDIT')
Mode changing often in scripts is not ideal, as it makes the code harder to understand and also has a performance impact, which will become clear when working with many objects at once. However, this method of prototyping is valuable as it is easy to get something up and running quickly.
Now all the commands needed to make our prototype are known, let’s write the script! First try writing the script yourself by copying and tweaking commands from the info window, paying attention to when you need to change mode or change the selection for command to work correctly. If you run into problems, check your code against the finished script below. It’s also a good idea to search the Blender Python API Reference if you need to know more information about a specific object type or function.
import bpy

def make_tube():
    obj_original = bpy.context.object
    # Separate the selected mesh elements (hopefully the user selected some edges!)
    bpy.ops.mesh.separate(type='SELECTED')
    bpy.ops.object.mode_set(mode='OBJECT')
    # Get the object that was created from the selected parts
    obj_tube = bpy.context.selected_objects[1]
    bpy.ops.object.select_all(action='DESELECT')
    # Set this to the active object
    obj_tube.select_set(True)
    bpy.context.view_layer.objects.active = obj_tube
    # Enter edit mode and run bevel
    bpy.ops.object.mode_set(mode='EDIT')
    bpy.ops.mesh.select_all(action='SELECT')
    bpy.ops.mesh.bevel(offset_type='PERCENT', offset_pct=30.0,
        segments=4, vertex_only=True)
    bpy.ops.object.mode_set(mode='OBJECT')
    # Convert to a curve and tubify it!
    bpy.ops.object.convert(target='CURVE')
    bpy.context.object.data.bevel_depth = 0.1
    bpy.context.object.data.bevel_resolution = 2
    bpy.ops.object.shade_smooth()
    bpy.ops.object.convert(target='MESH')
    # Join back to the original object
    obj_original.select_set(True)
    bpy.context.view_layer.objects.active = obj_original
    bpy.ops.object.join()
    bpy.ops.object.mode_set(mode='EDIT')

# Call the function above
make_tube()
One quick note about this script is that after separating the selection from the original object, there should be exactly two objects selected; The original object and the separated object. The active object will still be the original selection, so the selected_objects list is used in order to get the separated object.
Now we have a script that when called will turn selected edges into a smooth tube! This is a great start, but wouldn’t it be nice if we could add this to Blender as if it were a built-in command and assign it to a shortcut or Quick Favourite? Even better, how about the ability to tweak the settings of the tube interactively? Well, we can, and that’s what we’ll do next.
An add-on in Blender is a type of script that can be installed through the preferences menu and will remain available to the user even after Blender is restarted. An add-on usually consists of one or more classes called operators, which are functions registered with Blender and exposed to the user in the same way as Blender’s built-in tools. Although an add-on does require a little more code than a basic script, it’s not that much, and Blender even includes a template add-on script that can be used as a starting point. However, we’re going to write the extra code ourselves.
There are essentially three parts to making our first add-on work; First, we must let Blender know some metadata about the add-on, such as its name, category, author and version; Second, the simple function we wrote must be converted into an operator; Finally, the operator that we add must be registered in order for Blender to know it exists.
bl_info = {
    "name": "Edge to Tube",
    "description": "Turn selected edges into a tube",
    "category": "Mesh",
    "author": "Your Name",
    "version": (1, 0),
    "blender": (2, 80, 0),
    "wiki_url": "https://github.com/andyp123/blender_addon_tutorial"
}
The bl_info dictionary is displayed by Blender in the add-on preferences once the add-on has been installed. Make sure to correctly set the “blender” property, as add-ons made for previous versions of Blender are not compatible and will not run if it is not set to (2, 80, 0). The “version” property is less important, but can be used to differentiate different versions of your add-on if you decide to release it on the internet for other Blender users.
import bpy

# As of Blender 2.80, operator names must conform to a specific convention
# Naming the operator like this, instead of just EdgeToTube avoids warnings
class Mesh_OT_EdgeToTube(bpy.types.Operator):
   """Edge to Tube"""                 # Shown as hover tooltips
    bl_idname = "mesh.edge_to_tube"   # Internal name in Blender
    bl_label = "Edge to Tube"         # Name shown in search etc.
    bl_options = {'REGISTER', 'UNDO'}

    def execute(self, context):
        # make_tube code goes in here
        return {'FINISHED'}

    @classmethod
    def poll(cls, context):
        if len(context.selected_objects) == 1:
            return (context.object.mode == 'EDIT' and
                   context.object.type == 'MESH')
        return False
This is the skeleton for the operator class we are going to make. At the top are some parameters that identify the operator to Blender and allow the operator to use undo and redo. The execute function is where the edge to tube code we wrote in the previous section will go. The poll function prevents the operator from being called if certain conditions are not met, which in this case are that there must be a single selected object in edit mode.
classes = {
    Mesh_OT_EdgeToPipe,
}

def register():
    for c in classes:
        bpy.utils.register_class(c)

def unregister():
    for c in classes:
        bpy.utils.unregister_class(c)

# This allows the add-on to be run directly from Blender's
# text editor without needing to be installed.
if __name__ == "__main__":
    register()
Before a custom operator can be used, it must first be registered with Blender. The name of the operator class must be added to the classes list. The register and unregister functions use this list and are called when Blender loads, when add-ons are installed, removed, enabled or disabled, and also when scripts are reloaded.
Now copy and paste the function body of the make_tube script into the execute function and run the script to register the ‘Edge to Tube’ operator in Blender. Test that it works by selecting some edges of a cube and running the operator from the operator search menu (‘F3’, then type ‘edge to tube’). Hopefully everything will have worked, but if there were errors, check the error, fix any problems in your code and try again.
Once everything is working, save your script to a file named ‘edge_to_tube.py’. Now the script is saved, it can be installed in Blender through the Add-ons section in Blender Preferences (‘Edit > Preferences’) by clicking the ‘Install…’ button and selecting the file you saved. Once installed, you will need to enable it by checking the box to the left of the add-on name. Now you can use your new operator even if you restart blender!
The add-on is still not finished, and we are going to continue developing it. However, having it installed can cause conflicts, so hit the ‘Remove’ button to uninstall it for the time being.
Although we’ve made a working add-on that does something useful, it would be far more useful if the results were tweakable. This is where operator properties come in. Operator properties are class variables that are exposed in the redo panel that appears in the bottom left corner of the 3d view after calling an operator, and we will use them to make our tubes tweakable.
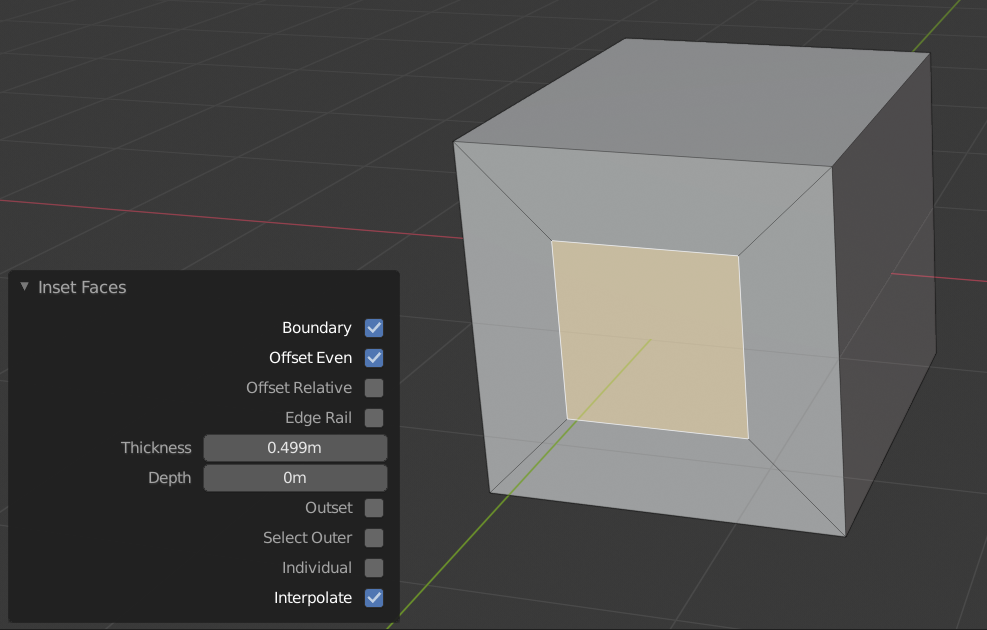 The redo panel for the Inset Faces operator.
The first thing to do is identify which aspects of the tube we would like to be able to adjust. Tube thickness is the most obvious setting, followed by the size of the bevelled corners, and detail or smoothness of the tube. By looking at the commands used in our Mesh_OT_EdgeToTube operator’s execute function, we can see that changing all of these things can be accomplished quite easily.
import bpy
from bpy.props import *
In order to use operator properties, we first need to import the property types. There are many different types of property, but we will need only FloatProperty and IntProperty.
    bl_options = {'REGISTER', 'UNDO'}

    tube_radius: FloatProperty(
        name="Tube Radius",
        description="Radius of the tube",
        default=0.1
    )

    corner_bevel_segments: IntProperty(
        name="Corner Segments",
        description="How many segments to add at tube corners",
        default=4,
        min=0,
        max=32
    )

    corner_bevel_percentage: FloatProperty(
        name="Corner Smoothing",
        description="How much to smooth the tube corners",
        default=20.0,
        min=0.0,
        max=50.0
    )

    def execute(self, context):
The properties defined above belong to the Mesh_OT_EdgeToTube class, and can be accessed inside member functions by preceding them with the ‘self’ object reference. This snippet shows how they can be used in the execute function.
# Enter edit mode and run bevel
if self.corner_bevel_segments > 0:
bpy.ops.object.mode_set(mode='EDIT')
bpy.ops.mesh.select_all(action='SELECT')
bpy.ops.mesh.bevel(offset_type='PERCENT',
offset_pct=self.corner_bevel_percentage,
segments=self.corner_bevel_segments, vertex_only=True)
bpy.ops.object.mode_set(mode='OBJECT')
# Convert to a curve
bpy.ops.object.convert(target='CURVE')
bpy.context.object.data.bevel_depth = self.tube_radius
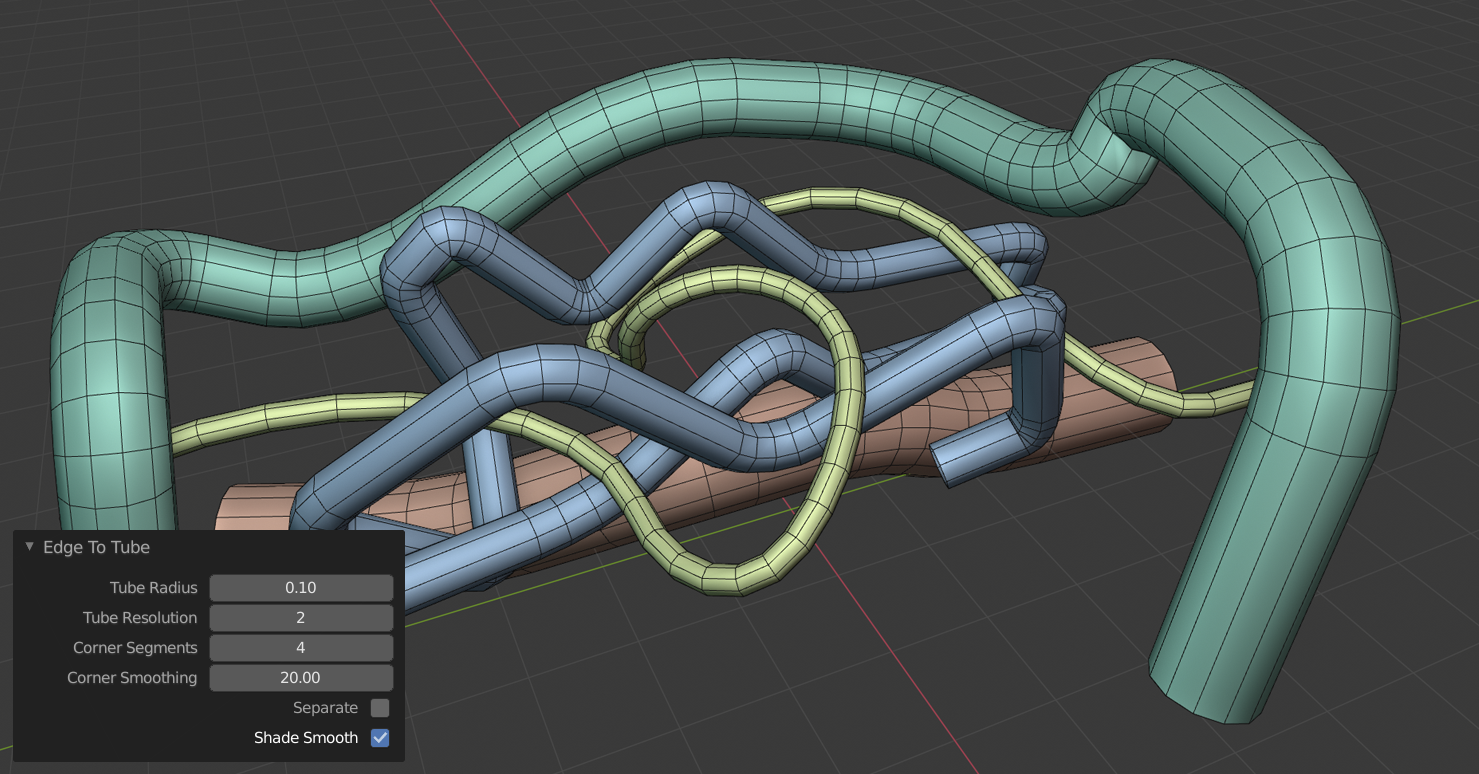
bpy.context.object.data.bevel_resolution = 2Now add all the properties you like to your code, hooking them up in the execute function. Try to do a couple more than just what is shown above. Now when you run the Edge to Tube operator, you should see something like the redo panel shown below. Tweak the settings and watch the resulting tube change shape!
That’s it, our add-on is complete!
Although we’ve just made one relatively simple Blender add-on, hopefully you can now see how easy it is to start prototyping your ideas. Not only is it possible to make simple operators, but entire libraries of functionality, buttons, widgets and all manner of useful tools can be bundled in add-ons and shared with other Blender users. We’ve barely even scratched the surface of what is possible with Python in Blender, but luckily there are plenty of online resources to make going deeper a less daunting experience.