"We are the robots / Ya tvoi sluga / Ya tvoi rabotnik" — Kraftwerk
Read on Medium | Talk to Demo Bot
It's as easy as:
- Clone the boilerplate.
- Customize message bindings and commands for your bot.
- Push your bot to Heroku and review it with Facebook.
- You're live! 💬
Rubotnik is a minimalistic boilerplate and a microframework proof-of-concept that allows you to launch your functional bot on a Messenger Platform in a matter of minutes. It is a companion to ingenious facebook-messenger gem and piggybacks on its Bot.on :event triggers. The main promise of Rubotnik is to speed up bot development in Ruby and provide a more natural mental model for bot-user interactions.
Rubotnik is also very beginner friendly 👶 🍼 and can be used in class to teach programming students about bots.
Rubotnik comes with a bare-bones architecture that ensures multiple users are served without delays or overlaps. It also provides a single shared namespace for everything your bot can do, so your bot's "commands" can be easily bound to incoming messages (or postbacks) through intuitive DSL, like so (strings are treated as case-insensitive regexps):
# Will match any of the words
bind "hello", "hi", "bonjour", "привет" to: :my_method_for_greeting

# Will match only if all words are present (ignoring order)
bind "what", "time", "is", all: true, to: :tell_time

# Same logic for postbacks
bind "ACTION_BUTTON", to: :action_for_buttonNote: multiple commands may be matched from a single message, in that case commands will be executed in order of matching.
"Talking" to the connected user is as straightforward as it gets:
say "Hello!"You can provide hints to the user in the form of quick replies:
replies = UI::QuickReplies.build(["Yes", "YES"], ["No", "NO"])
# Builds an array of hashes:
# [{:content_type=>"text", :title=>"Yes", :payload=>"YES"},
# {:content_type=>"text", :title=>"No", :payload=>"NO"}]

say "Do you want to see more?", quick_replies: replies
# Creates and sends this hash through Facebook Messenger Platform API:
#  {
#   recipient: {
#     id: "USER_ID"
#   },
#   message: {
#     text: "Do you want to see more?",
#     "quick_replies":[
#       {
#         content_type: "text",
#         title: "Yes",
#         payload: "YES"
#       },
#       {
#         content_type: "text",
#         title: "No",
#         payload: "NO"
#       }
#     ]
#   }
# }
Implementing conversation threads is like composing a movie script. Your bot is in constant dialogue with the user: each command starts by handling user's answer to your previous question and ends with posing a new one:
# bot.rb
bind "nice to meet you", to: :handle_name_and_ask_age, start_thread: {
                                                  message: "What's your name?"
                                                }

# commands.rb
def handle_name_and_ask_age
  # @message references an incoming message from the user
  # We assume it's a reaction to your previous message
  name = @message.text
  # ... do something with the data ...
  say "Hello, #{name}!"
  say "How old are you?"
  next_command :handle_age_and_ask_smth_else
end

def handle_age_and_ask_smth_else
  # ...
end
Rubotnik does not depend on any database out of the box and runs on Rack, so it functions as a self-contained web app (primed for Heroku). It can work with your main project through the REST API and use its database for persistence. The default server is Puma, but you can use any other Rack webserver for production or development (note that in-memory user store does not support parallelism through processes and a Puma server can only run with one "worker", multiple threads are fine).
Sinatra is enabled inside the boilerplate by default, and you can use its familiar syntax to define new webhooks for incoming API calls.
A built-in set of convenience classes makes working with Messenger Platform less tedious (you don't need to hardcode huge nested JSONs/hashes anymore to use basic interface features, just call one of the builder classes inside UI module).
DISCLAIMER: I am a new programmer and a recent Le Wagon graduate, passionate about all things Ruby. This is my first attempt at framework design and OSS. I welcome any discussion that can either push this project forward (and turn it into a separate gem), or prove its worthlessness. Please, star this repo if you want me to carry on.
Assuming you are going to use this boilerplate as a starting point for your own bot:
git clone git@github.com:progapandist/rubotnik-boilerplate.git

mv rubotnik-boilerplate YOUR_PROJECT_NAME

cd YOUR_PROJECT_NAME

rm -rf .git # to delete boilerplate's git history
git init # to start tracking your own project

bundle install
Now open the boilerplate in your favorite text editor and let's take a look at the structure
.
├── Gemfile
├── Gemfile.lock
├── Procfile
├── README.md # this readme
├── bot.rb # <= !!! YOUR STARTING POINT !!!
├── commands # everything in this folder will become
             # private methods for Dispatch classes
│   ├── commands.rb # write your commands as methods here
│   ├── questionnaire.rb # or in one of associated modules
│   └── show_ui_examples.rb
├── config
│   └── puma.rb # a configuration file for Puma
├── config.ru
├── demo # Constants for UI elements used in the demo.
         # you are free to delete this folder
│   └── sample_elements.rb
├── helpers # general helpers mixed into bot.rb
            # and accessible from everywhere inside the boilerplate
│   └── helpers.rb
├── privacy_policy.pdf  # replace with your own for FB approval
├── rubotnik # an embryo for the framework
│   ├── bot_profile.rb
│   ├── message_dispatch.rb
│   ├── persistent_menu.rb # design your persistent menu here
│   ├── postback_dispatch.rb
│   ├── rubotnik.rb
│   ├── user.rb # User model, define your own containers for state
│   └── user_store.rb # in-memory storage for users
└── ui # convenience classes to build UI elemens
    ├── fb_button_template.rb
    ├── fb_carousel.rb
    ├── image_attachment.rb
    ├── quick_replies.rb
    └── ui.rb
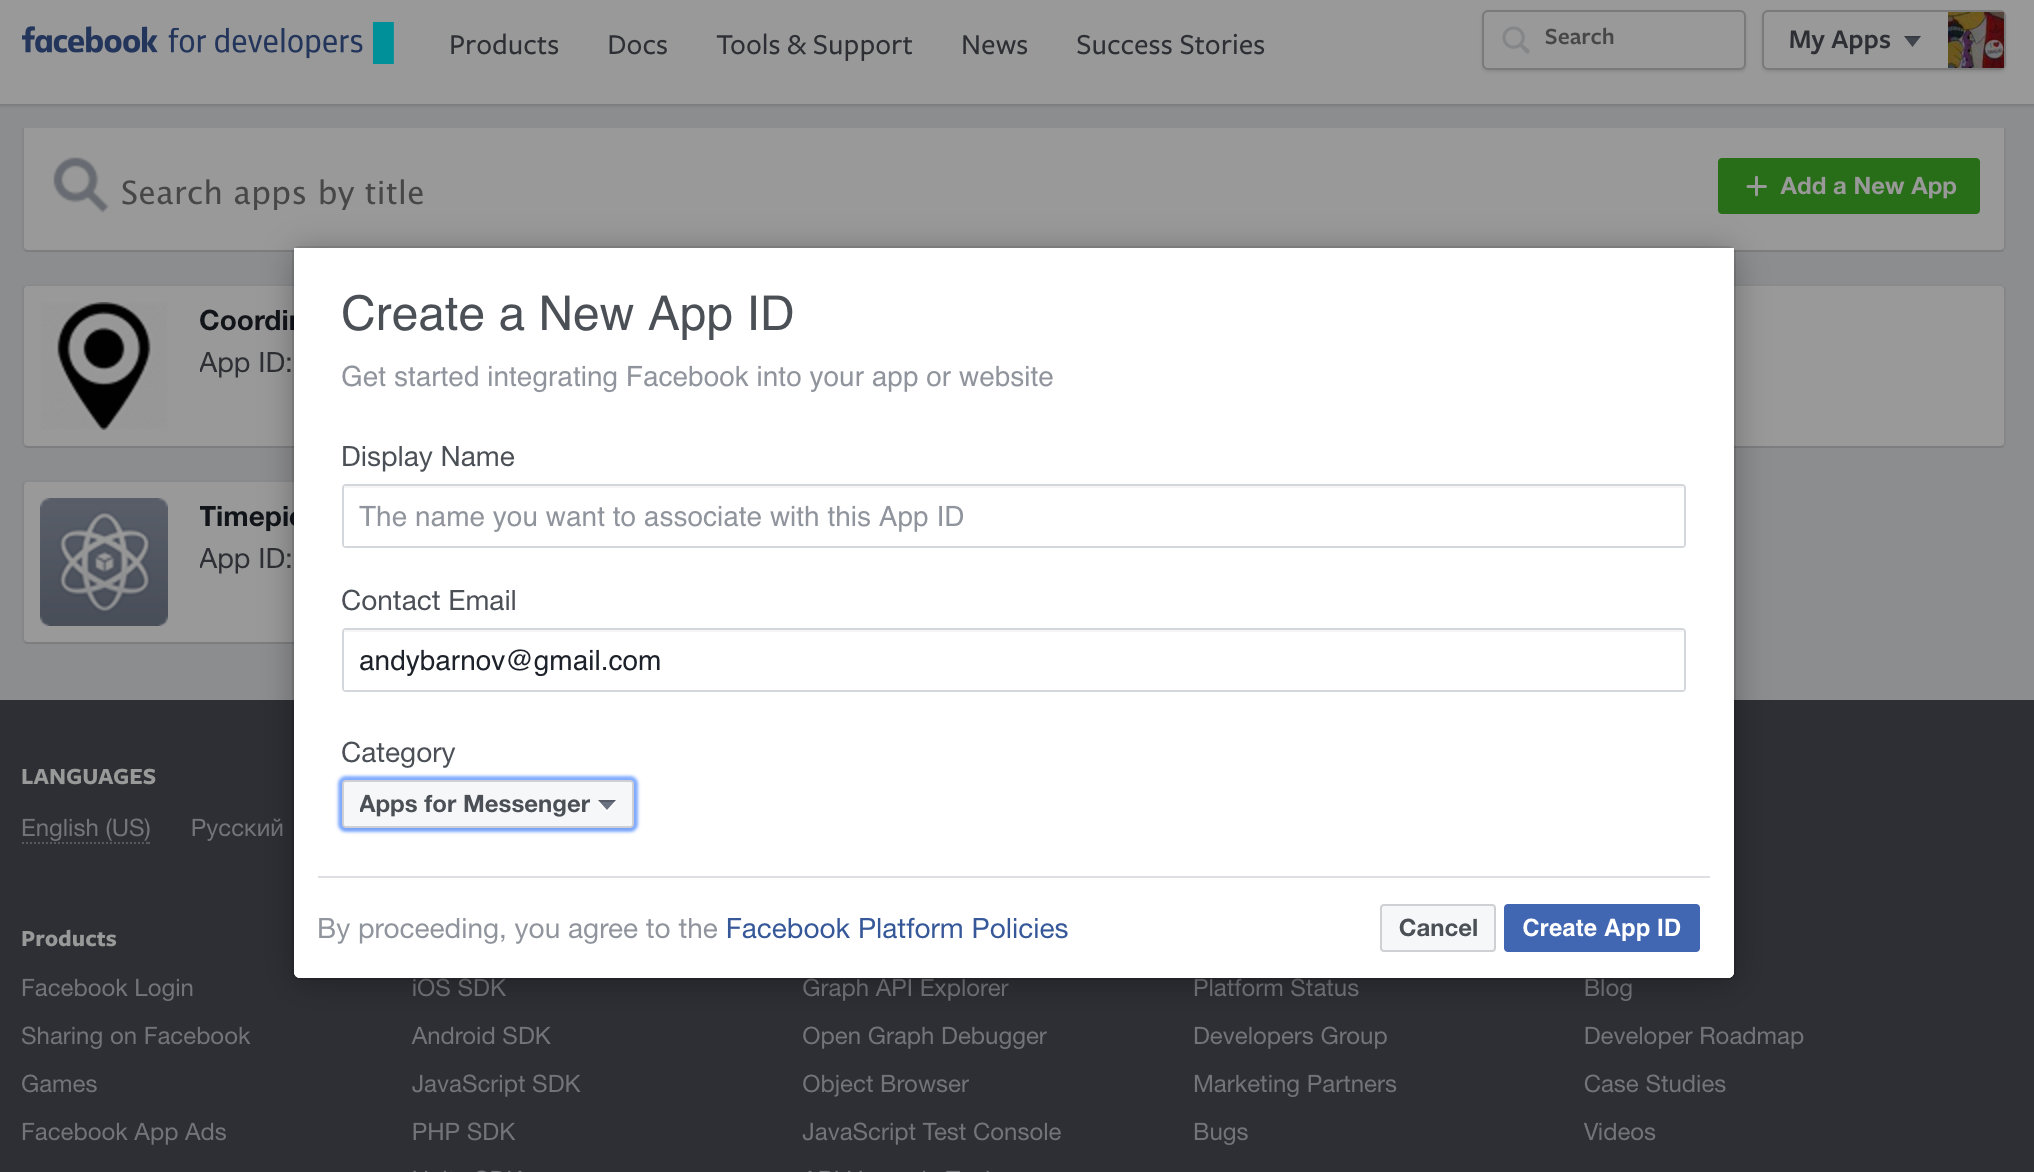
Login to Facebook For Developers. In the top right corner, click on your avatar and select "Add a new app"
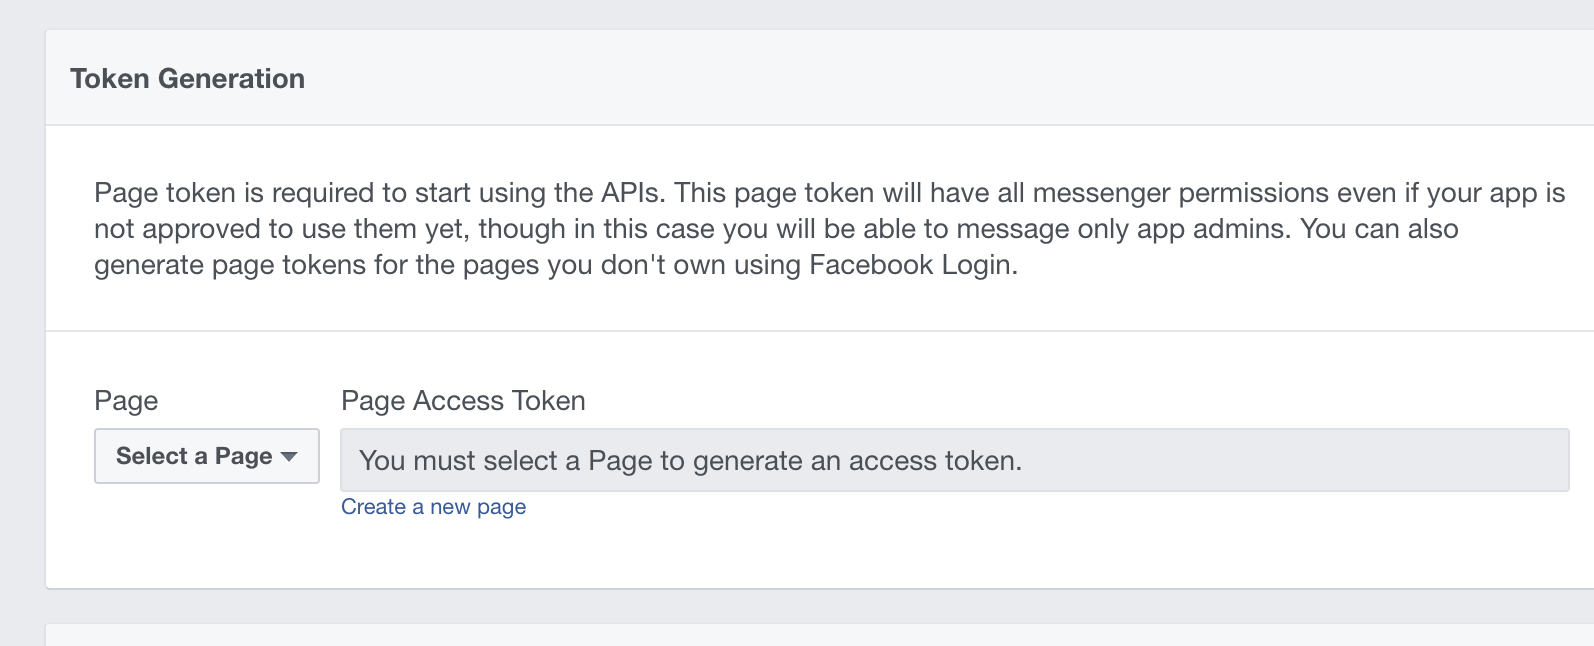
In the resulting dashboard, under PRODUCTS/Messenger/Settings, scroll to "Token Generation" and either select an existing page for your bot (if you happen to have one) or create a new one.
Copy Page Access Token and keep it at hand.
Create a file named .env on the root level of the boilerplate. Create another file called .gitignore and add this single line of code:
.env
Save the .gitignore file. Now open your .env and put two tokens (one you've just generated and another you need to come up with and save for later) inside:
ACCESS_TOKEN=your_page_access_token_from_the_dashboard
VERIFY_TOKEN=come_up_with_any_string_you_will_use_at_next_step
From now on, they can be referenced inside your program as ENV['ACCESS_TOKEN'] and ENV['VERIFY_TOKEN'].
Note:
Rubotnik stores its environment variables (aka config vars) locally in .env file (here goes the standard reminder to never check this file into remote repository) heroku local loads its contents automatically, so you don't need to worry about setting them manually. If you don't want to use heroku local and prefer an old good rackup, make sure to uncomment require 'dotenv/load' on top of bot.rb so variables will be loaded in your local environment by dotenv gem. If you do so, don't forget to comment it out again before pushing to Heroku for production. In production, you will have to set your config variables by hand, either in your dashboard, or by using heroku config:set VARIABLE_NAME=value command in the terminal.
Make sure you have Heroku CLI. Run heroku local to start bot server on localhost. Provided you set up your token correctly, you should see something like this:
By default, bot will run on port 5000. Start ngrok on the same port:
ngrok http 5000
This will expose your localhost for external connections through an URL like https://92832de0.ngrok.io (the name will change every time you restart ngrok, so better keep it running in a separate terminal tab). Make note of the URL that start with https://, you will give to Facebook in the next step.
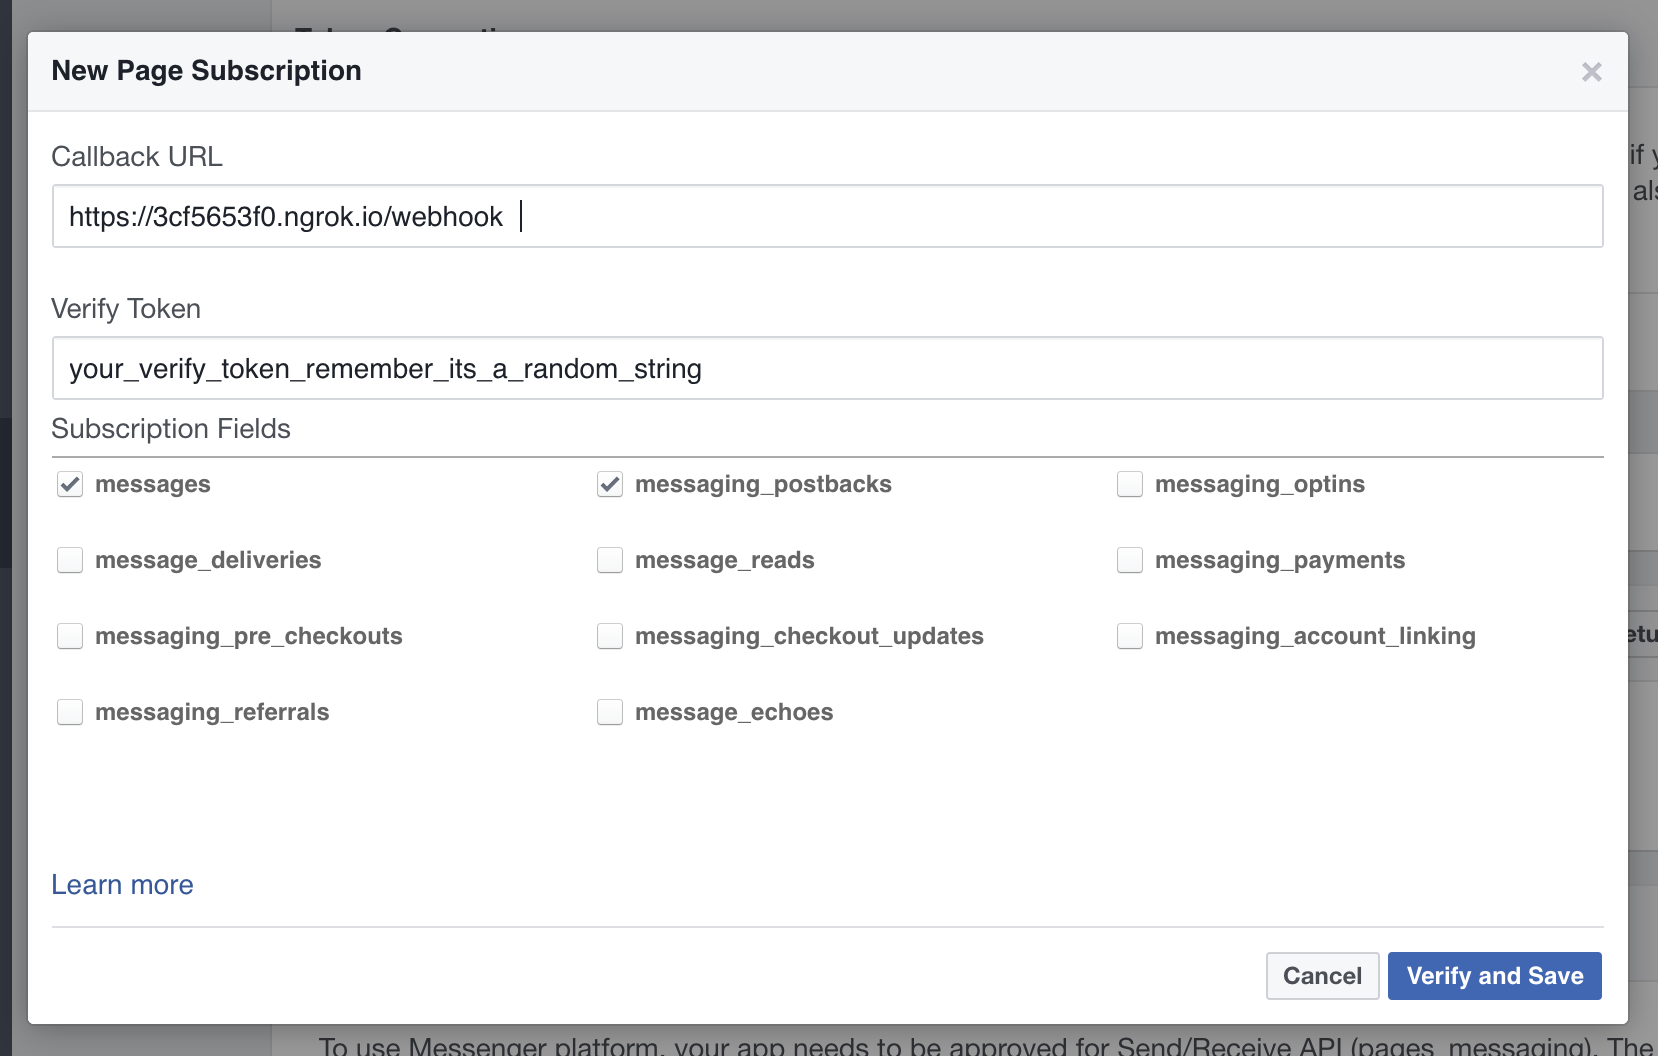
Now that your bot is running on your machine, we need to connect it to the Messenger Platform. Go back to your dashboard. Right under Token Generation find Webhooks and click "Setup Webhooks". In the URL field put your HTTPS ngrok address ending with /webhook, provide the verify token you came up with earlier and under Subscription Fields tick messages and messaging_postbacks. Click "Verify and Save".
🎉 Congrats! Your bot is connected to Facebook! You can start working on it.
Your starting point is bot.rb file that serves your bot, enables its persistent menu and a greeting screen, and provides top-level routing for messages and postbacks.
Messages and postbacks (referenced inside the common namespace as @message and @postback) are Facebook::Messenger::Incoming::Message and Facebook::Messenger::Incoming::Postback objects of facebook-messenger gem and have all the properties defined in its README. The only difference being, in Rubotnik message is always an instance variable prepended with @
@message.id         # => 'mid.1457764197618:41d102a3e1ae206a38'
@message.sender     # => { 'id' => '1008372609250235' }
@message.seq         # => 73
@message.sent_at     # => 2016-04-22 21:30:36 +0200
@message.text        # => 'Hello, bot!'
@message.attachments # => [ { 'type' => 'image', 'payload' => { 'url' => 'https://www.example.com/1.jpg' } } ]
Greeting screen (the one with 'Get Started' button and a welcome message) can be configured inside rubotnik/bot_profile.rb.
Persistent menu (note it supports nesting) can be defined inside rubotnik/persistent_menu.rb.
Follow the logic of the provided examples, you can also refer to Facebook documentation (just note that all the examples there are raw JSONs as the API accepts them, some parts of them have already been abstracted out on facebook-messenger gem level).
The most important thing in bot.rb happens inside of blocks fed to Bot.on :messages and Bot.on :postbacks method calls.
Every incoming message or postback creates an instance of respective Dispatch class (either MesssageDispatch or PostbackDispatch). These classes provide DSL for routing and track users' state inside the threads, ensuring messages from different users never overlap.
Routing DSL is used inside blocks passed to Rubotnik::MessageDispatch.new(message).route or Rubotnik::PostbackDispatch.new(postback).route. More on that later.
Inside helpers/helpers.rb there are some pre-defined helper methods (you can write your own!) that are made available globally by mixing in the module into the bot.rb namespace.
Most important of them is say that lets you send a plain message to a connected user. It defaults to @user instance variable that is set automatically for you on each message or postback received, but you can pass an optional user: argument to send something to a different user.
The syntax is straightforward:
say 'Nice to meet you!'say can take an array of quick replies (a maximum of 11) that will appear at the bottom of the message and will remove any guesswork for your user regarding her further actions:
In order to do that, you either define an array of replies either by hand, following Facebook's example or by using UI::QuickReplies.build class method that allows you to build quick replies by passing arrays of two strings in the form of ['title', 'POSTBACK'] as arguments. Than you pass the result as a quick_replies argument to say method.
# Achieves the same result as on the screenshot above
replies = UI::QuickReplies.build(['Yes', 'YES'], ['No', 'NO'])
say 'Welcome to the sample questionnaire! Are you ready?', quick_replies: replies
There are two ways to catch user's selection of a quick reply later in the program: either by looking at next @message's .text or by accessing its .quick_reply property that will contain a string you defined as a payload for a given reply. (Note: it's a convention to define payload in CAPITAL_CASE). See the example of that in questionnaire.rb.
text_message? allows you to check if the message received from the user contains text (and isn't a GIF, a sticker or anything else). Useful for implementing sanity checks.
message_contains_location? checks if the user has shared a location with your bot. Then you can access its coordinates.
get_user_info(*fields) takes a list of fields good for Graph API User and makes a call to the Graph referencing connected user's id and requesting specified fields. Returns a hash with user data. Keys are symbols.
get_user_info(:first_name, :last_name) # => { first_name: "John", last_name: "Doe" } next_command and stop_thread are used to chain commands together in order to create conversation threads. More on that later.
Rubotnik comes with a simple DSL to bind messages and postbacks to respective commands. The DSL is enabled inside a block passed to Rubotnik::MessageDispatch.new(message).route or Rubotnik::PostbackDispatch.new(postback).route. The basic syntax is:
bind "word", "synonym", to: :command_name
# a method command_name should be found inside Commands module
# or any other module mixed into it.
Note that you reference a method to execute (we call it 'command' in this README) by providing its name as a symbol
Example:
# bot.rb
Bot.on :message do |message|
  # Use DSL inside the following block:
  Rubotnik::MessageDispatch.new(message).route do
    bind "hey", "hi", to: :hey_yourself
  end
end

# commands.rb
def hey_yourself
  say "#{@message.text} yourself!"
end
Any message from any user containing 'hey' (case insensitive) OR 'hi' will trigger hey_yourself command immediately and reset user's state.
In this particular case your command does not do much, so it's probably easier to define behavior directly inside the routing block. Any bind statement will also take a block.
This will achieve the same result:
# bot.rb
Bot.on :message do |message|
  # Use DSL inside the following block:
  Rubotnik::MessageDispatch.new(message).route do
    bind "hey", "hi" do
      say "#{@message.text} yourself!"
    end
  end
end
You can set all: true flag to match not ANY of the trigger words in the message, but all of them. The order doesn't matter.
bind "eat", "shoot", "leave", all: true, to: :about_panda
# will match 'Who eats shoots and leaves?'
# but won't match "Don't leave me now"
Sometimes user's message will prompt your bot to ask additional questions, in Rubotnik's terms we'll call it a thread. You start threads like so:
bind 'questionnaire', to: :start_questionnaire, start_thread: {
  message: "Welcome to the sample questionnaire!",
  quick_replies: UI::QuickReplies.build(%w[Yes YES], %w[No NO])
}
start_thread keyword argument should be a hash: it contains a message that will be your bot's prompt to continue conversation and an (optional) set of quick replies.
Then inside a command you point to: you can start by handling next @message from user. See more in Threads.
It makes sense to send an introductory message when the user first comes in contact with your bot. Inside rubotnik/bot_profile.rb you define a postback to be triggered when the user clicks 'Get Started' button on your bot's welcome screen. Then you can handle it in your postback routing.
Rubotnik::PostbackDispatch.new(postback).route do
  bind 'START' do
    say 'First time, huh? Hello and welcome!'
    say 'Here are some suggestions for you:', quick_replies: HINTS
endYou don't want to leave your user's messages unanswered. It's not polite and makes a bad user experience. You can set a default behavior to be applied to any message that did not trigger any reactions defined with bind. That way you can nudge your user towards available interaction scenarios. Use the default call inside your message routing block that takes its own block.
Rubotnik::MessageDispatch.new(message).route do
  bind 'news', to: :latest_news
  default do
    say "I'm sorry, I did not recognize your command. Here's what you can do:"
    # ...
  end
endNote: default block should always come last, just before the closing end of your routing block.
It is recommended to script each new thread in a separate file by containing its methods inside a module and mix it into Commands by using require_relative and include in commands.rb. The example is provided as part of the boilerplate, take a look at questionnaire.rb.
# bot.rb
# ...
bind 'QUESTIONNAIRE', to: :start_questionnaire, start_thread: {
  message: questionnaire_welcome,
  quick_replies: questionnaire_replies
}
# ...

# questionnaire.rb
def start_questionnaire
  if @message.quick_reply == 'START_QUESTIONNAIRE' || @message.text =~ /yes/i
    say "Great! What's your name?"
    say "(type 'Stop' at any point to exit)"
    next_command :handle_name_and_ask_gender
  else
    say "No problem! Let's do it later"
    stop_thread
  end
end

def handle_name_and_ask_gender
  # Fallback functionality if stop word used or user input is not text
  fall_back && return
  @user.answers[:name] = @message.text
  replies = UI::QuickReplies.build(%w[Male MALE], %w[Female FEMALE])
  say "What's your gender?", quick_replies: replies
  next_command :handle_gender_and_ask_age
end
The start_questionnaire command was pointed at in the routing block for postbacks inside bot.rb with a provided start_thread hash that already contained a starting message. So we begin start_questionnaire method by handling user's response. If it's not 'Yes', we stop the thread right away by calling a stop_thread helper method that resets user's state (commands queued up for execution are being added behind the scenes to User's @commands property).
If the user agreed to continue, we ask him his name and queue up the next command in the thread that will be called upon next message received. We do it by calling next_command :handle_name_and_ask_gender. It handles user's response to "What's your name?" message and stores the answer inside User model (you are free to choose your own mechanism to store data gathered from input). Then it asks the next question and queues up the next command.
The process repeats until the thread is over and we stop it with stop_thread.
This concept ensures that all user's actions are completely independent of each other and your bot is not bothered with tracking state until a user sends her next message (it may happen after a long interruption, for instance).
Certainly, this approach breaks the Single Responsibility Principle in a way that each command actually does two things: handles a reaction to new message received and sets the stage for the next one, but I tend to think that in case with bot design, this particular logic is justified.
You can use classes defined inside the UI module to build common Messenger UI elements and send them to the user.
QuickReplies.build takes either a list of hashes of the form { title: "string", payload: "STRING" } or a list of two-element arrays, where the first item is a title and the second is a payload:
UI::QuickReplies.build ["Yes", "POSITIVE"], ["No", "NEGATIVE"]When the user selects a quick reply, @message.text will contain the first element of the array (same as the title: key) and @message.quick_reply will contain the second element (or payload: key). You can then pass the result of a call to .build to the say helper.
Note: If you want to create a large array of quick replies as a constant and pass it to the builder method, you must call it with a splat operator:
MY_REPLIES = [{...}, {...}, {...} ... ]
replies = UI::QuickReplies.build(*MY_REPLIES)
say "Here you go", quick_replies: replies
QuickReplies.location creates a special type of quick reply that prompts user to share her location.
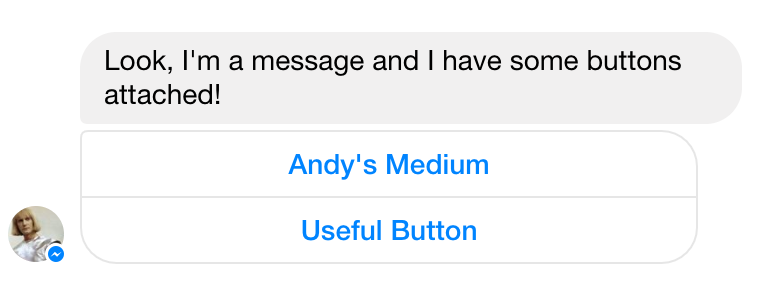
FBButtonTemplate takes two arguments: string for the text message and an array of hashes for buttons. See types of buttons available in Messenger Platform docs. Calling .send(@user) on the instance of FBButtonTemplate delivers the template to the connected user.
Example:
TEXT = "Look, I'm a message and I have some buttons attached!"
BUTTONS = [
  {
    type: :web_url,
    url: 'https://medium.com/@progapanda',
    title: "Andy's Medium"
  },
  {
    type: :postback,
    payload: 'BUTTON_TEMPLATE_ACTION',
    title: 'Useful Button'
  }
]
# builds an element and sends it to the user
UI::FBButtonTemplate.new(TEXT, BUTTONS).send(@user)
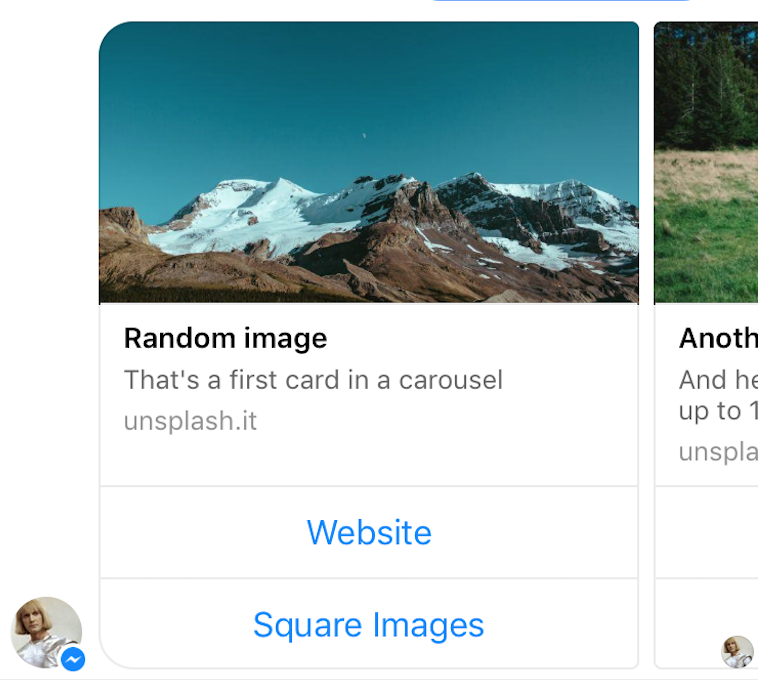
Generic template is a way to send the user a carousel of items, each consisting of an image, a title, a description and up to 3 action buttons. Each card can be made clickable and link to a website. Constructing Generic Template involves building a long nested JSON (refer to Facebook docs to see what keys are available) and Rubotnik tries to abstract it at least a little bit. You only need to build hashes for the elements array of the original documentation. Create your structure and save it in a constant:
# A carousel with two items (platform supports up to 10)
CAROUSEL = [
  {
    title: 'Random image',
    # Horizontal image should have 1.91:1 ratio
    image_url: 'https://unsplash.it/760/400?random',
    subtitle: "That's a first card in a carousel",
    default_action: {
      type: 'web_url',
      url: 'https://unsplash.it'
    },
    buttons: [
      {
        type: :web_url,
        url: 'https://unsplash.it',
        title: 'Website'
      },
      {
        type: :postback,
        title: 'Square Images',
        payload: 'SQUARE_IMAGES'
      }
    ]
  },
  {
    title: 'Another random image',
    # Horizontal image should have 1.91:1 ratio
    image_url: 'https://unsplash.it/600/315?random',
    subtitle: "And here's a second card. You can add up to 10!",
    default_action: {
      type: 'web_url',
      url: 'https://unsplash.it'
    },
    buttons: [
      {
        type: :web_url,
        url: 'https://unsplash.it',
        title: 'Website'
      },
      {
        type: :postback,
        title: 'Unsquare Images',
        payload: 'HORIZONTAL_IMAGES'
      }
    ]
  }
]
Then you can create an instance of FBCarousel by passing your template to the constructor. Calling .send(@user) will send a carousel to the connected user.
UI::FBCarousel.new(CAROUSEL).send(@user)Here is the the result:
Calling .square_images on the fresh instance of FBCarousel will change the aspect ratio of your images from 'horizontal' (default) to 'square'. Note that horizontal images should have 1.91:1 aspect ratio.
# sending square images
UI::FBCarousel.new(CAROUSEL).square_images.send(@user)You can send an image to the user. Note that image won't have any text, but you can send a regular message along with it.
Example:
img_url = 'https://unsplash.it/600/400?random'
UI::ImageAttachment.new(img_url).send(@user)Facebook Messenger Platform Webhook Reference specifies other types of callbacks that can be delivered to your bot's webhook. Please refer directly to facebook-messenger README to catch optin, referral and delivery events.
Once you have designed your bot and tested in on localhost, it's time to send it to the cloud, so it live its life without being tethered to your machine. Assuming you already have a Heroku account and Heroku CLI tools installed, here's pretty much the whole process:
heroku create YOUR_APP_NAME
heroku config:set ACCESS_TOKEN=your_own_page_token
heroku config:set VERIFY_TOKEN=your_own_verify_token
git push heroku master
Now don't forget to go back to your Facebook developer console and change the address of your webhook from your ngrok URL to Heroku one. That's it!
- Support for other Messenger UI elements like List Template
- Support for Messenger Platform's webviews
- Integration with NLU services like Wit.ai and API.ai
Most of all, I'll appreciate any help with turning Rubotnik into a proper gem with generators for new projects and other grown-up things.
You're welcome to fork the project and create a PR or you can just email me and I'll add you as collaborator.
MIT License
Copyright (c) 2016-2017 Andrei Baranov
Permission is hereby granted, free of charge, to any person obtaining a copy of this software and associated documentation files (the "Software"), to deal in the Software without restriction, including without limitation the rights to use, copy, modify, merge, publish, distribute, sublicense, and/or sell copies of the Software, and to permit persons to whom the Software is furnished to do so, subject to the following conditions:
The above copyright notice and this permission notice shall be included in all copies or substantial portions of the Software.
THE SOFTWARE IS PROVIDED "AS IS", WITHOUT WARRANTY OF ANY KIND, EXPRESS OR IMPLIED, INCLUDING BUT NOT LIMITED TO THE WARRANTIES OF MERCHANTABILITY, FITNESS FOR A PARTICULAR PURPOSE AND NONINFRINGEMENT. IN NO EVENT SHALL THE AUTHORS OR COPYRIGHT HOLDERS BE LIABLE FOR ANY CLAIM, DAMAGES OR OTHER LIABILITY, WHETHER IN AN ACTION OF CONTRACT, TORT OR OTHERWISE, ARISING FROM, OUT OF OR IN CONNECTION WITH THE SOFTWARE OR THE USE OR OTHER DEALINGS IN THE SOFTWARE.
