Custom Entity Component System architecture designed to work with "large" entities.
Warning
The package is in a preview state. The API may change without advance notice. Production usage is not recommended.
Package summary:
- Skeleton of the ECS architecture model designed especially for large entities (e.g. entities which contain thousand of triangles etc).
- Package forces to keep your logic and data separate and maintain the ECS design pattern.
Unity.Burstfriendly systems.- Easily customizable engine.
- Easily testable architecture.
- Auto-creation of component tuples for selected types.
- Basic implementations of the
World,Solver,Entity,BaseComponent,BaseSystem<T>,SolverJobsOrder,SolverActionsOrder, and more. - staticless features, all objects used in the engine are not static (except utils/extensions).
Install the package using one of the following methods
Using scoped registry (recommended)
Use OpenUPM CLI or add corresponding entries to the project'smanifest.json manually.
Add or modify scoped registries in the manifest
  "scopedRegistries": [
    {
      "name": "OpenUPM",
      "url": "https://package.openupm.com/",
      "scopes": [
        "com.andywiecko"
      ]
    }
  ]
and in the dependencies provide selected version of the package
"dependencies": {
    "com.andywiecko.ecs": "0.2.1",
    ...
See Unity docs for more details https://docs.unity3d.com/2021.1/Documentation/Manual/upm-scoped.html
git install
Use package manager via git install: https://github.com/andywiecko/ECS.git#v0.2.1
Manual instalation
Clone or download this repository and then selectpackage.json using Package Manager (Window/Package Manager).
The package implements a custom approach to the ECS design pattern. ECS stands for entity component system. In principle, the pattern is relatively simple. Entities contain components, components include data, and systems modify the data in the components. The key feature of the pattern is that logic and data are separated, i.e. all data can be found in components, and logic in systems.
This package was built as a core feature of the PBD2D engine.
It is designed to work with large entities, i.e. entities that hold a large amount of data.
For small entities up to a few bytes, I could recommend using the Unity.Entities.
The main part of the framework is the World.
World can be considered as database, a container for all data injected into the simulation.
It contains information about registered components, set configurations, and enabled systems.
%%{init: {"theme": "neutral", "flowchart": {"curve": "stepBefore", "useMaxwidth": false}}}%%

graph BT
subgraph w[World]
    a; b; c;
end

a[Components Registry]
b[Systems Registry]
c[Configurations Registry]
At Solver one can configure the execution order of the systems by passing the proper ScriptableObject with configuration, namely JobsOrder and ActionsOrder.
%%{init: {"theme": "neutral", "flowchart": { "useMaxwidth": false}}}%%

graph TB

subgraph one[ ]
    direction TB
    w1[World] --> s[Solver] --> w1;
end

c[Jobs Order<br>Actions Order] --> s
Solver contains OnScheduling event, list of jobs1, and OnJobsComplete event, which are invoked every Solver.Update() in order, respectively
%%{init: {"theme": "neutral", "flowchart": { "useMaxwidth": false}}}%%

graph TB

subgraph one["Update()"]
    direction TB
    e1[OnScheduling] --> jobs[Jobs] --> e2[OnJobsComplete]
end
One can introduce a custom hierarchy of the solver lifecycle by implementing ActionsOrder and JobsOrder.
The package contains default basic implementations:
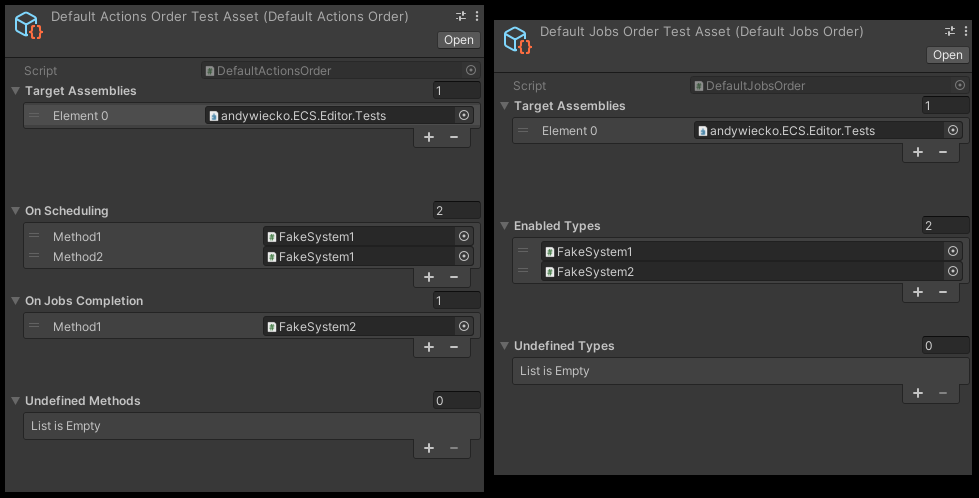
DefaultActionsOrdersupports solver action on scheduling/on jobs complete events selection.DefaultJobsOrdersupports linear ordering of the jobs.
Below there is a figure of DefaultActionOrder and DefaultJobsOrder editors.
The selected assets are directly fetched from test assembly.
Note
More complex
JobsOrderimplementation can be found at PBD2D.
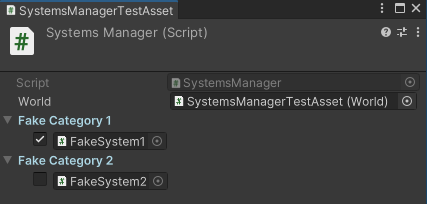
The SystemManager is responsible for populating the World.SystemRegistry with all target system instances.
Default active status of a given system type can be set there, as well as, given system status can be changed during runtime.
In the figure below one can find the SystemsManager editor.
The selected asset is directly fetched from the test assembly.
Entities are just MonoBehaviours to which one attaches the components.
To derive a new entity implement the abstract Entity class.
public class MyEntity : Entity
{

}
%%{init: {"theme": "neutral", "flowchart": { "useMaxwidth": false}}}%%
graph TB
subgraph Entity
c1[<b>C1</b> component];
c2[<b>C2</b> component];
c3[<b>C3</b> component];
end
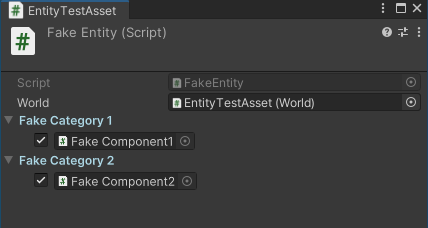
In the figure below one can see the Entity editor.
The selected asset is directly fetched from the test assembly.
Note
[RequireComponent(typeof(MyEntity))]attribute can be used to mark the given component to be visible at a givenEntityeditor.
The components shouldn't contain any logic by design. Components should be treated as pure objects for holding the data and/or configuration. The given components can be attached to selected entity types only.
To create new a component it is crucial to add a new component contract. Introducing the contract is essential since system does not know any information about component implementations and it is required that system works on selected interface.
public interface IMyComponent : IComponent
{

}
Then one has to implement the introduced interface.
The BaseComponent class can be helpful, however, it is not necessary to use the class and the contract can be implemented on the pure C# (non-MonoBehaviour) class.
[RequiredComponent(typeof(MyEntity))]
public class MyComponent : BaseComponent, IMyComponent
{

}All logic related to components data should be included in systems.
It is recommended to implement the abstract class BaseSystem<T> or BaseSystemWithConfiguration<T, V>, however,
one can implement a custom system by implementing the general BaseSystem class.
When one does not require some configuration, use BaseSystem<T> where T corresponds to the interface assigned from IComponent.
In the following snippet, the system schedules selected jobs on all IMyComponents objects from the World for which the system is attached to
public class MySystem : BaseSystem<IMyComponent>
{
    public override JobHandle Schedule(JobHandle dependencies)
    {
        foreach(var component in References)
        {
            // ...
        }

        return dependencies
    }
}
Sometimes one needs to provide some global configurations to the system (e.g. gravity).
More information related to configurations can be found at #Configurations.
Assuming that SimulationConfiguration is defined,
the system can implement BaseSystemWithConfiguration
public class MySystemWithConfiguration : BaseSystemWithConfiguration<IMyComponent, SimulationConfiguration>
{
    public override JobHandle Schedule(JobHandle dependencies)
    {
        foreach(var component in References)
        {
            var c = Configuration;
            // ...
        }

        return dependencies
    }
}
Note
Using
BaseSystemWithConfigurationclass is not required for accessing the configurations. One can find them throughWorld.ConfigurationsRegistry.
%%{init: {"theme": "neutral", "flowchart": {"curve": "basis", "useMaxwidth": false}}}%%

graph LR
subgraph World
subgraph Entity
    c1[<b>C1</b> component];
    c2[<b>C2</b> component];
    c3[<b>C3</b> component];
end

    g[<b>G</b> configuration]
    s["System<<b>C, G</b>>"];
end

c2 --> s --> c2;
g --> s;
Except for jobs, one can define actions inside systems as well, just by decorating the system's method with the SolverAction attribute
public class MySystem : BaseSystem
{
    [SolverAction]
    private void MyMethod()
    {

    }

    // ...
}
Configurations are similar to components, but with the restriction that only one instance of the given type of configuration can be present at World.ConfigurationsRegistry.
Configurations can be used for setting the global values related to the World, e.g. global gravity vector.
The configuration must implement the IConfiguration interface, for example
[Serializable]
public class MyConfiguration : IConfiguration
{
    [field: SerializeField]
    public int Value { get; private set; } = 0;
}
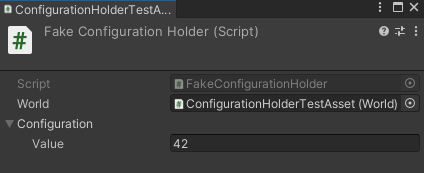
Additionally, to instantiate configuration at the scene, implement the corresponding holder
public class MyConfigurationHolder : ConfigurationHolder<MyConfiguration> { }Below one can find an example ConfigurationHolder editor.
Components can be matched into pairs by using tuples. A component tuple is a virtual component that can be created automatically and does not live on the scene. It is useful in cases when one needs to introduce some kind of interaction e.g. collisions.
public IMyTuple : IComponent
{

}
public MyTuple : ComponentsTuple<IMyComponent, IMyComponent>, IMyTuple
{
protected override bool InstantiateWhen(IMyComponent c1, IMyComponent c2) => c1.Id != c2.Id;
}Currently, the package supports only two argument tuples.
-
EntitiesRegistry - Actions only system impl.
- Scheduling jobs from job.
- Jobs caching mechanism.
- Components/entities initialization dependencies.
Footnotes
-
More precisely list of type
List<Func<JobHandle, JobHandle>>. ↩


