OctoPrint API
Library for use with Arduino compatible micro controllers (web enabled) to access the Octoprint API on Raspberry Pi's (or any Linux based box) running the [OctoPrint](https://octoprint.org/) 3D printer web server by the brilliant Gina Häußge, aka @foosel.What does it do?
You can connect to the OctoPrint server via it's awesome REST API and pull back information about the state of the 3D printer, the temperatures of it's print bed, hotend(s), and any current print job progress. In fact, you can do most things via the REST API with some GET and POST commands.
Crucially I use this to keep track of current print job completion percentage. Using something simple like a Neopixel stick - you can have a portable progress bar sat next to you, while your 3D printer is printing away in your garage, basement, shed etc. Saves you time opening up a browser in your laptop or phone, and logging in and viewing the current status - just glace up at some LEDs and see how far it's gone.
This library will make it easy for you to get the information, I leave it up to you what and how you process this data in the most useful or pointless way!
Getting Started
You will of course need a 3D printer which is running on OctoPrint, and an Arduino compatible microcontroller that can connect to the internet/your network - basically an ESP8266! Your OctoPi installation will need a valid API key, and you will also need to enable CORS.
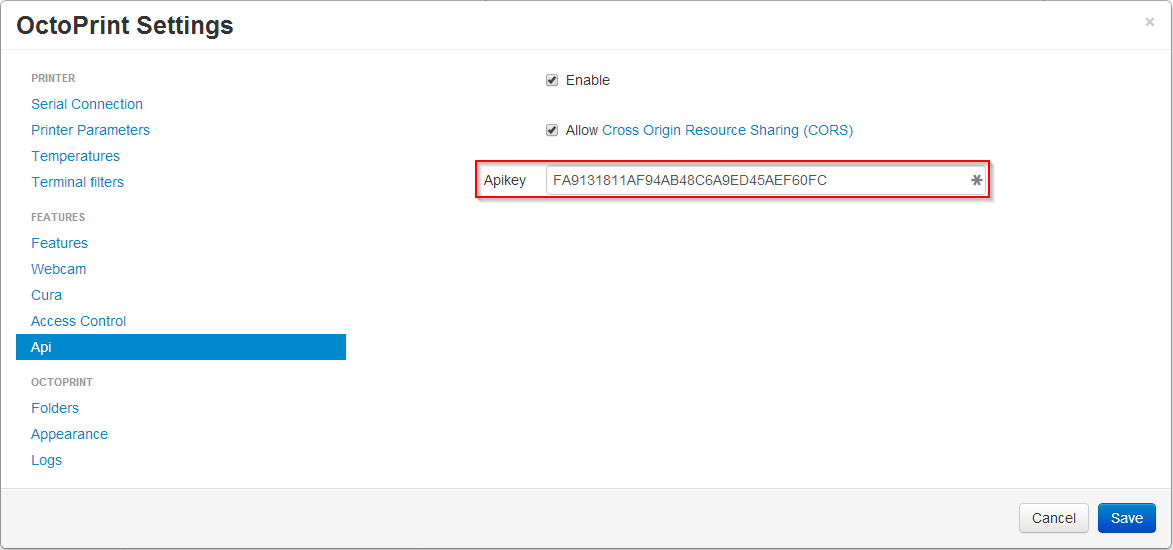
Create an API Key
In your OctoPrint server settings, go to Api and enable it, and copy the API Key.
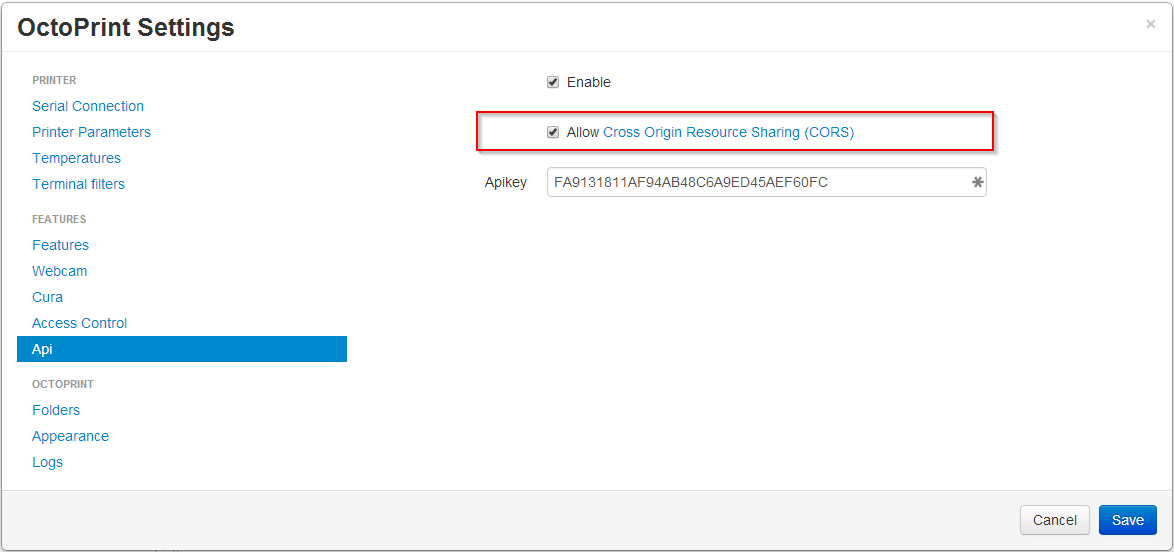
Enable CORS (cross-origin resource sharing)
You need to enable this to access the API.
Test your connection
You can check if your server is ready to accept request to the REST API by going to it in a browser on a PC/laptop and adding in the API key as a parameter. The URL would look something like this:
http://192.168.1.2/api/version?apikey=ABC123DEF456ETCYOUGETHEIDEA
where 192.168.1.2 is the local IP of your OctoPrint server, and ABC123DEF456ETCYOUGETHEIDEA is your API key.
Your browser should give you something like this:
{
  "api": "0.1",
  "server": "1.3.6"
}
Hooray, you can now talk to your OctoPrint server via it's API. And so can your Arduino.
Connecting if External, e.g. Over the Internet
It works if you use your hostname and custom port that forwards... more instructions to follow :)
Installation
Available in the official Arduino Library Manager - Sketch -> Include Library -> Manage Libraries... and then search for "octoprint" and click Install!
Also available via GitHub if you clone it or download as a ZIP. The downloaded ZIP code can be included as a new library into the IDE selecting the menu:
Sketch / include Library / Add .Zip library
You will also have to install the awesome ArduinoJson library written by Benoît Blanchon. Search ArduinoJson on the Arduino Library manager or get it from here. If you've not got it already, what have you been doing?!
Include OctoPrint API in your project:
#include <OctoPrintAPI.h>
Examples
HelloWorldSerial
This is the first sketch to try out. Enter your WiFi credentials, your OctoPrint network info, API key, compile and upload. Open the serial monitor and you should start to see printer information coming back. Works on both ESP8266 and ESP32 boards.
GetPrintJObInfo
Uses the getPrintJob() function of the class to get the current print job and returns most of the useful API variables. Gives a "real world" example of using the variables to print more human readable info once collected from the API.
Acknowledgments
- Hat tip to Brian Lough, aka @witnessmenow for is work on his Arduino API libraries which gave me the base to create my own. His YouTube API is used in our office every day to keep score!
- Gina Häußge (@foosel) for her amazing work on OctoPrint, which without her, none of this would be even possible.
- Miles Nash for the first to use my library in a live Arduino project - 3D Printer Monitoring with Alexa and Arduino
Authors
- Stephen Ludgate - Initial work - chunkysteveo
License
See the LICENSE.md file for details
Release History
- 1.1.1
- New functions and methods to use with the library, lots! You can now use POST to send commands to the printer and get it to do actions. Check out the Wiki for available functions.
- 1.1.0
-
It's a big update to this new library, but needed to allow it to work across all (probably) Arduino clients, and not just ESP8266. Big up to Brian Lough @witnessmenow for this update which swapped out HTTPClient to passing the (whatever) client TO the library instead. If you are using the library already - you will need to update your scripts to the new call staring call - Sorry!
-
Added ESP32 example too as proof of concept for that platform, thanks again to Brian for confirming this works.
-
- 1.0.4
- It's being used! User feedback to include the job process endpoint as a priority, thanks Miles Nash for the prompt that it's in use, and you like it!
- 1.0.3
- Correction of keyword file for library, and property file version not matching.
- 1.0.2
- Correction to library.properties file and caps of OctoPrint
- 1.0.1
- Tidying up Github readme, lots to learn.
- 1.0.0
- First release, just getting it out there.
Requests / Future To Do List
- Look into HTTPS OctoPrint installations and use WiFiSecure (maybe?).
POST calls to send data to the print server.- Add more example scripts.
- Create the OLED screen copy to replicate the ramps full graphic smart controller (or the 20x4 one at least!).
- Add my Neopixel progress bar dongle thingy!
Meta
Stephen Ludgate:
Email - info@chunkymedia.co.uk
https://github.com/chunkysteveo/OctoPrintAPI
Contributing
- Fork it (https://github.com/chunkysteveo/OctoPrintAPI/fork)
- Create your feature branch (
git checkout -b feature/fooBar) - Commit your changes (
git commit -am 'Add some fooBar') - Push to the branch (
git push origin feature/fooBar) - Create a new Pull Request


