This is a Spring-based demo project to show how a Vaadin User Interface (website) can interact with the GPIOs of a Raspberry Pi by using the Pi4J library.
Following versions of this code are available in branches:
- vaadin-23-spring-2.6: Initial example with LED output and button input, based on Vaadin 23 and Spring Boot 2.6. It is described in detail in this Foojay.io blog post.
- main: WORK IN PROGRESS ... Extended example with Vaadin 24.0.4, Spring Boot 3.0.6, and Pi4J 2.3.0. Configuration of the component is specific for the CrowPi 1. Blog post is "under construction".
The base code with different Vaadin layouts, was generated on start.vaadin.com/app.

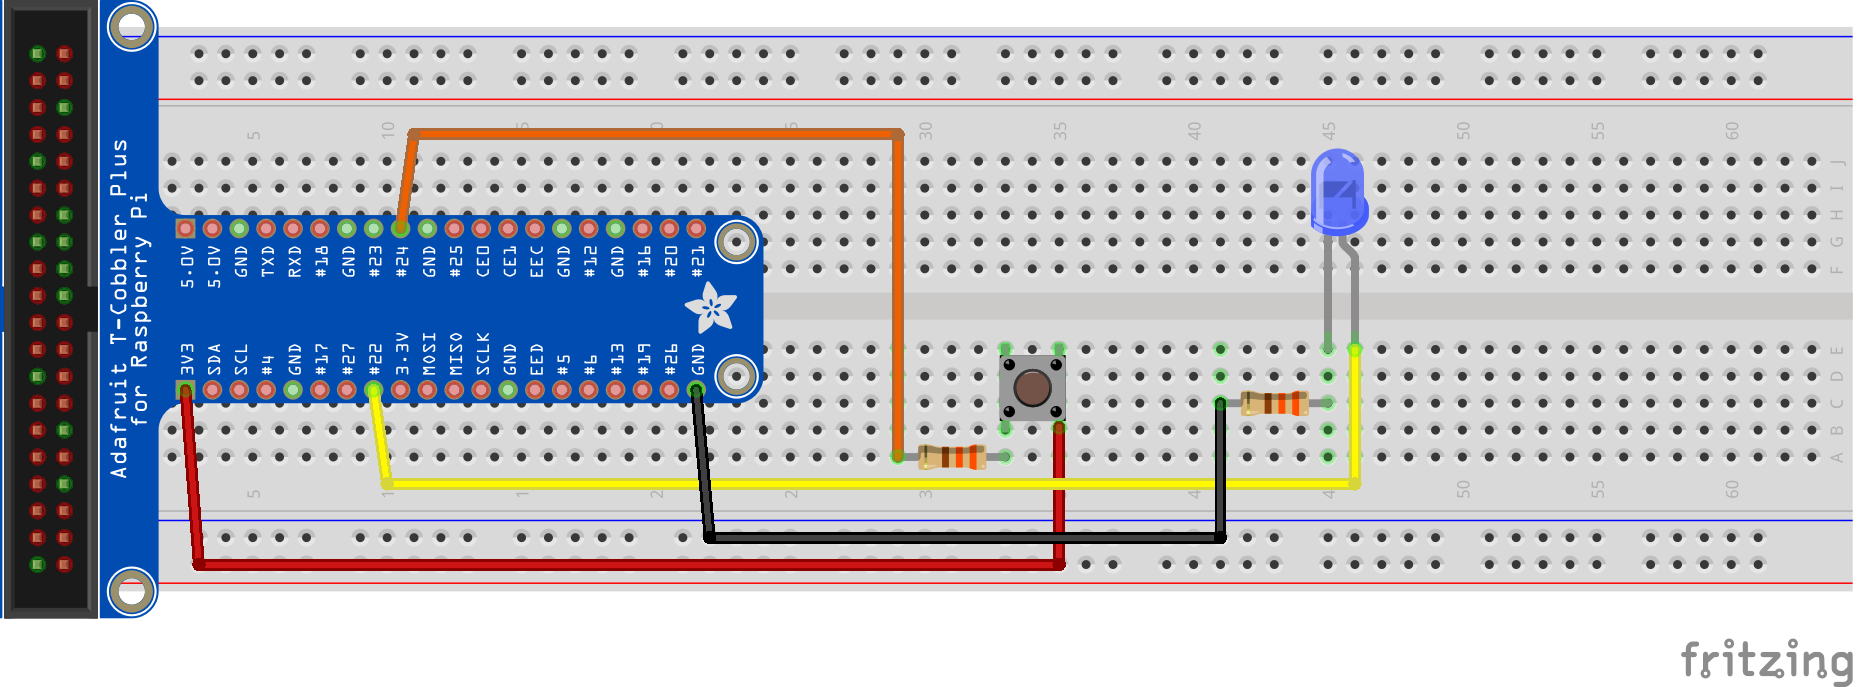
The GPIO interaction of the initial example is based on the Pi4J minimal example application and uses a button and a LED to demonstration digital input and output interaction. The wiring is very simple and only needs a few components
TODO
If you are developing on a PC, you can build the application with the following command
- Windows:
mvnw clean package -Pproduction - Mac & Linux:
./mvnw clean package -Pproduction
and upload to your Raspberry Pi with (replace login pi and the IP address with the one of your board)
$ scp target/pi4jdemo-1.0-SNAPSHOT.jar pi@192.168.0.222://home/pi/We can now start the application on our Raspberry Pi, but need to run with sudo as Pi4J (still) needs this to be able
to interact with the GPIOs using PiGpio as the native library.
$ sudo java -jar /home/pi/pi4jdemo-1.0-SNAPSHOT.jarIf you installed Java with SDKMAN as a normal user, you will probably get this error
sudo: java: command not found
One way to fix this, is let the command itself lookup where Java is installed by using which java:
$ sudo `which java` -jar /home/pi/pi4jdemo-1.0-SNAPSHOT.jarOr specify the Java-runtime to be used:
$ sudo ~/.sdkman/candidates/java/19.0.2-zulu/bin/java -jar /home/pi/pi4jdemo-1.0-SNAPSHOT.jarThis project can be used as a starting point to create your own Vaadin application with Spring Boot. It contains all the necessary configuration and some placeholder files to get you started.
The project is a standard Maven project. To run it from the command line, type mvnw (Windows), or ./mvnw (Mac &
Linux), then open
http://localhost:8080 in your browser.
You can also import the project to your IDE of choice as you would with any Maven project. Read more on how to import Vaadin projects to different IDEs ( Eclipse, IntelliJ IDEA, NetBeans, and VS Code).
To create a production build, call mvnw clean package -Pproduction (Windows), or ./mvnw clean package -Pproduction (
Mac & Linux). This will build a JAR file with all the dependencies and front-end resources, ready to be deployed. The
file can be found in the target folder after the build completes.
Once the JAR file is built, you can run it using
java -jar target/pi4jdemo-1.0-SNAPSHOT.jar
MainLayout.javainsrc/main/javacontains the navigation setup (i.e., the side/top bar and the main menu). This setup uses App Layout.viewspackage insrc/main/javacontains the server-side Java views of your application.viewsfolder infrontend/contains the client-side JavaScript views of your application.themesfolder infrontend/contains the custom CSS styles.
- Read the documentation at vaadin.com/docs.
- Follow the tutorials at vaadin.com/tutorials.
- Watch training videos and get certified at vaadin.com/learn/training.
- Create new projects at start.vaadin.com.
- Search UI components and their usage examples at vaadin.com/components.
- View use case applications that demonstrate Vaadin capabilities at vaadin.com/examples-and-demos.
- Discover Vaadin's set of CSS utility classes that enable building any UI without custom CSS in the docs.
- Find a collection of solutions to common use cases in Vaadin Cookbook.
- Find Add-ons at vaadin.com/directory.
- Ask questions on Stack Overflow or join our Discord channel.
- Report issues, create pull requests in GitHub.