This repository contains source code necessary to reproduce some of the main results in our paper:
Bansal*, Agarwal*, Nguyen* (2020). SAM: The sensitivity of attribution methods to hyperparameters. Computer Vision and Pattern Recognition (CVPR). Oral presentation. paper | code
If you use this software, please consider citing:
@inproceedings{bansal2020sam,
    title={SAM: The Sensitivity of Attribution Methods to Hyperparameters},
    author={Naman Bansal, Chirag Agarwal, Anh Nguyen},
    booktitle={Proceedings of the IEEE conference on computer vision and pattern recognition},
    pages={},
    year={2020}
}
This repository is built using PyTorch. You can install the necessary libraries by pip installing the requirements text file pip install -r ./requirements.txt
The code was set up using python=3.6.7
All of our experiments were conducted on two groups of classifiers: (a) GoogLeNet and ResNet-50 pre-trained on the 1000-class 2012 ImageNet dataset; and (b) the robust versions of them, i.e. GoogLeNet-R and ResNet-R that were trained to also be invariant to small adversarial changes in the input image. The two regular models are obtained from the PyTorch model zoo, the ResNet-R from Engstrom et al., and we trained GoogLeNet-R by ourselves using the code released by the author. While the two robust classifiers are more invariant to pixel-wise noise they have lower ImageNet validation-set accuracy scores (50.94% and 56.25%) than those of the original GoogLeNet and ResNet (68.86% and 75.59%).
Engstrom et al. adversarially trained a ResNet-50 model using Projected Gradient Descent (PGD) attack with a normalized step size. We followed the author and trained robust GoogLeNet model, denoted as GoogLeNet-R, for our sensitivity experiments. We used adversarial perturbation in -norm for generating adversarial samples during training. Additionally, we used
=3, a step size of 0.5 and the number of steps as 7 for PGD. The model was trained end-to-end for 90 epochs using a batch-size of 256 on 4 Tesla-V100 GPU's. We used SGD optimizer with a learning rate (lr) scheduler starting with lr=0.1 and dropping the learning rate by 10 after every 30 epochs.
All the pre-trained models are available here. The user has to download the weight files and store them under the ./models/ directory. GoogLeNet-R can be trained using the script provided in train.sh. The user has to install the robustness repo and provide the input directory for the ImageNet training images under data_path argument.
Note: Before running the train.sh scripts, replace the files under robustness/imagenet_models/ (e.g. ~/anaconda3/envs/your_env/lib/python3.6/site-packages/robustness/imagenet_models/) in the robustness library folder with the files in the folder madry_files.
These are the following modifations that we made to the robustness directory (now ./naman_robustness).
- By default, the robust model returns a tuple (logits, input). We changed it to output only logits.
- By default, it requires a different input normalization as mentioned in the original repo. We have modified it to allow both the normal pytorch pre-processing and the one used originally. Please refer to the function
load_madry_model(), in./utils.pyfor more details. - If you are wrtiting your own explanation method or want to rewrite one of the methods in our repo for robust models, we would recommend setting
my_attacker=Truewhile callingload_madry_model(). This greatly simplifies the implementation. You should only set it to False if you want to adversarially perturb the image.
We ran our experiments on a 1735 images from the original ImageNet validation dataset as described in the paper. We have provided a text file in ./img_file_names/paper_images_list.txt. So if you run any explanation method with input directory being a path to the validation set, our implementation will only produce heatmaps on the 1735 images mentioned in the list instead of running on all the 50K images.
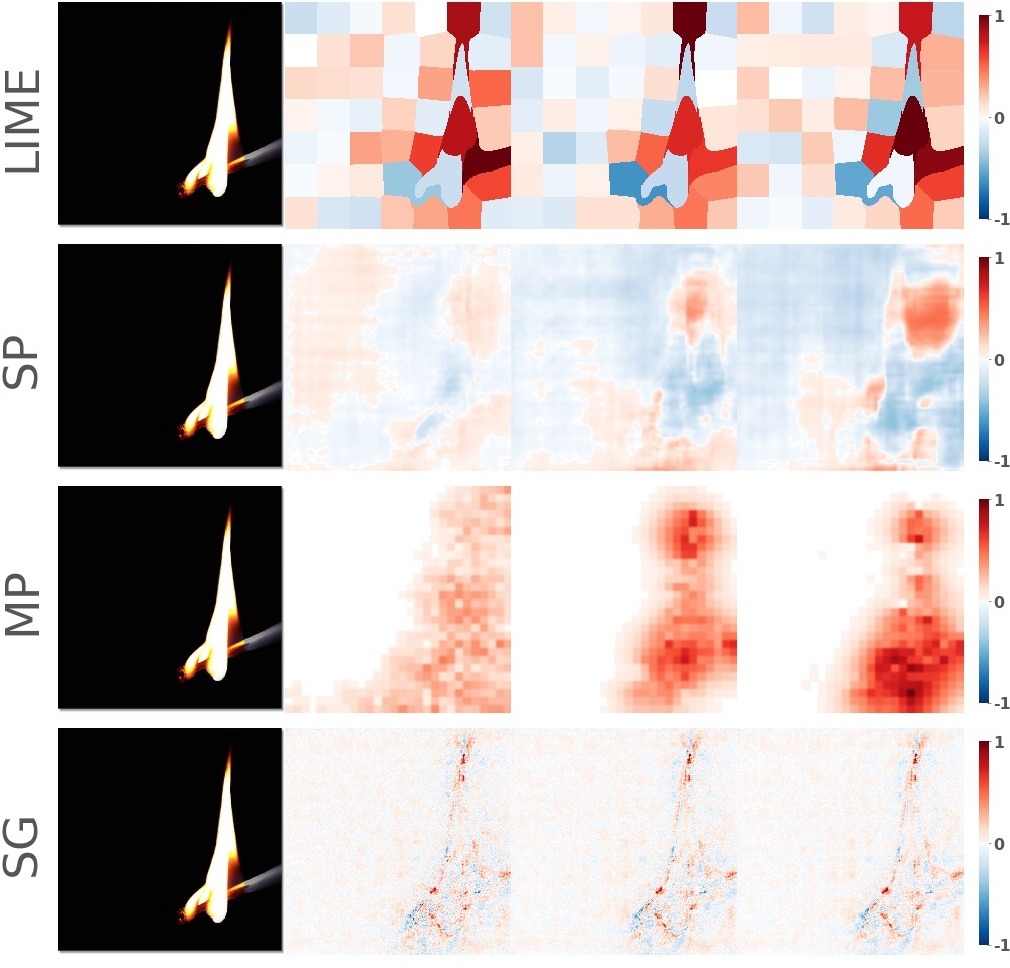
- The shell script for generating Figure 1 of our paper is in teaser.sh. Given an image, the script runs SmoothGrad, Sliding-Patch, LIME, and Meaningful Perturbation algorithm for their different hyperparameters and produces a montage image of their respective attribution maps
Generating the attribution map for the class "matchstick".
Running source teaser.sh produces this result:
The real image followed by the different attribution maps generated using (top-->bottom) LIME, Sliding-Patch, Meaningful Perturbation and SmoothGrad algorithms. We show the sensitivity (left-->right) of each explanation algorithm with respect to its respective hyperparameter.
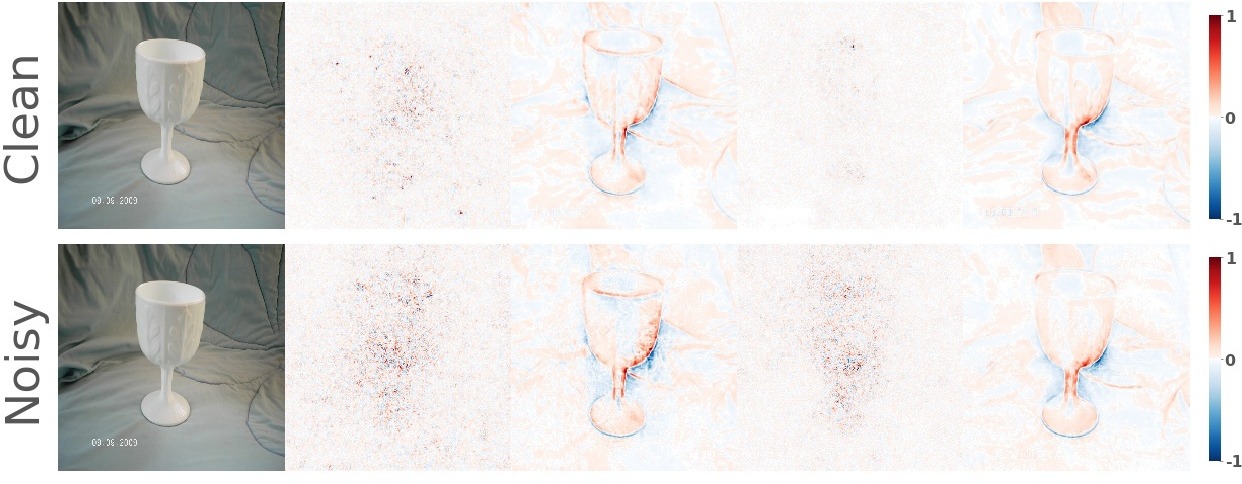
- The shell script for generating Figure 2 of our paper is in gradient.sh. Given an image, the script generates the gradient of four models (GoogLeNet, GoogLeNet-R, ResNet-50, and ResNet-50-R) for a clean and noisy image respectively.
Generating the attribution map for the class "goblet".
Running source gradient.sh produces this result:
The clean image followed by the gradient attribution maps generated using (left-->right) GoogLeNet, GoogLeNet-R, ResNet-50, and ResNet-50-R models. We show the sensitivity of the gradients on adding a small Gaussian noise to the clean image for all the models respectively.
- The shell script for evaluating the sensitivity of different explanation methods is in sensitivity.sh. The sensitivity is calculated for five sample images in this folder across all four models (GoogLeNet, GoogLeNet-R, ResNet-50, and ResNet-50-R).
Running
source sensitivity.shruns the sensitivity test on Vanilla Gradient (VG), Input x Gradient (IG), Sliding-Patch (SP), Meaningful Perturbation (MP), LIME, and Smooth Gradient (SG) explanation methods on their respective hyperparameters. Given the list of images in the folder, the script calculates the average accuracy scores across all the images using the evaluation metrics described in the paper.
Running
for patch in {52,53,54}
do
  CUDA_VISIBLE_DEVICES=0 python Occlusion_Madry.py -idp ./Images/images_sensitivity/ -ops ${patch} -op ./results/Sensitivity/Occlusion/
done

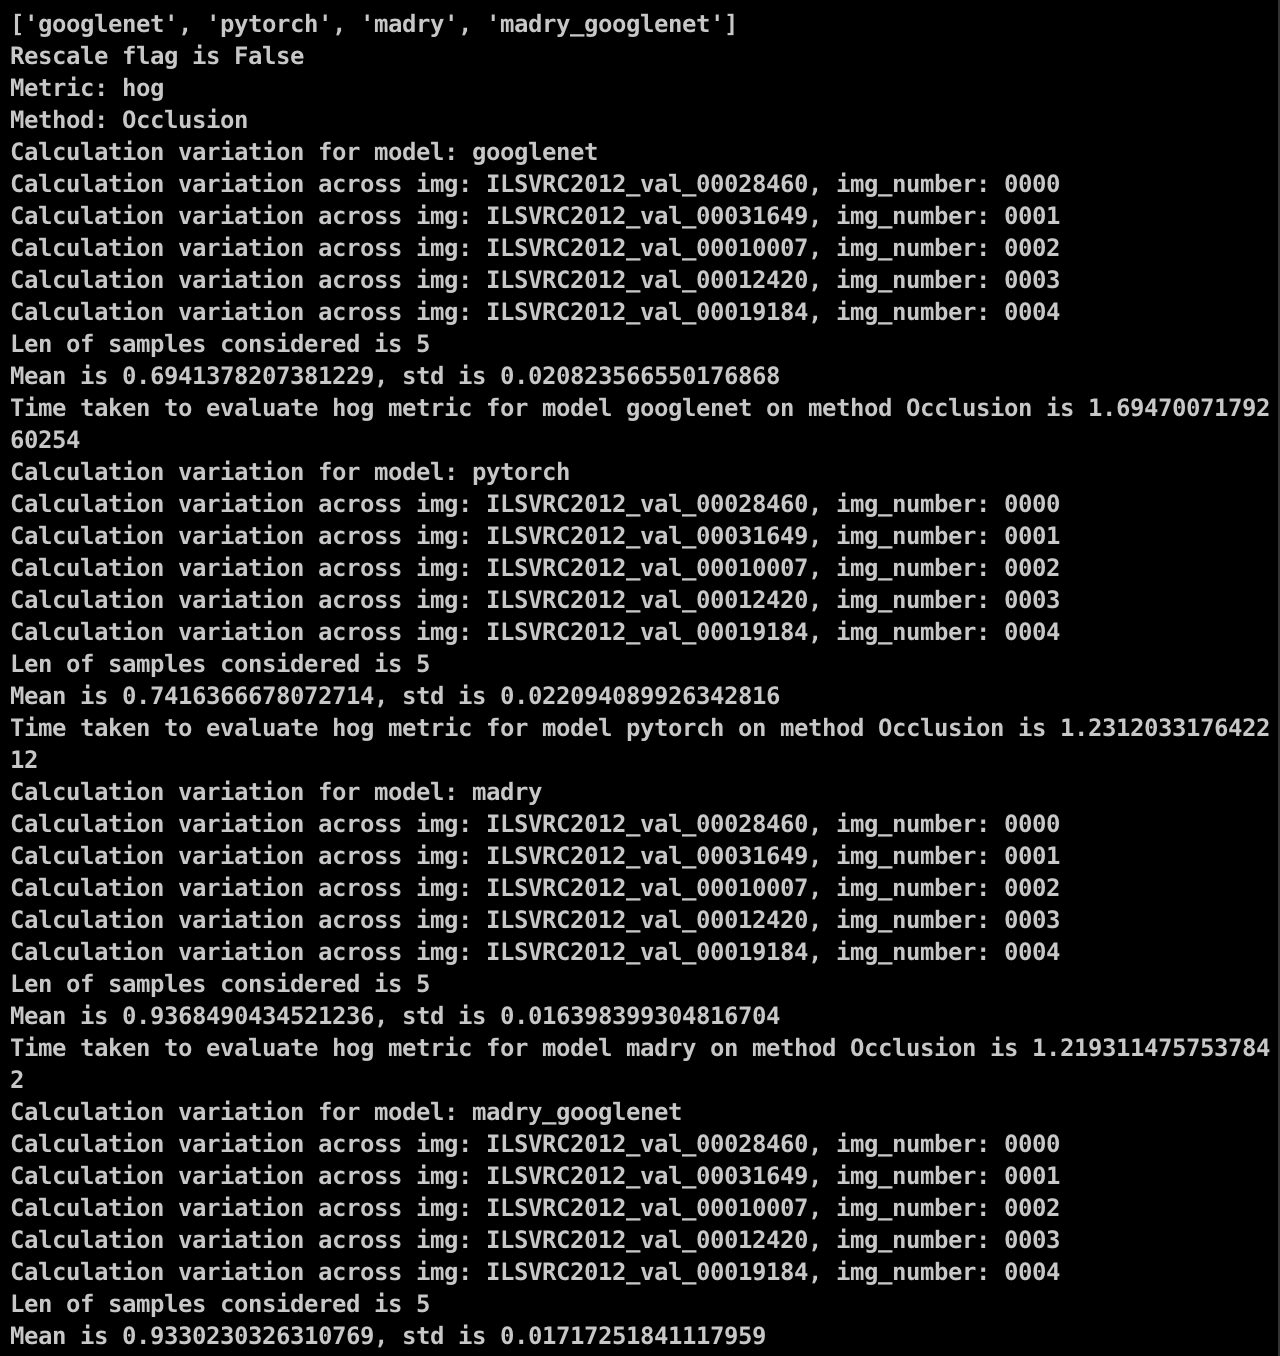
python Sensitivity_Analysis_Basic_Occlusion_Comp_With_Default_Settings.py -idp ./results/Sensitivity/Occlusion/ -mn occlusion --metric_name hog -op ./results/evaluation_result_text_files/Occlusion --exp_num a03
from the sensitivity.sh would produce the sensitivity results of the Sliding-Patch explanation algorithm to its different patch sizes (52, 53, 54). It generates a report (shown in figure below) which lists down the mean and standard deviation of all evaluation metric scores.
Note that the code in this repository is licensed under MIT License, but, the pre-trained condition models used by the code have their own licenses. Please carefully check them before use.
If you have questions/suggestions, please feel free to email us or create github issues.


