- HTML English Video Tutorial
- Learn HTML by building a project Bangla Tutorial
- html complete course Bangla (Beginner to Advanced)
- You can learn HTML from here
- Assignment for HTML

In this chapter we will discuss what is HTML, why do we need HTML, advantages and disadvantages of HTML, History of HTML, environment setup for HTML, basic structure of HTML
- client, server model
- http request + http response
- web design - html, css, js, js libraries/frameworks
- give a demo for this
- HTML stands for HyperText Markup Language
- It is not a programming language but markup language where tags are responsible for defining the elements and layout of a webpage, including headings, paragraphs, images, links, and more.
- Tim Berners-Lee created HTML in 1990
- HTML 1.0 - 1990
- HTML 2.0 - 1993
- HTML 3.0 - 1995 (Not fully implemented)
- HTML 3.2 - 1997
- HTML 4.0 - 1997
- HTML 4.01 - 1999
- HTML5 - 2014 (Ongoing development with subsequent versions like HTML5.1, HTML5.2, etc.)
-
Advantages of HTML:
-
Easy to Learn: HTML has a simple and straightforward syntax, making it easy for beginners to learn and understand.
-
Platform Independent: HTML is platform-independent and can be used on any operating system or device that has a web browser.
-
Wide Browser Support: HTML is supported by all major web browsers, ensuring compatibility and accessibility across different platforms.
-
-
Disadvantages of HTML:
-
Limited Styling Options: HTML has limited styling capabilities compared to CSS (Cascading Style Sheets). While HTML can define basic styles, more complex and detailed styling is better achieved using CSS.
-
Lack of Interactivity: HTML on its own is static and lacks interactivity. To add dynamic behavior or functionality to web pages, additional technologies such as JavaScript or server-side languages are required.
-
Browser Compatibility Issues: Different web browsers may interpret HTML code differently, leading to potential compatibility issues. Developers must test and ensure cross-browser compatibility.
-
Security Risks: HTML alone does not provide built-in security features. Web developers must implement security measures and follow best practices to protect against vulnerabilities, such as cross-site scripting (XSS) attacks.
-
Setting up a development environment for HTML involves choosing the right tools and configuring them properly to streamline your web development process. Here’s a step-by-step guide to get you started:
-
Visual Studio Code (VS Code):
- Lightweight and highly customizable.
- Supports extensions for various languages and tools.
- Download:
- Go to the VS Code website.
- Download the installer for your operating system.
- Install:
- Run the installer and follow the instructions to install VS Code.
-
Sublime Text:
- Fast and lightweight.
- Supports many plugins for added functionality.
-
Atom:
- Open-source and highly customizable.
- Has a large community and many packages available.
-
WebStorm:
- A powerful IDE specifically for web development.
- Offers many built-in features for HTML, CSS, and JavaScript.
-
Part-1 Visual studio Code extensions for web developer | Bangla Tutorial
-
Part-2 Visual studio Code extensions for web developer | Bangla Tutorial
-
Visual studio Code extensions for web developer | English Tutorial
-
Installing Extensions in VS Code
- Open VS Code.
- Go to the Extensions view by clicking on the Extensions icon in the Activity Bar on the side of the window or by pressing
Ctrl+Shift+X. - Search for the desired extensions and click Install.
Following extensions enhance the functionality of Visual Studio Code, making it a more powerful and enjoyable tool for development. These extensions significantly enhance the functionality, usability, and efficiency of Visual Studio Code, making it an even more powerful tool for developers.
-
Live Server: The Live Server extension launches a local development server with a live reload feature for static and dynamic pages. This means that every time you save your HTML, CSS, or JavaScript file, the browser will automatically refresh to show the changes.
Benefits:
- Instant feedback on changes
- Great for testing and debugging
- Works with any file type that a browser can open
-
Live Preview:** The Live Preview extension provides an in-editor browser preview. This allows you to see your web application in action side-by-side with your code. It updates in real-time as you edit your files.
Benefits:
- Convenient for quick checks
- Saves time switching between the editor and the browser
- Integrated with the VSCode interface
-
VSCode Pets: VSCode Pets adds a fun element to your coding environment by allowing you to adopt a virtual pet that lives in your status bar. The pet can perform various actions and is customizable.
Benefits:
- Adds a fun, motivational element to coding
- Can reduce stress and make coding sessions more enjoyable
-
Code Spell Checker: (10.8M) Code Spell Checker is a basic spell checker that works well with code and plain text. It helps you catch spelling mistakes in your comments, strings, and plain text.
Benefits:
- Improves code documentation and readability
- Reduces spelling errors in comments and strings
- Supports custom dictionaries and language settings
-
Prettier Code Formatter: Prettier is an opinionated code formatter. It enforces a consistent style by parsing your code and re-printing it with its own rules. It supports many languages and integrates with most editors, including VSCode.
Benefits:
- Ensures code consistency
- Reduces the amount of code style discussions in code reviews
- Configurable to match your project's style guide
-
Indent Rainbow: Indent Rainbow colorizes the indentation levels in your code. Each level of indentation is given a different color, which helps in visualizing the structure of the code.
Benefits:
- Improves readability of indented code
- Helps to quickly identify misaligned or incorrect indentation
- Useful for languages with significant indentation (e.g., Python)
-
Image Preview: The Image Preview extension allows you to see image previews directly in your VSCode editor. When you hover over an image file path in your code, a preview of the image is displayed.
Benefits:
- Quick access to image previews without leaving the editor
- Useful for web development when working with images
- Enhances the visual aspect of coding with images
-
CodeSnap: CodeSnap allows you to take beautiful screenshots of your code. It lets you highlight the portion of code you want to capture and then generates an image that can be shared or saved.
Benefits:
- Creates clean and professional-looking code snippets
- Useful for sharing code on social media, blogs, or presentations
- Customizable appearance to match your preferences
-
GitHub Themes: GitHub Themes extension provides a collection of themes based on GitHub's color schemes. This extension allows you to apply GitHub's dark and light themes to your VSCode editor.
Benefits:
- Brings the familiar GitHub look to your editor
- Offers both dark and light themes to match your preference
- Enhances the visual consistency for developers who work with GitHub frequently
-
Material Icon Theme: The Material Icon Theme extension changes the default file icons in VSCode to Material Design icons. This makes it easier to differentiate between file types and improves the visual appearance of the editor.
Benefits:
- Enhanced visual differentiation between file types
- Modern, clean design that aligns with Material Design principles
- Improved aesthetics and user experience
-
Better Comments: (HTML,CSS,JS etc.) The Better Comments extension helps you create more readable and organized comments in your code. It allows you to colorize comments to differentiate between different types of comments, such as alerts, queries, to-dos, and highlights.
Benefits:
- Improves code readability and organization
- Helps to quickly identify different types of comments
- Useful for collaboration and documentation
-
Excalidraw: Excalidraw is an extension for creating hand-drawn style diagrams directly within VSCode. It is great for visualizing ideas, planning, and creating sketches without leaving the editor.
Benefits:
- Easy to create and share diagrams and sketches
- Integrated with VSCode for a seamless workflow
- Useful for brainstorming and planning
-
Live Share: Live Share enables real-time collaboration in VSCode. It allows multiple developers to edit and debug the same codebase simultaneously, sharing the same session with live changes.
Benefits:
- Real-time collaborative coding and debugging
- Enhances team productivity and remote collaboration
- Secure and easy to set up
-
Auto Rename Tag: (HTML) The Auto Rename Tag extension automatically renames paired HTML/XML tags. When you edit an opening tag, the closing tag is updated to match, and vice versa.
Benefits:
- Saves time and reduces errors when renaming tags
- Increases efficiency when editing HTML/XML structures
-
HTML End Tag Labels: (HTML) HTML End Tag Labels adds labels to the end of HTML tags to help you see the corresponding opening tag. This is especially useful for deeply nested HTML structures.
Benefits:
- Enhances readability of HTML code
- Makes it easier to identify matching opening and closing tags
- Useful for debugging and editing large HTML files
-
BEM Helper: (CSS)
-
axe accessibility linter: (HTML)
-
Color Highlight: (CSS)The Color Highlight extension highlights color codes in your code editor, displaying the actual color next to the code. It supports various color formats, including hex, RGB, and HSL.
Benefits:
- Immediate visual feedback for color values
- Simplifies the process of working with colors in CSS and design
- Supports multiple color formats
-
HTML To CSS Autocompletion: (CSS)
-
CSS Flexbox cheatsheet: (CSS)
-
CSS Navigation (CSS): CSS Navigation allows you to navigate to CSS rules directly from your HTML or JSX files. You can jump to the CSS definition of a class or ID by clicking on it.
Benefits:
- Easy navigation to CSS definitions
- Reduces context switching between files
- Enhances code readability and maintainability
-
JavaScript (ES6) Code Snippets: This extension provides a collection of useful code snippets for ES6 (ECMAScript 2015). It includes shortcuts for common JavaScript syntax and constructs, making it quicker to write standard code patterns.
Benefits:
- Increases coding speed with predefined snippets
- Reduces repetitive typing
- Helps with learning and using ES6 features
-
DOM Code Snippets: (JS)
gid→ const var = document.getElementById('id') dqs→ const var = document.querySelector('selector'); dqa→ const var = document.querySelectorAll('selector'); dce→ const var = document.createElement('element');
-
Error Lens: (JS) The Error Lens extension enhances the visibility of errors, warnings, and other diagnostics by highlighting them directly in the code editor. It overlays error messages next to the code lines where the issues occur.
Benefits:
- Immediate visual feedback on errors and warnings
- Reduces the time spent searching for issues in the code
- Enhances the debugging and development process
-
ESLint: (JS) ESLint is a linter for identifying and reporting on patterns in JavaScript. The ESLint extension integrates with VSCode to provide real-time feedback on code quality and style issues.
Benefits:
- Enforces code quality and consistency
- Helps to catch potential errors and bugs early
- Configurable to match your project's coding standards
-
Path Intellisense: (JS) (13.1 M installed) Path Intellisense provides autocompletion for file paths in VSCode. It helps you quickly find and insert file paths while coding, reducing errors and saving time.
Benefits:
- Autocompletion for file paths
- Reduces errors and speeds up development
- Improves productivity when working with file imports and references
-
Import Cost: (JS) (3.8 M) Import Cost displays the size of the imported package inline in the editor. It helps you understand the impact of your dependencies on your application's bundle size.
Benefits:
- Provides real-time feedback on import sizes
- Helps to optimize and manage dependencies
- Reduces the risk of bloating your application's bundle size
-
Quokka.js (3.2M) quokka.js is a live scratchpad for JavaScript that provides real-time feedback as you type. It shows the results of code execution inline within the editor.
Benefits:
- Real-time code execution feedback
- Helps with rapid prototyping and debugging
- Improves learning and exploration of JavaScript
-
Npm Intellisense: (8M installed) Npm Intellisense provides autocompletion for npm modules in your import statements. It helps you quickly add dependencies to your JavaScript projects.
Benefits:
- Autocompletion for npm modules
- Speeds up dependency management
- Reduces errors in import statements
-
JavaScript Booster: JavaScript Booster provides various code actions to improve your JavaScript code, including extracting variables, simplifying expressions, and converting to arrow functions.
Benefits:
- Enhances JavaScript code with one-click actions
- Improves code quality and readability
- Speeds up refactoring
-
REST Client: (JS) (4.6M) The REST Client extension allows you to send HTTP requests and view responses directly within VSCode. It supports various HTTP methods and provides a convenient way to test and debug APIs.
Benefits:
- Convenient API testing and debugging
- Eliminates the need for external tools like Postman
- Supports multiple HTTP methods and environments
-
Thunder Client: (JS) Thunder Client is a lightweight alternative to Postman integrated within VSCode. It provides a simple and intuitive interface for testing REST APIs, with features like collections, environments, and request history.
Benefits:
- Integrated API client within VSCode
- Lightweight and easy to use
- Supports collections and environments for organized testing
-
Debugger for Chrome: This extension allows you to debug your JavaScript code running in Google Chrome directly from VSCode. It provides a seamless debugging experience with breakpoints, call stacks, and variable inspection.
Benefits:
- Integrated debugging within VSCode
- Supports setting breakpoints, inspecting variables, and stepping through code
-
Jest: The Jest extension integrates the Jest testing framework into VSCode. It provides features like running tests, viewing test results, and debugging tests directly within the editor.
Benefits:
- Integrated test running and debugging
- Improves test-driven development workflow
- Provides real-time feedback on test status
-
ES7 + React/redux/react-native snippet: (React)
-
ERD Editor: (ERD)
-
GitLens — Git supercharged GitLens supercharges the Git capabilities built into VSCode. It helps you visualize code authorship, track changes, and understand the history of your codebase.
Benefits:
- Visualize code authorship and history
- Track changes and navigate Git repositories
- Improves collaboration and code understanding
-
Markdown previewer
-
Markdown Lint (7m)
-
Fluent Icons (change the vscode activity bar icons)
-
Themes extension: Dark vision < Fleety < Andromeda < Framer dark < Cyberpunk < pro hacker theme < Github theme
-
JSON to TS
-
JSON to TS + Pretty TypeScript Errors
-
DOTENV: (5.6m) VSCode .env syntax highlighting
-
git graph (8.3m)
-
gitlens (32.3m)
-
Create a Project Folder:
- Create a folder on your computer where you will store your project files. For example,
html-project.
- Create a folder on your computer where you will store your project files. For example,
-
Open the Project Folder in VS Code:
- Open VS Code.
- Go to
File>Open Folderand select your project folder.
-
Create a New File: In VS Code, go to
File>New Fileor pressCtrl+N. -
Save the File: Save the file as
index.htmlin your project folder by going toFile>Save Asand typingindex.html. -
Add Basic HTML Boilerplate: Type
html:5and pressTabto automatically generate a basic HTML boilerplate using Emmet.
<!DOCTYPE html>
<html lang="en">
<head>
    <meta charset="UTF-8">
    <meta name="viewport" content="width=device-width, initial-scale=1.0">
    <title>Document</title>
</head>
<body>
    <h1>Hello, World!</h1>
</body>
</html>-
Open Live Server:
- With your
index.htmlfile open, right-click on the editor and selectOpen with Live Server. - Alternatively, click on the Go Live button at the bottom right of the status bar.
- With your
-
View Your Page:
- Your default web browser should open, displaying your
index.htmlfile. Any changes you make to the file will automatically reload in the browser.
- Your default web browser should open, displaying your
-
Install Git:
- Download and install Git from the official Git website.
-
Initialize a Git Repository:
-
Open a terminal in VS Code by pressing
Ctrl+`` (backtick) or going toView>Terminal`. -
Initialize a new Git repository in your project folder:
git init
-
-
Add Files and Commit:
-
Add your files to the repository and commit your changes:
git add .
git commit -m "Initial commit"
-
-
Set Up a Remote Repository:
-
Create a new repository on GitHub, GitLab, or Bitbucket.
-
Link the local repository to the remote repository:
git remote add origin https://github.com/yourusername/yourrepository.git
git push -u origin main
-
-
MDN Web Docs:
- Comprehensive resource for learning HTML, CSS, and JavaScript.
- MDN Web Docs
-
W3Schools:
- Tutorial website for learning web technologies.
- W3Schools
-
HTML document has 2 important part: head, body
-
In the following example a basic structure of a HTML document
<!DOCTYPE html>
<html>
  <head>
    TITLE, META TAG ETC.
  </head>
  <body>
    CONTENT OF THE WEBPAGE
  </body>
</html>
-
Always use
<!DOCTYPE html>to tell the browser what type of document to expect; remember it is not a tag, just a declaration -
Every HTML document must have
<html>pair tag and Inside<html>tag we use<head>and<body>as the example shows above. -
Inside head tag we use meta tag, set title etc.
-
Inside body tag we write everything that we want to display on web page.
- Tag is the heart of html; HTML document is mainly built with tag.
- Tag Syntax:
<keyword>; Inside the angular brackets we need to write predefined keywords to use html tag. - Small / capital letters both can be used when writing html tag; however small letter is prefered.
- Example:
<p> This is a paragraph </p>In the example,<p>is an opening tag,</p>is a closing tag andThis is a paragraphis called content. In between the starting tag to end tag we have content. Everything from starting tag to end tag is called Element
-
There are 2 types of html tag: Pair/container tag and empty tag
-
Pair tag has starting and ending; However, empty tag has no closing tag.
-
Some of the example of pair tag and empty tags are given below:
<!-- Some examples of Pair/Container Tag -->
<html>
  ...
</html>
<head>
  ...
</head>
<body>
  ...
</body>
<p>...</p>
<h1>...</h1>
<script>
  ...
</script>
<style></style>
....

<!-- Some examples of Empty Tag -->
<meta />
<link />
<br />
<hr />
<img />
<input />
...
-
Attribute helps tag to extend its capabilities
-
In the following example,
<img/>is tag; src, height, width are the attributes<img src="anis.jpg" height="200" width="200" />
-
Attribute Syntax:
attributeName="attributeValue"
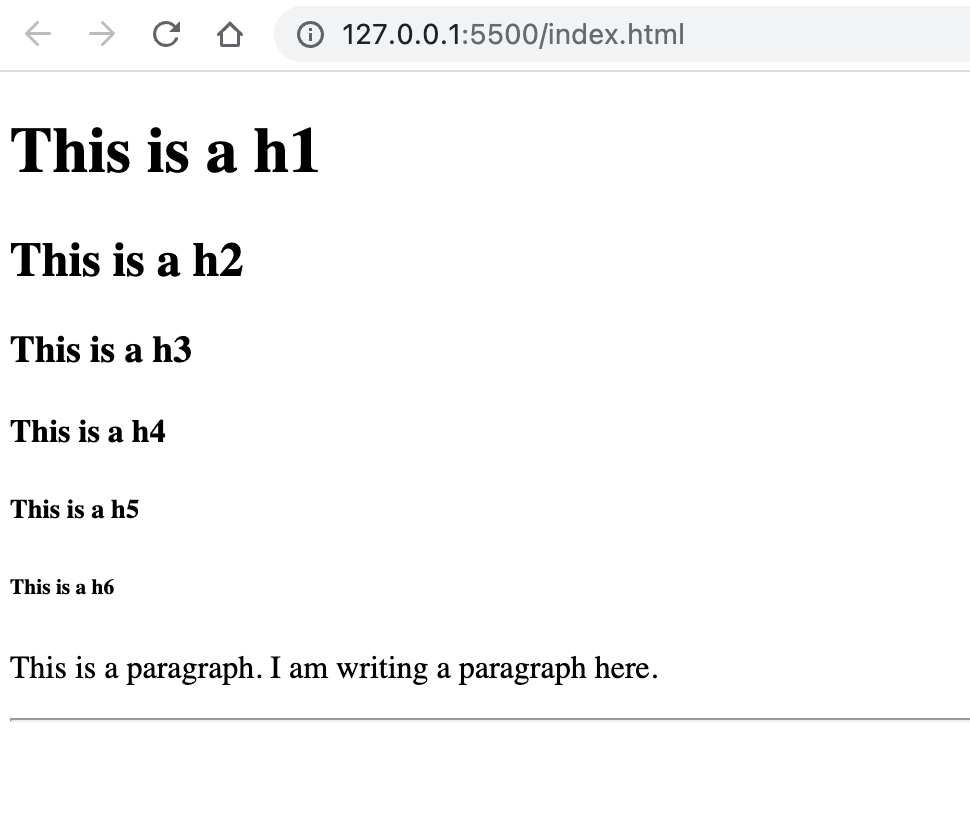
<body>
  <!--6 heading tags-->
  <h1>This is a h1</h1>
  <h2>This is a h2</h2>
  <h3>This is a h3</h3>
  <h4>This is a h4</h4>
  <h5>This is a h5</h5>
  <h6>This is a h6</h6>

  <!--to create a paragrap use p tag-->
  <p>This is a paragraph. I am writing a paragraph here.</p>

  <!--to create a horizontal rule use hr tag-->
  <hr size="2" />
</body>-
output of the text-formatting tags is below:
-
There are 6 HTML heading levels.
<h1>is the largest level and<h6>is the smallest level. -
by default, heading tags and paragraph tag create new line (block level element)
-
<hr size="2"/>here<hr/>is an empty tag responsible for creating horizontal rule and size attribute set the heights of the horizontal rule in pixel

<!DOCTYPE html>
<html lang="en">
  <head>
    <meta charset="UTF-8" />
    <meta http-equiv="X-UA-Compatible" content="IE=edge" />
    <meta name="viewport" content="width=device-width, initial-scale=1.0" />

    <style>
      body {
        background-color: #222;
      }
      h1 {
        /* color: white; */
        /* color: #fff; */
        color: rgb(255, 255, 255);
        text-align: center;
      }
    </style>

    <title>Document</title>
  </head>
  <body>
    <h1>Bangladesh is my motherland. I miss Bangladesh a lot.</h1>
    <p style="color: green;">I also miss my family</p>
  </body>
</html>- From the example, you can see that for styling html elements inside the html documents we can use style tag or style attribute
- style attribute in HTML: style="property: value; property: value..." (from the example you can see that
<p>tag has style attribute where paragraph color is set as green) - style tag in HTML:
<style> ... </style>tag must be used inside the head tag as shown in this example. In this example you can see that<h1>and<body>tag has styling property like color, text-align, background-color. - To set color of an html element we can use color name / hexadecimal color code / rgb color / hsl code as a value of color property as shown in this example for h1 tag.
<!-- This is a comment -->© < > > ♥ - First example shows the example of a html comment
- second example shows an example of entity
- To create an entity first write & then give a keyword and then give a semicolon
©will create copyright symbol<will create less than symbol>will create greater than symbol♥will create hearts symbol
-
Unicode character website: https://unicode-table.com/en/
-
W3School emoji link: https://www.w3schools.com/charsets/ref_emoji.asp
-
iconfinder icon link: https://www.iconfinder.com/
-
Pick image from unsplash
-
Choose color from
- Inspect Element: Within the browser developer tools, the "Inspect Element" feature allows you to examine and modify the HTML structure in real-time. You can navigate through the document tree, view CSS styles, and experiment with changes to identify and fix layout or formatting issues.
- Use Comments: Insert comments (
<!-- ... -->) within your HTML code to temporarily remove or isolate sections of code that might be causing issues. This helps you narrow down the problematic area and identify the source of the problem. - After writing your html code you can check the validity on this website https://validator.w3.org/
- Text Formatting tags: Applying formatting to text using tags like strong, em, u, s, sup, sub, blockquote, and code.
<body>
  <!-- b(bold) and strong tag are quite similar -->
  <b>This is a bold text</b> <br />
  <strong>This is a strong text</strong> <br />

  <!-- i(italic) and em(emphasize) tag are quite similar -->
  <i>This is a italic text</i> <br />
  <em>This is a emphasize text</em> <br />

  <!-- u(underline) -->
  <u>This is a italic text</u> <br />

  <!--tags can be used inside one another-->
  <b>bold. <i> italic and bold</i></b> <br />

  <mark>Important task should be highlighted</mark> <br />
  <!-- del (deleted) -->
  <del>This is a deleted text</del> <br />

  <!-- sup (superscript), sub(subscript) -->
  H<sub>2</sub>O <br />
  (a+b)<sup>2</sup> <br />

  <!-- pre tag helps to show text as you want to formatted -->
  <pre>
      This is a
        life changing documentation
      Read,learn, enjoy
        ofcourse share with others
  </pre>

  <abbr title="google is a search engine">Google</abbr>
  <address>Anisul Islam 192 anis road, London United Kingdom</address>

  <h2>What our customer thinks?</h2>
  <blockquote>
    <p>Lorem ipsum dolor sit amet, consectetur adipiscing elit. Sed varius</p>
    <footer>John Doe</footer>
  </blockquote>

  <code> console.log("hello"); </code>
</body>
output of the text-formatting tags is below:

-
The
<blockquote>tag is used to enclose a block of quoted text. It is commonly used to represent quotations, excerpts, or highlighted text. The<p>element inside the<blockquote>represents the quoted text, and the<footer>element provides attribution or the source of the quote. -
The
<code>tag is used to define a section of code or programming instructions. It is commonly used for displaying code snippets or highlighting code within a paragraph.
Lists in HTML are used to group related items together. HTML provides various types of lists to represent different kinds of information: ordered lists, unordered lists, and definition lists. Each type of list has attributes that can modify its behavior or appearance. Here’s a detailed explanation of each type with relevant attributes:
Ordered lists are used when the order of the items is important. Each item in an ordered list is numbered automatically by the browser.
Attributes:
type: Specifies the type of numbering (e.g., "1" for numbers, "A" for uppercase letters, "a" for lowercase letters, "I" for uppercase Roman numerals, "i" for lowercase Roman numerals).start: Specifies the starting number of the list.reversed: Reverses the order of the list items.
Syntax:
<ol type="A" start="3" reversed>
  <li>First item</li>
  <li>Second item</li>
  <li>Third item</li>
</ol>Example:
<ol type="I" start="5">
  <li>Install Visual Studio Code</li>
  <li>Install necessary extensions</li>
  <li>Create a new project folder</li>
  <li>Create an index.html file</li>
  <li>Write HTML content</li>
</ol>
In this example, the list items are numbered starting from V (5) in uppercase Roman numerals.
Unordered lists are used when the order of the items does not matter. Each item in an unordered list is typically marked with a bullet point.
Attributes:
type: Specifies the type of bullet (e.g., "disc", "circle", "square" - note that this attribute is deprecated and not recommended for use).
Syntax:
<ul type="circle">
  <li>Milk</li>
  <li>Bread</li>
  <li>Eggs</li>
</ul>Example:
<ul>
  <li>HTML</li>
  <li>CSS</li>
  <li>JavaScript</li>
</ul>
In this example, the list items are marked with default bullet points.
The <li> element is used to define each item in both ordered and unordered lists. It can also have attributes to modify its behavior.
Attributes:
value: Specifies the value of the list item in an ordered list.
Syntax:
<ol>
  <li value="10">Item 1</li>
  <li>Item 2</li>
  <li>Item 3</li>
</ol>Example:
<ol>
  <li value="10">Step 10</li>
  <li>Step 2</li>
  <li>Step 3</li>
</ol>
In this example, the first list item will start with the number 10, followed by 2 and 3.
Lists can be nested inside each other to create sub-lists. This is useful for representing hierarchical data.
Syntax:
<ul>
  <li>Item 1
    <ul>
      <li>Sub-item 1.1</li>
      <li>Sub-item 1.2</li>
    </ul>
  </li>
  <li>Item 2</li>
</ul>Example:
<ul>
  <li>Frontend Development
    <ul>
      <li>HTML</li>
      <li>CSS</li>
      <li>JavaScript</li>
    </ul>
  </li>
  <li>Backend Development
    <ul>
      <li>Node.js</li>
      <li>Express.js</li>
      <li>Databases
        <ul>
          <li>MySQL</li>
          <li>MongoDB</li>
        </ul>
      </li>
    </ul>
  </li>
</ul>
In this example, the main list contains items related to frontend and backend development, and each of these items contains nested lists.
Definition lists are used to represent a list of terms and their definitions. Each term is enclosed in a <dt> (definition term) element, and each definition is enclosed in a <dd> (definition description) element.
Syntax:
<dl>
  <dt>Term 1</dt>
  <dd>Definition for Term 1</dd>
  <dt>Term 2</dt>
  <dd>Definition for Term 2</dd>
</dl>Example:
<dl>
  <dt>HTML</dt>
  <dd>HyperText Markup Language, the standard language for creating web pages.</dd>
  <dt>CSS</dt>
  <dd>Cascading Style Sheets, used to style HTML elements.</dd>
  <dt>JavaScript</dt>
  <dd>A programming language used to create dynamic and interactive effects on web pages.</dd>
</dl>
In this example, the terms "HTML", "CSS", and "JavaScript" are defined with their respective descriptions.
- Ordered Lists (
<ol>): Use for items that have a specific order. Items are numbered. Attributes includetype,start, andreversed. - Unordered Lists (
<ul>): Use for items that do not have a specific order. Items are marked with bullet points. Attributes includetype(deprecated). - List Items (
<li>): Define individual items in both ordered and unordered lists. Thevalueattribute specifies the value of the list item in an ordered list. - Nested Lists: Create hierarchical structures by nesting lists inside each other.
- Definition Lists (
<dl>): Use for terms and their definitions. Contains<dt>for terms and<dd>for definitions.
<body>
  <h3>Web development front end skills</h3>
  <ol>
    <li>HTML</li>
    <li>GitHub</li>
    <li>Figma</li>
    <li>CSS</li>
    <li>Tailwind CSS / Bootstrap</li>
  </ol>

  <dl>
    <dt>Google</dt>
    <dd>Google is a search engine</dd>
  </dl>
</body>
output of the list code

Links are a fundamental aspect of web navigation, enabling users to move from one webpage to another or to different sections within a page. HTML uses anchor tags (<a>) to create hyperlinks. Here’s an in-depth look at links and navigation:
The anchor tag (<a>) is used to define hyperlinks in HTML. The content inside the anchor tag is typically clickable and directs the user to another location when clicked.
Syntax:
<a href="URL">Link Text</a>Example:
<a href="https://www.example.com">Visit Example.com</a>In this example, the text "Visit Example.com" is a clickable link that directs the user to https://www.example.com.
Links can be either absolute or relative, depending on how they reference the target URL.
Absolute Links:
An absolute link provides the full URL, including the protocol (http or https), domain name, and path. Absolute links are used to link to external websites or resources.
Syntax:
<a href="https://www.example.com/page.html">Example Page</a>Example:
<a href="https://www.google.com">Go to Google</a>In this example, clicking the link will take the user to Google's homepage.
Relative Links:
A relative link provides a path relative to the current document or the root of the website. Relative links are commonly used to link to other pages within the same website.
Syntax:
<a href="page.html">Example Page</a>Example:
<a href="about.html">About Us</a>
<a href="/contact.html">Contact</a>
<a href="../index.html">Home</a>about.htmllinks to a page in the same directory as the current document./contact.htmllinks to a page at the root level of the website.../index.htmllinks to a page one directory level up from the current document.
Anchor tags can include various attributes that define the link's behavior and provide additional information. The most commonly used attributes are href, target, and title.
1. href Attribute:
The href (Hypertext REFerence) attribute specifies the URL of the page the link goes to. Without this attribute, the <a> tag will not function as a hyperlink.
Syntax:
<a href="URL">Link Text</a>Example:
<a href="https://www.example.com">Visit Example.com</a>2. target Attribute:
The target attribute specifies where to open the linked document. Common values include:
_self: Opens the link in the same tab or window (default behavior)._blank: Opens the link in a new tab or window._parent: Opens the link in the parent frame._top: Opens the link in the full body of the window.
Syntax:
<a href="URL" target="_blank">Link Text</a>Example:
<a href="https://www.example.com" target="_blank">Visit Example.com in a new tab</a>In this example, clicking the link will open https://www.example.com in a new browser tab.
3. title Attribute:
The title attribute provides additional information about the link, typically displayed as a tooltip when the user hovers over the link.
Syntax:
<a href="URL" title="Tooltip Text">Link Text</a>Example:
<a href="https://www.example.com" title="Go to Example.com">Visit Example.com</a>In this example, hovering over the link will display the tooltip "Go to Example.com".
Here’s an example that combines all the elements discussed:
<!DOCTYPE html>
<html lang="en">
<head>
    <meta charset="UTF-8">
    <meta name="viewport" content="width=device-width, initial-scale=1.0">
    <title>Links and Navigation</title>
</head>
<body>
    <h1>Navigation Links</h1>
    <p>
        <a href="https://www.example.com" target="_blank" title="Go to Example.com">Visit Example.com</a>
    </p>
    <p>
        <a href="about.html" title="Learn more about us">About Us</a>
    </p>
    <p>
        <a href="/contact.html" title="Get in touch with us">Contact</a>
    </p>
    <p>
        <a href="../index.html" title="Return to homepage">Home</a>
    </p>
</body>
</html>-
Linking to other pages within the website and external websites.
-
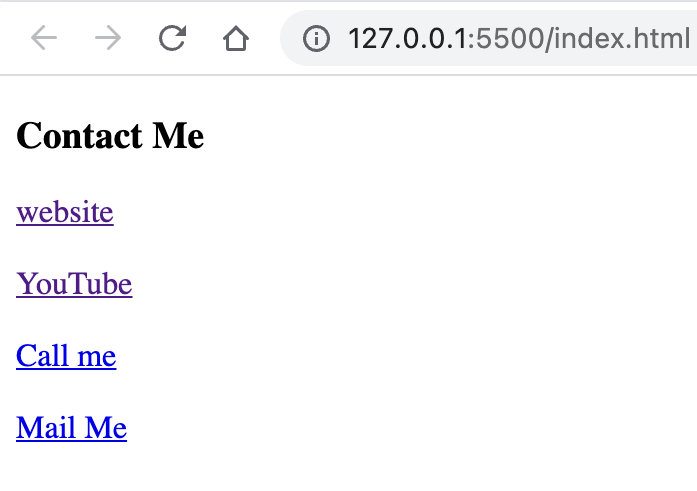
Creating hyperlinks using the
<a> ... </a>tag and understanding attributes like href, target, and rel.- Inside
<a>linkhref="url"attribute is used where we give the address where we want to visit based on click - Inside
<a>linktarget="_blank"attribute is used to open a new tab for the visited page/site - As shown in the following example we can send email by clicking the link for that we have to use
href="mailto:EMAIL_ADDRESS_HERE" - As shown in the following example we can call somone by clicking the link for that we have to use
href="tel:PHONE_NUMBER_HERE"
<body>
  <h3>Contact Me</h3>
  <a href="http://www.studywithanis.com" target="_blank">website</a> <br />
  <br />
  <a href="https://www.youtube.com/c/anisulislamrubel" target="_blank"
    >YouTube</a
  >
  <br />
  <br />
  <a href="tel:0017444044000" target="_blank">Call me</a> <br />
  <br />
  <a href="mailto:anisul2010s@yahoo.co.uk" target="_blank">Mail Me</a>
</body>
output of the html link code
- Inside

Images are an essential part of web pages, adding visual appeal and context to the content. In HTML, images are inserted using the <img> tag. Here's a detailed explanation of how to work with images in HTML, including inserting images, using image attributes, and linking images.
The <img> tag is used to embed images in an HTML document. This tag is an empty element, meaning it does not have a closing tag.
Syntax:
<img src="image_url" alt="description">Example:
<img src="https://www.example.com/image.jpg" alt="Example Image">In this example, an image from https://www.example.com/image.jpg is displayed, and "Example Image" is used as alternative text.
The <img> tag supports several attributes that define the source of the image, provide alternative text, and control the display of the image.
1. src Attribute:
The src (source) attribute specifies the path to the image file. This can be a relative URL, an absolute URL, or a data URL.
Syntax:
<img src="image_url">Example:
<img src="https://www.example.com/logo.png">2. alt Attribute:
The alt (alternative text) attribute provides a textual description of the image. This text is displayed if the image cannot be loaded and is also used by screen readers to describe the image to visually impaired users. Providing descriptive alt text improves accessibility and SEO.
Syntax:
<img src="image_url" alt="description">Example:
<img src="https://www.example.com/logo.png" alt="Company Logo">3. width and height Attributes:
The width and height attributes specify the dimensions of the image in pixels. Setting these attributes can help ensure that the layout of the page remains consistent even if the image takes time to load.
Syntax:
<img src="image_url" width="width_value" height="height_value">Example:
<img src="https://www.example.com/logo.png" alt="Company Logo" width="200" height="100">In this example, the image is displayed with a width of 200 pixels and a height of 100 pixels.
Images can also be used as hyperlinks. To create a clickable image, wrap the <img> tag inside an anchor (<a>) tag.
Syntax:
<a href="link_url">
  <img src="image_url" alt="description">
</a>Example:
<a href="https://www.example.com">
  <img src="https://www.example.com/logo.png" alt="Company Logo" width="200" height="100">
</a>
In this example, clicking on the image will take the user to https://www.example.com.
Here’s an example that combines inserting images, using image attributes, and creating clickable images:
<!DOCTYPE html>
<html lang="en">
<head>
    <meta charset="UTF-8">
    <meta name="viewport" content="width=device-width, initial-scale=1.0">
    <title>Images in HTML</title>
</head>
<body>
    <h1>Images in HTML</h1>

    <!-- Inserting an Image -->
    <p>Here is an example of an image:</p>
    <img src="https://www.example.com/image.jpg" alt="Example Image">

    <!-- Using Image Attributes -->
    <p>This image has specified width and height:</p>
    <img src="https://www.example.com/logo.png" alt="Company Logo" width="200" height="100">

    <!-- Image Linking -->
    <p>Click on the image to visit Example.com:</p>
    <a href="https://www.example.com">
      <img src="https://www.example.com/logo.png" alt="Company Logo" width="200" height="100">
    </a>
</body>
</html>- Inserting Images (
<img>): Use the<img>tag to embed images in HTML. srcAttribute: Specifies the path to the image file.altAttribute: Provides alternative text for the image, improving accessibility and SEO.widthandheightAttributes: Define the dimensions of the image in pixels.- Image Linking: Wrap the
<img>tag in an<a>tag to create clickable images.
By understanding and utilizing these features, you can effectively incorporate and manage images within your web pages, enhancing both the visual appeal and functionality of your content.
- For adding image on webpage we use
<img />tag as shown in the following example. - some common attribute for
<img />tag:src, alt, height, width, title - syntax for adding image:
<img src="imagename" alt="alternative" title="profile image"> srcattribute needs the image addressaltattribute shows some text about image if image is not foundtitleattribute shows some tooltip text when we hover over the imageheightandwidthattribute helps us to set the height and width of imageloading="lazy"if you have too many images and you want to load them lazily (after loading the other things first then you want to load images)- we can use
<img>tag inside of<a>tag so that when we click an image it will take us to a link.<a href="" target="_blank"> <img src="" alt="" /> </a>
-
iframe helps us to display any website, youtube video or map inside our own webpage
iframe Example<iframe width="560" height="315" src="https://www.youtube.com/embed/oN8aS_HW4k8" title="YouTube video player" allowfullscreen > </iframe>
- Understanding table structure, headers, rows, colspan, rowspan and data cells.
-
<table>tag is used to create table. -
<thead>tag is used to create table head. -
<tbody>tag is used to create table body. -
<tfoot>tag is used to create table footer. -
<tr>tag is used to create table row. -
<td>tag is used to create table data cell. -
<th>tag is used to create table header cell. -
<caption>tag is used to create table caption. -
Table Attributes: border: Specifies the width of the table's border. cellpadding: Specifies the space between the cell content and its borders. cellspacing: Specifies the space between cells.
-
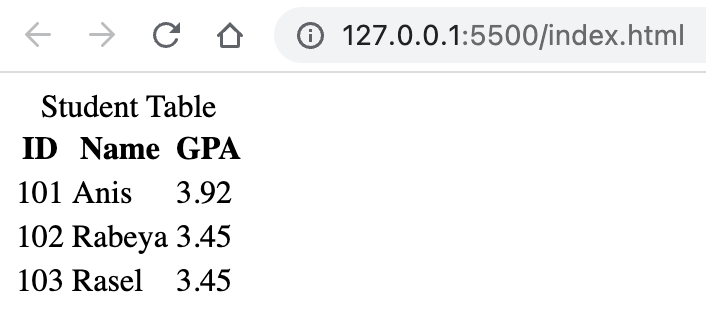
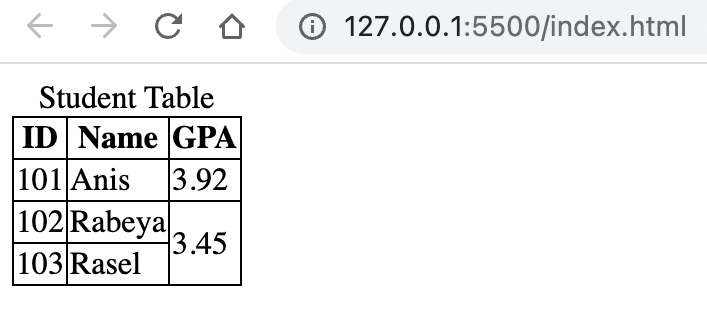
Follow the image to understand td, tr,
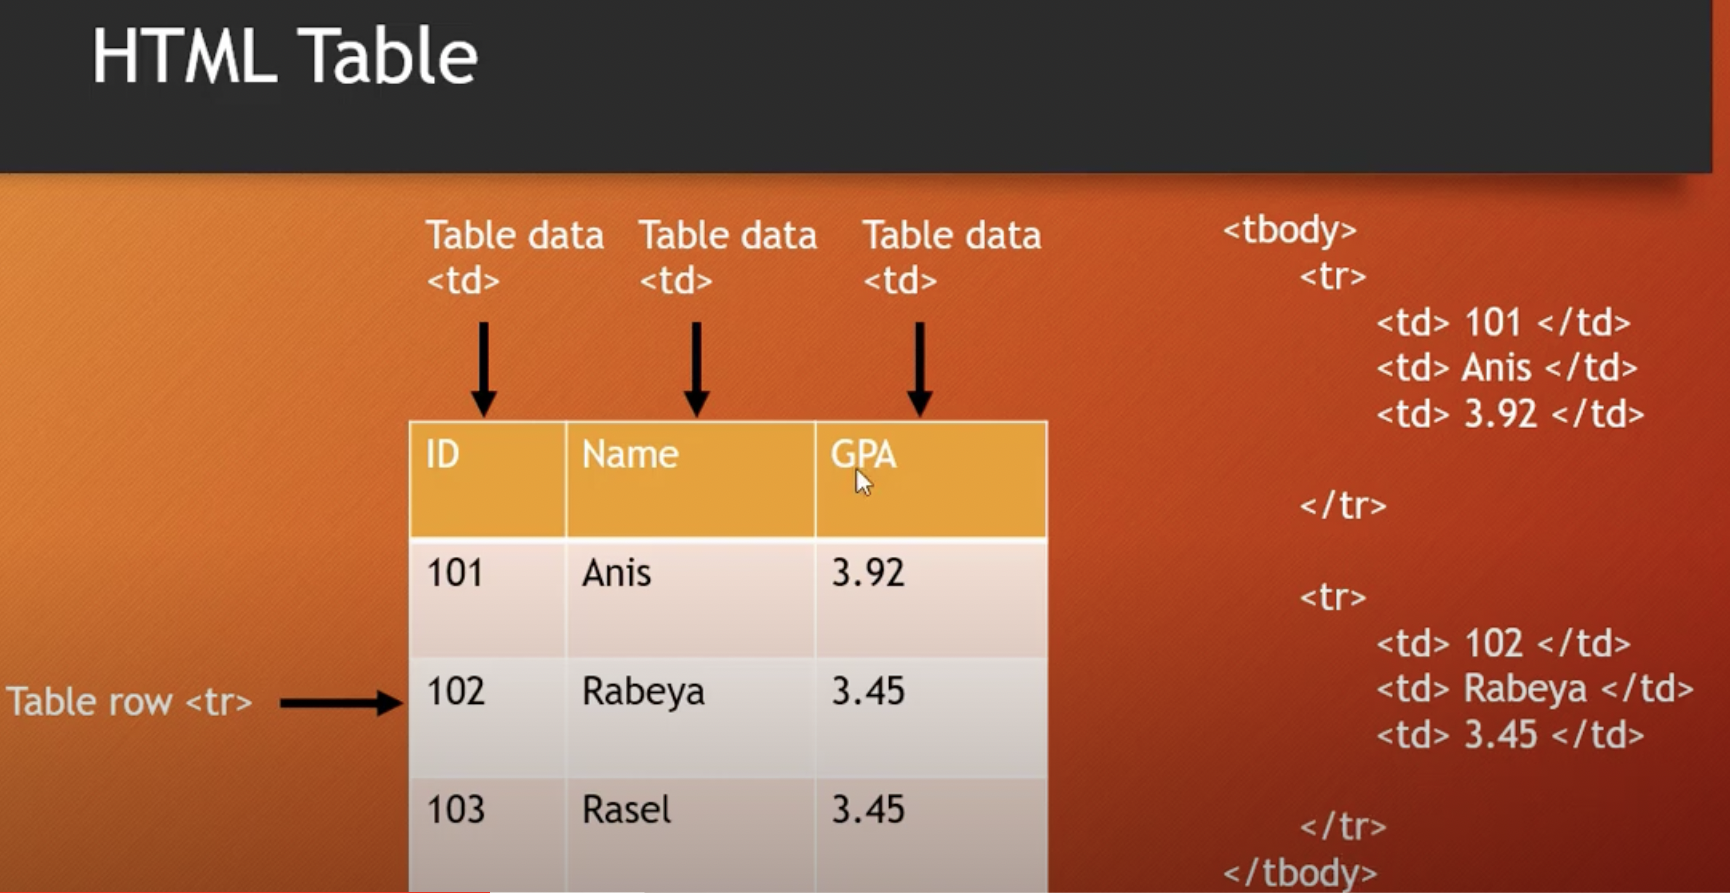
<body>
  <table>
    <caption>
      Student Table
    </caption>
    <thead>
      <tr>
        <th>ID</th>
        <th>Name</th>
        <th>GPA</th>
      </tr>
    </thead>
    <tbody>
      <tr>
        <td>101</td>
        <td>Anis</td>
        <td>3.92</td>
      </tr>
      <tr>
        <td>102</td>
        <td>Rabeya</td>
        <td>3.45</td>
      </tr>
      <tr>
        <td>103</td>
        <td>Rasel</td>
        <td>3.45</td>
      </tr>
    </tbody>
  </table>
</body>
output of the above html code


-
rowspan="N"attribute is used to tell that a cell will expand N number of rows. -
colspan="N"attribute is used to tell that a cell will expand N number of columns. -
An example of rowspan is given below:
<!DOCTYPE html>
<html lang="en">
  <head>
    <title>Document</title>

    <style>
      table,
      th,
      td {
        border: 1px solid;
        border-collapse: collapse;
      }
    </style>
  </head>
  <body>
    <table>
      <caption>
        Student Table
      </caption>
      <thead>
        <tr>
          <th>ID</th>
          <th>Name</th>
          <th>GPA</th>
        </tr>
      </thead>
      <tbody>
        <tr>
          <td>101</td>
          <td>Anis</td>
          <td>3.92</td>
        </tr>
        <tr>
          <td>102</td>
          <td>Rabeya</td>
          <td rowspan="2">3.45</td>
        </tr>
        <tr>
          <td>103</td>
          <td>Rasel</td>
        </tr>
      </tbody>
    </table>
  </body>
</html>
output of the above html code
-
An example of rowspan is given below:
<!DOCTYPE html>
<html lang="en">
  <head>
    <title>Document</title>

    <style>
      table,
      th,
      td {
        border: 1px solid;
        border-collapse: collapse;
      }
    </style>
  </head>
  <body>
    <table>
      <caption>
        Student Table
      </caption>
      <thead>
        <tr>
          <th>ID</th>
          <th>Name</th>
          <th colspan="2">Phone</th>
        </tr>
      </thead>
      <tbody>
        <tr>
          <td>101</td>
          <td>Anis</td>
          <td>017</td>
          <td>018</td>
        </tr>
        <tr>
          <td>102</td>
          <td>Rabeya</td>
          <td>019</td>
          <td>015</td>
        </tr>
      </tbody>
    </table>
  </body>
</html>
output of the above html code

-
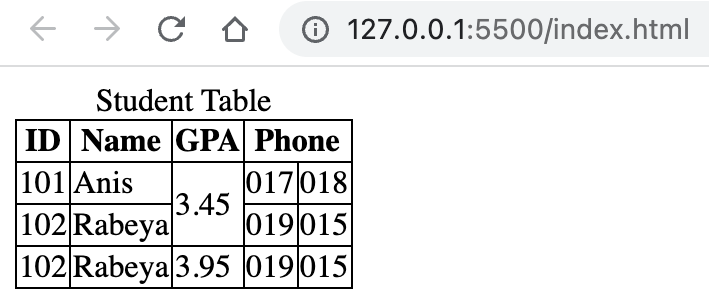
An example of colspan and rowspan is given below:
<!DOCTYPE html>
<html lang="en">
  <head>
    <title>Document</title>

    <style>
      table,
      th,
      td {
        border: 1px solid;
        border-collapse: collapse;
      }
    </style>
  </head>
  <body>
    <table>
      <caption>
        Student Table
      </caption>
      <thead>
        <tr>
          <th>ID</th>
          <th>Name</th>
          <th>GPA</th>
          <th colspan="2">Phone</th>
        </tr>
      </thead>
      <tbody>
        <tr>
          <td>101</td>
          <td>Anis</td>
          <td rowspan="2">3.45</td>
          <td>017</td>
          <td>018</td>
        </tr>
        <tr>
          <td>102</td>
          <td>Rabeya</td>
          <td>019</td>
          <td>015</td>
        </tr>
        <tr>
          <td>102</td>
          <td>Rabeya</td>
          <td>3.95</td>
          <td>019</td>
          <td>015</td>
        </tr>
      </tbody>
    </table>
  </body>
</html>
output of the above html code


-
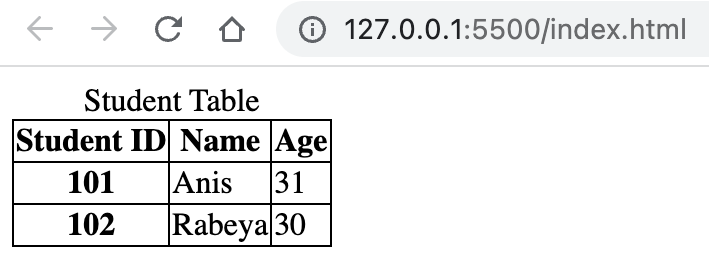
<th scope="col/row"> -
An example of accessible table using scope is given below:
<!DOCTYPE html>
<html lang="en">
  <head>
    <title>Document</title>

    <style>
      table,
      th,
      td {
        border: 1px solid;
        border-collapse: collapse;
      }
    </style>
  </head>
  <body>
    <table>
      <caption>
        Student Table
      </caption>
      <thead>
        <tr>
          <th scope="col">Student ID</th>
          <th scope="col">Name</th>
          <th scope="col">Age</th>
        </tr>
      </thead>
      <tbody>
        <tr>
          <th scope="row">101</th>
          <td>Anis</td>
          <td>31</td>
        </tr>
        <tr>
          <th scope="row">102</th>
          <td>Rabeya</td>
          <td>30</td>
        </tr>
      </tbody>
    </table>
  </body>
</html>
output of the above html code
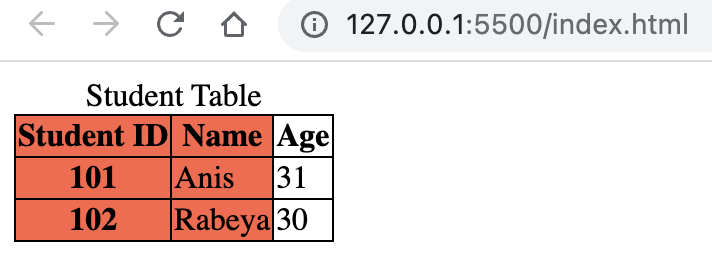
An example of table using
<colgroup> & <col>tags is given below:<!DOCTYPE html> <html lang="en"> <head> <title>Document</title> <style> table, th, td { border: 1px solid; border-collapse: collapse; } </style> </head> <body> <table> <caption> Student Table </caption> <colgroup> <col span="2" style="background-color: tomato" /> </colgroup> <thead> <tr> <th scope="col">Student ID</th> <th scope="col">Name</th> <th scope="col">Age</th> </tr> </thead> <tbody> <tr> <th scope="row">101</th> <td>Anis</td> <td>31</td> </tr> <tr> <th scope="row">102</th> <td>Rabeya</td> <td>30</td> </tr> </tbody> </table> </body> </html>
output of the above html code


Forms are essential for collecting user input on web pages. HTML provides a variety of elements to create forms and handle user input effectively. Here’s a detailed explanation of the form elements, input types, and form attributes:
Forms are created using the <form> element, and various input controls can be placed inside it to collect data from the user.
1. <form> Element:
The <form> element defines a form that collects user input. It can contain various input elements like text fields, checkboxes, radio buttons, and more.
Syntax:
<form action="submit_url" method="post">
  <!-- Form elements go here -->
</form>Example:
<form action="/submit-form" method="post">
  <label for="name">Name:</label>
  <input type="text" id="name" name="name">
  <button type="submit">Submit</button>
</form>
2. <input> Element:
The <input> element is used to create various types of input fields, such as text, password, email, etc.
Syntax:
<input type="input_type" name="name">Example:
<input type="text" name="username" placeholder="Enter your username">3. <textarea> Element:
The <textarea> element is used for multi-line text input.
Syntax:
<textarea name="name" rows="number" cols="number"></textarea>Example:
<textarea name="comments" rows="4" cols="50" placeholder="Enter your comments"></textarea>4. <button> Element:
The <button> element represents a clickable button. It can be used to submit a form.
Syntax:
<button type="button_type">Button Text</button>Example:
<button type="submit">Submit</button>
<button type="reset">Reset</button>
5. <select> and <option> Elements:
The <select> element creates a dropdown list, and the <option> elements define the options within the dropdown list.
Syntax:
<select name="name">
  <option value="value1">Option 1</option>
  <option value="value2">Option 2</option>
</select>Example:
<select name="country">
  <option value="us">United States</option>
  <option value="ca">Canada</option>
  <option value="uk">United Kingdom</option>
</select>The <input> element supports various types, each suitable for different kinds of data.
Common Input Types:
text: Single-line text input.password: Password input (masked characters).email: Email address input.number: Numeric input.date: Date input.checkbox: Checkbox input.radio: Radio button input.submit: Submit button.reset: Reset button.
Example:
<form action="/submit-form" method="post">
  <label for="username">Username:</label>
  <input type="text" id="username" name="username">

  <label for="password">Password:</label>
  <input type="password" id="password" name="password">

  <label for="email">Email:</label>
  <input type="email" id="email" name="email">

  <label for="age">Age:</label>
  <input type="number" id="age" name="age" min="1" max="100">

  <label for="dob">Date of Birth:</label>
  <input type="date" id="dob" name="dob">

  <label for="newsletter">Subscribe to newsletter:</label>
  <input type="checkbox" id="newsletter" name="newsletter">

  <p>Gender:</p>
  <input type="radio" id="male" name="gender" value="male">
  <label for="male">Male</label>
  <input type="radio" id="female" name="gender" value="female">
  <label for="female">Female</label>

  <button type="submit">Submit</button>
  <button type="reset">Reset</button>
</form>Forms have several attributes that define how the data is sent and handled.
1. action Attribute:
The action attribute specifies the URL to which the form data will be sent when the form is submitted.
Syntax:
<form action="submit_url">
  <!-- Form elements go here -->
</form>Example:
<form action="/submit-form" method="post">
  <!-- Form elements go here -->
</form>
2. method Attribute:
The method attribute specifies the HTTP method to be used when submitting the form. Common values are GET and POST.
Syntax:
<form method="method_type">
  <!-- Form elements go here -->
</form>Example:
<form action="/submit-form" method="post">
  <!-- Form elements go here -->
</form>- GET: Appends the form data to the URL, suitable for form submissions where data is not sensitive.
- POST: Sends the form data in the request body, suitable for form submissions where data is sensitive.
3. name Attribute:
The name attribute specifies the name of the form element. It is used to identify form data after submission.
Syntax:
<input type="text" name="name">Example:
<form action="/submit-form" method="post">
  <label for="username">Username:</label>
  <input type="text" id="username" name="username">
  <button type="submit">Submit</button>
</form>Here’s an example form that includes various input types, form elements, and attributes:
<!DOCTYPE html>
<html lang="en">
<head>
    <meta charset="UTF-8">
    <meta name="viewport" content="width=device-width, initial-scale=1.0">
    <title>Form Example</title>
</head>
<body>
    <h1>Registration Form</h1>
    <form action="/submit-form" method="post">
        <label for="username">Username:</label>
        <input type="text" id="username" name="username" required>

        <label for="password">Password:</label>
        <input type="password" id="password" name="password" required>

        <label for="email">Email:</label>
        <input type="email" id="email" name="email" required>

        <label for="age">Age:</label>
        <input type="number" id="age" name="age" min="1" max="100">

        <label for="dob">Date of Birth:</label>
        <input type="date" id="dob" name="dob">

        <label for="comments">Comments:</label>
        <textarea id="comments" name="comments" rows="4" cols="50"></textarea>

        <label for="country">Country:</label>
        <select id="country" name="country">
            <option value="us">United States</option>
            <option value="ca">Canada</option>
            <option value="uk">United Kingdom</option>
        </select>

        <label for="newsletter">Subscribe to newsletter:</label>
        <input type="checkbox" id="newsletter" name="newsletter">

        <p>Gender:</p>
        <input type="radio" id="male" name="gender" value="male">
        <label for="male">Male</label>
        <input type="radio" id="female" name="gender" value="female">
        <label for="female">Female</label>

        <button type="submit">Submit</button>
        <button type="reset">Reset</button>
    </form>
</body>
</html>- Form Elements: Use
<form>to define a form, and<input>,<textarea>,<button>,<select>, and<option>for various input controls. - Input Types: Common types include
text,password,email,number,date,checkbox,radio,submit, andreset. - Form Attributes: Use
actionto specify the form submission URL,methodto specify the HTTP method, andnameto identify form elements.
By understanding and utilizing these form elements, input types, and attributes, you can create effective and user-friendly forms for collecting and processing user input on your web pages.
Semantic Tags:
-
<header>: Represents the introductory content or a group of navigational links. -
<nav>: Represents a section of navigation links. -
<main>: Represents the dominant content of the<body>. -
<article>: Represents a self-contained composition in a document (e.g., a blog post). -
<section>: Represents a standalone section of content. -
<footer>: Represents the footer for a section or document. -
Importance of Semantic HTML:
- Enhances the accessibility of web content.
- Improves SEO (Search Engine Optimization) by providing meaningful context to search engines.
- Helps developers understand the structure and purpose of different sections of a web page.
-
div can help to divide screen but it is not semantic
-
purpose of HTML5
- adding more semantic tags
- more form types
- improve accessibility
- improved storage facilities
- improved graphics & media
- remove few things
-
HTML5 Semantic elements:
<header> <nav> <main> <article> <aside> <section> <footer> <figure> <figcaption> <details> <summary> <mark> <time> -
sematic tags vs non semantic tags
- semantic tags are meaningful tags for human, search engine. example:
<form> <table> <p> <h1> etc. - non-semantic tags are not meaningful tags for human, search engine. example:
<span> <div> etc. - sematic tags vs non semantic tags example is given below:
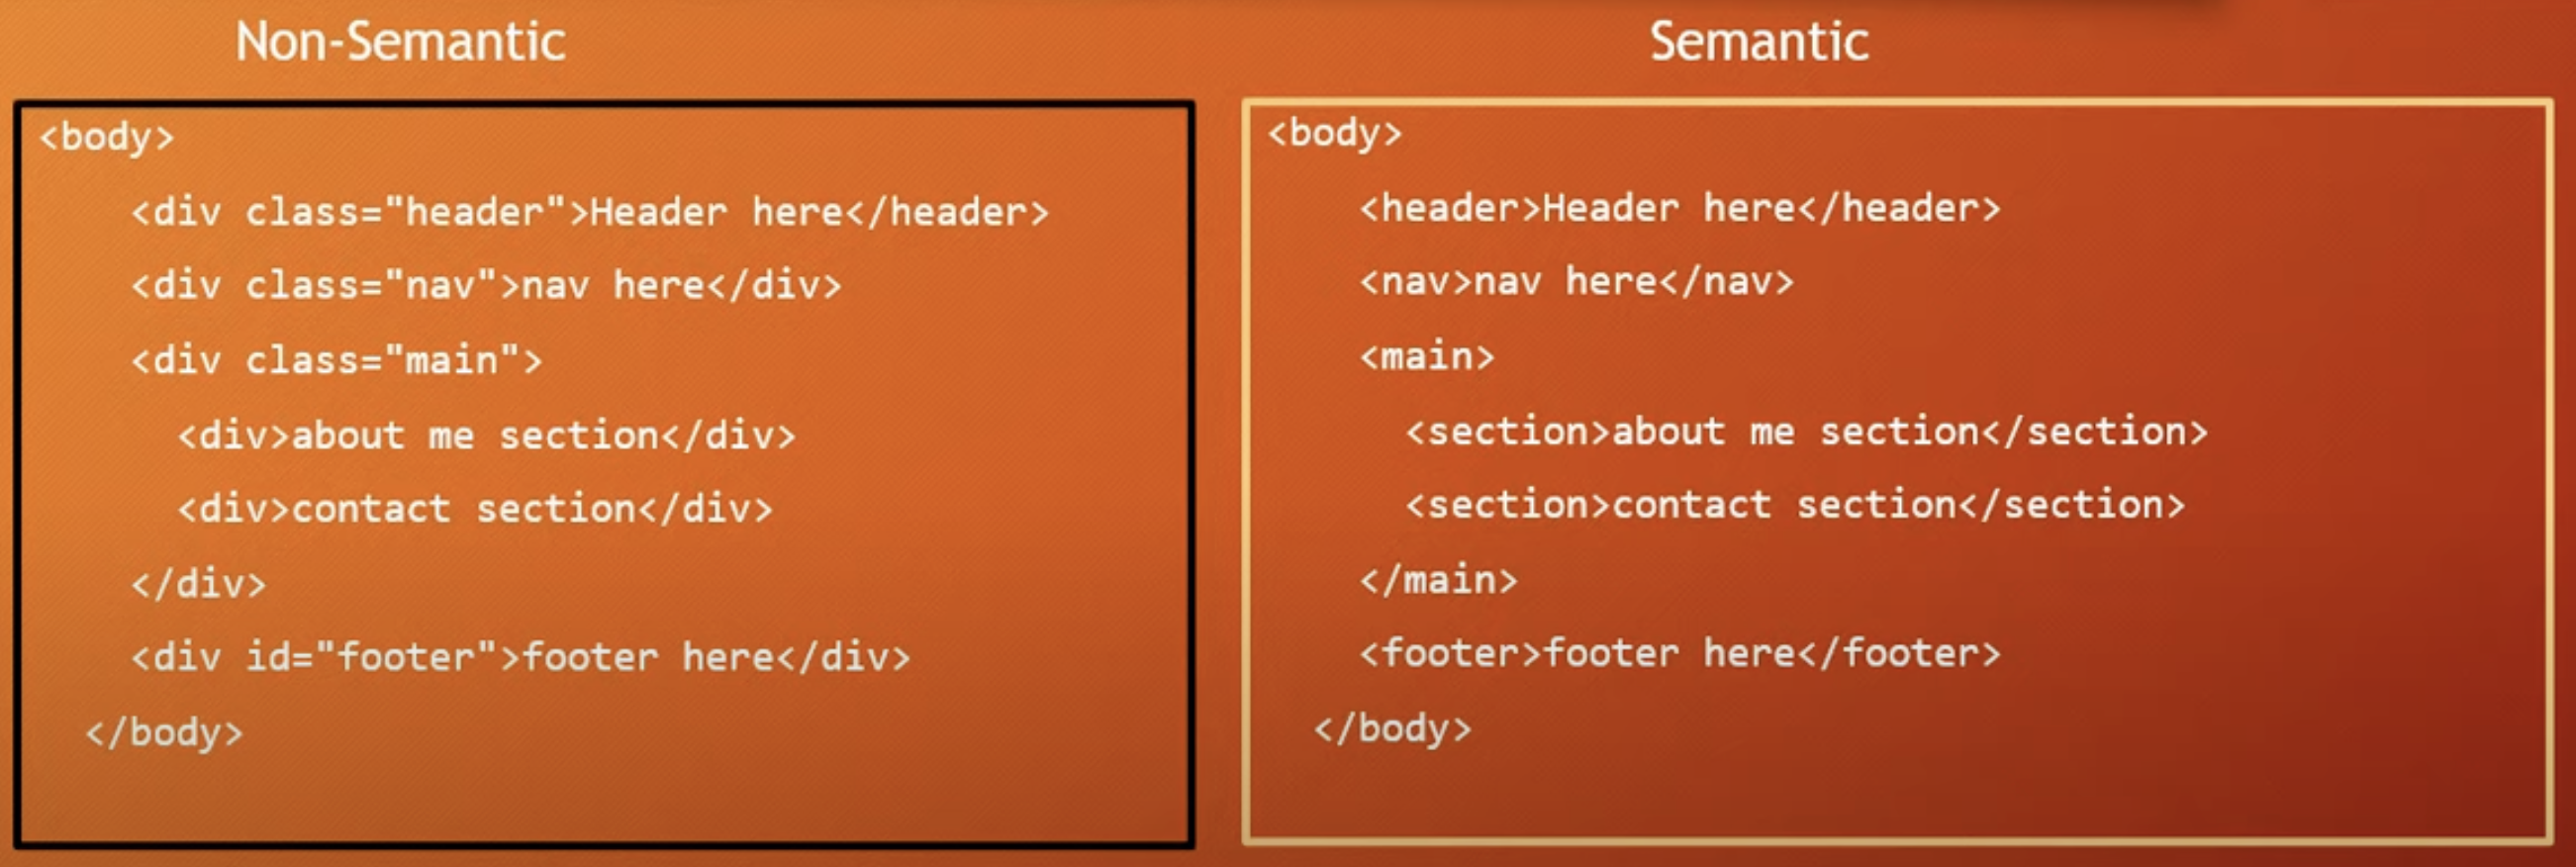
- semantic tags are meaningful tags for human, search engine. example:

<!DOCTYPE html>
<html lang="en">
<head>
<meta charset="UTF-8" />
<meta name="viewport" content="width=device-width, initial-scale=1.0" />
<title>My Portfolio</title>
</head>
<body>
<!--Section: navbar -->
<nav>
<ul>
<li>
<a href="#about">About Me</a>
</li>
<li>
<a href="#skills">My Skills</a>
</li>
<li>
<a href="#projects">My Projects</a>
</li>
<li>
<a href="#contact">Contact Me</a>
</li>
</ul>
</nav>
<!--Section: intro -->
<header id="intro">
<h1>Anisul Islam</h1>
<p><em>Web developer and Lecturer of Computer Sceience</em></p>
<a href="https://www.youtube.com/channel/UCEXwc6mNh7Lakj6lX-7a2Mg">
<img src="./images/anis.jpeg" alt="Anisul Islam" height="150" />
</a>
<hr />
</header>
<!--Section: about me -->
<section id="about">
<h2>About Me</h2>
<p><strong>Experience:</strong> 5 years expercince in web development</p>
<p>
<strong>Education:</strong> Master's in Software, Web and cloud
computing
</p>
</section>
<!--Section: Skills -->
<section id="skills">
<h2>Skills</h2>
<table border="1" cellpadding="5" cellspacing="0">
<thead>
<tr>
<th>Technology</th>
<th>Proficiency</th>
</tr>
</thead>
<tbody>
<tr>
<td>HTML</td>
<td>Expert</td>
</tr>
<tr>
<td>CSS</td>
<td>Expert</td>
</tr>
<tr>
<td>JavaScript</td>
<td>Intermediate</td>
</tr>
</tbody>
</table>
</section>
<!--Section: Projects -->
<section id="projects">
<h2>Projects</h2>
<ol>
<li>
<a
target="_blank"
href="https://github.com/anisul-Islam/portfolio-html"
>portfolio website</a
>
</li>
<li>Blog website</li>
<li>E-commerce website</li>
</ol>
</section>
<!--Section: Contacts -->
<section id="contact">
<h2>Contact Me</h2>
<form>
<div>
<label for="name">Name : </label>
<input type="text" id="name" name="name" required />
</div>
<div>
<label for="email">Email : </label>
<input type="email" id="email" name="email" required />
</div>
<div>
<label for="message">Meassage : </label>
<textarea name="message" id="message" cols="20" rows="10"></textarea>
</div>
<button type="submit">Submit</button>
<button type="reset">Clear</button>
</form>
</section>
<!--Section: footer -->
<footer>
<p>Copyright reserved by © Anisul2024</p>
<p>Developed with ♥</p>
<a href="tel:01710444700"> Call me</a>
<a href="mailto:anisul@yahoo.co.uk">Email me</a>
</footer>
</body>
</html>- Using meta tags (
<meta>) to define page metadata, such as title, description, and keywords. Understanding the impact of meta tags on search engine optimization (SEO).
<head>
  <meta charset="UTF-8" />
  <meta http-equiv="X-UA-Compatible" content="IE=edge" />
  <meta name="viewport" content="width=device-width, initial-scale=1.0" />
  <meta name="description" content="Free complete html tutorials 2021" />
  <meta name="keywords" content="HTML, html, html5" />
  <meta name="author" content="Anisul Islam" />
  <link rel="stylesheet" href="style.css" />
  <style>
    body {
      background-color: aquamarine;
    }
  </style>
  <script src="index.js"></script>
  <title>Document</title>
</head>- Inside
<head>tag we can define metadata(document title, character set, links, scripts, styles), other information that will not be visible to the users - meta tag provides information to the browsers and search engines about the webpage
<meta charset="UTF-8" />defines the character encoding for the HTML document.<meta http-equiv="X-UA-Compatible" content="IE=edge" />for supporting older version of IE.<meta name="viewport" content="width=device-width, initial-scale=1.0" />defines that webpage width is related to devices width and initial zoom level is 1.<link rel="stylesheet" href="style.css">generally connects css file to html. Inside of href attribute we give the css file name.<style> ... </style>we can use<style> ... </style>tag directly inside the head tag for designing html elements.<script src="index.js"></script>generally connects js file to html. we can also use<script> ... </script>tag directly inside the body tag.
Adding Font Awesome icons and Google Fonts to your HTML project enhances the visual appeal and usability of your website. Here's an explanation of how to include both in your project:
Font Awesome is a popular library for scalable vector icons that can be customized with CSS. To add Font Awesome icons to your HTML project, follow these steps:
-
Include the Font Awesome CDN: Add the Font Awesome CSS file to your HTML document's
<head>section using the Content Delivery Network (CDN). This allows you to use Font Awesome icons without downloading any files.<!DOCTYPE html> <html lang="en"> <head> <meta charset="UTF-8"> <meta name="viewport" content="width=device-width, initial-scale=1.0"> <title>Font Awesome and Google Fonts</title> <!-- Font Awesome CDN --> <link rel="stylesheet" href="https://cdnjs.cloudflare.com/ajax/libs/font-awesome/5.15.4/css/all.min.css"> </head> <body> <!-- Add an icon --> <i class="fas fa-home"></i> </body> </html>
The
<link>tag above includes the Font Awesome CSS file, allowing you to use icons in your HTML document. Theitag with the classesfas fa-homeadds a home icon to your page. -
Use Icons: To use an icon, insert an
<i>or<span>element and apply the relevant classes for the icon you want to use. Font Awesome uses class names to identify icons.<!-- Example of using Font Awesome icons --> <i class="fas fa-home"></i> <!-- Home icon --> <i class="fas fa-envelope"></i> <!-- Envelope icon --> <i class="fas fa-phone"></i> <!-- Phone icon -->
Google Fonts provides a library of free and open-source fonts that you can use in your web projects. To add Google Fonts to your HTML project, follow these steps:
-
Select a Font: Visit Google Fonts, browse the available fonts, and select the ones you want to use. For example, let's select "Roboto."
-
Include the Google Fonts Link: Copy the
<link>tag provided by Google Fonts and add it to the<head>section of your HTML document.<!DOCTYPE html> <html lang="en"> <head> <meta charset="UTF-8"> <meta name="viewport" content="width=device-width, initial-scale=1.0"> <title>Font Awesome and Google Fonts</title> <!-- Font Awesome CDN --> <link rel="stylesheet" href="https://cdnjs.cloudflare.com/ajax/libs/font-awesome/5.15.4/css/all.min.css"> <!-- Google Fonts --> <link rel="stylesheet" href="https://fonts.googleapis.com/css2?family=Roboto:wght@400;700&display=swap"> <style> body { font-family: 'Roboto', sans-serif; } </style> </head> <body> <h1>Using Google Fonts and Font Awesome Icons</h1> <p>This is an example of using Google Fonts (Roboto) and Font Awesome icons.</p> <i class="fas fa-home"></i> <!-- Home icon --> </body> </html>
The
<link>tag above includes the Google Fonts stylesheet, which allows you to use the "Roboto" font in your HTML document. -
Apply the Font: Use CSS to apply the selected font to your HTML elements. In this example, we've set the body to use the "Roboto" font.
body {
    font-family: 'Roboto', sans-serif;
}
<!--Section: footer -->
<footer>
<p>Copyright reserved by © Anisul2024</p>
<p>Developed with ♥</p>
<a href="tel:01710444700">Call me</a>
<a href="mailto:anisul@yahoo.co.uk">Email me</a>
<!-- Social Media Section -->
<h3>Follow Me</h3>
<ul class="social-media">
<li>
<a href="https://www.facebook.com/yourprofile" target="_blank">
<i class="fab fa-facebook-f"></i>
</a>
</li>
<li>
<a href="https://www.twitter.com/yourprofile" target="_blank">
<i class="fab fa-twitter"></i>
</a>
</li>
<li>
<a href="https://www.linkedin.com/in/yourprofile" target="_blank">
<i class="fab fa-linkedin-in"></i>
</a>
</li>
<li>
<a href="https://www.instagram.com/yourprofile" target="_blank">
<i class="fab fa-instagram"></i>
</a>
</li>
</ul>
</footer><caption class="table-caption">My Skills and Proficiency</caption>
-
Advanced form elements (
<select>, <option>, <textarea>) -
Form validation attributes (required, pattern, min, max)
-
Form submission (method, action)
-
Using form controls like text inputs, checkboxes, radio buttons, dropdowns, and submit buttons.
-
HTML
<form>Elements:<form>element is used to create a html form. form help us to collect user data.<input />element is the most used form element.<label>element is used for labelling form elements. It helps the form elements accessible byguiding the screen reader.<label for="name">element hasfor=""attribute which value should be equal to<input id="name"/>element's id value.<select>- helps to create dropdown menu.<optgroup label="programming">- helps to create options for dropdown menu.<option>- helps to create options for dropdown menu.<textarea>- helps to create multiple lines text input field.<button>- helps to create button.<fieldset><legend><output><datalist>&list=""attributes
-
form tag attributes:
<form action="/home" method="post" autocomplete="on">-> enable the autocomplete option.<form action="/home" method="post" autocomplete="on" enctype="text/plain">-> sends data without encoding.name=""attribute is used to set the name of any element which is essential for getting data in server side especially.
-
input tag type attribute
type=""attribute can change the visualization of<input />element.<input type="text"/>creates a single line text input field.<input type="email"/>creates a single line email input field.<input type="password"/>creates a single line password input field.<input type="number"/>creates a single line number input field.<input type="checkbox"/>creates a checkbox input field.<input type="radio"/>creates a radio button input field.<input type="button"/>creates a clikable button.<input type="submit"/>creates a submit button for form.<input type="color"/>creates a color picker input field.<input type="date"/>creates a date picker.<input type="month"/>creates a month picker.<input type="time"/>creates a time picker.<input type="week"/>creates a week picker.<input type="image"/>creates a image selector.<input type="file"/>creates a file selector.<input type="url"/>creates a url selector.<input type="tel"/>creates a input field for telephone number.<input type="search"/>is used for searching.<input type="hidden"/>creates a input field which is not visible to user.<input type="range" min="" max=""/>creates a range by setting min and max value, default range is 0 to 100.
<fieldset>
  <legend>Contact Me</legend>
  <label for="email"> Email: </label>
  <input type="email" id="email" />
</fieldset>
-
HTML Forms Validation:
requiredattribute specifies that an input element must be filled before submitting the form.max=""attribute is used to set the maximum input value for an input field.min=""attribute is used to set the minimum input value for an input field.pattern=""attribute is used to set a regular expression for validating an input field.
-
others
-
value=""attribute is used to set initial value for input field. -
readonlyattribute is used to set an input field as readonly. -
checkedattribute is used to set an input field already checked. -
disabledattribute is used to make a input field disable. -
size=""attribute is used to set the number of characters for an input field. -
maxlength=""attribute is used to set the maximum number of characters for an input field. -
placeholder=""attribute is used to give a hint to the users. -
step=""attribute specifies steps for input field. -
autofocusattribute makes an input field automatically focus when the page is loaded. -
height="" width=""attribute is used to set input elements height and width. -
list="id_of_datalist"attribute is used to set input elements height and width.
-
-
update the portfolio project
 <!--Section: Contacts -->
    <section id="contact">
        <h2>Contact Me</h2>
        <form>
            <div>
                <label for="name">Name : </label>
                <input type="text" id="name" name="name" required />
            </div>

            <div>
                <label for="email">Email : </label>
                <input type="email" id="email" name="email" required />
            </div>

            <div>
                <label for="subject">Subject : </label>
                <select id="subject" name="subject" required>
                    <option value="">Select a subject</option>
                    <option value="inquiry">Inquiry</option>
                    <option value="feedback">Feedback</option>
                    <option value="job">Job Opportunity</option>
                </select>
            </div>

            <div>
                <label for="message">Message : </label>
                <textarea name="message" id="message" cols="30" rows="5" required></textarea>
            </div>

            <div>
                <label for="age">Age : </label>
                <input type="number" id="age" name="age" min="1" max="100" />
            </div>

            <div>
                <label for="website">Website : </label>
                <input type="url" id="website" name="website" pattern="https?://.+" />
            </div>

            <div>
                <label for="image">Upload Image : </label>
                <input type="file" id="image" name="image" accept="image/*" />
            </div>

            <button type="submit">Submit</button>
            <button type="reset">Clear</button>
        </form>
</section><!DOCTYPE html>
<html lang="en">
<head>
<meta charset="UTF-8" />
<meta name="viewport" content="width=device-width, initial-scale=1.0" />
<title>Event Invitation</title>
</head>
<body>
<header>
<h1>You're Invited!</h1>
</header>
<div class="container">
<div class="main-content">
<div class="event-details">
<h2>Event Details</h2>
<p><strong>Date:</strong> July 24, 2024</p>
<p><strong>Time:</strong> 6:00 PM - 9:00 PM</p>
<p><strong>Location:</strong> 123 Main Street, Cityville</p>
</div>
<div class="rsvp">
<h2>RSVP</h2>
<form action="submit_rsvp.php" method="post">
<div>
<label for="name">Name:</label>
<input type="text" id="name" name="name" required />
</div>
<div>
<label for="email">Email:</label>
<input type="email" id="email" name="email" required />
</div>
<div>
<label for="guests">Number of Guests:</label>
<input
type="number"
id="guests"
name="guests"
min="1"
max="10"
required
/>
</div>
<div>
<label for="message">Message:</label>
<textarea id="message" name="message" rows="5"></textarea>
</div>
<button type="submit">Submit RSVP</button>
</form>
</div>
</div>
</div>
</body>
</html><!-- index.html -->
<!DOCTYPE html>
<html lang="en">
<head>
<meta charset="UTF-8">
<meta name="viewport" content="width=device-width, initial-scale=1.0">
<title>Documentation Page</title>
<link rel="stylesheet" href="styles.css">
</head>
<body>
<header>
<h1>Project Documentation</h1>
<nav>
<ul>
<li><a href="#introduction">Introduction</a></li>
<li><a href="#installation">Installation</a></li>
<li><a href="#usage">Usage</a></li>
<li><a href="#api">API</a></li>
<li><a href="#faq">FAQ</a></li>
</ul>
</nav>
</header>
<main>
<section id="introduction">
<h2>Introduction</h2>
<p>This project is a comprehensive guide to help you understand and utilize the features of our software.</p>
</section>
<section id="installation">
<h2>Installation</h2>
<p>Follow the steps below to install the software:</p>
<ol>
<li>Download the installation package from our website.</li>
<li>Run the installer and follow the on-screen instructions.</li>
<li>Once installed, open the software from the start menu.</li>
</ol>
</section>
<section id="usage">
<h2>Usage</h2>
<p>Here are some basic instructions on how to use the software:</p>
<ul>
<li>Open the software and log in using your credentials.</li>
<li>Navigate through the menu to access different features.</li>
<li>Use the help section for detailed instructions on each feature.</li>
</ul>
</section>
<section id="api">
<h2>API</h2>
<p>Our software provides a robust API for developers. Here are some of the key endpoints:</p>
<table>
<thead>
<tr>
<th>Endpoint</th>
<th>Description</th>
<th>Method</th>
</tr>
</thead>
<tbody>
<tr>
<td>/api/login</td>
<td>Authenticate user</td>
<td>POST</td>
</tr>
<tr>
<td>/api/data</td>
<td>Retrieve data</td>
<td>GET</td>
</tr>
<tr>
<td>/api/update</td>
<td>Update data</td>
<td>PUT</td>
</tr>
</tbody>
</table>
</section>
<section id="faq">
<h2>FAQ</h2>
<details>
<summary>What is this software?</summary>
<p>This software is a tool designed to help you manage your tasks efficiently.</p>
</details>
<details>
<summary>How do I reset my password?</summary>
<p>Click on the 'Forgot Password' link on the login page and follow the instructions.</p>
</details>
<details>
<summary>Who do I contact for support?</summary>
<p>You can reach out to our support team via the contact form on our website.</p>
</details>
</section>
</main>
<footer>
<p>© 2024 MyCompany. All rights reserved.</p>
</footer>
</body>
</html>body {
font-family: Arial, sans-serif;
margin: 0;
padding: 0;
background-color: #f4f4f4;
color: #333;
}
header {
background: #4CAF50;
color: #fff;
padding: 20px 0;
text-align: center;
}
nav ul {
list-style: none;
padding: 0;
}
nav ul li {
display: inline;
margin: 0 10px;
}
nav ul li a {
color: #fff;
text-decoration: none;
}
main {
width: 80%;
margin: auto;
padding: 20px;
}
section {
margin-bottom: 20px;
}
h2 {
color: #4CAF50;
}
table {
width: 100%;
border-collapse: collapse;
margin: 20px 0;
}
table, th, td {
border: 1px solid #ddd;
padding: 8px;
}
th {
background-color: #f2f2f2;
}
footer {
background: #4CAF50;
color: #fff;
text-align: center;
padding: 10px 0;
position: fixed;
bottom: 0;
width: 100%;
}- https://formspree.io/
- add the endpoint
Multimedia elements in HTML allow you to embed and manage various media types such as videos, audio, and other media objects. Here's an overview of the main multimedia elements and how to use them:
The <video> element is used to embed video content in an HTML document. It supports various attributes to control playback, including controls, autoplay, loop, and more.
Example:
<video width="320" height="240" controls>
  <source src="movie.mp4" type="video/mp4">
  <source src="movie.ogg" type="video/ogg">
  Your browser does not support the video tag.
</video>src: Specifies the path to the video file.type: Specifies the MIME type of the video file.controls: Adds play, pause, and volume controls.autoplay: Starts playing the video automatically (not recommended for user experience).loop: Loops the video playback.
The <audio> element is used to embed sound content in an HTML document. It can also be controlled with various attributes similar to the <video> element.
Example:
<audio controls>
  <source src="audio.mp3" type="audio/mpeg">
  <source src="audio.ogg" type="audio/ogg">
  Your browser does not support the audio element.
</audio>src: Specifies the path to the audio file.type: Specifies the MIME type of the audio file.controls: Adds play, pause, and volume controls.autoplay: Starts playing the audio automatically.loop: Loops the audio playback.
These tags allow you to embed different types of media and interactive content, such as Flash, PDF files, other web pages, and more.
Example of <embed>:
<embed src="example.pdf" width="600" height="500" type="application/pdf">src: Specifies the path to the media file.type: Specifies the MIME type of the embedded content.widthandheight: Specify the dimensions of the embedded content.
Example of <object>:
<object data="example.pdf" type="application/pdf" width="600" height="500">
  <p>Alternative text for browsers that do not support embedded objects.</p>
</object>data: Specifies the path to the media file.type: Specifies the MIME type of the embedded content.widthandheight: Specify the dimensions of the embedded content.
Example of <iframe>:
<iframe src="https://www.example.com" width="600" height="400"></iframe>src: Specifies the URL of the page to embed.widthandheight: Specify the dimensions of the embedded iframe.frameborder: Specifies whether the iframe should have a border (1 or 0).allowfullscreen: Allows the iframe content to be displayed in fullscreen mode.
<video>: Embed video files with various playback controls.<audio>: Embed audio files with playback controls.<embed>: Embed other media types like PDFs and Flash.<object>: Embed various media types, providing fallback content.<iframe>: Embed another HTML page or content into the current document.
These elements and tags enhance the multimedia experience on web pages, allowing you to present a rich variety of content seamlessly.
<!DOCTYPE html>
<html lang="en">
<head>
    <meta charset="UTF-8">
    <meta name="viewport" content="width=device-width, initial-scale=1.0">
    <title>Download PDF Example</title>
    <style>
        .download-btn {
            display: inline-block;
            padding: 10px 20px;
            font-size: 16px;
            color: white;
            background-color: blue;
            text-decoration: none;
            border-radius: 5px;
        }
    </style>
</head>
<body>
    <h1>Download PDF Example</h1>
    <a href="path/to/yourfile.pdf" download="YourFileName.pdf" class="download-btn">
        Download PDF
    </a>
</body>
</html>3.8 HTML5 Elements
-
<canvas>:- The
<canvas>element is used to draw graphics on the web using JavaScript. It provides a resolution-dependent bitmap canvas which can be used for rendering graphs, game graphics, or other visual images.
- The
-
<svg>:- The
<svg>element is used to define vector-based graphics. Unlike bitmaps, SVG images can be scaled indefinitely without losing quality. This makes SVG ideal for logos, icons, and complex graphics that require high resolution.
- The
-
<progress>:- The
<progress>element represents the completion progress of a task, such as a download or file upload. It is typically used to show how much of the task has been completed.
- The
-
<meter>:- The
<meter>element represents a scalar measurement within a known range, such as disk usage, temperature, or battery level. It is useful for displaying values that have a known maximum and minimum.
- The
Here's how you can integrate these HTML5 elements into your existing portfolio project:
<!DOCTYPE html>
<html lang="en">
<head>
<meta charset="UTF-8">
<meta name="viewport" content="width=device-width, initial-scale=1.0">
<title>My Portfolio</title>
<link rel="stylesheet" href="https://cdnjs.cloudflare.com/ajax/libs/font-awesome/5.15.4/css/all.min.css">
</head>
<body>
<!--Section: Header -->
<header>
<nav>
<ul>
<li><a href="#about">About Me</a></li>
<li><a href="#skills">My Skills</a></li>
<li><a href="#projects">My Projects</a></li>
<li><a href="#contact">Contact Me</a></li>
</ul>
</nav>
</header>
<!--Section: Main content -->
<main>
<!--Section: Intro -->
<section id="intro">
<h1>Anisul Islam</h1>
<p><em>Web developer and Lecturer of Computer Science</em></p>
<a href="https://www.youtube.com/channel/UCEXwc6mNh7Lakj6lX-7a2Mg">
<img src="./images/anis.jpeg" alt="Anisul Islam" height="150">
</a>
<hr>
</section>
<!--Section: About me -->
<section id="about">
<h2>About Me</h2>
<p><strong>Experience:</strong> 5 years experience in web development</p>
<p><strong>Education:</strong> Master's in Software, Web and Cloud Computing</p>
</section>
<!--Section: Skills -->
<section id="skills">
<h2>Skills</h2>
<table border="1" cellpadding="5" cellspacing="0">
<thead>
<tr>
<th>Technology</th>
<th>Proficiency</th>
</tr>
</thead>
<tbody>
<tr>
<td>HTML</td>
<td>Expert</td>
</tr>
<tr>
<td>CSS</td>
<td>Expert</td>
</tr>
<tr>
<td>JavaScript</td>
<td>Intermediate</td>
</tr>
</tbody>
</table>
<!-- Using <progress> to show skill level completion -->
<h3>Skill Progress</h3>
<label for="htmlProgress">HTML:</label>
<progress id="htmlProgress" value="90" max="100">90%</progress><br>
<label for="cssProgress">CSS:</label>
<progress id="cssProgress" value="80" max="100">80%</progress><br>
<label for="jsProgress">JavaScript:</label>
<progress id="jsProgress" value="70" max="100">70%</progress>
<!-- Using <meter> to show experience level -->
<h3>Experience Level</h3>
<label for="experienceLevel">Experience:</label>
<meter id="experienceLevel" min="0" max="10" value="5">5 years</meter>
</section>
<!--Section: Projects -->
<section id="projects">
<h2>Projects</h2>
<ol>
<li>
<a target="_blank" href="https://github.com/anisul-Islam/portfolio-html">Portfolio Website</a>
</li>
<li>Blog Website</li>
<li>E-commerce Website</li>
</ol>
</section>
<!--Section: Drawing and Graphics -->
<section id="graphics">
<h2>Graphics</h2>
<!-- Using <canvas> for drawing -->
<h3>Canvas Example</h3>
<canvas id="myCanvas" width="200" height="100" style="border:1px solid #000000;"></canvas>
<script>
const canvas = document.getElementById('myCanvas');
const ctx = canvas.getContext('2d');
ctx.fillStyle = '#FF0000';
ctx.fillRect(10, 10, 150, 75);
</script>
<!-- Using <svg> for vector graphics -->
<h3>SVG Example</h3>
<svg width="100" height="100">
<circle cx="50" cy="50" r="40" stroke="black" stroke-width="3" fill="red" />
<text x="50" y="55" font-size="20" text-anchor="middle" fill="white">SVG</text>
</svg>
</section>
<!--Section: Contacts -->
<section id="contact">
<h2>Contact Me</h2>
<form>
<div>
<label for="name">Name: </label>
<input type="text" id="name" name="name" required>
</div>
<div>
<label for="email">Email: </label>
<input type="email" id="email" name="email" required>
</div>
<div>
<label for="subject">Subject: </label>
<select id="subject" name="subject" required>
<option value="">Select a subject</option>
<option value="inquiry">Inquiry</option>
<option value="feedback">Feedback</option>
<option value="job">Job Opportunity</option>
</select>
</div>
<div>
<label for="message">Message: </label>
<textarea name="message" id="message" cols="30" rows="5" required></textarea>
</div>
<div>
<label for="age">Age: </label>
<input type="number" id="age" name="age" min="1" max="100">
</div>
<div>
<label for="website">Website: </label>
<input type="url" id="website" name="website" pattern="https?://.+">
</div>
<div>
<label for="file">Upload CV: </label>
<input type="file" id="file" name="file" accept=".pdf">
</div>
<button type="submit">Submit</button>
<button type="reset">Clear</button>
</form>
</section>
</main>
<!--Section: Footer -->
<footer>
<p>Copyright reserved by © Anisul2024</p>
<p>Developed with ♥</p>
<a href="tel:01710444700"> Call me</a>
<a href="mailto:anisul@yahoo.co.uk">Email me</a>
<div class="social-media">
<a href="https://facebook.com/yourprofile" target="_blank"><i class="fab fa-facebook"></i></a>
<a href="https://twitter.com/yourprofile" target="_blank"><i class="fab fa-twitter"></i></a>
<a href="https://linkedin.com/in/yourprofile" target="_blank"><i class="fab fa-linkedin"></i></a>
<a href="https://github.com/yourprofile" target="_blank"><i class="fab fa-github"></i></a>
</div>
</footer>
</body>
</html><canvas>: Added to the "Graphics" section to draw a simple red rectangle using JavaScript.<svg>: Added to the "Graphics" section to create a scalable vector graphic (SVG) with a red circle and white text.<progress>: Added to the "Skills" section to display the progress of proficiency levels for different skills.<meter>: Added to the "Skills" section to show the experience level as a scalar measurement.
By incorporating these elements, you can showcase the capabilities of HTML5 in handling graphics, progress indicators, and scalar measurements, enhancing the interactivity and visual appeal of your portfolio.
-
<details>elements have tewo states: closed, open -
<summary>a short summary of details is provided by summary element -
<figure>can have diagram, photos inside of it. -
<figcaption>can set the figure caption.An example of details, summary elements are given below:
<!DOCTYPE html>
<html lang="en">
  <head>
    <title>Document</title>
    <style>
      details[open] > summary {
        background-color: aqua;
      }
    </style>
  </head>
  <body>
    <details>
      <summary>Anisul Islam</summary>
      My Name is Anisul Islam. I am 31 years old. I have done my masters in
      Software, Web & cloud at Tampere University, Finland.
    </details>

    <!-- no need to understand this part cause I just tested using javascript here -->
    <!-- <script>
      const details = document.querySelector("details");
      details.addEventListener("toggle", () => {
        if (details.open) {
          console.log("open");
        } else {
          console.log("close");
        }
      });
    </script> -->
    <figure>
      <img src="./images/list.png" alt="list" />
      <figcaption>fig1: list image</figcaption>
    </figure>
  </body>
</html>
output of the heading style code
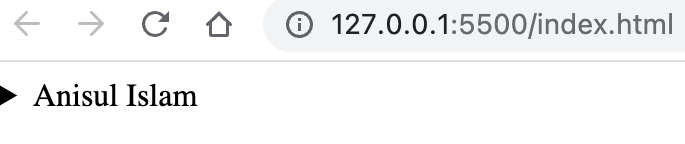


-
Input Types
-
Date Input (
<input type="date">): This allows users to select a date from a date picker.<label for="birthday">Birthday:</label> <input type="date" id="birthday" name="birthday">
-
Color Input (
<input type="color">): This allows users to choose a color from a color picker.<label for="favcolor">Favorite Color:</label> <input type="color" id="favcolor" name="favcolor" value="#ff0000">
-
Range Input (
<input type="range">): This creates a slider control for selecting a value from a range.<label for="volume">Volume:</label> <input type="range" id="volume" name="volume" min="0" max="100">
-
Number Input (
<input type="number">): This allows users to enter a number, with optionalmin,max, andstepattributes.<label for="quantity">Quantity:</label> <input type="number" id="quantity" name="quantity" min="1" max="10">
-
-
Datalist (
<datalist>): This element provides an "autocomplete" feature for input fields. It contains a set of<option>elements that represent the predefined values.<label for="browser">Choose a browser:</label> <input list="browsers" id="browser" name="browser"> <datalist id="browsers"> <option value="Chrome"> <option value="Firefox"> <option value="Safari"> <option value="Edge"> <option value="Opera"> </datalist>
-
Output (
<output>): This element represents the result of a calculation or user action.<form oninput="result.value=parseInt(a.value)+parseInt(b.value)"> <input type="range" id="a" value="50"> + <input type="number" id="b" value="50"> <output name="result" for="a b">100</output> </form>
-
Fieldset (
<fieldset>) and Legend (<legend>): The<fieldset>element is used to group related elements in a form, and the<legend>element represents a caption for the<fieldset>.<fieldset> <legend>Personal Information</legend> <label for="fname">First name:</label> <input type="text" id="fname" name="fname"><br><br> <label for="lname">Last name:</label> <input type="text" id="lname" name="lname"> </fieldset>
- Date Input: The
<input type="date">provides a graphical date picker in most browsers, making it easier for users to select a date. - Color Input: The
<input type="color">opens a color picker that allows users to select a color visually. - Range Input: The
<input type="range">creates a slider that lets users select a value from a specified range, providing a more interactive way to choose numbers. - Number Input: The
<input type="number">includes arrows for incrementing and decrementing values, and can enforceminandmaxconstraints. - Datalist: The
<datalist>element, when linked to an input field, provides predefined options that the user can select from, similar to a dropdown but with autocomplete functionality. - Output: The
<output>element is used to display the result of a calculation within a form. - Fieldset and Legend: The
<fieldset>groups related form controls together, and the<legend>provides a caption for the group, which is useful for organizing complex forms.
These advanced form elements and attributes enhance the functionality and user experience of forms by providing more interactive and semantically meaningful controls.
- check this repo for web accessibility
- what is web accessibility?
- making website supportive for disable people and search engine
- how to check web accessibility?
- inspect -> lighthouse -> accessibility
- axe Devtools for accessibility testing
- chromeVox for screen reading
-
Use Semantic elements over non semantic elements.
- semantic tags are meaningful tags for human, search engine. example:
<form> <table> <p> <h1> etc. - non-semantic tags are not meaningful tags for human, search engine. example:
<span> <div> etc. - In the following example button is more accessible than div for making a button. Semantic elements help the screen readers.
<div>Click me</div>
<button>Click me</button>
- Example of explicit semantic vs implicit sematic element
<div role="button">Click me</div>
<button>Click me</button>
- landmarks helps to naviagte from one place to another: header, h1...h6, main, nav, footer
- semantic tags are meaningful tags for human, search engine. example:
-
Use Heading tags in order
- use one h1 element in a webpage
- keep sequence when using: h1 -> h2 -> h3 ... (follow top-down order)
-
Use alt attribute
- use alt attribute for
<img />element - alt attribute provides more info to the blind people
- low bandwidth might not render the image so the alt will help here
- alt attributes helps technologies like search engines
- title attribute can be used when we hover over image to get extra information
- use alt attribute for
-
Contrast ratio checker
- use contrast ratio checker for foreground and background color: https://webaim.org/resources/contrastchecker/
-
Declare the languages
<html lang="en">
-
Meaningful Link txt
- make link text descriptive, understandable and clear
<a href="http://studywithanis.com" target="_blank"> Visit Anisul Islam's website </a>
- make link text descriptive, understandable and clear
-
Form related matters
- use label and bind input elements with label by using id and for value same. example is given below:
<label for="email">Email: </label> <input type="email" id="email" />

<div class="form-control">
  <fieldset>
    <legend>Choose Gender:</legend>
    <div class="form-control">
      <input type="radio" id="male" name="gender" value="male" />
      <label for="male">Male</label>
    </div>
    <div class="form-control">
      <input type="radio" id="female" name="gender" value="female" />
      <label for="female">Female</label>
    </div>
  </fieldset>
</div>
-
Use aria-label vs aria-labelby vs aria-descriptionby
-
these attribute has no visual impact but they are for assistive purpose. use them only when you can not use semantic elements
-
The aria-label and aria-labelledby attributes are both used to give an element it's accessible name.
-
using forms with standards labels - you shouldn't need it at all: -> label, for is more than enough
-
aria-label add accessible name directly to an element and it has higher priority than the element value. In the following example screen reader will say learn more about me instead of learn more
<button aria-label="Learn more about me">Learn more</button>
-
aria-labelby create a relationship between elements
<h3 id="hobbies">Hobbies</h3>
<ul aria-labelledby="hobbies">
  <li>Playing Football</li>
  <li>Playing Badminton</li>
  <li>Swimming</li>
</ul>
-
aria-descriptionby
<div>
  <label for="password"> Password </label>
  <input
    type="password"
    name="password"
    id="password"
    aria-describedby="help"
    required
  />
  <div id="help">Pasword must be at least 8 character long</div>
</div>
-
-
role and tabindex -> tabindex can start from 0 then -1, -2 for lesser priority so that you can navigate by keyboard one after one in an order
  <!-- use nav, role, tabindex, aria-label for an accessible navbar  -->

  <!-- NOT ACCESSIBLE -->
  <div id="nav">
    <a href="#">Home</a>
    <a href="#about">About Me</a>
    <a href="#tutorial">Tutorials</a>
    <a href="#contact">Contact Me</a>
  </div>

  <!-- ACCESSIBLE  -->
  <nav aria-label="navigation menu">
    <ul id="menubar" role="menubar" aria-label="navigation menu">
      <li role="none">
        <a href="#" role="menuitem" tabindex="-1">Home</a>
      </li>
      <li role="none">
        <a href="#about" role="menuitem" tabindex="-1">About Me</a>
      </li>
      <ul role="menu" aria-label="tutorials">
        <li role="none">
          <a href="#tutorials" role="menuitem" tabindex="0">Tutorials</a>
          <ul>
            <li role="none">
              <a href="#html" role="menuitem" tabindex="-1">HTML</a>
            </li>
            <li role="none">
              <a href="#css" role="menuitem" tabindex="-1">CSS</a>
            </li>
          </ul>
        </li>
      </ul>
      <li role="none">
        <a href="#contact" role="menuitem" tabindex="-1">Contact Me</a>
      </li>
    </ul>
</nav>- References:
- https://www.w3.org/WAI/fundamentals/accessibility-intro/
- https://www.w3schools.com/html/html_accessibility.asp
- Exploring HTML5 APIs like Geolocation, Drag and Drop, Web Storage, and Web Workers. Understanding their usage and practical applications.
-
Geolocation API:
-
The Geolocation API allows you to retrieve the user's geographic location information.
-
Example:
if (navigator.geolocation) {
  navigator.geolocation.getCurrentPosition(function (position) {
    var latitude = position.coords.latitude;
    var longitude = position.coords.longitude;
    console.log('Latitude: ' + latitude + ', Longitude: ' + longitude);
  });
} else {
  console.log('Geolocation is not supported by this browser.');
}
-
-
Drag and Drop API:
-
The Drag and Drop API enables you to create drag-and-drop interactions between elements on a web page.
-
Example:
var draggableElement = document.getElementById('draggable');
var dropZone = document.getElementById('drop-zone');

draggableElement.addEventListener('dragstart', function (event) {
  event.dataTransfer.setData('text/plain', event.target.id);
});

dropZone.addEventListener('dragover', function (event) {
  event.preventDefault();
});

dropZone.addEventListener('drop', function (event) {
  event.preventDefault();
  var data = event.dataTransfer.getData('text/plain');
  var element = document.getElementById(data);
  dropZone.appendChild(element);
});
-
-
Web Storage API:
-
The Web Storage API provides a way to store key-value pairs locally in the user's browser.
-
Example:
// Store data
localStorage.setItem('username', 'John');

// Retrieve data
var username = localStorage.getItem('username');
console.log(username);

// Remove data
localStorage.removeItem('username');
-
-
Canvas API:
-
The Canvas API allows you to draw graphics and animations on a web page using JavaScript.
-
Example:
var canvas = document.getElementById('my-canvas');
var context = canvas.getContext('2d');

context.fillStyle = 'red';
context.fillRect(50, 50, 100, 100);

context.strokeStyle = 'blue';
context.lineWidth = 2;
context.strokeRect(75, 75, 50, 50);

context.beginPath();
context.arc(150, 150, 50, 0, 2 * Math.PI);
context.fillStyle = 'green';
context.fill();
context.closePath();
-
-
Building reusable HTML templates and components using
<template>and custom elements.<template id="user-template"> <div class="user-card"> <h2 class="user-name"></h2> <p class="user-email"></p> </div> </template> <script> // Clone the template and populate the data var template = document.getElementById('user-template'); var clone = template.content.cloneNode(true); clone.querySelector('.user-name').textContent = 'John Doe'; clone.querySelector('.user-email').textContent = 'john.doe@example.com'; // Insert the cloned template into the document document.body.appendChild(clone); </script>
-
Leveraging frameworks like Angular, React, or Vue.js for more advanced component-based development.
-
Unicode Character Table
- URL: Unicode Table
- Description: A comprehensive resource for finding Unicode characters, including symbols, special characters, and emojis. It provides the Unicode code point and various representations of each character.
-
HTML Special Characters
- URL: W3Schools HTML Symbols
- Description: A reference for HTML symbols and special characters, including their HTML codes and descriptions.
-
CopyChar
- URL: CopyChar
- Description: A simple tool to copy special characters and symbols. Categories include punctuation, currency symbols, arrows, and more.
-
Font Awesome
-
URL: Font Awesome
-
Description: A popular icon library offering scalable vector icons that can be customized with CSS. Free and Pro versions are available.
-
Usage:
<link rel="stylesheet" href="https://cdnjs.cloudflare.com/ajax/libs/font-awesome/5.15.4/css/all.min.css">
<i class="fas fa-camera"></i>
-
-
Material Icons
-
URL: Material Icons
-
Description: A set of icons from Google designed for use with Material Design. Available as font and SVG.
-
Usage:
<link rel="stylesheet" href="https://fonts.googleapis.com/icon?family=Material+Icons">
<i class="material-icons">face</i>
-
-
Ionicons
-
URL: Ionicons
-
Description: A beautiful set of premium icons for use in web, iOS, Android, and desktop apps. Available as font and SVG.
-
Usage:
<link rel="stylesheet" href="https://unpkg.com/ionicons@5.5.2/dist/css/ionicons.min.css">
<i class="ion-md-heart"></i>
-
-
Bootstrap Icons
-
URL: Bootstrap Icons
-
Description: Official open-source SVG icon library for Bootstrap.
-
Usage:
<link rel="stylesheet" href="https://cdnjs.cloudflare.com/ajax/libs/bootstrap-icons/1.8.1/font/bootstrap-icons.min.css">
<i class="bi bi-alarm"></i>
-
-
Emojipedia
- URL: Emojipedia
- Description: A comprehensive emoji reference website that provides detailed information about each emoji, including how it appears on different platforms.
-
Get Emoji
- URL: Get Emoji
- Description: A simple website to copy and paste emojis. Categories include smileys, animals, food, activities, and more.
-
EmojiCopy
- URL: EmojiCopy
- Description: Allows you to copy emojis with a single click. It features a search function and categories for easy browsing.
-
JoyPixels (formerly EmojiOne)
- URL: JoyPixels
- Description: Offers a comprehensive set of emojis for use in web projects, available as SVG and PNG.
<p>Currency symbols: $ € ¥ £</p>
<p>Check mark: ✓</p><link rel="stylesheet" href="https://cdnjs.cloudflare.com/ajax/libs/font-awesome/5.15.4/css/all.min.css">
<p>Social Icons:
<i class="fab fa-facebook"></i>
<i class="fab fa-twitter"></i>
<i class="fab fa-instagram"></i>
</p><p>Emojis: 😀 😃 😄 😁 😆 😅 😂 🤣 🥲</p>These resources and examples should help you incorporate symbols, icons, and emojis into your web projects effectively.
-
Color Palettes and Inspiration
-
Coolors
- URL: Coolors
- Description: Generate color schemes with ease, save your favorite palettes, and explore trending palettes for inspiration.
-
Adobe Color
- URL: Adobe Color
- Description: Create, explore, and save color schemes. You can also extract color themes from images.
-
Colormind
- URL: Colormind
- Description: A color scheme generator that uses deep learning to generate color palettes based on color theory.
-
Color Hunt
- URL: Color Hunt
- Description: A free and open platform for color inspiration with curated color palettes.
-
Paletton
- URL: Paletton
- Description: Create color schemes based on color wheel theory, including monochromatic, analogous, triadic, and tetradic schemes.
-
-
Color Picker Tools
-
HTML Color Picker by W3Schools
- URL: HTML Color Picker
- Description: Simple color picker tool to select and preview colors in different formats (HEX, RGB, HSL).
-
CSS Color Picker by CSS-TRICKS
- URL: CSS-TRICKS Color Picker
- Description: An accessible color picker that ensures the colors you choose meet contrast standards.
-
Canva Color Palette Generator
- URL: Canva Color Palette Generator
- Description: Upload an image and Canva will generate a color palette from it.
-
-
Color Libraries and Systems
-
Material Design Colors
- URL: Material Design Colors
- Description: Official Material Design color palette by Google, offering a wide range of primary and accent colors.
-
Flat UI Colors
- URL: Flat UI Colors
- Description: A collection of color palettes based on the flat design trend, featuring vibrant and muted colors.
-
Tailwind CSS Color Palette
- URL: Tailwind CSS Colors
- Description: Extensive color palette used in Tailwind CSS, great for designing modern web interfaces.
-
-
Accessibility Tools
-
Contrast Ratio
- URL: Contrast Ratio
- Description: Check the contrast ratio between two colors to ensure text is readable for users with visual impairments.
-
Accessible Colors
- URL: Accessible Colors
- Description: A color palette generator that ensures your colors meet WCAG contrast guidelines.
-
-
MDN Web Docs (Mozilla Developer Network)
- URL: MDN HTML Guide
- Description: Comprehensive documentation and tutorials on HTML, including elements, attributes, and best practices.
-
W3Schools
- URL: W3Schools HTML Tutorial
- Description: Beginner-friendly tutorials covering HTML basics to advanced topics, with interactive examples and exercises.
-
Codecademy
- URL: Codecademy HTML Course
- Description: Interactive course that teaches HTML through hands-on projects and exercises.
-
freeCodeCamp
- URL: freeCodeCamp Responsive Web Design Certification
- Description: Free comprehensive course covering HTML, CSS, and responsive web design principles.
-
HTML Dog
- URL: HTML Dog Tutorials
- Description: Offers tutorials on HTML, CSS, and JavaScript with practical examples and best practices.
-
HTML Snippets
- Description: Provides a collection of useful HTML snippets for faster coding.
- Extension ID:
abusaidm.html-snippets
-
Live Server
- Description: Launch a development local Server with live reload feature for static & dynamic pages.
- Extension ID:
ritwickdey.LiveServer
-
Prettier - Code formatter
- Description: An opinionated code formatter that supports many languages and integrates with VS Code.
- Extension ID:
esbenp.prettier-vscode
-
Emmet
- Description: Provides support for Emmet syntax for writing HTML and CSS faster.
- Extension ID: Built-in (no need to install separately)
-
Path Intellisense
- Description: Autocompletes filenames in your HTML, CSS, and JavaScript files.
- Extension ID:
christian-kohler.path-intellisense
-
Auto Close Tag
- Description: Automatically adds closing tags for HTML and XML elements.
- Extension ID:
formulahendry.auto-close-tag
-
Auto Rename Tag
- Description: Automatically renames paired HTML/XML tags.
- Extension ID:
formulahendry.auto-rename-tag
-
Bracket Pair Colorizer
- Description: Colors matching brackets to make code more readable.
- Extension ID:
CoenraadS.bracket-pair-colorizer-2
-
Beautify
- Description: Beautify your code in place for HTML, CSS, and JavaScript files.
- Extension ID:
HookyQR.beautify
These resources and extensions will help you learn HTML effectively and improve your productivity while coding in VS Code.
-
- Create a simple portfolio website to showcase your projects and skills.
- Include sections such as "About Me", "Projects", "Skills", and "Contact".
- Use basic HTML tags, lists, links, images, and forms.
-
Recipe Blog:
- Build a blog to share your favorite recipes.
- Include a list of recipes, each linking to a detailed page.
- Use images, lists for ingredients, and steps for instructions.
-
- Design a digital version of your resume or CV.
-
- Build a webpage to invite friends to an event.
- Include details such as date, time, location, and RSVP form.