drift
A Websocket-Http Tunnel written in kotlin that lets you access any HTTP Api on servers deployed behind firewall(s)/Nat(s)/Proxy
What is drift?
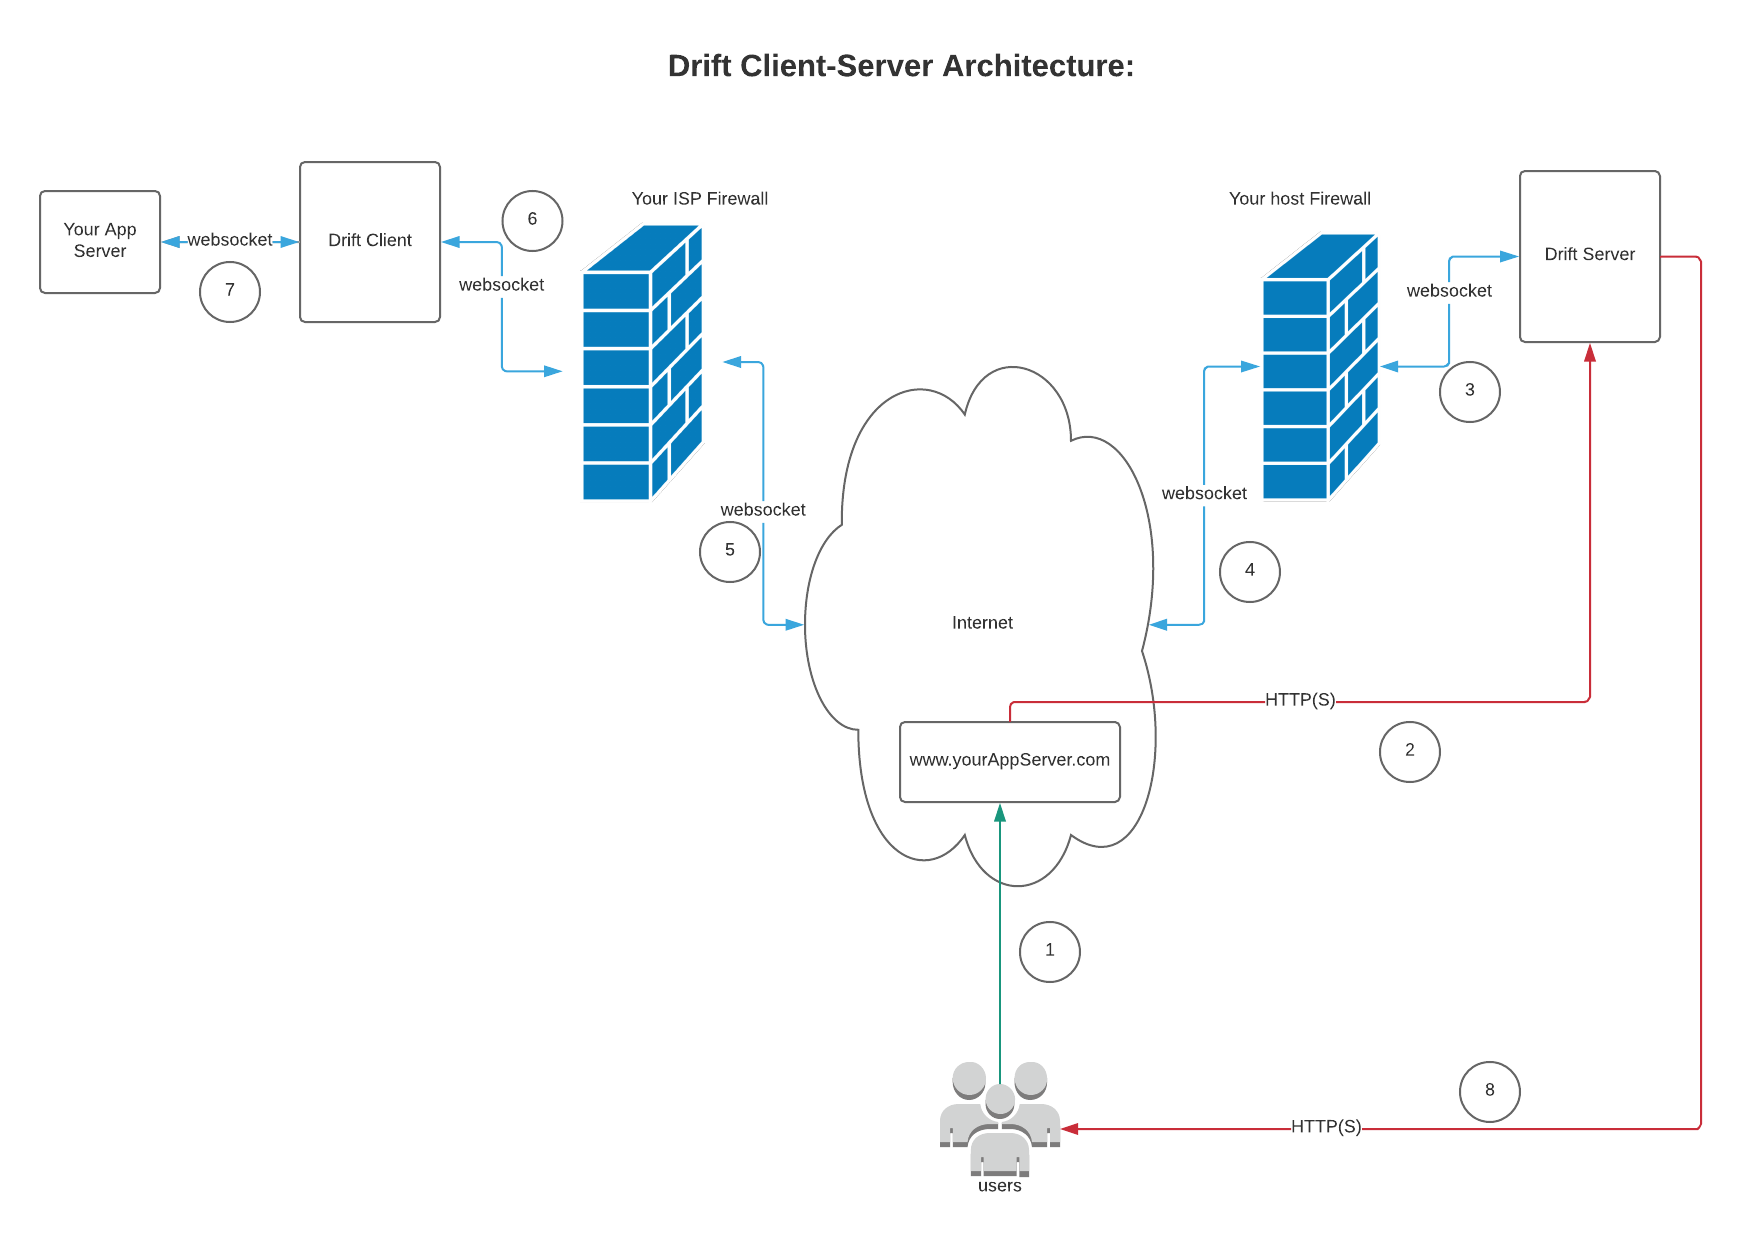
Drift lets you deploy any application anywhere and expose it on internet via a websocket-http tunnels. So how does it look like?
How does it work ?
Preconditions: Your client should have access to internet/drift server. The drift client establishes a connection to the drift server over outbound http which is usually not blocked by firewalls. The drift server then sends an upgrade, upgrading just established http connection to a websocket connection. Now your drift server is ready to accept incoming traffic and forward it to you app server deployed via the websocket connection.
Getting Started
The drift app can be run int following three modes:
- SERVER
- CLIENT
- SERVER AND CLIENT
The applciation is published at docker as ankur4u007/drift, so to run it as docker(easier for windows,
linux. For mac see Running using docker on a mac below) you must have docker installed.
If you prefer gradle way of running things please refer to Build and Run locally using gradle section.
To run as server:
docker run -it --net=host -e "TUNNEL__SERVER__ENABLED=TRUE" ankur4u007/drift
To run as client:
docker run -it --net=host -e "TUNNEL__CLIENT__ENABLED=TRUE" ankur4u007/drift
To run as both the server and client:
docker run -it --net=host -e "TUNNEL__SERVER__ENABLED=TRUE" -e "TUNNEL__CLIENT__ENABLED=TRUE" ankur4u007/drift
Build and Run locally using gradle
The app is developed using spring reactive and can be easily build and run with gradlew
- To build:
./gradlew clean build - To run locally:
./gradlew clean run.- to run as client: simply set the value
tunnel.client.enabledtotrueinsidesrc/main/resources/application.yml - to run as server: simply set the value
tunnel.server.enabledtotrueinsidesrc/main/resources/application.yml - to run as both server and client, set both
tunnel.client.enabledandtunnel.server.enabledto true.
- to run as client: simply set the value
Build using docker:
Additionally you can also build docker images after you have built with gradle. To do so simple run:
docker build --force-rm -t ankur4u007/drift .
Running using docker on a mac ?
well docker-for-mac doesn't yet fully support the --net=host mode, so the best option you have is to run either
everything(drift client, drift server, and local app server) inside docker.
Lets say you are running an app inside docker that is hosted at port 80.
docker ps output, assuming determined_mestorf is the app you deployed on 80 :
63ebcd34870a filebrowser/filebrowser:v1.10.0 "/filebrowser --conf…" 3 hours ago Up 3 hours 0.0.0.0:8001->80/tcp determined_mestorf
Then you can simply run the drift client and server by running:
docker run -it -e "TUNNEL__SERVER__ENABLED=TRUE" -e "TUNNEL__CLIENT__ENABLED=TRUE" -e "TUNNEL__CLIENT__LOCALSERVER__URL=http://<<ip:port of your app>>" -p8080:8080 ankur4u007/drift
where <<ip:port of your app>> is the ip with port of your container.
Docker ps output for driver client server looks like:
265e7847c0f5 ankur4u007/drift "/bin/sh -c 'sh /hom…" 2 hours ago Up 2 hours 0.0.0.0:8080->8080/tcp wizardly_wright
Now you can hit http://localhost:8080 to see the result.
Configurations
The drift server and app has a number of configurations available. Most of them are defaulted to some appropriate value. Neverthless they can be changed using environment variable. Below are list of available configuration options that can be changed :
TUNNEL__SERVER__ENABLED: Flag to determine where to act as a server. Default value: false
TUNNEL__SERVER__KEY: key value that needs to same accross server and client so that they can autheticate each other. Default value:`2b625f93-7006-47e2-a469-f41ec3dc7442
TUNNEL__SERVER__REMOTECLIENT_EVICTDURATIONINSEC: time till which a client session will be kept if not response from client is observerd. Default value: 120
TUNNEL__SERVER__REMOTECLIENT_TIMEOUTINSEC: timeout value for client requests. Once passed request would timeout and drift server would send ClientTimedOutException to caller. Default value: 60
TUNNEL__CLIENT__ENABLED: Flag to determine where to act as a client. Default value: false
TUNNEL__CLIENT__REMOTESERVER__URL: a websocket Url for deployed drift server. Default value: ws://localhost:8080
TUNNEL__CLIENT__KEY: key value that needs to same accross server and client so that they can autheticate each other. Default value:`2b625f93-7006-47e2-a469-f41ec3dc7442
TUNNEL__CLIENT__PING__DURATIONINSEC: time interval in seconds for within which client will ping server to indicate that it is alive. default value: 10
TUNNEL__CLIENT__PING__DELAYINSEC: timey delay in seconds before the client sends the first ping to server. Default value: 1
TUNNEL__CLIENT__PING__RECONNECTAFTERMAXMISSES: number of unsuccessful pings after which client will try to restablish the connection with the server. Default value: 10
TUNNEL__CLIENT__LOCALSERVER__URL: Url of your app server where the drift client will forward incoming request from the drift server. Default value: http://localhost:8001
TUNNEL__CLIENT__LOCALSERVER__CONNECTTIMEOUTINSEC: connect timeout value for local server, drift client will timeout the request if your local server is unable to connect within this duration. Default value: 2
TUNNEL__CLIENT__LOCALSERVER__READTIMEOUTINSEC: read timeout value for local server, drift client will timeout the request if your local server is unable to respond within this duration. Default value: 2
You can also change the default port 8080 on which the server runs by changing the server.port value in application.yml.
However if you do so don't forget to expose the same port in Dockerfile and rebuild the docker image for changes to take place.
Refer this on how to build your docker image.

