November 2020
See https://github.com/Acuant/iOSSDKV11/releases for release notes.
This software is subject to Acuant's end user license agreement (EULA), which can be found here.
This document provides detailed information about the Acuant iOS SDK. The Acuant-recommended workflow is described below.

Note The acceptable quality image is well-cropped, sharp and with no glare present, has a resolution of at least 300 dpi (for data capture) or 600 dpi (for authentication). The aspect ratio should be acceptable and matches an ID document.
- iOS version 11.0 or later
The SDK includes the following modules:
Acuant Face Capture Library (AcuantFaceCapture):
- Uses native iOS Camera to capture face.
Acuant Passive Liveness Library (AcuantPassiveLiveness):
- Uses proprietary algorithm to detect a live person
Acuant Common Library (AcuantCommon):
- Contains all shared internal models and supporting classes
Acuant Camera Library (AcuantCamera):
- Implemented using iOS native camera library
- Uses AcuantImagePreparation for cropping
- Uses https://github.com/gali8/Tesseract-OCR-iOS for OCR on device
Acuant Image Preparation Library (AcuantImagePreparation):
- Contains all image processing such as cropping, calculation of sharpness and glare
Acuant Document Processing Library (AcuantDocumentProcessing):
- Contains all the methods to upload the document images, process and get results
Acuant Face Match Library (AcuantFaceMatch):
- Contains a method to match two facial images
Acuant EChip Library (AcuantEchipReader):
- Contains methods for e-Passport chip reading and authentication using Ozone
Acuant HG Liveness Library (AcuantHGLiveness):
- Uses iOS native camera library to capture facial liveness using a proprietary algorithm
Acuant IP Liveness Library (AcuantIPLiveness):
- Uses proprietary algorithm to detect a live person
Note: IP Liveness is now referred to in the UI as Enhanced Liveness.
- Add the following dependent embedded frameworks:
-
AcuantFaceCapture
-
AcuantPassiveLiveness
-
AcuantCommon
-
AcuantImagePreparation
-
AcuantDocumentProcessing
-
AcuantHGLiveness
-
AcuantFaceMatch
-
AcuantEchipReader
-
AcuantCamera - TesseractOCRiOS.framework
-
AcuantIPLiveness - iProov.framework - KeychainAccess.framework - SocketIO.framework - Starscream.framework - SwiftyJSON.framework
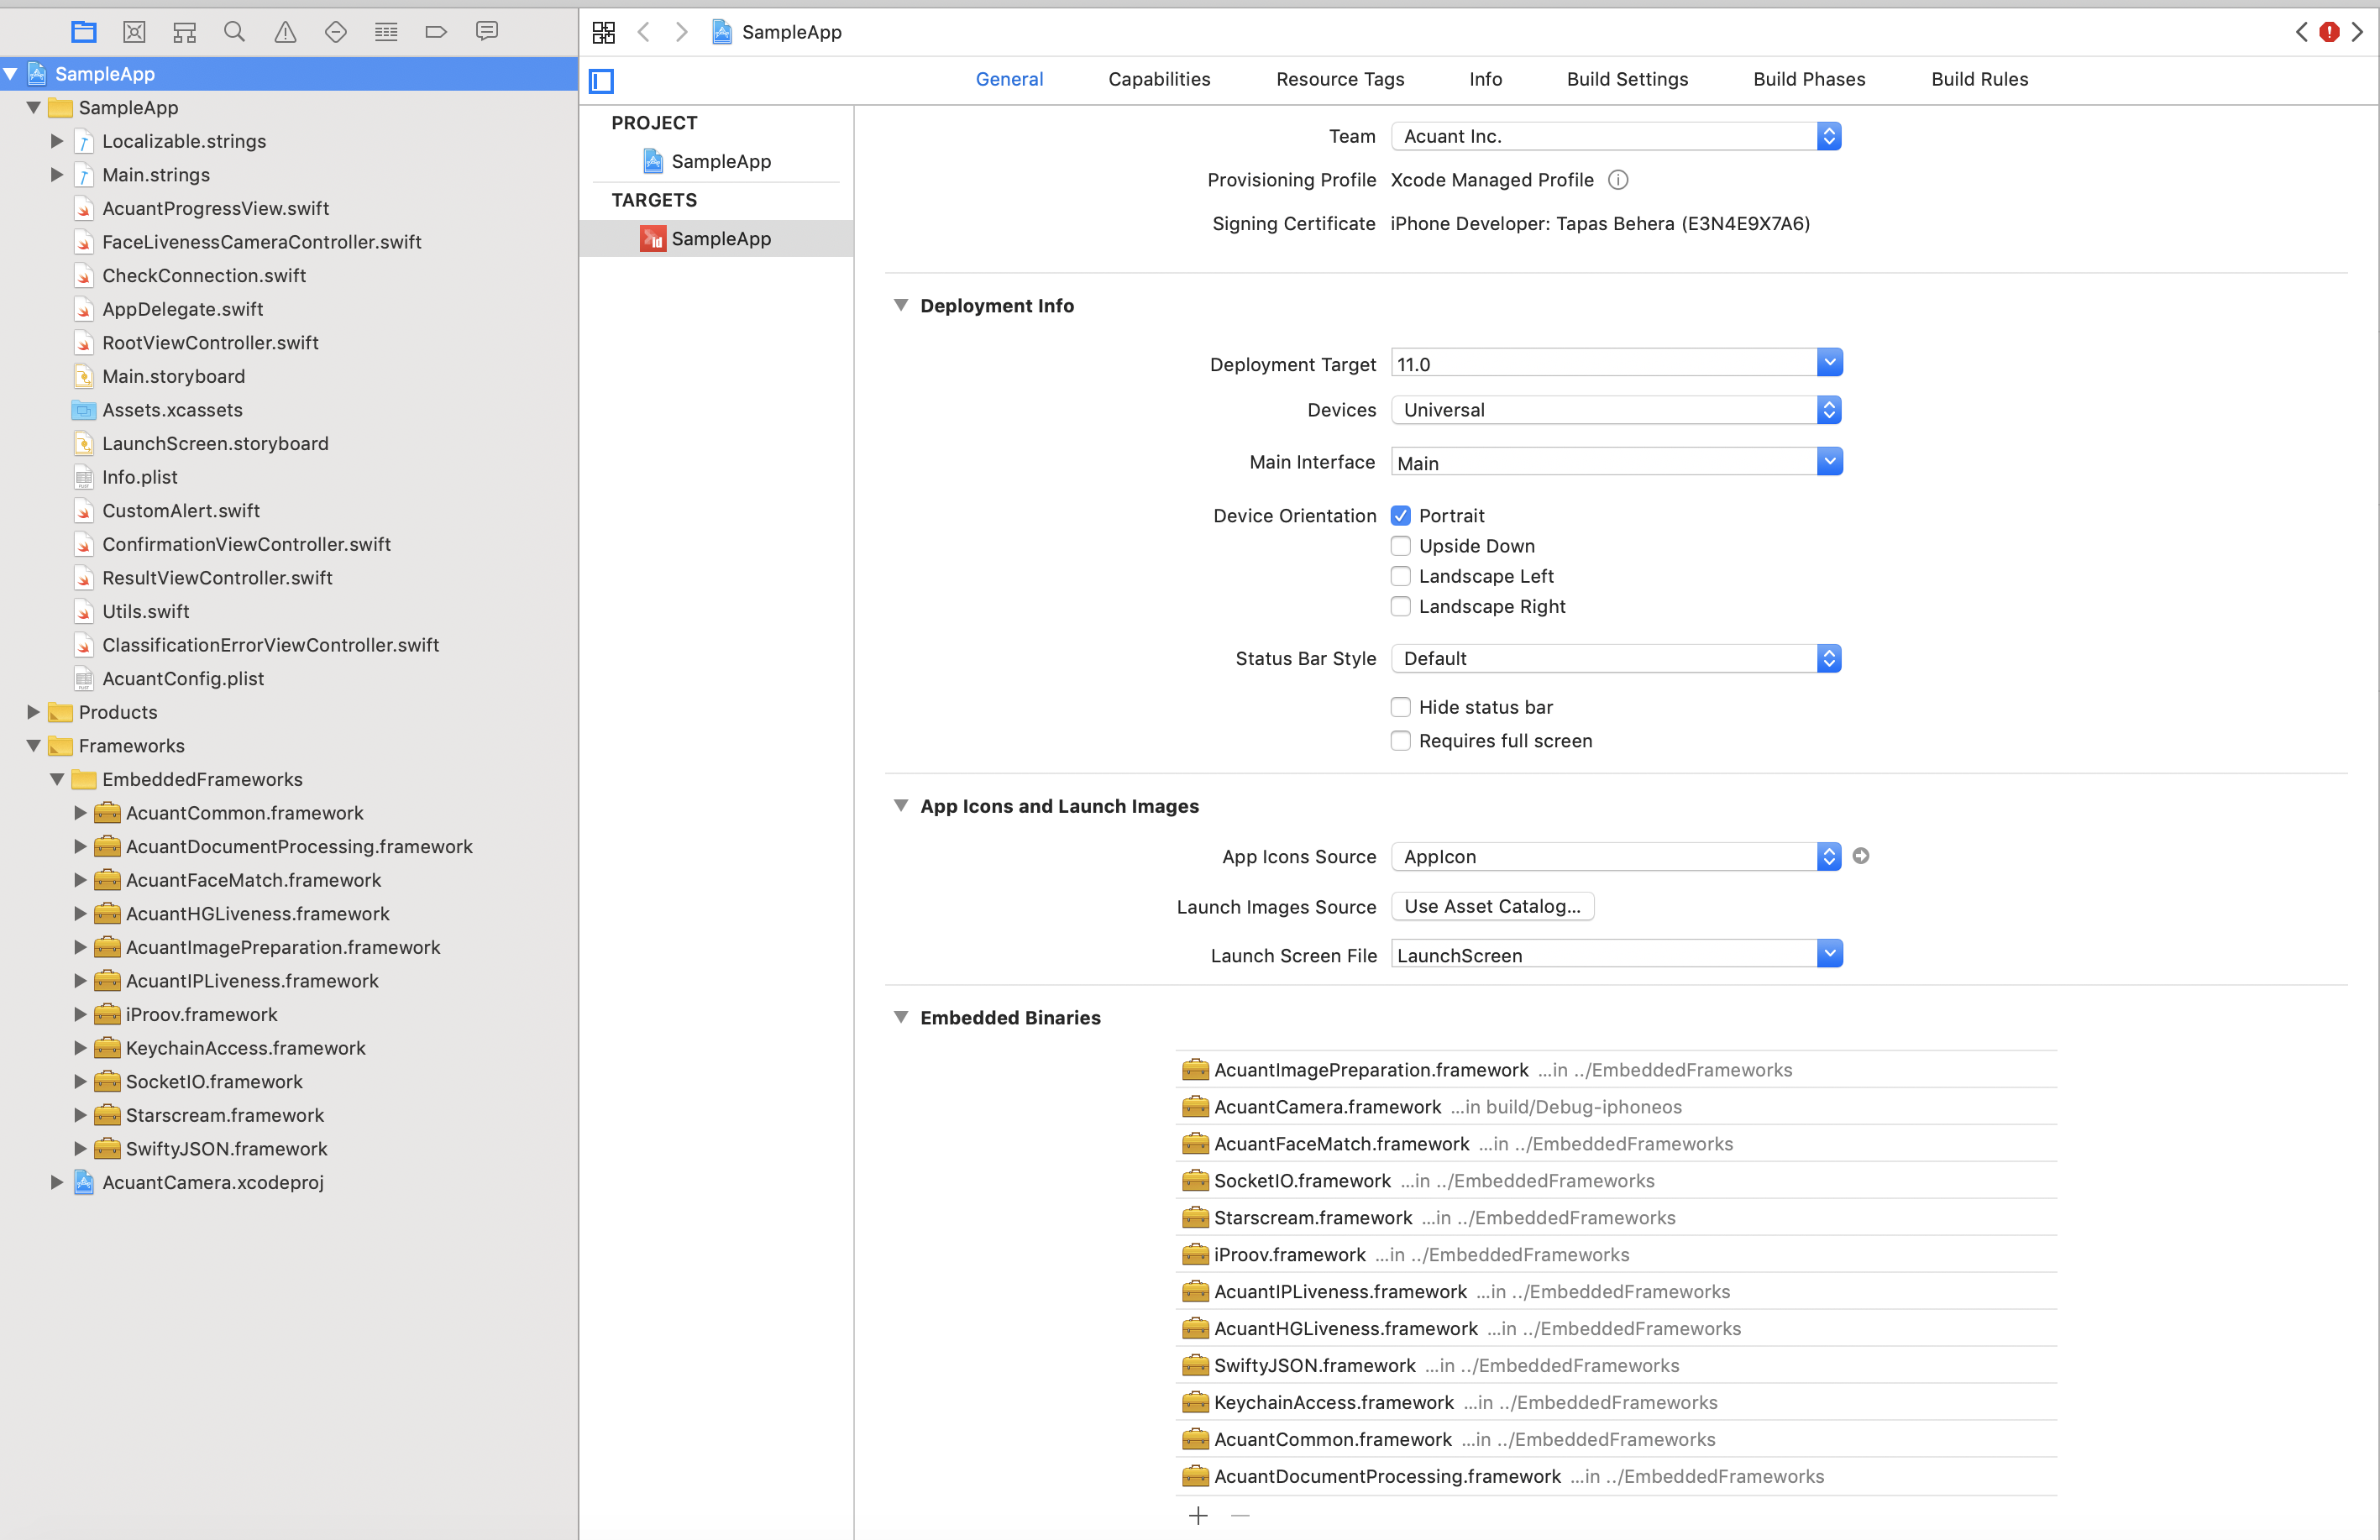
Note: AcuantCamera and AcuantFaceCapture are open projects. You will have to add the source code to your solution for frameworks.

-
Open your project in Xcode and navigate to Build Phases tab in application project settings. Add a "New Run Script".
-
Add the following to the script.
/usr/local/bin/carthage copy-frameworks -
Create new inputFileList.xcfilelist and outputFileList.xcfilelist. Add necessary frameworks to both files. Example in repository.
-
Add the .xcfilelist to your run script. For additional information, please visit https://github.com/Carthage/Carthage.
-
If you are using COCOAPODS, then add the following podfile:
platform :ios, '11' pod 'AcuantiOSSDKV11', '~> 11.4.6' #for all packages #indepedent packages below #=== AcuantCamera ==== platform :ios, '11' pod 'AcuantiOSSDKV11/AcuantCamera' dependency AcuantImagePreparation dependency AcuantCommon pod 'AcuantiOSSDKV11/AcuantCamera/Mrz' # if you want MRZ camera dependency TesseractOCRiOS pod 'AcuantiOSSDKV11/AcuantCamera/Document' # if you want Document camera # ===================== #AcuantFaceCapture platform :ios, '11' pod 'AcuantiOSSDKV11/AcuantFaceCapture' #AcuantImagePreparation platform :ios, '11' pod 'AcuantiOSSDKV11/AcuantImagePreparation' dependency AcuantCommon #AcuantDocumentProcessing platform :ios, '11' pod 'AcuantiOSSDKV11/AcuantDocumentProcessing' dependency AcuantCommon #AcuantHGLiveness platform :ios, '11' pod 'AcuantiOSSDKV11/AcuantHGLiveness' dependency AcuantCommon #AcuantIPLiveness platform :ios, '11' pod 'AcuantiOSSDKV11/AcuantIPLiveness' dependency AcuantCommon dependency iProov #AcuantPassiveLiveness platform :ios, '11' pod 'AcuantiOSSDKV11/AcuantPassiveLiveness' dependency AcuantCommon #AcuantFaceMatch platform :ios, '11' pod 'AcuantiOSSDKV11/AcuantFaceMatch' dependency AcuantCommon #AcuantEchipReader platform :ios, '11' pod 'AcuantiOSSDKV11/AcuantEchipReader' dependency AcuantCommon -
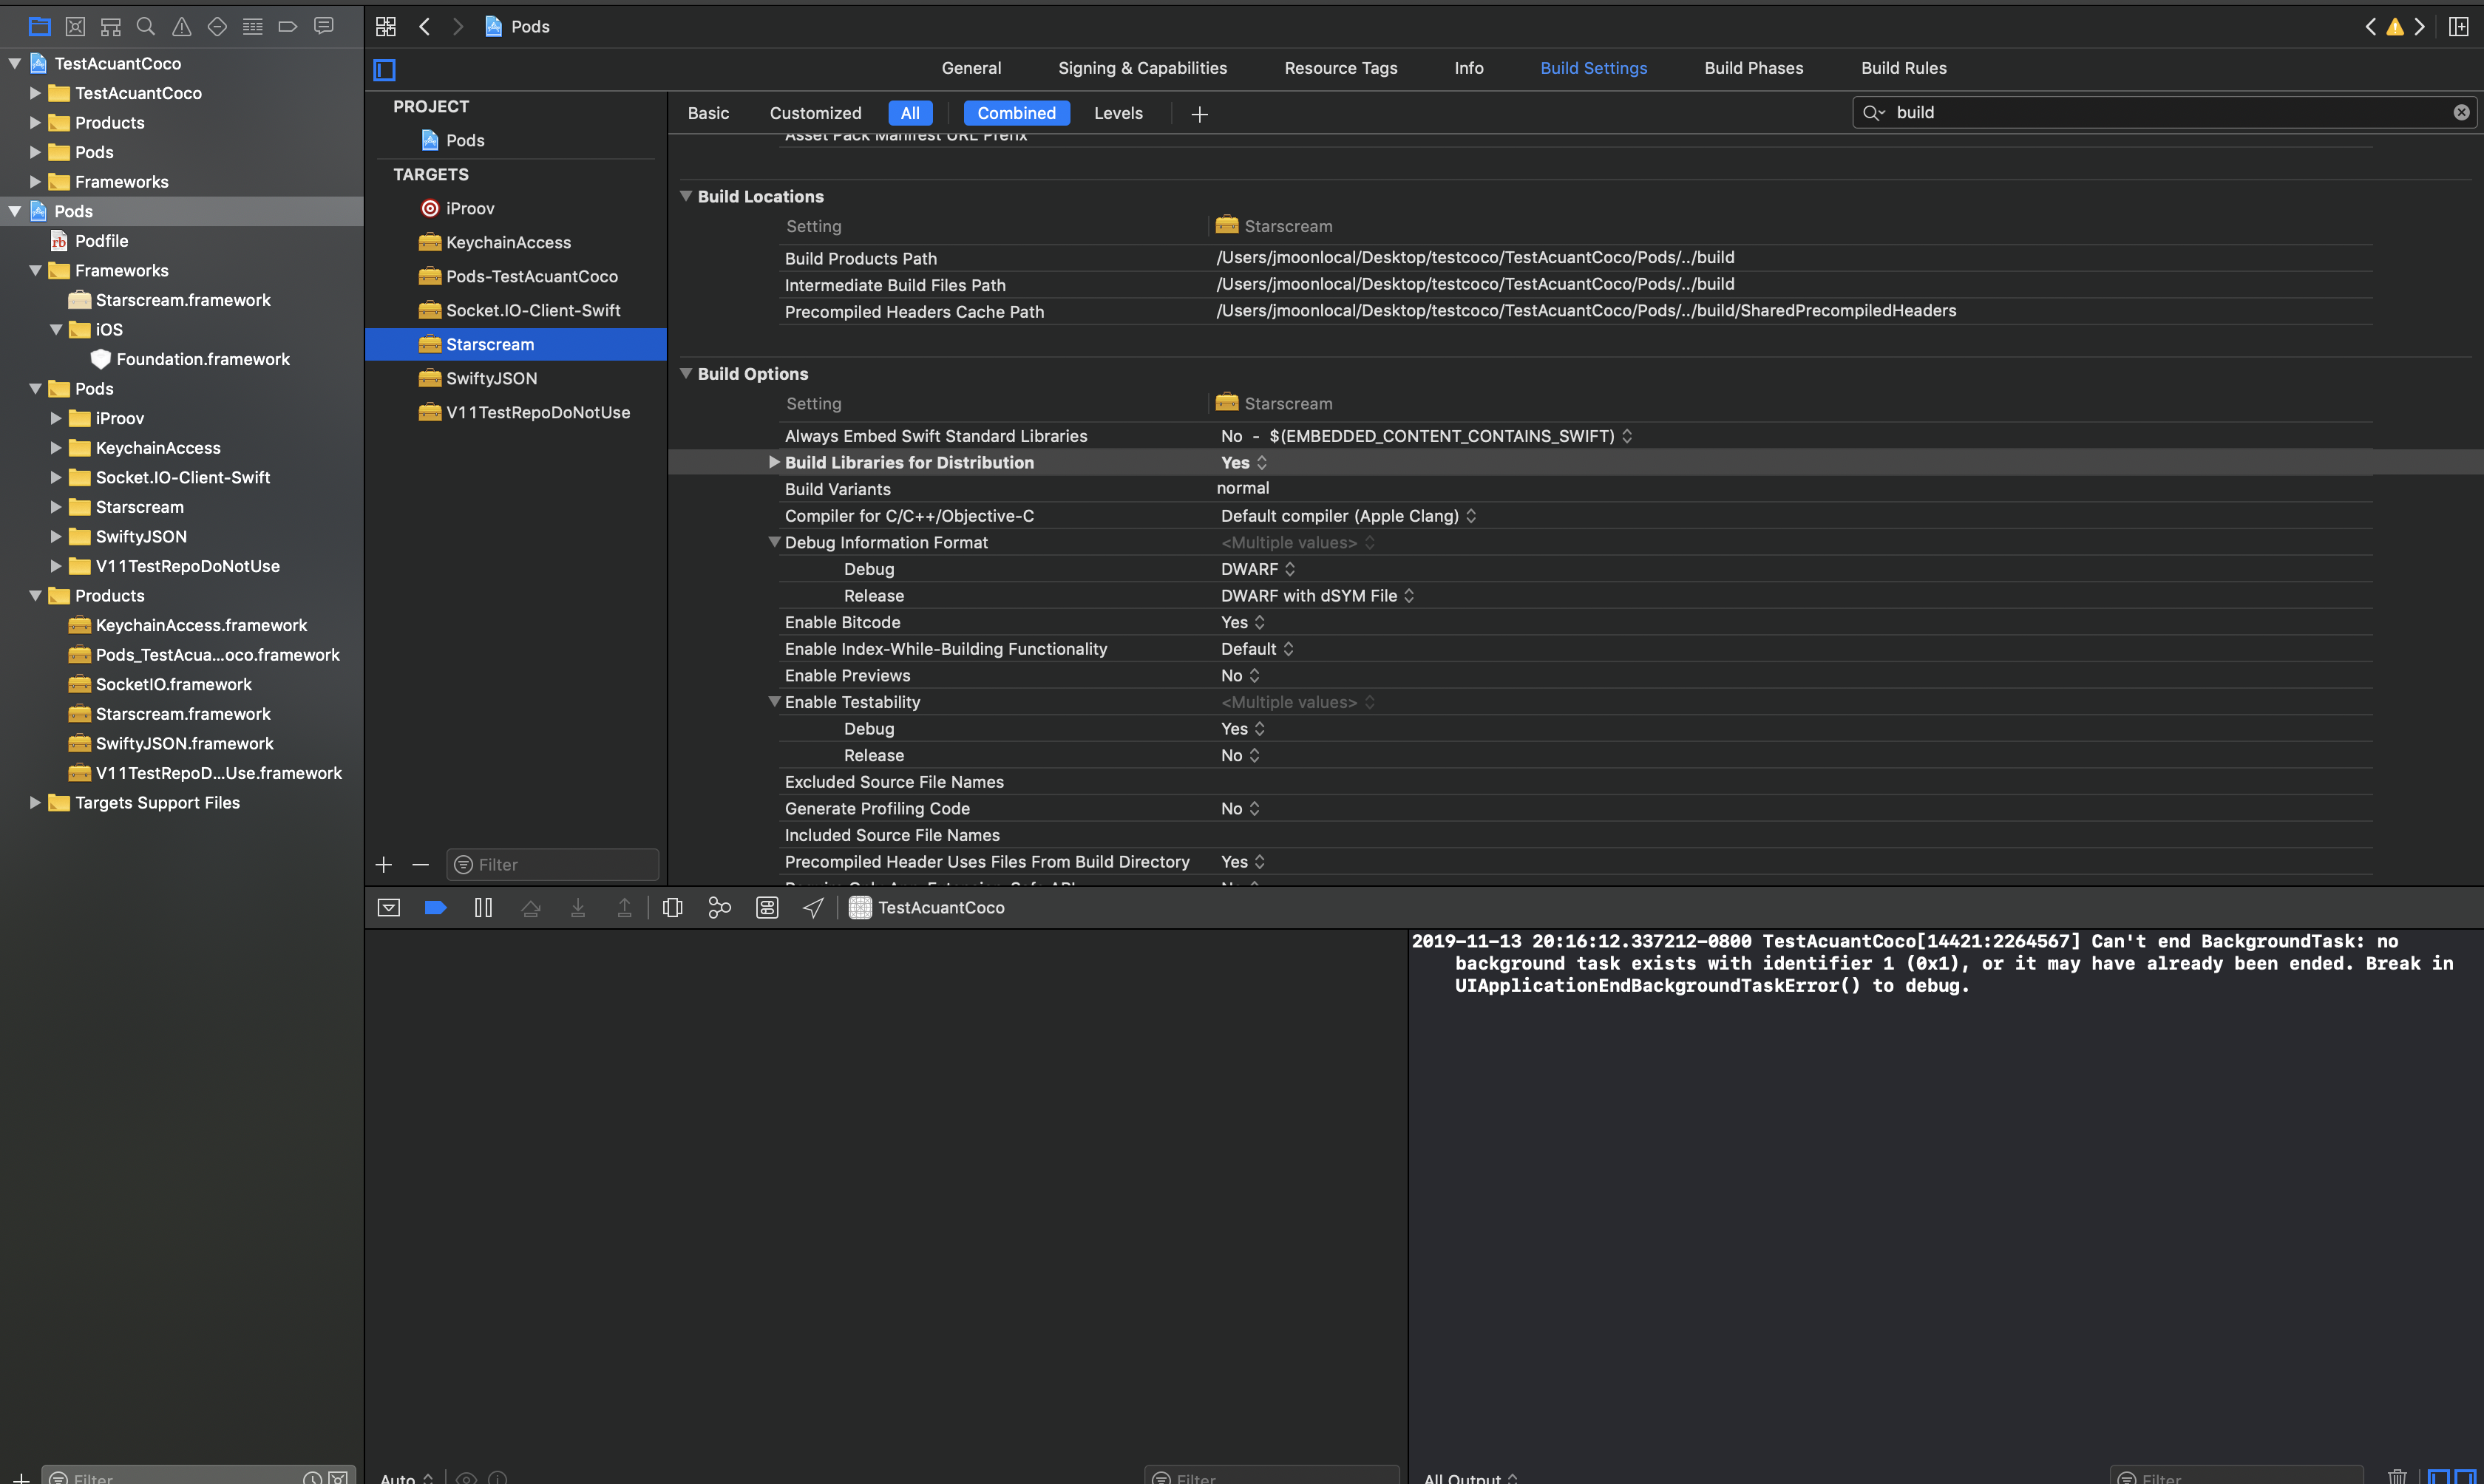
Enable "BUILD_FOR_DISTRIBUTION" for all Acuant pod frameworks in Build Settings.
-
Using Cocoapods. Add to your Podfile.
post_install do |installer| installer.pods_project.targets.each do |target| if ['AcuantiOSSDKV11', 'KeychainAccess', 'Socket.IO-Client-Swift', 'Starscream' 'SwiftyJSON'].include? target.name target.build_configurations.each do |config| config.build_settings['BUILD_LIBRARY_FOR_DISTRIBUTION'] = 'YES' end end end end -
Manually
-

-
Create a plist file named AcuantConfig which includes the following details:
 <?xml version="1.0" encoding="UTF-8"?>
 <!DOCTYPE plist PUBLIC "-//Apple//DTD PLIST 1.0//EN" "http://www.apple.com/DTDs/PropertyList-1.0.dtd">
 <plist version="1.0">
 	<dict>
 		<key>acuant_username</key>
 		<string>xxxxxx@acuantcorp.com</string>
 		<key>acuant_password</key>
 		<string>xxxxxxxxxx</string>
 		<key>acuant_subscription</key>
 		<string>xxxxxxxxxxxxxxxxxxxxxxxxxxxxxxxxx</string>
 		<key>frm_endpoint</key>
 		<string>https://frm.acuant.net</string>
 		<key>passive_liveness_endpoint</key>
 		<string>https://us.passlive.acuant.net</string>
 		<key>med_endpoint</key>
 		<string>https://medicscan.acuant.net</string>
 		<key>assureid_endpoint</key>
 		<string>https://services.assureid.net</string>
 		<key>acas_endpoint</key>
 		<string>https://acas.acuant.net</string>
 		<key>ozone_endpoint</key>
 		<string>https://ozone.acuant.net</string>
 	</dict>
 </plist>
The following are the default values for testing purposes:
 PREVIEW
 		<key>frm_endpoint</key>
 		<string>https://preview.face.acuant.net</string>
 		<key>passive_liveness_endpoint</key>
 		<string>https://preview.passlive.acuant.net</string>
 		<key>med_endpoint</key>
 		<string>https://preview.medicscan.acuant.net</string>
 		<key>assureid_endpoint</key>
 		<string>https://preview.assureid.acuant.net</string>
 		<key>acas_endpoint</key>
 		<string>https://preview.acas.acuant.net</string>
 		<key>ozone_endpoint</key>
 		<string>https://preview.ozone.acuant.net</string>
The following are the default values based on region:
 USA
 	<key>frm_endpoint</key>
 	<string>https://frm.acuant.net</string>
 	<key>passive_liveness_endpoint</key>
 	<string>https://us.passlive.acuant.net</string>
 	<key>med_endpoint</key>
 	<string>https://medicscan.acuant.net</string>
 	<key>assureid_endpoint</key>
 	<string>https://services.assureid.net</string>
 	<key>acas_endpoint</key>
 	<string>https://acas.acuant.net</string>
 	<key>ozone_endpoint</key>
 	<string>https://ozone.acuant.net</string>

 EU
 	<key>frm_endpoint</key>
 	<string>https://eu.frm.acuant.net</string>
 	<key>passive_liveness_endpoint</key>
 	<string>https://eu.passlive.acuant.net</string>
 	<key>assureid_endpoint</key>
 	<string>https://eu.assureid.acuant.net</string>
 	<key>acas_endpoint</key>
 	<string>https://eu.acas.acuant.net</string>
 	<key>ozone_endpoint</key>
 	<string>https://eu.ozone.acuant.net</string>

 AUS
 	<key>frm_endpoint</key>
 	<string>https://aus.frm.acuant.net</string>
 	<key>passive_liveness_endpoint</key>
 	<string>https://aus.passlive.acuant.net</string>
 	<key>assureid_endpoint</key>
 	<string>https://aus.assureid.acuant.net</string>
 	<key>acas_endpoint</key>
 	<string>https://aus.acas.acuant.net</string>
 	<key>ozone_endpoint</key>
 	<string>https://aus.ozone.acuant.net</string>
-
Use Acuant Services to retrieve a token. We recommend using a proxy service to retrieve the token to ensure integrity of credentials.
-
Set the token:
if let success = Credential.setToken(token: ""){ //token was valid } else{ //invalid or expired token } -
Tokens will eventually expire, depending on the provided settings. Use the method below to ensure token is still valid before reusing the token.
if let token : AcuantJwtToken = Credential.getToken(){ let valid: Bool = token.isValid() } -
NOTE: If token is set, all service calls will attempt to authorize using the token. If the token is not set, the legacy credentials will be used.
-
IMPORTANT: You will still need to provide the SubscriptionId in the Credential object in order to use Acuant Services with bearer tokens.
Initialization
-
Select packages for initialization.
let packages = [AcuantEchipPackage(), AcuantImagePreparationPackage()] -
Initialize the sdk.
 let initalizer: IAcuantInitializer = AcuantInitializer()

 let task = initalizer.initialize(packages: packages){ [weak self]
 	error in
 		if let err = error{
 			//error
 		}
 		else{
 			//success
 		}
 }
Note: If you are not using a configuration file for initialization, then use the following statement (providing appropriate credentials for username, password, and subscription ID):
 Credential.setUsername(username: "xxx")
 Credential.setPassword(password: "xxxx")
 Credential.setSubscription(subscription: "xxxxxx")

 let endpoints = Endpoints()
 endpoints.frmEndpoint = "https://frm.acuant.net"
 endpoints.healthInsuranceEndpoint = "https://medicscan.acuant.net"
 endpoints.idEndpoint = "https://services.assureid.net"
 endpoints.acasEndpoint = "https://acas.acuant.net"
 endpoints.ozoneEndpoint = "https://ozone.acuant.net"

 Credential.setEndpoints(endpoints: endpoints)
AcuantImagePreparation may be initialized by providing only a username and a password. However, without providing a Subscription ID, the application can only capture an image and get the image. Initialize without a Subscription ID:
- Only the AcuantCamera, AcuantImagePreparation, and AcuantHGLiveness modules may be used.
- The SDK can be used to capture the identity documents.
- The captured images can be exported from the SDK. See the DocumentCaptureDelegate protocol in the AcuantCamera project.
-
AcuantCamera is best used in portrait mode. Lock the orientation of the app before using Camera.
-
Set up callbacks:
// Returns the image and barcodeString captured from device public protocol CameraCaptureDelegate { func setCapturedImage(image:Image, barcodeString:String?) } -
Open the camera:
Note: Options are now defined through an options object. See AcuantCameraOptions for all configurable fields.
let options = AcuantCameraOptions(autoCapture: true, hideNavigationBar: true) let documentCameraController = DocumentCameraController.getCameraController(delegate:self!, cameraOptions: options) navigationController.pushViewController(documentCameraController, animated: false) -
Get the captured image:
public protocol CameraCaptureDelegate { func setCapturedImage(image:Image, barcodeString:String?) } -
User canceled:
 func setCapturedImage(image:Image, barcodeString:String?){
 	if let success = image.image{
 	}
 	else{
 		//user has canceled
 	}
 }
Custom UI with DocumentCaptureSesssion (see DocumentCameraController.swift for reference):
-
Get the DocumentCaptureSesssion.
@objc public protocol DocumentCaptureDelegate { func readyToCapture() // gets called when triggering capture func documentCaptured(image:UIImage, barcodeString:String?) // gets called with captured result } let captureSession = DocumentCaptureSession.getDocumentCaptureSession( delegate: DocumentCaptureDelegate, // session callback frameDelegate: FrameAnalysisDelegate, // frame analysis callback autoCapture:Bool, // enable frame analysis captureDevice:AVCaptureDevice?) // AV Capture Device -
Start the session, and then add the session to AVCaptureVideoPreviewLayer.
captureSession.start() // will start the capture session. let videoPreviewLayer = AVCaptureVideoPreviewLayer(session: captureSession) //add custom ui -
Receive Frame Results.
@objc public enum FrameResult : Int{ case NO_DOCUMENT, // No document SMALL_DOCUMENT, // Document is small BAD_ASPECT_RATIO, // Document type does not match aspect ratio GOOD_DOCUMENT, // Document is good to trigger capture DOCUMENT_NOT_IN_FRAME // Document is not in frame } @objc public protocol FrameAnalysisDelegate{ func onFrameAvailable(frameResult: FrameResult, points: Array<CGPoint>?) } -
Trigger capture.
captureSession.enableCapture() -
DocumentCaptureDelegate will be executed with result
func documentCaptured(image:UIImage, barcodeString:String?)Note: AcuantCamera is dependent on AcuantImagePreparation and AcuantCommon.
-
Add Tesseract dependency. See https://github.com/gali8/Tesseract-OCR-iOS
-
Add the OCRB Training data to you project. We recommend using the training data resource in Assets directory of the Sample App. Please refer to https://www.raywenderlich.com/2010498-tesseract-ocr-tutorial-for-ios#toc-anchor-005.
-
Set View Controller UI customizations.
public enum MrzCameraState : Int { case None = 0, Align = 1, MoveCloser = 2, TooClose = 3, Good = 4, Captured = 5 } let vc = AcuantMrzCameraController() vc.options = AcuantCameraOptions() vc.customDisplayMessage : ((MrzCameraState) -> String) = { state in switch(state){ case .None, .Align: return "" case .MoveCloser: return "Move Closer" case .TooClose: return "Too Close!" case .Good: return "Reading MRZ" case .Captured: return "Captured" } } -
Set callback.
vc.callback : ((AcuantMrzResult?) -> Void)? = { [weak self] result in if let success = result{ DispatchQueue.main.async { //pop or dismiss the View Controller self?.navigationController?.popViewController(animated: true) } } else{ //User Canceled } } -
Present or Push the View Controller. Push is shown in example.
self.navigationController?.pushViewController(controller, animated: false) -
Result.
 public class AcuantMrzResult{
 	public var surName:String = ""
 	public var givenName:String = ""
 	public var country:String = ""
 	public var passportNumber: String = ""
 	public var nationality:String = ""
 	public var dob: String = ""
 	public var gender: String = ""
 	public var passportExpiration: String = ""
 	public var personalDocNumber: String = ""
 	public var checkSumResult1: Bool = false
 	public var checkSumResult2: Bool = false
 	public var checkSumResult3: Bool = false
 	public var checkSumResult4: Bool = false
 	public var checkSumResult5: Bool = false
 }
-
Configure the application to detect NFC Tags. Add "Near Field Communication" Capability to the target app under Signing and Capability in Xcode. Then, add "NFCReaderUsageDescription" key to the Info.plist of the app. For more info, please look at "Configure the App to Detect NFC Tags" on https://developer.apple.com/documentation/corenfc/building_an_nfc_tag-reader_app.
-
Add "ISO7816 application identifiers for NFC Tag Reader Session" key with "A0000002471001" as item value in application info.plist.
-
AcuantEchipPackage must be initialized in the previous step.
-
This feature is only available in iOS version 13. You will need to use the @available attribute to use methods inside module.
-
Create an instance of Acuant Reader. Make sure this object does not get disposed while reading.
private let reader: IAcuantEchipReader = AcuantEchipReader() -
Create a session request.
let request = AcuantEchipSessionRequest(passportNumber: "", dateOfBirth: "", expiryDate: "") -
Set custom messages based on state of reader.
public enum AcuantEchipDisplayMessage { case requestPresentPassport case authenticatingWithPassport(Int) case readingDataGroupProgress(String, Int) case error case authenticatingExtractedData case successfulRead } let customDisplayMessage : ((AcuantEchipDisplayMessage) -> String?) = { message in switch message { case .requestPresentPassport: return "Hold your iPhone near an NFC enabled passport." case .authenticatingWithPassport(let progress): let progressString = handleProgress(percentualProgress: progress) return "Authenticating with passport.....\n\n\(progressString)" case .readingDataGroupProgress(let dataGroup, let progress): let progressString = handleProgress(percentualProgress: progress) return "Reading \(dataGroup).....\n\n\(progressString)" case .error: return "Sorry, there was a problem reading the passport. Please try again" case .successfulRead: return "Passport read successfully" case .authenticatingExtractedData: return "Authenicating with Ozone" } } -
Start the reader.
self.reader.readNfcTag(request: request, customDisplayMessage: customDisplayMessage){ [weak self] (model, error) in if let result = model{ //success } else{ if let err = error{ //error } else{ //user canceled } } } -
Result.
public class AcuantPassportModel { public var documentType : String public var documentSubType : String public var personalNumber : String public var documentNumber : String public var issuingAuthority : String public var documentExpiryDate : String public var firstName : String public var lastName : String public var dateOfBirth : String public var gender : String public var nationality : String public var image : UIImage? public var passportSigned = OzoneResultStatus.UNKNOWN public var passportCountrySigned = OzoneResultStatus.UNKNOWN public var passportDataValid = false public var age: Int? public var isExpired: Bool? public func getRawDataGroup(dgId: AcuantDataGroupId) -> [UInt8]?{ return self.dataGroups[dgId] } } public enum OzoneResultStatus : Int{ case SUCCESS case FAILED case UNKNOWN } public enum AcuantDataGroupId : Int { case COM case DG1 case DG2 case DG3 case DG4 case DG5 case DG6 case DG7 case DG8 case DG9 case DG10 case DG11 case DG12 case DG13 case DG14 case DG15 case DG16 case SOD case Unknown } -
Map country to passport.
 public let AcuantCountryDataPageMap: [String: String]
 //{ "CountryCode": "Location" }
This module contains all image preparation functionality.
After an image is captured, it is cropped and checked for sharpness and glare. This is done using the evaluateImage of AcuantImagePreparation.
public class func evaluateImage(image: UImage, callback: (AcuantImage, AcuantError) -> ())
The callback returns the AcuantImage and AcuantError. The AcuantImage can be used to be verify the crop, sharpness, and glare.
public class AcuantImage {
	public let image: UIImage
	public let data: NSData
	public let sharpness: Int
	public let glare: Int
	public let dpi: Int
}
After a document image is captured, it can be processed using the following steps.
Note: If an upload fails with an error, retry the image upload using a better image.
-
Create an instance:
public class func createInstance(options:IdOptions,delegate:CreateInstanceDelegate) public protocol CreateInstanceDelegate{ func instanceCreated(instanceId: String?,error:AcuantError?); } -
Prepare the image. You must pass in AcuantImage.data and idData.barcodeString (when applicable) in EvaluatedImageData.
public class EvaluatedImageData { public let imageBytes: NSData public let barcodeString: String? public init(imageBytes: NSData, barcodeString: String?) } -
Upload the image:
public class func uploadImage(instancdId:String,data:EvaluatedImageData,options:IdOptions,delegate:UploadImageDelegate) public protocol UploadImageDelegate{ func imageUploaded(error: AcuantError?,classification:Classification?); } -
Get the data:
public class func getData(instanceId:String,isHealthCard:Bool,delegate:GetDataDelegate?) public protocol UploadImageDelegate{ func imageUploaded(error: AcuantError?,classification:Classification?); } -
Delete the instance:
 public class func deleteInstance(instanceId : String,type:DeleteType, delegate:DeleteDelegate)

 public protocol DeleteDelegate {
 	func instanceDeleted(success : Bool)
 }
-
(Optional) Set default Image. Locate "acuant_default_face_image.png" in the Assets directory of sample app project. Add this to your app if needed.
-
Set localized strings in app's localizables:
"acuant_face_camera_initial" = "Align face to start capture"; "acuant_face_camera_face_too_close" = "Too Close! Move Away"; "acuant_face_camera_face_too_far" = "Move Closer"; "acuant_face_camera_face_has_angle" = "Face has Angle. Do not tilt"; "acuant_face_camera_face_not_in_frame" = "Move in Frame"; "acuant_face_camera_face_moved" = "Hold Steady"; "acuant_face_camera_capturing_2" = "Capturing\n2..."; "acuant_face_camera_capturing_1" = "Capturing\n1..."; -
Set any UI Customizations needed:
class FaceAcuantCameraOptions{ public let totalCaptureTime: Int //totoal time to capture public let bracketColorDefault: CGColor //bracket color default (no face) public let bracketColorError: CGColor //bracket color error (error in face requirements) public let bracketColorGood: CGColor //bracket color good (good face requirements) public let fontColorDefault: CGColor //font color default public let fontColorError: CGColor //font color error public let fontColorGood: CGColor //font color good public let defaultImageUrl: String //default image public let showOval: Bool // show oval } //example let options = FaceAcuantCameraOptions() -
Get the Controller and push to navigationController:
let controller = AcuantFaceCaptureController() controller.options = options controller.callback = { [weak self] (image: UIImage?) in if(image == nil){ //user canceled } } self.navigationController.pushViewController(controller, animated: true) -
Use the callback with the captured result.
Acuant recommends using the LiveAssessment property rather than the score) to evaluate response. AcuantPassiveLiveness.startSelfieCapture will return a rescaled image.
Follow these recommendations to effectively process an image for passive liveness:
- Height: minimum 480 pixels; recommended 720 or 1080 pixels
- Compression: Image compression is not recommended (JPEG 70 level or above is acceptable). For best results, use uncompressed images.
- Out-of-plane rotation: Face pitch and yaw angle: from -20 to 20 degrees +/-3 degrees
- In-plane rotation: Face roll angle: from -30 to 30 degrees +/- 3 degrees
- Pupillary distance: Minimum distance between the eyes 90 +/- 5 pixels
- Face size: Minimum 200 pixels in either dimension
- Faces per image: 1
- Sunglasses: Must be removed
The following may significantly increase errors or false results:
- Using a motion blur effect
- Texture filtering
- A spotlight on the face and nearest surroundings
- An environment with poor lighting or colored light
Note The use of fish-eye lenses is not supported by this API.
-
Get Passive Liveness result with UIImage:
 //liveness request
 class AcuantLivenessRequest{
     public let image: UIImage
     public init(image: UIImage)
 }

 //liveness response
 class AcuantLivenessResponse{
 	public let score: Int
 	public let result: AcuantLivenessAssessment

 	public enum AcuantLivenessAssessment: String{
 		case Error
 		case PoorQuality
 		case Live
 		case NotLive
 	}
 }

 //liveness response
 class AcuantLivenessError{
 	public let errorCode: AcuantLivenessErrorCode?
 	public let description: String?


 	public enum AcuantLivenessErrorCode: String{
 	    case Unknown
 	    case FaceTooClose
 	    case FaceNotFound
 	    case FaceTooSmall
 	    case FaceAngleTooLarge
 	    case FailedToReadImage
 	    case InvalidRequest
 	    case InvalidRequestSettings
 	    case Unauthorized
 	    case NotFound
 	    case InternalError
 	    case InvalidJson
 	}
 }

 //example
 AcuantPassiveLiveness.postLiveness(request: AcuantLivenessRequest(image: image)){ [weak self]
 	(result: AcuantLivenessResponse?, error: AcuantLivenessError?) in
 		//response
 }
This module checks for liveness (whether the subject is a live person) by using blink detection. The user interface code for this is contained in the Sample application (FaceLivenessCameraController.swift) which customers may modify for their specific requirements.
Acuant UI in Sample App
// Code for HG Live controller
let liveFaceViewController = FaceLivenessCameraController()
liveFaceViewController.delegate : AcuantHGLiveFaceCaptureDelegate = self
self.navigationController.pushViewController(liveFaceViewController, animated: true)
Custom UI, create a face live capture session:
enum AcuantFaceType : Int {

    case NONE // No face

    case FACE_TOO_CLOSE // face is too close camera

    case FACE_MOVED // face moved from its original position

    case FACE_TOO_FAR // face is too far from camera

    case FACE_NOT_IN_FRAME // face is not in frame

    case FACE_GOOD_DISTANCE // face is good distance and in frame
}

public protocol AcuantHGLiveFaceCaptureDelegate {
		func liveFaceDetailsCaptured(liveFaceDetails: LiveFaceDetails?, faceType: AcuantHGLiveness.AcuantFaceType)
}

public class func getFaceCaptureSession(delegate:AcuantHGLiveFaceCaptureDelegate?, captureDevice: AVCaptureDevice?)-> FaceCaptureSession


let faceCaptureSession = AcuantHGLiveness.getFaceCaptureSession(delegate: self, captureDevice: captureDevice)
The AcuantIPLiveness module checks whether the subject is a live person.
-
Run the setup:
AcuantIPLiveness.performLivenessSetup(delegate:LivenessSetupDelegate) public protocol LivenessSetupDelegate{ func livenessSetupSucceeded(result:LivenessSetupResult) // Called when setup succeeds func livenessSetupFailed(error:AcuantError) // Called when setup failed } public class LivenessSetupResult { public var apiKey : String public var token : String public var userId : String public var apiEndpoint : String } -
Perform the Liveness test:
Note You can customize the UI as needed by using LivenessSetupResult.
// Adjust various colors for the camera preview: setupResult.ui.lineColor = .white setupResult.ui.backgroundColor = .black setupResult.ui.loadingTintColor = .lightGray setupResult.ui.notReadyTintColor = .orange setupResult.ui.readyTintColor = .green setupResult.ui.title = "title" // Specify a custom title to be shown. Defaults to nil which will show an auto generated message. Set to empty string ("") to hide the message entirely. setupResult.ui.regularFont = "SomeFont" setupResult.ui.boldFont = "SomeFont-Bold" setupResult.ui.fonts = ["SomeFont", "SomeFont-Bold"] // If using custom fonts, specify them here (don't forget to add them to your Info.plist!) setupResult.ui.logoImage = UIImage(named: "foo") setupResult.ui.scanLineDisabled = false // Disables the vertical sweeping scanline while flashing setupResult.ui.autoStartDisabled = false // Disable the "auto start" countdown functionality. The user will have to tap the screen to start liveness test AcuantIPLiveness.performLivenessTest(setupResult:LivenessSetupResult, delegate:LivenessTestDelegate) public protocol LivenessTestDelegate{ func livenessTestCompleted() // This is for the test; called when Enroll is complete func livenessTestCompletedWithError(error:AcuantError?) // This is for the test; called when Enroll is complete and error occured func livenessTestProcessing(progress: Double, message: String) // This is for real-time notifications of progress of liveness test. It will be called after user captures live face. It is intended to be used for custom UI progress notification. } -
Get the liveness test result:
 AcuantIPLiveness.getLivenessTestResult(token:String,userId:String,delegate:LivenessTestResultDelegate)

 public protocol LivenessTestResultDelegate{
 	func livenessTestResultReceived(result:LivenessResult) // Called when test result was received successfully
 	func livenessTestResultReceiveFailed(error:AcuantError) // Called when test result was not received
 }

 public class LivenessTestResult {
 	public var passedLivenessTest : Bool = false
 	public var image : UIImage? = nil

 }
The following is a list of dependencies:
- iProov.framework
- KeychainAccess.framework
- SocketIO.framework
- Startscream.framework
- SwiftyJSON.framework
This module is used to match two facial images:
	public class func processFacialMatch(facialData : FacialMatchData, delegate : FacialMatchDelegate)

	public protocol FacialMatchDelegate {
		func facialMatchFinished(result:FacialMatchResult?)
	}

	public class FacialMatchData{
		public var faceImageOne : UIImage // Facial image from ID Card (image gets compressed by 80%)
		public var faceImageTwo : UIImage // Facial image from selfie capture during liveness check (image gets compressed by 80%)
	}
public class AcuantErrorCodes{
	public static let ERROR_InvalidCredentials = -1
	public static let ERROR_InitializationNotFinished = -4
	public static let ERROR_Network = -5
	public static let ERROR_InvalidJson = -6
	public static let ERROR_CouldNotCrop = -7
	public static let ERROR_CouldNotCreateConnectInstance = -13
	public static let ERROR_CouldNotUploadConnectImage = -14
	public static let ERROR_CouldNotUploadConnectBarcode = -15
	public static let ERROR_CouldNotGetConnectData = -16
	public static let ERROR_CouldNotClassifyDocument = -20
	public static let ERROR_LowResolutionImage = -21
	public static let ERROR_BlurryImage = -22
	public static let ERROR_ImageWithGlare = -23
	public static let ERROR_CouldNotGetIPLivenessToken = -24
	public static let ERROR_NotALiveFace = -25
	public static let ERROR_CouldNotAccessLivenessData = -26
	public static let ERROR_CouldNotAccessCredential = -27
	public static let ERROR_USER_CANCELED_ACTIVITY = -28
	public static let ERROR_INVALID_PARAMETER = -29

	//ozone
	public static let ERROR_OzoneInvalidFormat = -50;
	public static let ERROR_OzoneNotAuthorized = -51;

	//echip
	public static let ERROR_EChipReadError = -60;
	public static let ERROR_InvalidNfcTag = -61;
	public static let ERROR_InvalidNfcKeyFormatting = -62;
}
public class AcuantErrorDescriptions {
	public static let ERROR_DESC_InvalidCredentials = "Invalid credentials"
	public static let ERROR_DESC_InvalidLicenseKey = "Invalid License Key"
	public static let ERROR_DESC_InvalidEndpoint = "Invalid endpoint"
	public static let ERROR_DESC_Network = "Network problem"
	public static let ERROR_DESC_InitializationNotFinished = "Initialization not finished"
	public static let ERROR_DESC_InvalidJson = "Invalid Json response"
	public static let ERROR_DESC_CouldNotCrop = "Could not crop image"
	public static let ERROR_DESC_BarcodeCaptureFailed = "Barcode capture failed"
	public static let ERROR_DESC_BarcodeCaptureTimedOut = "Barcode capture timed out"
	public static let ERROR_DESC_BarcodeCaptureNotAuthorized = "Barcode capture is not authorized"
	public static let ERROR_DESC_LiveFaceCaptureNotAuthorized = "Live face capture is not authorized"
	public static let ERROR_DESC_CouldNotCreateConnectInstance = "Could not create connect Instance"
	public static let ERROR_DESC_CouldNotUploadConnectImage = "Could not upload image to connect instance"
	public static let ERROR_DESC_CouldNotUploadConnectBarcode = "Could not upload barcode to connect instance"
	public static let ERROR_DESC_CouldNotGetConnectData = "Could not get connect image data"
	public static let ERROR_DESC_CardWidthNotSet = "Card width not set"
	public static let ERROR_DESC_CouldNotGetHealthCardData = "Could not get health card data"
	public static let ERROR_DESC_CouldNotClassifyDocument = "Could not classify document"
	public static let ERROR_DESC_LowResolutionImage = "Low resolution image"
	public static let ERROR_DESC_BlurryImage = "Blurry image"
	public static let ERROR_DESC_ImageWithGlare = "Image has glare"
	public static let ERROR_DESC_CouldNotGetIPLivenessToken = "Could not get face liveness token"
	public static let ERROR_DESC_NotALiveFace = "Not a live face"
	public static let ERROR_DESC_CouldNotAccessLivenessData = "Could not access liveness data"
	public static let ERROR_DESC_ERROR_CouldNotAccessCredential = "Could not get credential"
	public static let ERROR_DESC_USER_CANCELED_ACTIVITY = "User canceled activity"
	public static let ERROR_DESC_INVALID_PARAMETERS = "Invalid Parameters."
	public static let ERROR_DESC_OzoneInvalidFormat = "Ozone returned invalid format";

	public static let ERROR_DESC_OzoneNotAuthorized = "Credentials not authorized for ozone";
	public static let ERROR_DESC_EChipReadError = "Error reading eChip. Connection lost to passport or incorrect key.";
	public static let ERROR_DESC_InvalidNfcTag = "Tag Tech list was null. Most likely means unsupported passport/not a passport";
	public static let ERROR_DESC_InvalidNfcKeyFormatting = "Decryption key formatted incorrectly. Check DOB, DOE, and doc number.";
}
public class Image {
	public var image: UIImage? = nil
	public var dpi: Int = 0 // dpi value of the captured image
	public var error: AcuantError? = nil
	public var isCorrectAspectRatio = false // If the captured image has the correct aspect ratio
	public var aspectRatio: Float = 0.0 // Aspect ratio of the captured image
	public var points: Array<CGPoint> = []
	public var isPassport = false
	public init(){}
}
public class AcuantCameraOptions{
    public let timeInMsPerDigit: Int
    public let digitsToShow: Int
    public let allowBox: Bool
    public let autoCapture: Bool
    public let hideNavigationBar : Bool
    public let bracketLengthInHorizontal : Int
    public let bracketLengthInVertical: Int
    public let defaultBracketMarginWidth : CGFloat
    public let defaultBracketMarginHeight : CGFloat
    public let colorHold: CGColor
    public let colorCapturing: CGColor
    public let colorBracketAlign: CGColor
    public let colorBracketCloser: CGColor
    public let colorBracketHold: CGColor
    public let colorBracketCapture: CGColor
    public let defaultImageUrl: String
    public let showBackButton: Bool

}
public class IdOptions {
    public var cardSide: CardSide = CardSide.Front
    public var isHealthCard: Bool = false
    public var isRetrying: Bool = false
    public var authenticationSensitivity: AuthenticationSensitivity = AuthenticationSensitivity.Normal
}
All frameworks are fat (multi-architecture) binaries that contain slices for armv7, arm64, i386, and x86(64) CPU architectures. ARM slices are used by physical iOS devices, while i386 and x86(64) are used by the simulator.
Use the lipo command to check which slices are contained in the binaries:
lipo -info <path to the file>
You can also use the lipo command to remove unwanted slices:
	lipo -remove i386 <Path to the file> -o <Output file path>

	lipo -remove x86_64 <Path to the file> -o <Output file path>
Why does the Code signing “AcuantCommon.framework” error occur when I archive the sample application?
Acuant provides support for all CPU architectures that are required by simulators and devices. However, when exporting or publishing to the Test Flight/App Store, the simulator architectures (i386 and x86(64)) should be removed from the framework binaries.
- Archive the application.
- Select the archive and then click Distribute app> App store > Export.
Acuant does not provide obfuscation tools, however several third-party tools, including iXGuard and Arxan, are available.
Copyright 2020 Acuant Inc. All rights reserved.
This document contains proprietary and confidential information and creative works owned by Acuant and its respective licensors, if any. Any use, copying, publication, distribution, display, modification, or transmission of such technology, in whole or in part, in any form or by any means, without the prior express written permission of Acuant is strictly prohibited. Except where expressly provided by Acuant in writing, possession of this information shall not be construed to confer any license or rights under any Acuant intellectual property rights, whether by estoppel, implication, or otherwise.
AssureID and i-Dentify are trademarks of Acuant Inc. Other Acuant product or service names or logos referenced this document are either trademarks or registered trademarks of Acuant.
All 3M trademarks are trademarks of Gemalto Inc/Thales
Windows is a registered trademark of Microsoft Corporation.
Certain product, service, or company designations for companies other than Acuant may be mentioned in this document for identification purposes only. Such designations are often claimed as trademarks or service marks. In all instances where Acuant is aware of a claim, the designation appears in initial capital or all capital letters. However, you should contact the appropriate companies for more complete information regarding such designations and their registration status.
For technical support, go to: https://support.acuant.com
Acuant Inc. 6080 Center Drive, Suite 850, Los Angeles, CA 90045