Yolo 9000
YOLO9000: Better, Faster, Stronger - Real-Time Object Detection (State of the art)

Scroll down if you want to make your own video.
How to get started?
Ubuntu/Linux
git clone --recursive https://github.com/philipperemy/yolo-9000.git
cd yolo-9000
cat yolo9000-weights/x* > yolo9000-weights/yolo9000.weights # it was generated from split -b 95m yolo9000.weights
md5sum yolo9000-weights/yolo9000.weights # d74ee8d5909f3b7446e9b350b4dd0f44  yolo9000.weights
cd darknet
make # Will run on CPU. For GPU support, scroll down!
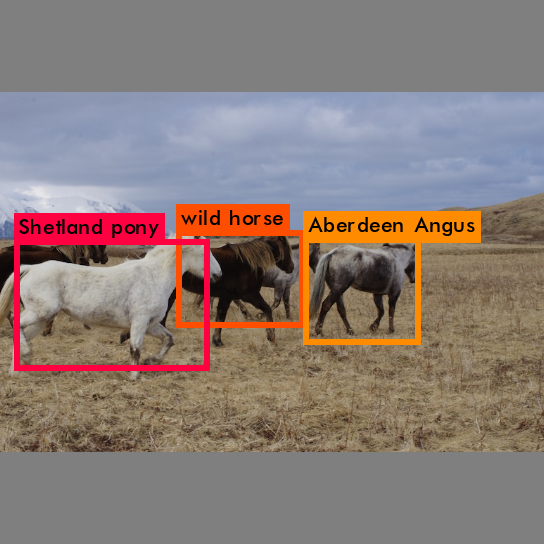
./darknet detector test cfg/combine9k.data cfg/yolo9000.cfg ../yolo9000-weights/yolo9000.weights data/horses.jpg
Mac OS
git clone --recursive https://github.com/philipperemy/yolo-9000.git
cd yolo-9000
cat yolo9000-weights/x* > yolo9000-weights/yolo9000.weights # it was generated from split -b 95m yolo9000.weights
md5 yolo9000-weights/yolo9000.weights # d74ee8d5909f3b7446e9b350b4dd0f44  yolo9000.weights
cd darknet
git reset --hard b61bcf544e8dbcbd2e978ca6a716fa96b37df767
make # Will run on CPU. For GPU support, scroll down!
./darknet detector test cfg/combine9k.data cfg/yolo9000.cfg ../yolo9000-weights/yolo9000.weights data/horses.jpg
You can use the latest version of darknet by running this command in the directory yolo-9000:
git submodule foreach git pull origin master
The output should be something like:
layer     filters    size              input                output
    0 conv     32  3 x 3 / 1   544 x 544 x   3   ->   544 x 544 x  32
    1 max          2 x 2 / 2   544 x 544 x  32   ->   272 x 272 x  32
    2 conv     64  3 x 3 / 1   272 x 272 x  32   ->   272 x 272 x  64
    3 max          2 x 2 / 2   272 x 272 x  64   ->   136 x 136 x  64
    4 conv    128  3 x 3 / 1   136 x 136 x  64   ->   136 x 136 x 128
    5 conv     64  1 x 1 / 1   136 x 136 x 128   ->   136 x 136 x  64
    6 conv    128  3 x 3 / 1   136 x 136 x  64   ->   136 x 136 x 128
    7 max          2 x 2 / 2   136 x 136 x 128   ->    68 x  68 x 128
    8 conv    256  3 x 3 / 1    68 x  68 x 128   ->    68 x  68 x 256
    9 conv    128  1 x 1 / 1    68 x  68 x 256   ->    68 x  68 x 128
   10 conv    256  3 x 3 / 1    68 x  68 x 128   ->    68 x  68 x 256
   11 max          2 x 2 / 2    68 x  68 x 256   ->    34 x  34 x 256
   12 conv    512  3 x 3 / 1    34 x  34 x 256   ->    34 x  34 x 512
   13 conv    256  1 x 1 / 1    34 x  34 x 512   ->    34 x  34 x 256
   14 conv    512  3 x 3 / 1    34 x  34 x 256   ->    34 x  34 x 512
   15 conv    256  1 x 1 / 1    34 x  34 x 512   ->    34 x  34 x 256
   16 conv    512  3 x 3 / 1    34 x  34 x 256   ->    34 x  34 x 512
   17 max          2 x 2 / 2    34 x  34 x 512   ->    17 x  17 x 512
   18 conv   1024  3 x 3 / 1    17 x  17 x 512   ->    17 x  17 x1024
   19 conv    512  1 x 1 / 1    17 x  17 x1024   ->    17 x  17 x 512
   20 conv   1024  3 x 3 / 1    17 x  17 x 512   ->    17 x  17 x1024
   21 conv    512  1 x 1 / 1    17 x  17 x1024   ->    17 x  17 x 512
   22 conv   1024  3 x 3 / 1    17 x  17 x 512   ->    17 x  17 x1024
   23 conv  28269  1 x 1 / 1    17 x  17 x1024   ->    17 x  17 x28269
   24 detection
Loading weights from ../yolo9000-weights/yolo9000.weights...Done!
data/horses.jpg: Predicted in 7.556429 seconds.
wild horse: 50%
Shetland pony: 84%
Aberdeen Angus: 72%
Not compiled with OpenCV, saving to predictions.png instead
The image with the bounding boxes is in predictions.png.
Names of the 9k classes
Available here:
Examples
./darknet detector test cfg/combine9k.data cfg/yolo9000.cfg ../yolo9000-weights/yolo9000.weights data/horses.jpg
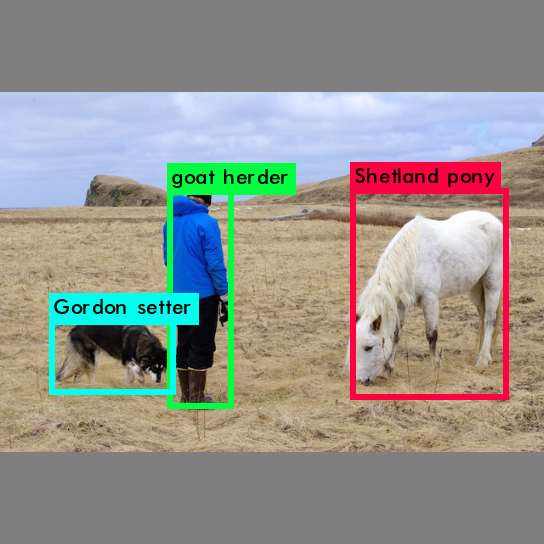
./darknet detector test cfg/combine9k.data cfg/yolo9000.cfg ../yolo9000-weights/yolo9000.weights data/person.jpg
Browse on https://pjreddie.com/darknet/yolo/ to find how to compile it for GPU as well. It's much faster!
GPU Support
Make sure that your NVIDIA GPU is properly configured beforehand. nvcc should be in the PATH. If not, something like this should do the job:
export PATH=/usr/local/cuda-8.0/bin:$PATH
export LD_LIBRARY_PATH=/usr/local/cuda-8.0/lib64:$LD_LIBRARY_PATH
Let's now compile darknet with GPU support!
cd darknet
make clean
vim Makefile # Change the first two lines to: GPU=1 and CUDNN=1. You can also use emacs or nano!
make
./darknet detector test cfg/combine9k.data cfg/yolo9000.cfg ../yolo9000-weights/yolo9000.weights data/dog.jpg
The inference should be much faster:
Loading weights from ../yolo9000-weights/yolo9000.weights...Done!
data/dog.jpg: Predicted in 0.035112 seconds.
car: 70%
canine: 56%
bicycle: 57%
Not compiled with OpenCV, saving to predictions.png instead
You can also run the command and monitor its status with nvidia-smi:
+-----------------------------------------------------------------------------+
| NVIDIA-SMI 375.26                 Driver Version: 375.26                    |
|-------------------------------+----------------------+----------------------+
| GPU  Name        Persistence-M| Bus-Id        Disp.A | Volatile Uncorr. ECC |
| Fan  Temp  Perf  Pwr:Usage/Cap|         Memory-Usage | GPU-Util  Compute M. |
|===============================+======================+======================|
|   0  TITAN X (Pascal)    Off  | 0000:02:00.0      On |                  N/A |
| 26%   49C    P2    76W / 250W |   4206MiB / 12189MiB |     10%      Default |
+-------------------------------+----------------------+----------------------+
|   1  TITAN X (Pascal)    Off  | 0000:04:00.0     Off |                  N/A |
| 29%   50C    P8    20W / 250W |      3MiB / 12189MiB |      0%      Default |
+-------------------------------+----------------------+----------------------+
|   2  TITAN X (Pascal)    Off  | 0000:05:00.0     Off |                  N/A |
| 31%   53C    P8    18W / 250W |      3MiB / 12189MiB |      0%      Default |
+-------------------------------+----------------------+----------------------+
|   3  TITAN X (Pascal)    Off  | 0000:06:00.0     Off |                  N/A |
| 29%   50C    P8    22W / 250W |      3MiB / 12189MiB |      0%      Default |
+-------------------------------+----------------------+----------------------+

+-----------------------------------------------------------------------------+
| Processes:                                                       GPU Memory |
|  GPU       PID  Type  Process name                               Usage      |
|=============================================================================|
|    0     30782    C   ./darknet                                     3991MiB |
+-----------------------------------------------------------------------------+
Here, we can see that our process darknet is running on the first GPU.
NOTE: We highly recommend a recent GPU with 8GB (or more) of memory to run flawlessly. GTX 1070, GTX 1080 Ti or Titan X are a great choice!
Make your own video! (Ubuntu/Linux)
First we have to install some dependencies (OpenCV and ffmpeg):
sudo apt-get install libopencv-dev python-opencv ffmpeg
cd darknet
make clean
vim Makefile # Change the first three lines to: GPU=1, CUDNN=1 and OPENCV=1. You can also use emacs or nano!
make
./darknet detector demo cfg/combine9k.data cfg/yolo9000.cfg ../yolo9000-weights/yolo9000.weights  -prefix output <path_to_your_video_mp4> -thresh 0.15
By default the threshold is set to 0.25. It means that Yolo displays the bounding boxes of elements with a 25%+ confidence. In practice, a lower threshold means more detected items (but also more errors).
Once this command returns, we merge the output images in a video:
ffmpeg -framerate 25 -i output_%08d.jpg output.mp4
We can now safely remove the temporary generated images:
rm output_*.jpg
The final video is output.mp4.
Important notes
It was successfully tested on Ubuntu 16.04 and Mac OS. I had it working on MacOS with a previous version of darknet. I now get a SEGFAULT on the newest darknet version with MacOS El Capitan. That's the reason why I pulled a slightly older version of darknet for Mac OS.

