Docker-compose setup for experimental commons, small commons, or local development of the Gen3 stack. Production use should use cloud-automation.
This setup uses Docker containers for Postgres, IndexD, Fence, Peregrine, Sheepdog, Windmill (data-portal), and nginx. Images for the CDIS microservices and nginx will be pulled from quay.io (master), while Postgres (9.5) images will be pulled from Docker Hub. Nginx will be used as a reverse proxy to each of the services. Below you will find information about migrating existing and setting up new compose services, some tips and basic information about using data commons. You can quickly find commonly used commands in our cheat sheet. Config file formats were copied from cloud-automation and stored in the Secrets directory and modified for local use with Docker Compose. Setup scripts for some of the containers are kept in the scripts directory.
The 2019/03 release includes changes necessary for running the latest versions of the gen3 services as of March 2019.
This release may fail to run earlier versions of gen3.
-
Changes
- add
arboristandpidginservices - move secrets to
Secrets/folder which git ignores (via the.gitignorefile),apis_configs/is renamed to atemplates/folder - bump to Postgres
9.6 - do not publish Postgres port to host by default - to avoid port conflicts on the host
- add
-
Migrate an existing commons to the new setup
- move the current secrets to
./Secrets:mv ./apis_configs Secrets git pulldocker-compose pull- pull the latestgen3Docker imagesbash ./creds_setup.sh- edit the
postgresservice indocker-compose.yamlto stay on version9.5- a9.6server cannot read data saved by a9.5server. If you want to erase the data currently in the commons, and proceed with Postgres9.6, thendocker-compose down -vclears the old data. - Set the settings in
Secrets/fence-config.yaml- be sure to set theclient_secretandclient_idfields underOPENID_CONNECT. - ready to go:
docker-compose up -d
- move the current secrets to
Database setup only has to occur the very first time you set up your local gen3 Docker Compose environment, as this docker-compose environment is configured to create a persistent volume for Postgres. The environment configuration is set up to automatically run setup scripts for the postgres container and set up the following:
- 3 databases
metadata_dbfence_dbindexd_db
- 4 users with passwords and superuser access
fence_userperegrine_usersheepdog_userindexd_user
Configure the Postgres database container to publish the db service port to the host machine by un-commenting the ports block under the postgres service in docker-compose.yml, then running docker-compose up -d postgres:
    #
    # uncomment this to make postgres available from the container host - ex:
    #    psql -h localhost -d fence -U fence_user
    ports:
      - 5432:5432
The container host can connect to the database after the port is published - ex:
psql -h localhost -U fence_user -d fence_db
- openssl
- Docker and Docker Compose
The official Docker installation page can be found here. If you've never used Docker before, it may be helpful to read some of the Docker documentation to familiarize yourself with containers.
If you are using Linux, then the official Docker installation does not come with Docker Compose. The official Docker Compose installation page can be found here. You can also read an overview of what Docker Compose is here if you want some extra background information. Go through the steps of installing Docker Compose for your platform, then proceed to set up credentials.
Setup credentials for Fence, a custom root CA and SSL certs with the provided script by running either:
bash ./creds_setup.sh
OR
bash ./creds_setup.sh YOUR CUSTOM DOMAIN
This script will create a Secrets folder that holds various secrets and configuration files.
The script by default generates an SSL certificate to access the gen3 stack at https://localhost. If you are running this in a remote server with an actual domain, you can run bash creds_setup.sh YOUR_DOMAIN. This will create SSL cert signed by the custom CA so that the microservices can talk to each other without bypassing SSL verification. If you are setting this up on AWS, ensure that you use an Elastic IP address BEFORE you set up and use that as your domain. On an EC2 instance, for example, this would be your ec2-YOUR-Elastic-IP-Addr.us-region-number.compute.amazonaws.com. This will save a lot of time and avoid editing the individual files to set up the hostname(fence-config.yaml, peregrine_creds.json, and sheepdog_creds.json) when the machine is rebooted. This is because each of the microservices can be configured to run on separate machines and thus have their respective configuration files. You will still need to bypass SSL verification when you hit the services from the browser. If you have real certs for your domain, you can copy to Secrets/TLS/service.key and Secrets/TLS/service.crt to overwrite our dev certs.
If you are using MacOS, you may run into an error with the default MacOS OpenSSL config not including the configuration for v3_ca certificate generation. You can refer to the solution on this Github issue on a related issue on Jetstack's cert-manager.
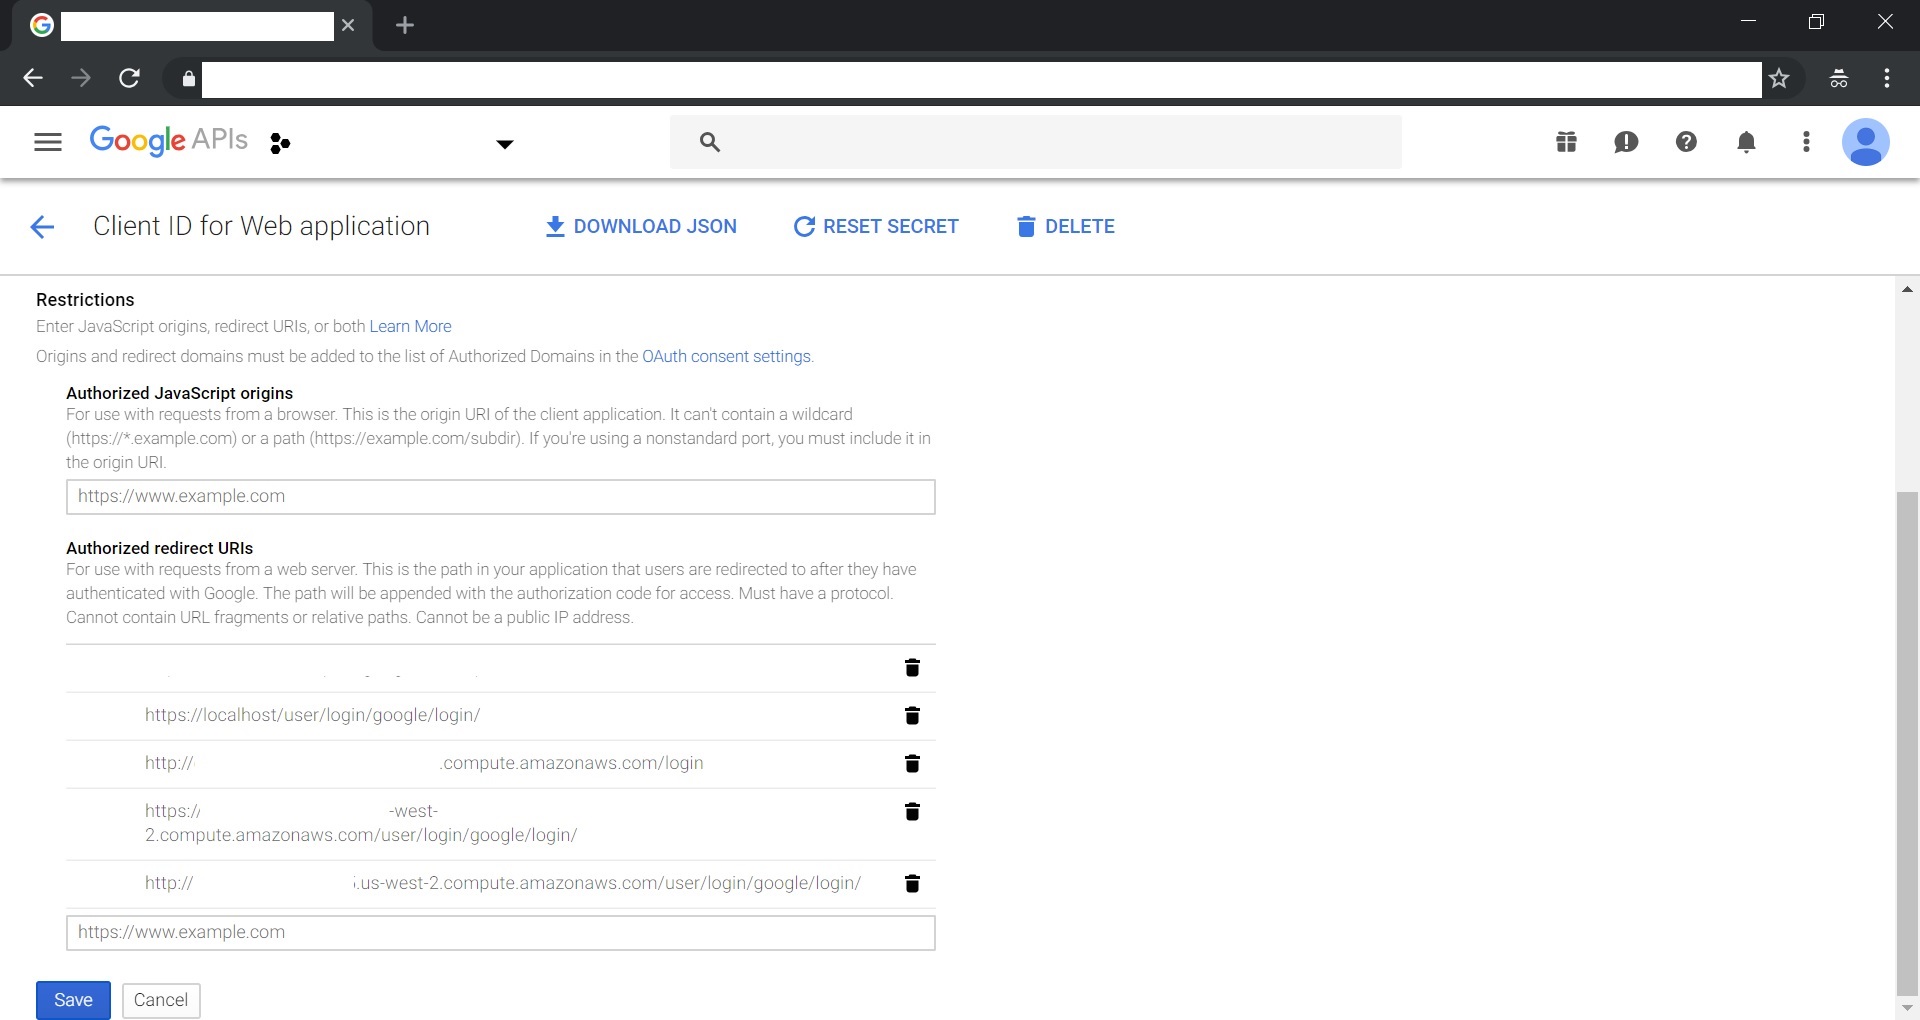
This Docker Compose setup also requires Google API Credentials in order for Fence microservice to complete its authentication. If you have Google API credentials set up already that you would like to use with the local gen3 Docker Compose setup, simply add https://localhost/user/login/google/login/ OR https://YOUR_REMOTE_MACHINE_DOMAIN/user/login/google/login/ to your Authorized redirect URIs in your credentials and copy your client ID and client secret from your credentials to the 'client_secret' and 'client_id' fields in the Secrets/fence-config.yaml under OPENID_CONNECT and google.
If you do not already have Google API Credentials, follow the steps below to set them up. See image below for an example on a sample Google account.
To set up Google API Credentials, go to the Credentials page of the Google Developer Console and click the 'Create Credentials' button. Follow the prompts to create a new OAuth Client ID for a Web Application. Add https://localhost/user/login/google/login/ OR https://YOUR_REMOTE_MACHINE_DOMAIN/user/login/google/login/ to your Authorized redirect URIs in the Credentials. Then copy your client ID and client secret and use them to fill in the 'google.client_secret' and 'google.client_id' fields in the Secrets/fence-config.yaml file.
To set up user privileges for the services, please edit the Secrets/user.yaml file, following the example format shown in the file. In particular, you should change yourlogin@gmail.com to the email you intend to log in with, so that you can create administrative nodes later on.
Fence container will automatically sync this file to the fence_db database on startup. If you wish to update user privileges while the containers are running (without restarting the container), just edit the Secrets/user.yaml file and then run
docker exec -it fence-service fence-create sync --arborist http://arborist-service --yaml user.yaml
This command will enter Fence container to run the fence-create sync command, which will update your user privileges. If you are logged in to your commons on a browser, you may need to log out and log back in again or clear your cookies in order to see the changes.
Now that you are done with the setup, all Docker Compose features should be available. If you are a non-root user you may need to add yourself to the 'docker' group: sudo usermod -aG docker your-user, and the log out and log back in.
Here are some useful commands:
The basic command of Docker Compose is
docker-compose up
which can be useful for debugging errors. To detach output from the containers, run
docker-compose up -d
When doing this, the logs for each service can be accessed using
docker logs
To stop the services use
docker-compose down
As the Docker images are pulled from quay.io, they do not update automatically. To update your Docker images, run
docker-compose pull
docker image prune -f
These commands may take a while, and they also may fail. If they do fail, simply rerun them, or just update/remove images one at a time manually. Sheepdog and Peregrine services download the dictionary schema at startup, and the portal service runs a series of pre-launch compilations that depend on Sheepdog and Peregrine, so it may take several minutes for the portal to finally come up at https://localhost Following the portal logs is one way to monitor its startup progress:
docker logs -f portal-service
You should of course git pull compose-services if you have not done so for a while. You also need to docker-compose pull new images from Quay--this will not happen automatically. If your git pull pulled new commits, and you already have a Secrets folder, you may also need to delete your old Secrets and rerun creds_setup.sh (see Setting up Credentials) to recreate it.
You can quickly find commonly used commands for compose services in our cheat sheet.
When developing, you can have local repositories of the services you are working on and use volumes to mount your local repository files onto the containers to override the containers' code (which is built from GitHub using quay.io). Then, you can restart a single container with
docker-compose restart [CONTAINER_NAME]
after you update some code in order to see changes without having to rebuild all the microservices. Keep in mind that running docker-compose restart does not apply changes you make in the docker-compose file. Look up the Docker documentation for more information about volumes.
To run Docker Compose on a remote machine, modify the hostname field in fence-config.yaml, peregrine_creds.json, and sheepdog_creds.json in the Secrets directory.
If you are encountering difficulties while setting up Docker Compose and need help from the Gen3 team, you can use the dump.sh script to create a zip file of your configuration and current logs, which you can share to get help.
bash dump.sh
Note that if docker-compose is not running, the logs will be empty.
The following configuration files will be included:
- docker-compose.yml
- user.yaml
- any file ending with "settings" or "config"
Credentials files are NOT included and lines containing "password", "secret" or "key" are removed from other files. If your files contain other kinds of sensitive credentials, make sure to remove them before running the script.
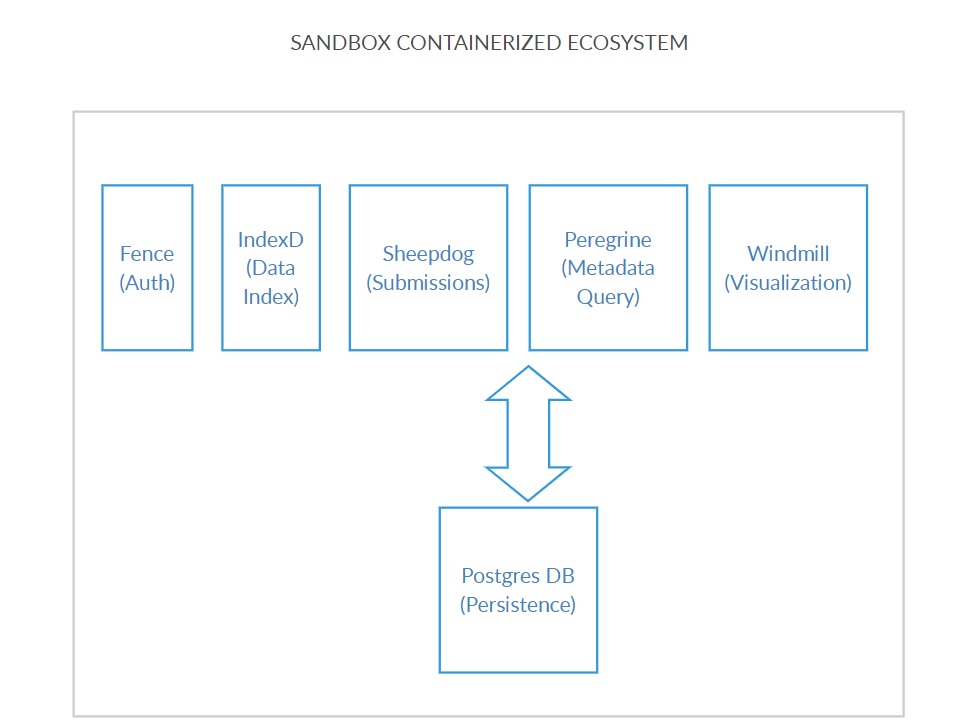
The sandbox ecosystem deployed thus architecturally looks as shown below:

All the microservices communicate with the Postgres Container based on the configuration specified above. Once the services are up and running, the environment can be visualized using the windmill microservice running on port 80 by typing the URL of the machine on which the containers are deployed. Please see example screenshot below as an example:
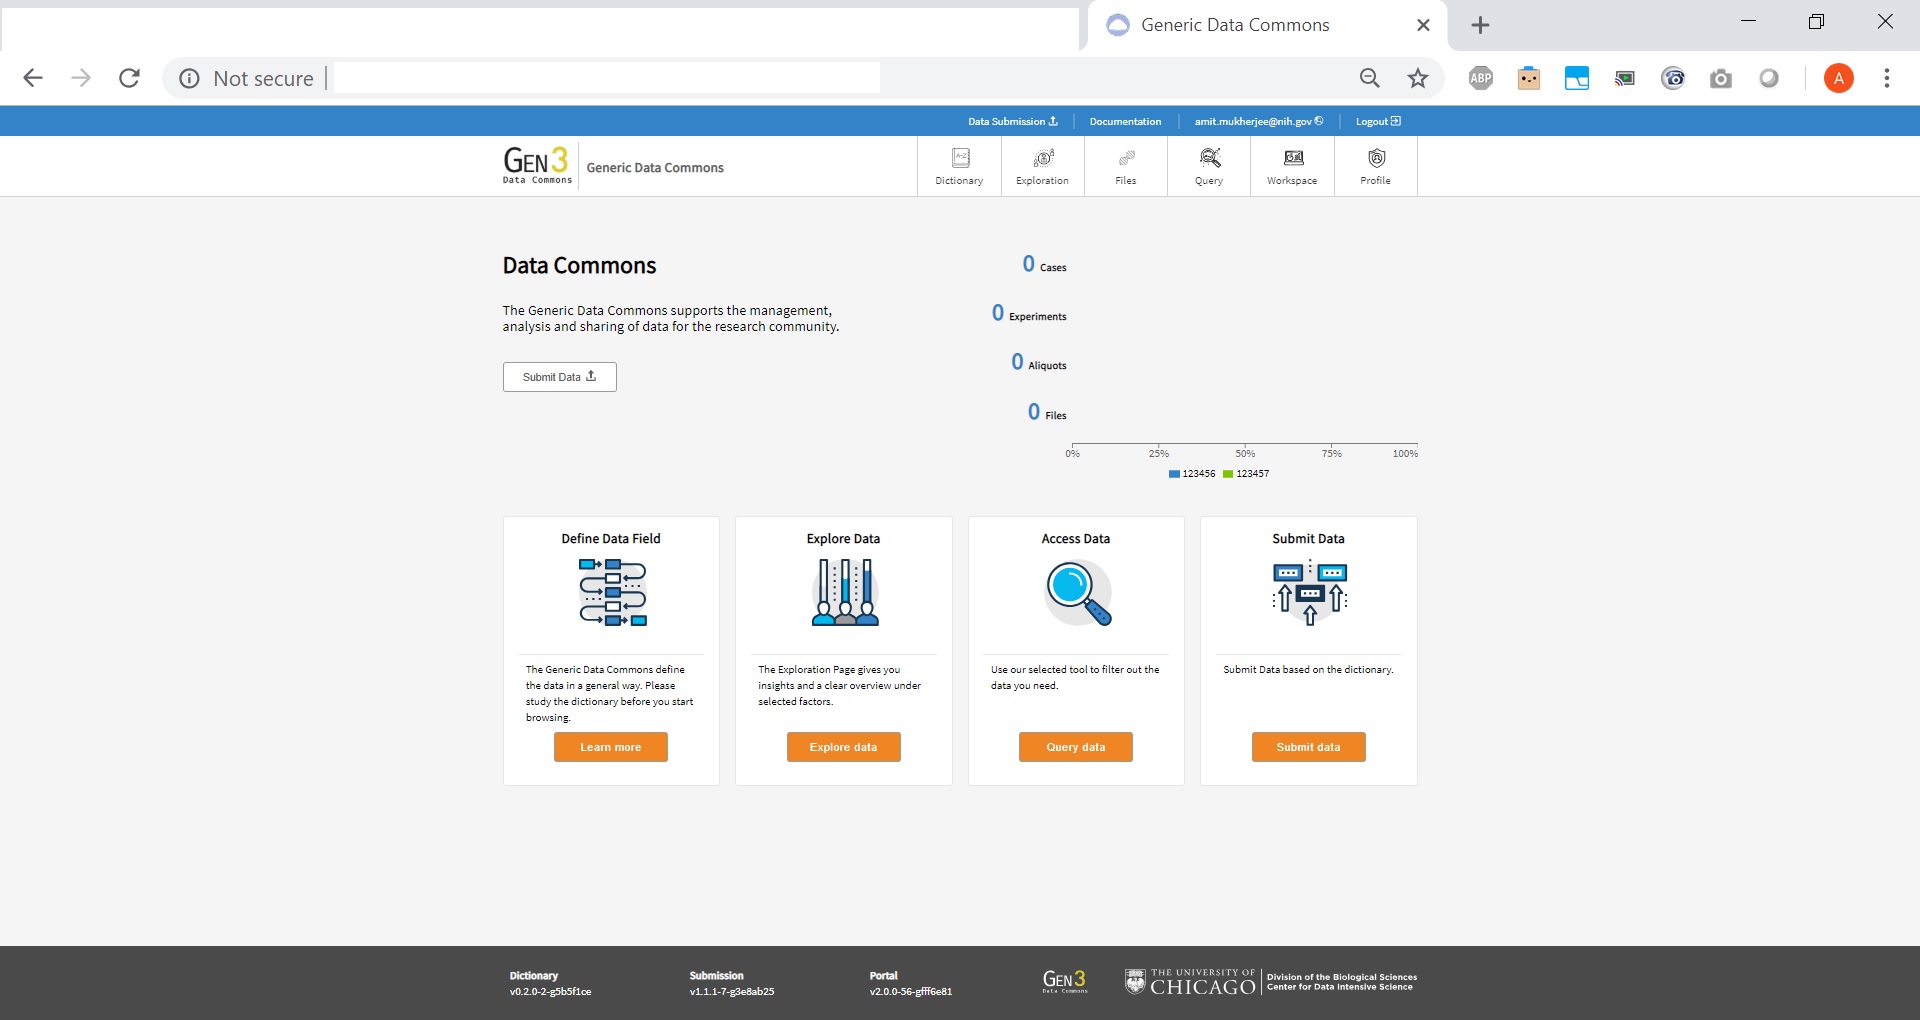
Upon clicking 'Login from Google' and providing Google Credentials(if the same Google Account is used where the developer credentials came from), the system redirects the user to their landing page as shown below:
For some general information about Gen3 Data Commons and how they work (such as how to access and submit data), visit the official site. The section below will go over some useful technical aspects of Gen3.
The smoke_test.sh script queries the health-check endpoints of each service
launched by docker-compose.yml.
bash smoke_test.sh localhost
In a Gen3 Data Commons, programs and projects are two administrative nodes in the graph database that serve as the most upstream nodes. A program must be created first, followed by a project. Any subsequent data submission and data access, along with control of access to data, is done through the project scope.
To create a program, visit the URL where your Gen3 Commons is hosted and append /_root. If you are running the Docker Compose setup locally, then this will be localhost/_root. Otherwise, this will be whatever you set the hostname field to in the creds files for the services with /_root added to the end. Here, you can choose to either use form submission or upload a file. I will go through the process of using form submission here, as it will show you what your file would need to look like if you were using file upload. Search for "program," and then fill in the "dbgap_accession_number" and "name" fields, and hit "Upload submission json from form" followed by "Submit". If the message is green ("succeeded:200"), that indicates success, while a grey message indicates failure. More details can be viewed by clicking on the "DETAILS" button.
To create a project, visit the URL where your Gen3 Commons is hosted and append the name of the program you want to create the project under. For example, if you are running the Docker Compose setup locally and would like to create a project under the program "Program1", the URL you will visit will be localhost/Program1. You will see the same options to use form submission or upload a file. This time, search for "project," and then fill in the fields and hit "Submit." Make a note of the dbgap_accession_number for later. Again, a green message indicates success while a grey message indicates failure, and more details can be viewed by clicking on the "DETAILS" button.
Once you've created a program and a project, you need to grant yourself permissions on your new project in order to submit data (unless you created a project for which you already had permissions--for example, if you used the template under youruser@gmail.com in the user.yaml and created a project called "Program1", then you can skip this step). See Controlling access to data for an example. The auth_id should be a string containing the dbgap_accession_number of your project.
After that, you're ready to start submitting data for that project! Please note that Data Submission refers to metadata regarding the file(s) (Image, Sequencing files etc.) that are to be uploaded. Please refer to the Gen3 website for additional details.
Access to data and admin privileges in Gen3 is controlled using Fence through the user.yaml file found in the Secrets directory. Admin privileges are required to create administrative nodes, which include programs and projects. For each user, you can control admin status as well as specific per-project permissions. The format of the user.yaml file is shown below:
users:
  user_email:
    admin: True
    projects:
    - auth_id: project_dbgap_accession_number
      privilege: ['create', 'read', 'update', 'delete', 'upload', 'read-storage']
Refer to Setting up Users to review how to apply the changes made in the user.yaml file to the database
The gen3 stack requires metadata submitted to the system to conform
to a schema defined by the system's dictionary. The gen3 developers
use a tool to generate test data that conforms to a particular dictionary.
For example - the following commands generate data files suitable to submit
to a gen3 stack running the default genomic dictionary at https://s3.amazonaws.com/dictionary-artifacts/datadictionary/develop/schema.json
export TEST_DATA_PATH="$(pwd)/testData"
mkdir -p "$TEST_DATA_PATH"

docker run -it -v "${TEST_DATA_PATH}:/mnt/data" --rm --name=dsim --entrypoint=data-simulator quay.io/cdis/data-simulator:master simulate --url https://s3.amazonaws.com/dictionary-artifacts/datadictionary/develop/schema.json --path /mnt/data --program jnkns --project jenkins --max_samples 10
For an introduction to the data model and some essential information for modifying a data dictionary, please read this before proceeding.
The data dictionary the commons uses is dictated by either the DICTIONARY_URL or the PATH_TO_SCHEMA_DIR environment variable in both Sheepdog and Peregrine. The default value for DICTIONARY_URL are set to https://s3.amazonaws.com/dictionary-artifacts/datadictionary/develop/schema.json and the default value for PATH_TO_SCHEMA_DIR is set to the datadictionary/gdcdictionary/schemas directory which is downloaded as part of the compose-services repo (from here). Both correspond to the developer test data dictionary, as one is on AWS and one is a local data dictionary setup. To override this default, edit the environment fields in the peregrine-service section of the docker-compose.yml file. This will change the value of the environment variable in both Sheepdog and Peregrine. An example, where the DICTIONARY_URL and PATH_TO_SCHEMA_DIR environment variables is set to the default values, is provided in the docker-compose.yml.
NOTE: Only one of the two environment variables can be active at a time. The data commons will prefer DICTIONARY_URL over PATH_TO_SCHEMA_DIR. To reduce confusion, keep the variable you're not using commented out.
There are 3 nodes that are required for the dev (default) portal--case, experiment, and aliquot. If you remove any one of these, then you will also need to change the APP environment variable in portal-service, in addition to changing the DICTIONARY_URL or PATH_TO_SCHEMA field.
As this is a change to the Docker Compose configuration, you will need to restart the Docker Compose (docker-compose restart) to apply the changes.
In order to enable guppy for exploration page, the gitops.json, etlMapping.yaml and guppy_config.json need to be configured. There are some examples of configurations located at https://github.com/uc-cdis/cdis-manifest. It is worth to mentioning that the index and type in guppy_config.json need to be matched with the index in etlMpping.json.
When the data dictionary is changed, those files are also configured accordingly so that the exploration page can work.
Run bash ./guppy_setup.sh to create/re-create ES indices
The templates/user.yaml file has been configured to grant data_upload privileges to the yourlogin@gmail.com user. Connect it to your s3 bucket by configuring access keys and bucket name in fence-config.yaml.
289,290c289,290
<     aws_access_key_id: 'your-key'
<     aws_secret_access_key: 'your-key'
---
>     aws_access_key_id: ''
>     aws_secret_access_key: ''
296c296
<   your-bucket:
---
>   bucket1:
309c309
< DATA_UPLOAD_BUCKET: 'your-bucket'
---
> DATA_UPLOAD_BUCKET: 'bucket1'


