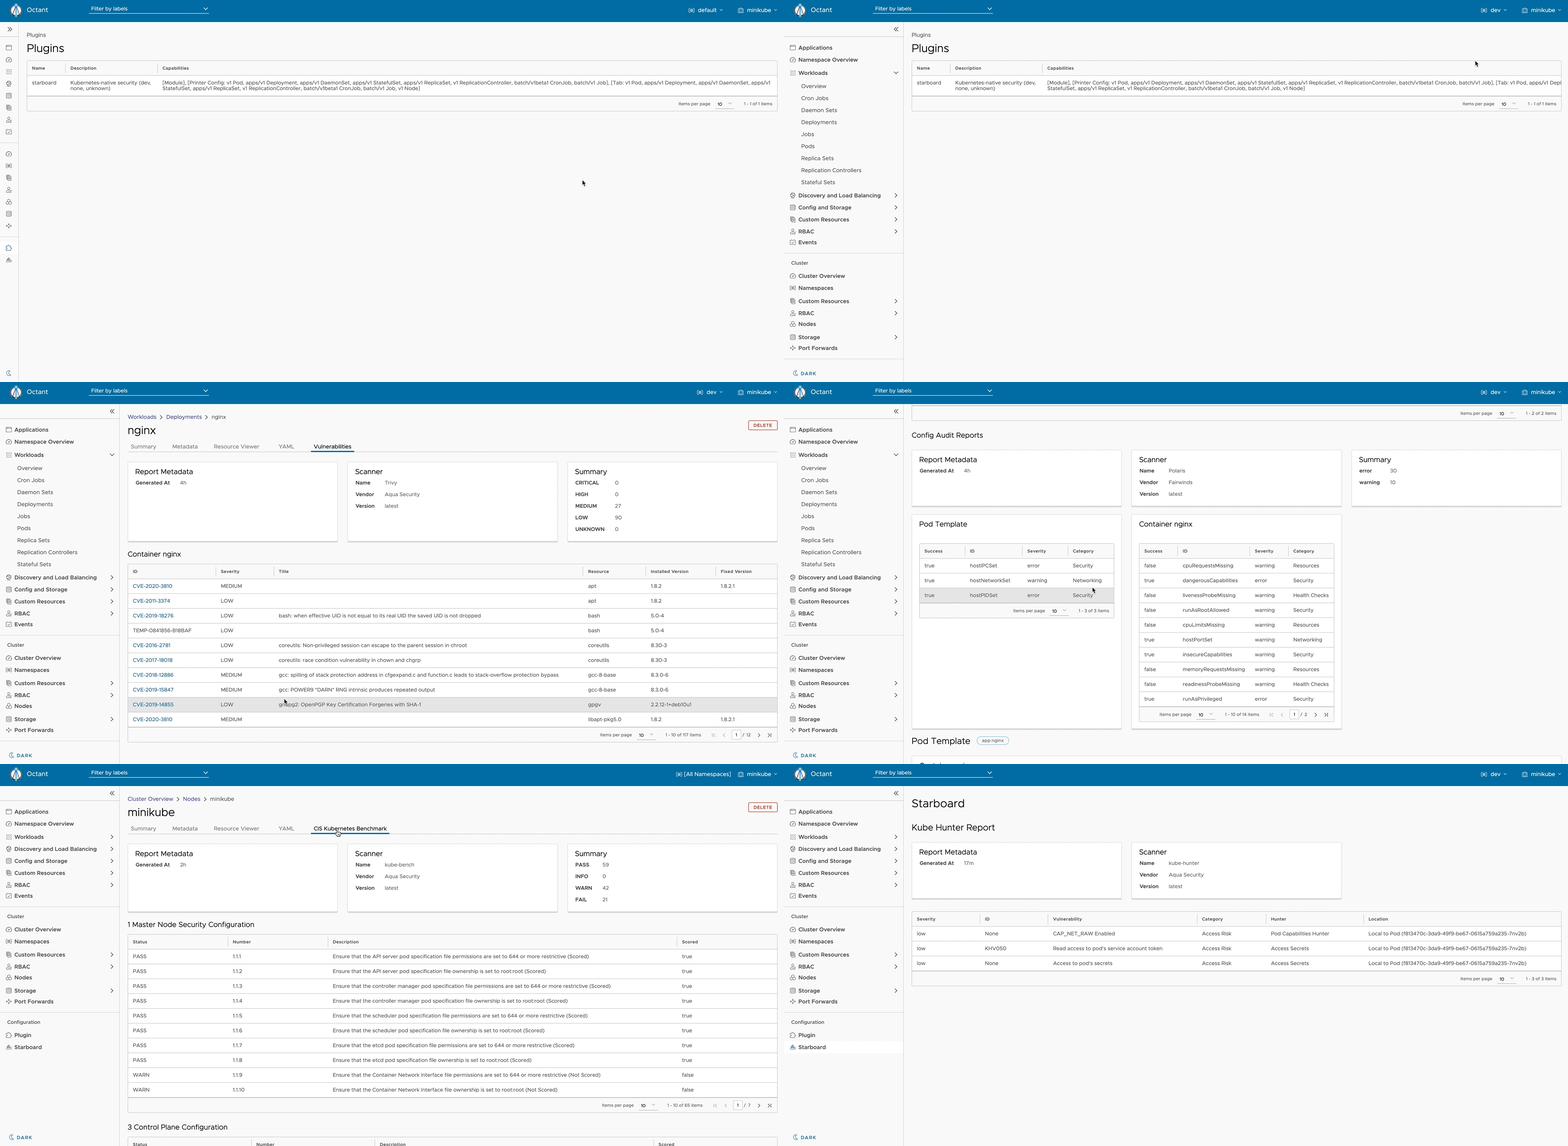
This is an Octant plugin for Starboard which provides visibility into vulnerability assessment reports for Kubernetes workloads stored as custom security resources.
This guide shows how to install the Starboard Octant plugin. The plugin can be installed either from source, or from pre-built binary releases.
- Octant >= 0.13 should first be installed. On macOS this is as simple as
brew install octant. For installation instructions on other operating systems and package managers, see Octant Installation. - Environment authenticated against your Kubernetes cluster
In the following instructions we assume that the
$HOME/.config/octant/pluginsdirectory is the default plugins location respected by Octant. Note that the default location might be changed by setting theOCTANT_PLUGIN_PATHenvironment variable when running Octant.
Every release of Starboard Octant plugin provides binary releases for a variety of operating systems. These binary versions can be manually downloaded and installed.
- Download your desired version
- Unpack it (
tar -zxvf starboard-octant-plugin_darwin_x86_64.tar) - Find the
starboard-octant-pluginbinary in the unpacked directory, and move it to the default Octant's configuration directory (mv starboard-octant-plugin_darwin_x86_64/starboard-octant-plugin $HOME/.config/octant/plugins). You might need to create the directory if it doesn't exist already.
Building from source is slightly more work, but is the best way to go if you want to test the latest (pre-release) version of the plugin.
You must have a working Go environment.
$ git clone git@github.com:aquasecurity/starboard-octant-plugin.git
$ cd starboard-octant-plugin
$ make install
The make install goal copies the plugin binary to the $HOME/.config/octant/plugins directory.
As an example let's run an old version of nginx that we know has vulnerabilities. Create an nginx Deployment in the
dev namespace:
$ kubectl create deployment nginx --image nginx:1.16 --namespace dev
Run the scanner to find the vulnerabilities:
$ starboard find vulnerabilities deploy/nginx --namespace dev
In the example above we are using the Starboard CLI to populate the vulnerability information. However, another option might be the operator which populates the Starboard CRDs. No matter how the CRDs are created, they are visible within Octant.
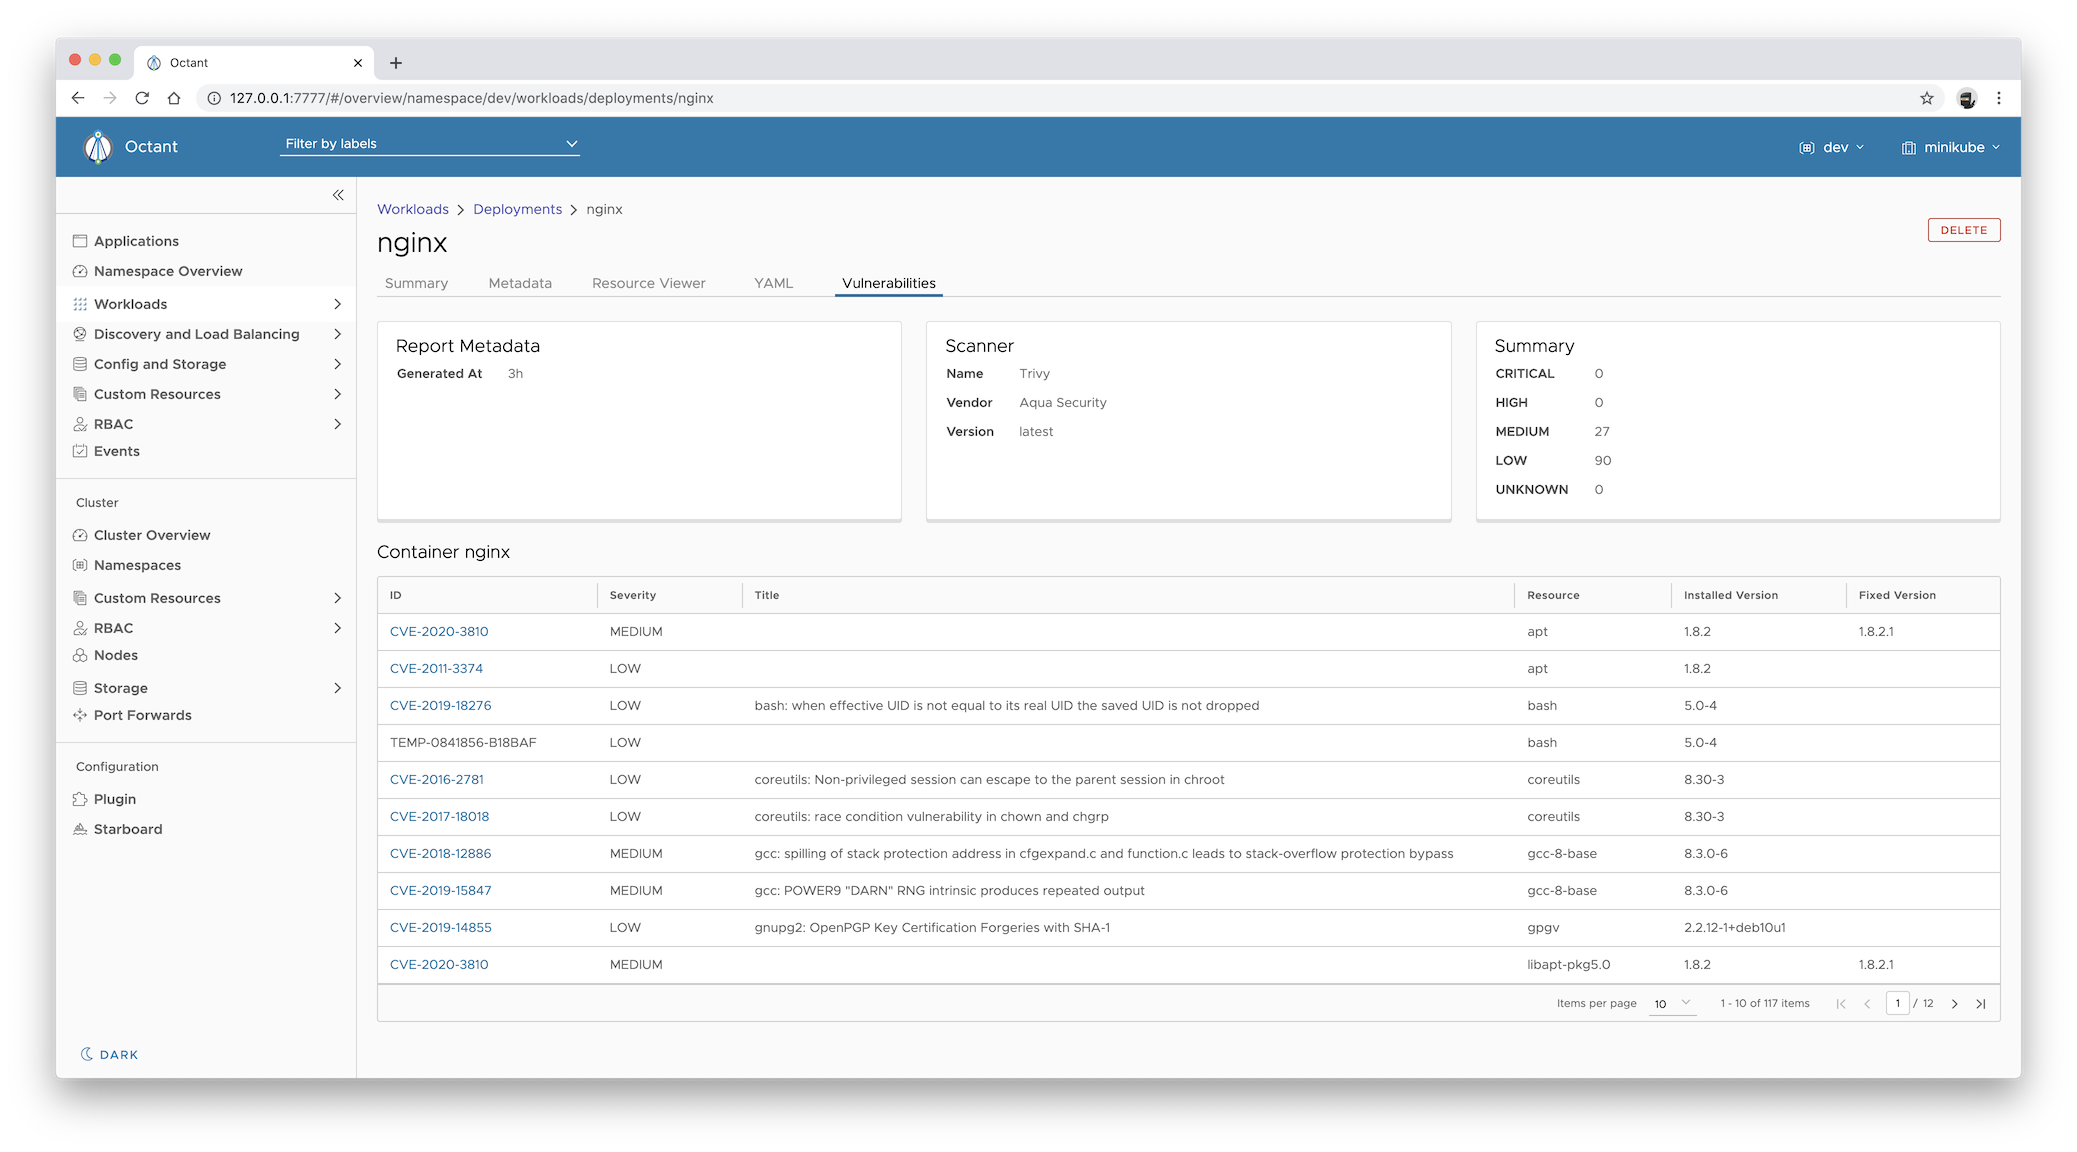
You can now display the vulnerabilities reports in the Octant interface by following these steps:
-
Run
octantand select thedevnamespace. -
Expand Workloads and select Deployments.
-
Click the
nginxlink to display the Deployment's details. -
Select the Vulnerabilities tab to access the vulnerabilities report.
The data displayed in the Vulnerabilities tab is equivalent of getting the
vulnerabilities.aquasecurity.github.ioresources for thenginxDeployment:$ starboard get vulnerabilities deploy/nginx --namespace dev --output yamlor
$ kubectl get vulnerabilityreports.aquasecurity.github.io \
  --selector starboard.resource.kind=Deployment,starboard.resource.name=nginx \
  --namespace dev \
  --output yaml
Similar to displaying vulnerability reports for the specified Deployment, Starboard Octant plugin allows you to display vulnerability reports for every Kubernetes workload, such as Cron Jobs, Daemon Sets, Jobs, unmanaged Pods, Replica Sets, Replication Controllers, and Stateful Sets.
To learn more about features provided by the Starboard Octant plugin, please review other use cases.
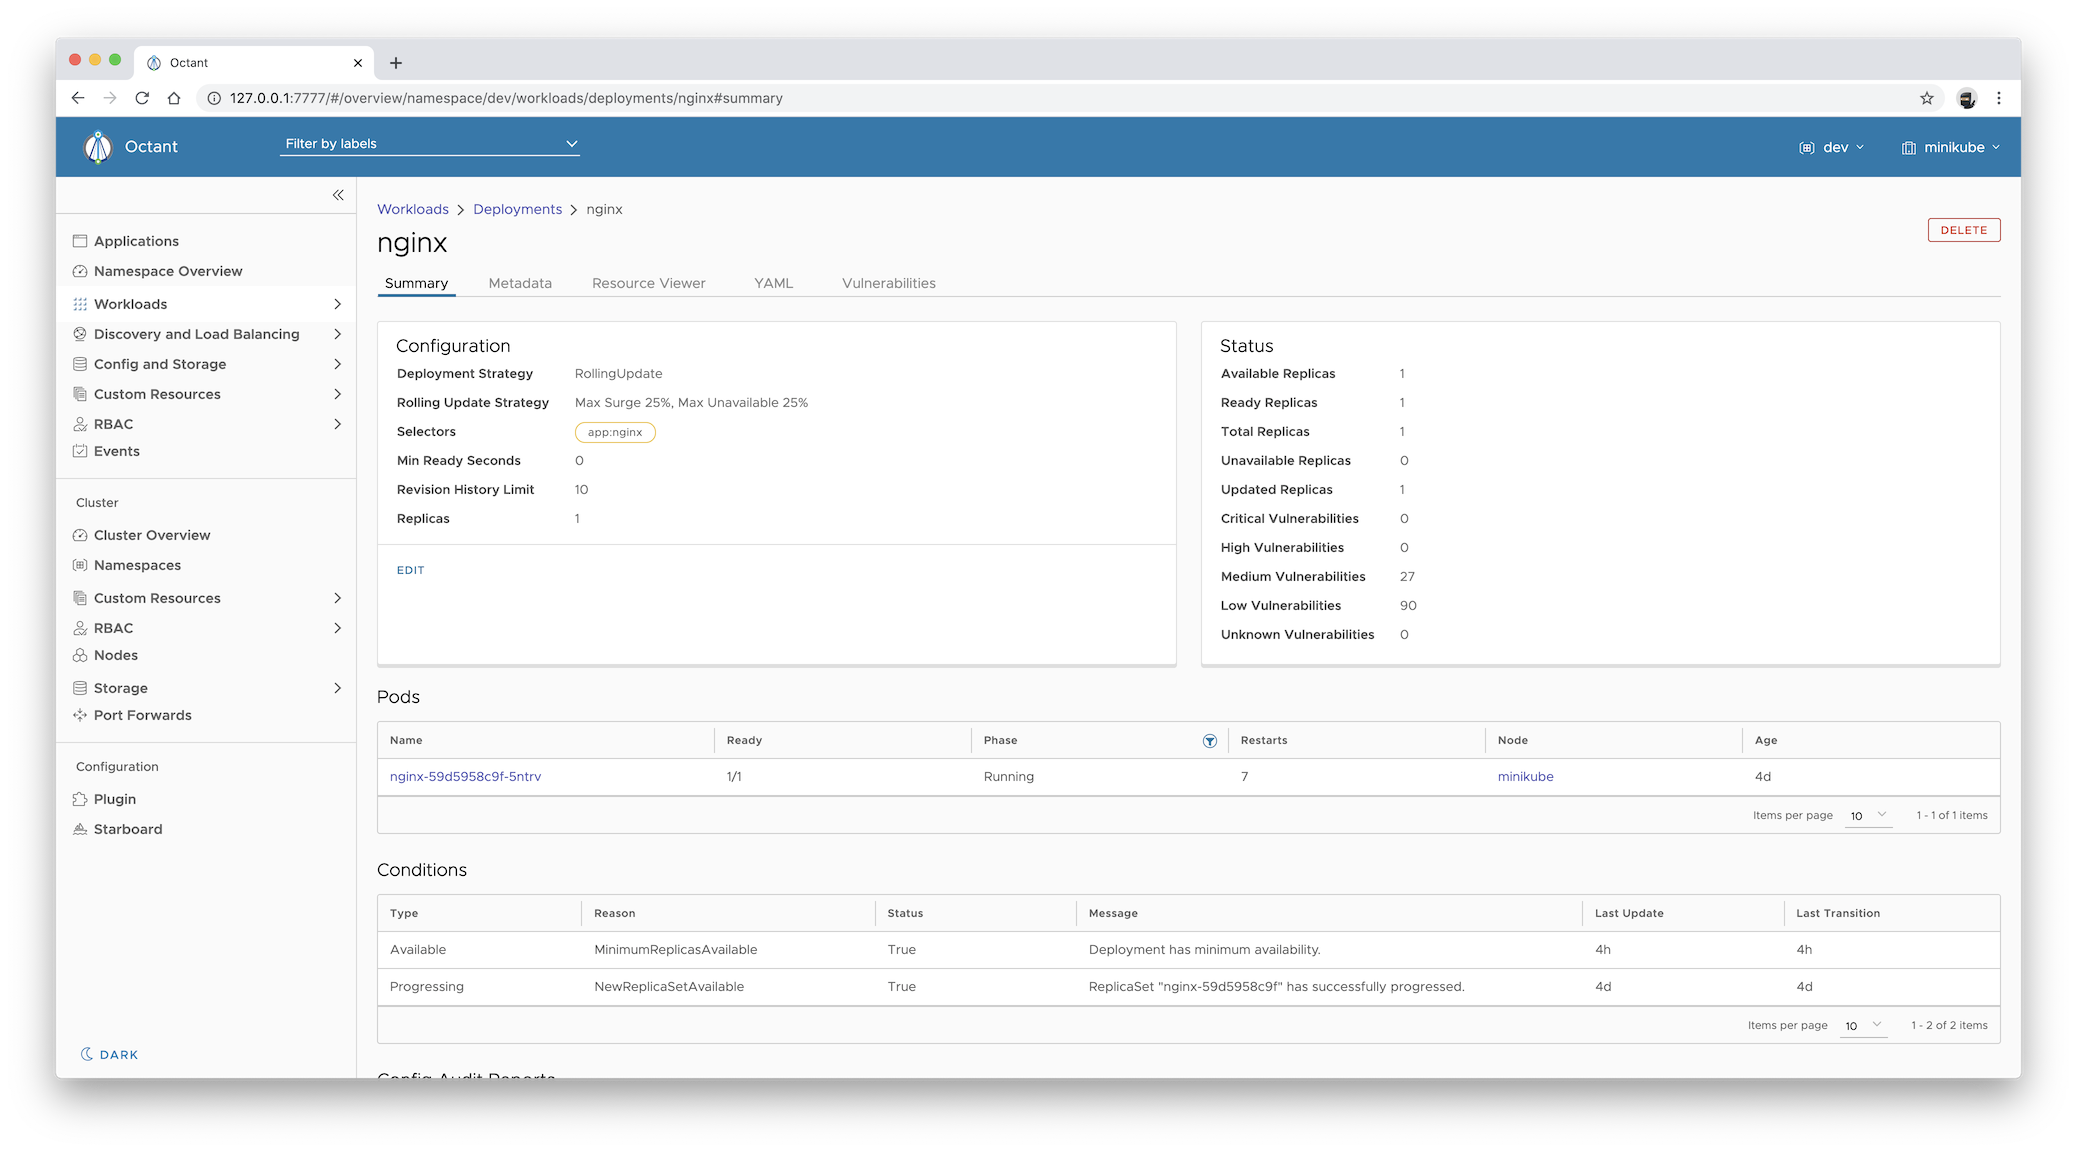
To display the summary of vulnerabilities for the specified workload:
-
Expand Workloads and select desired workload.
-
Click the link with the workload's name to display the details.
The Status card component shows the summary of vulnerabilities in the container images of the selected workload.
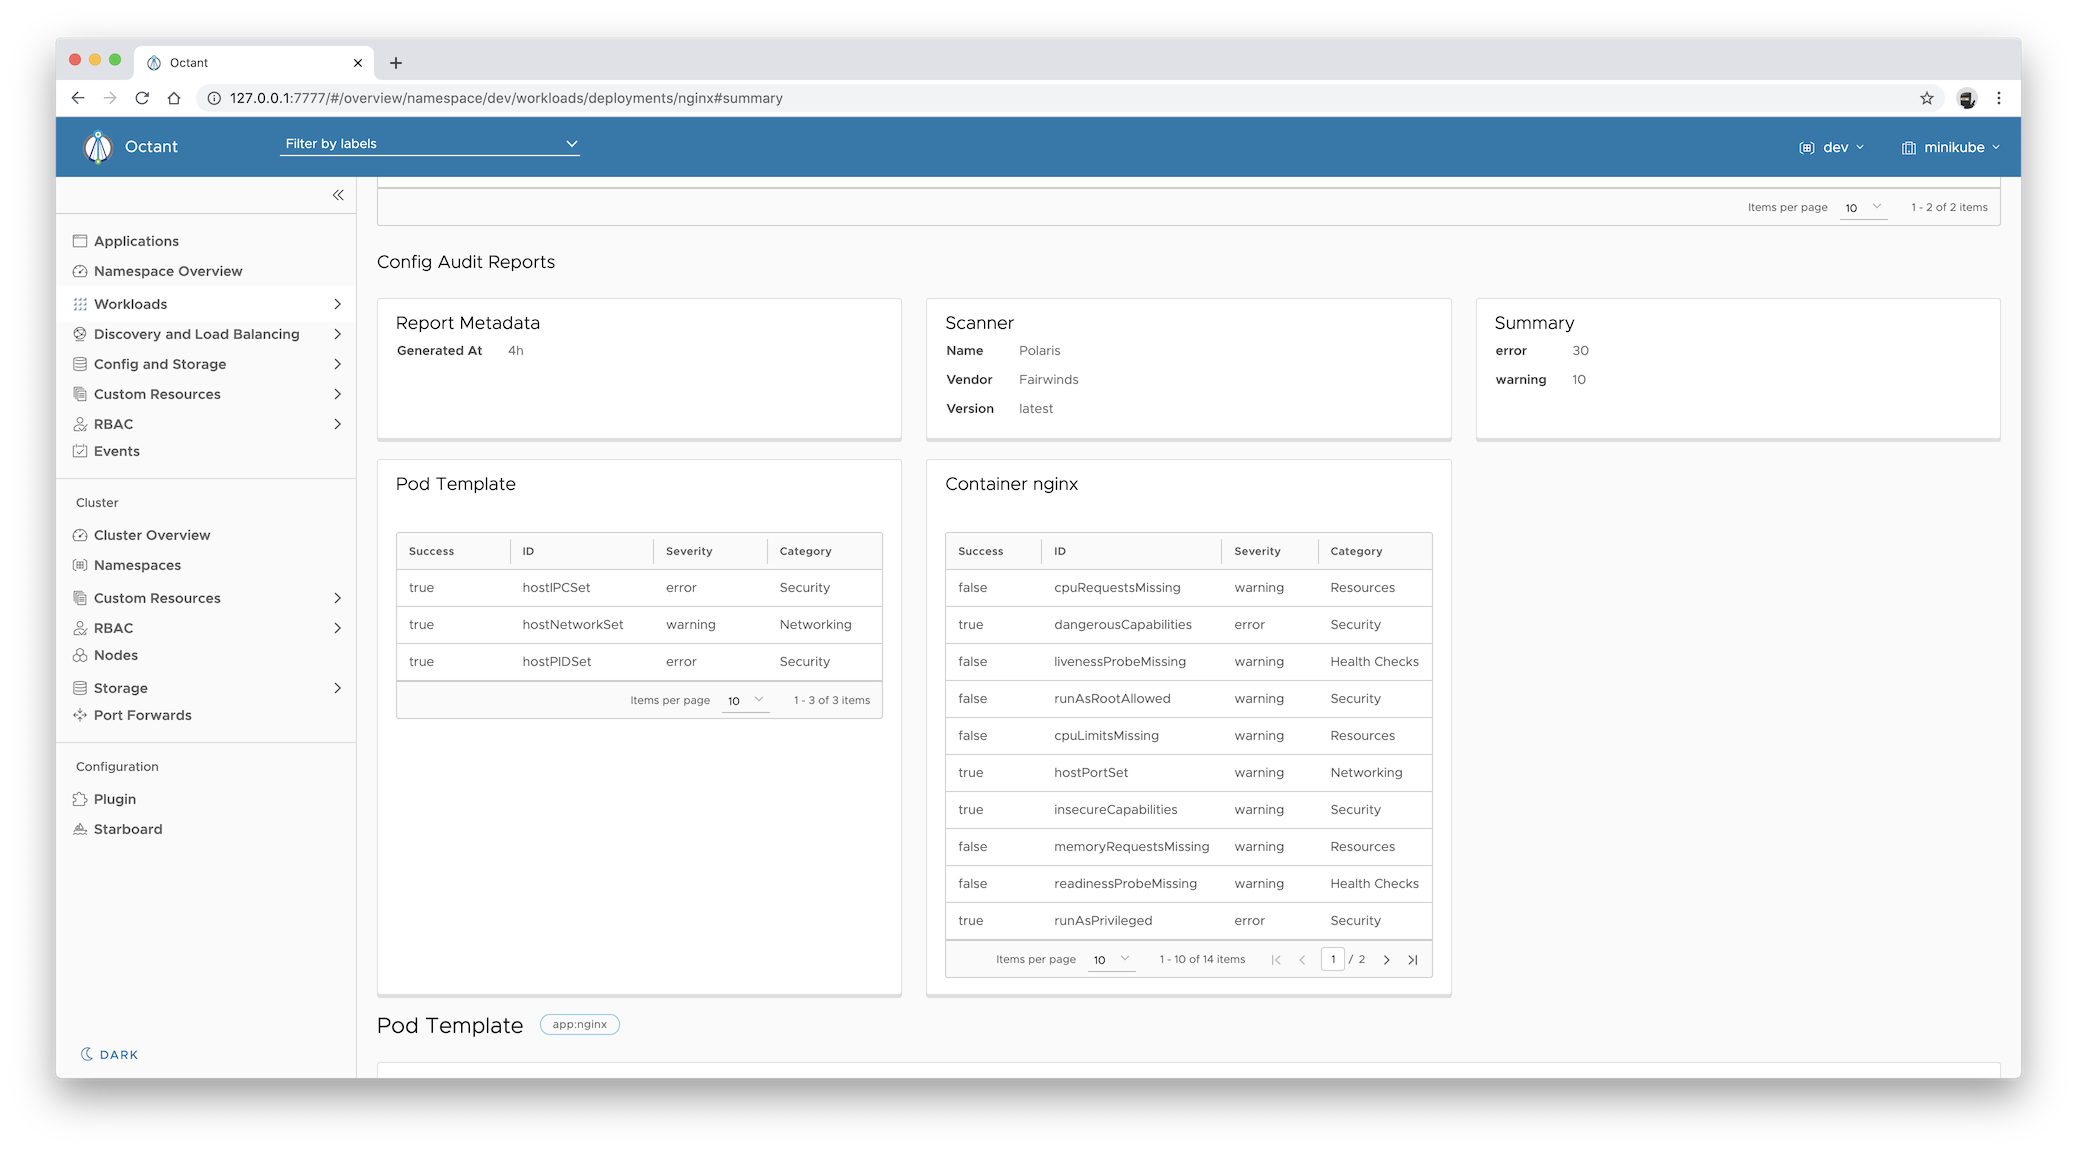
To display a configuration audit report for the specified workload, which is represented as an instance of the
configauditreports.aquasecurity.github.io resource:
-
Expand Workloads and select desired workload.
-
Click the link with the workload's name to display the details.
The report is shown under the Config Audit Report heading.
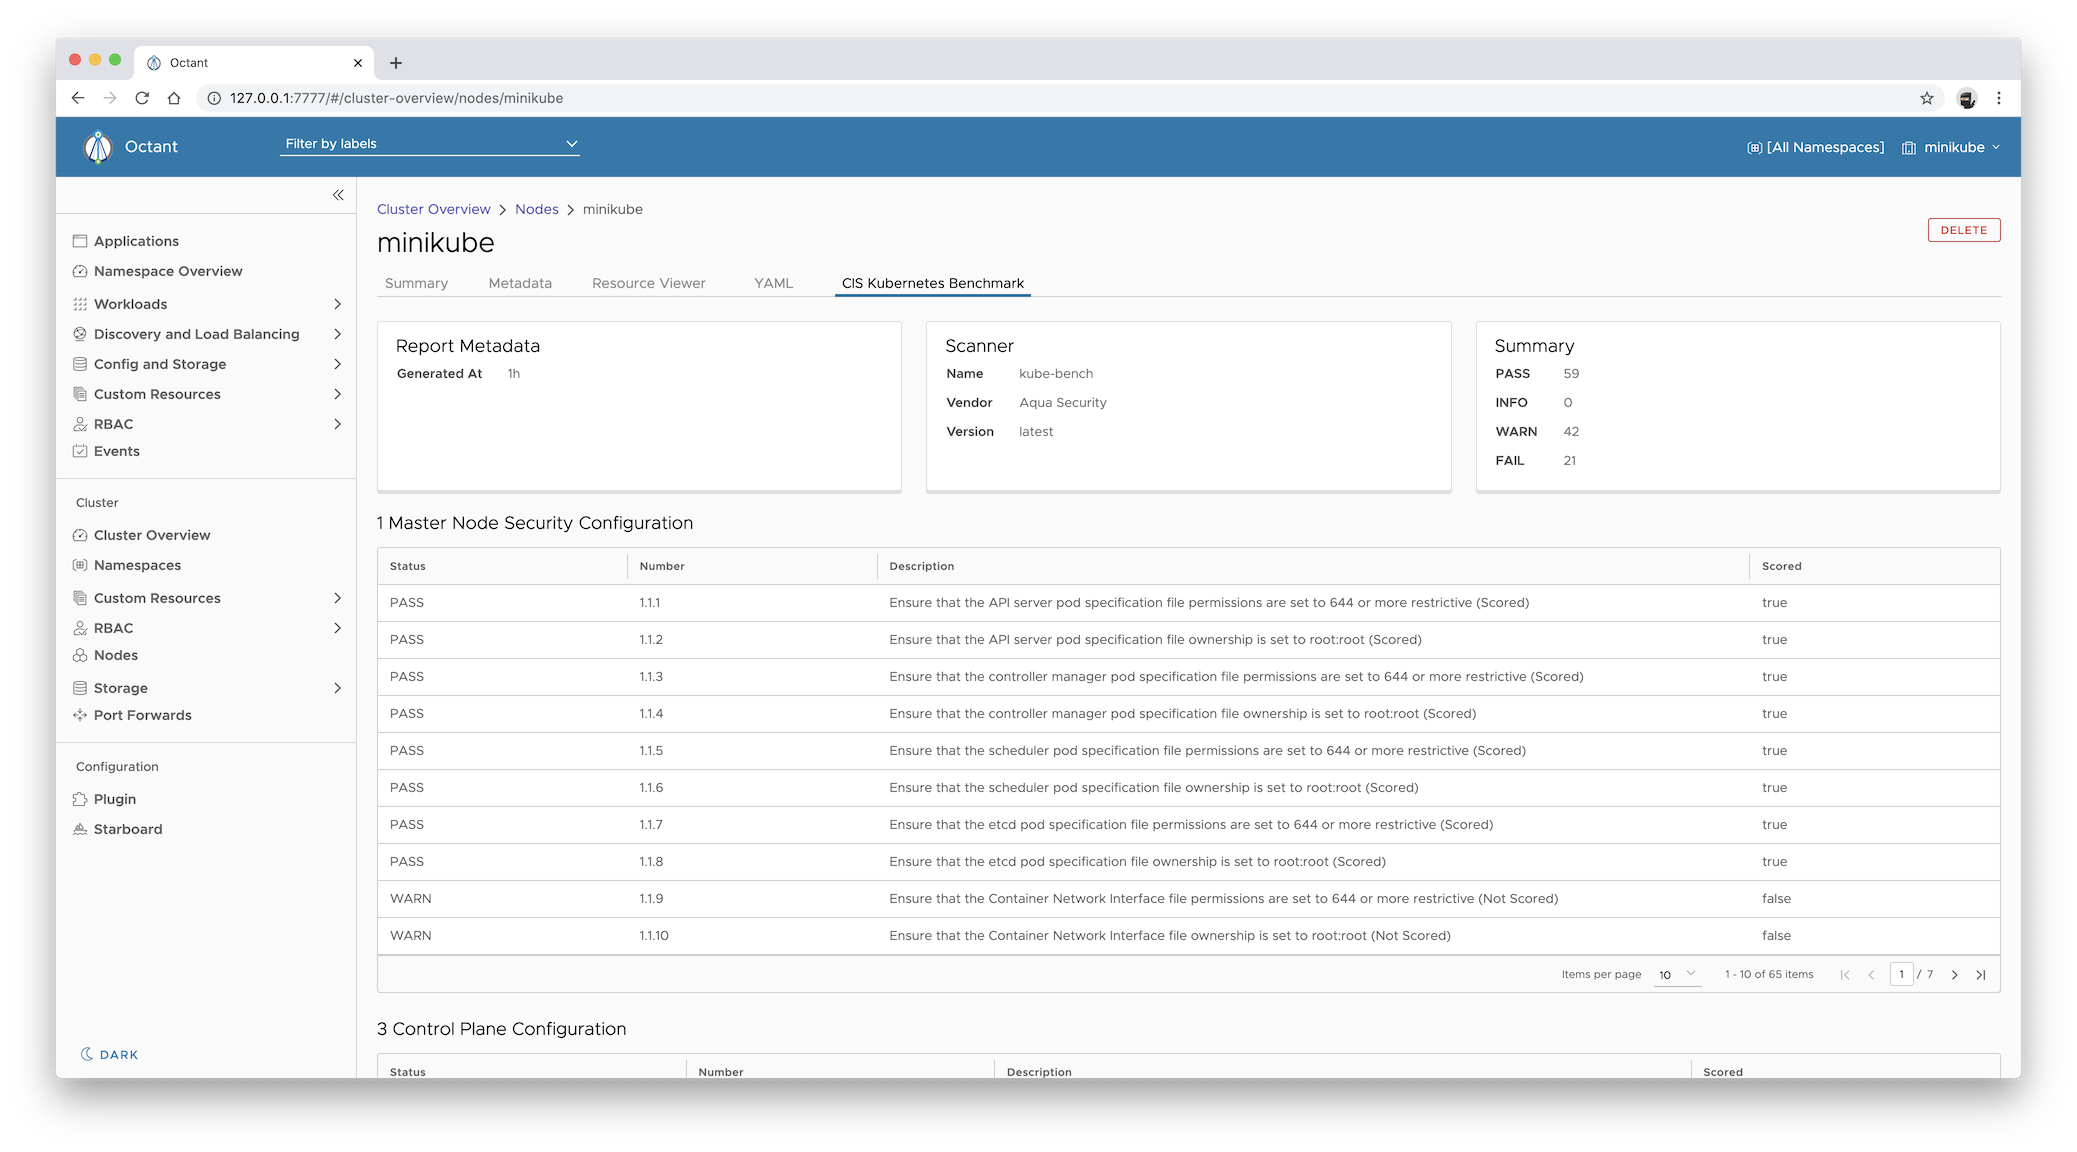
CIS Kubernetes Benchmarks reports are represented by ciskubebenchreports.aquasecurity.github.io resources, which
are associated with Nodes. To display the latest report for the specified Node:
-
Expand Nodes.
-
Click the link with the Node's name to display the details.
-
Select the CIS Kubernetes Benchmark tab to access the latest Kubernetes Benchmark report for that Node.
The report displayed in the CIS Kubernetes Benchmark tab is equivalent of getting the
ciskubebenchreportsresource for a given Node:$ kubectl get ciskubebenchreports.aquasecurity.github.io \ --selector starboard.resource.kind=Node,starboard.resource.name=minikube \ --output yaml
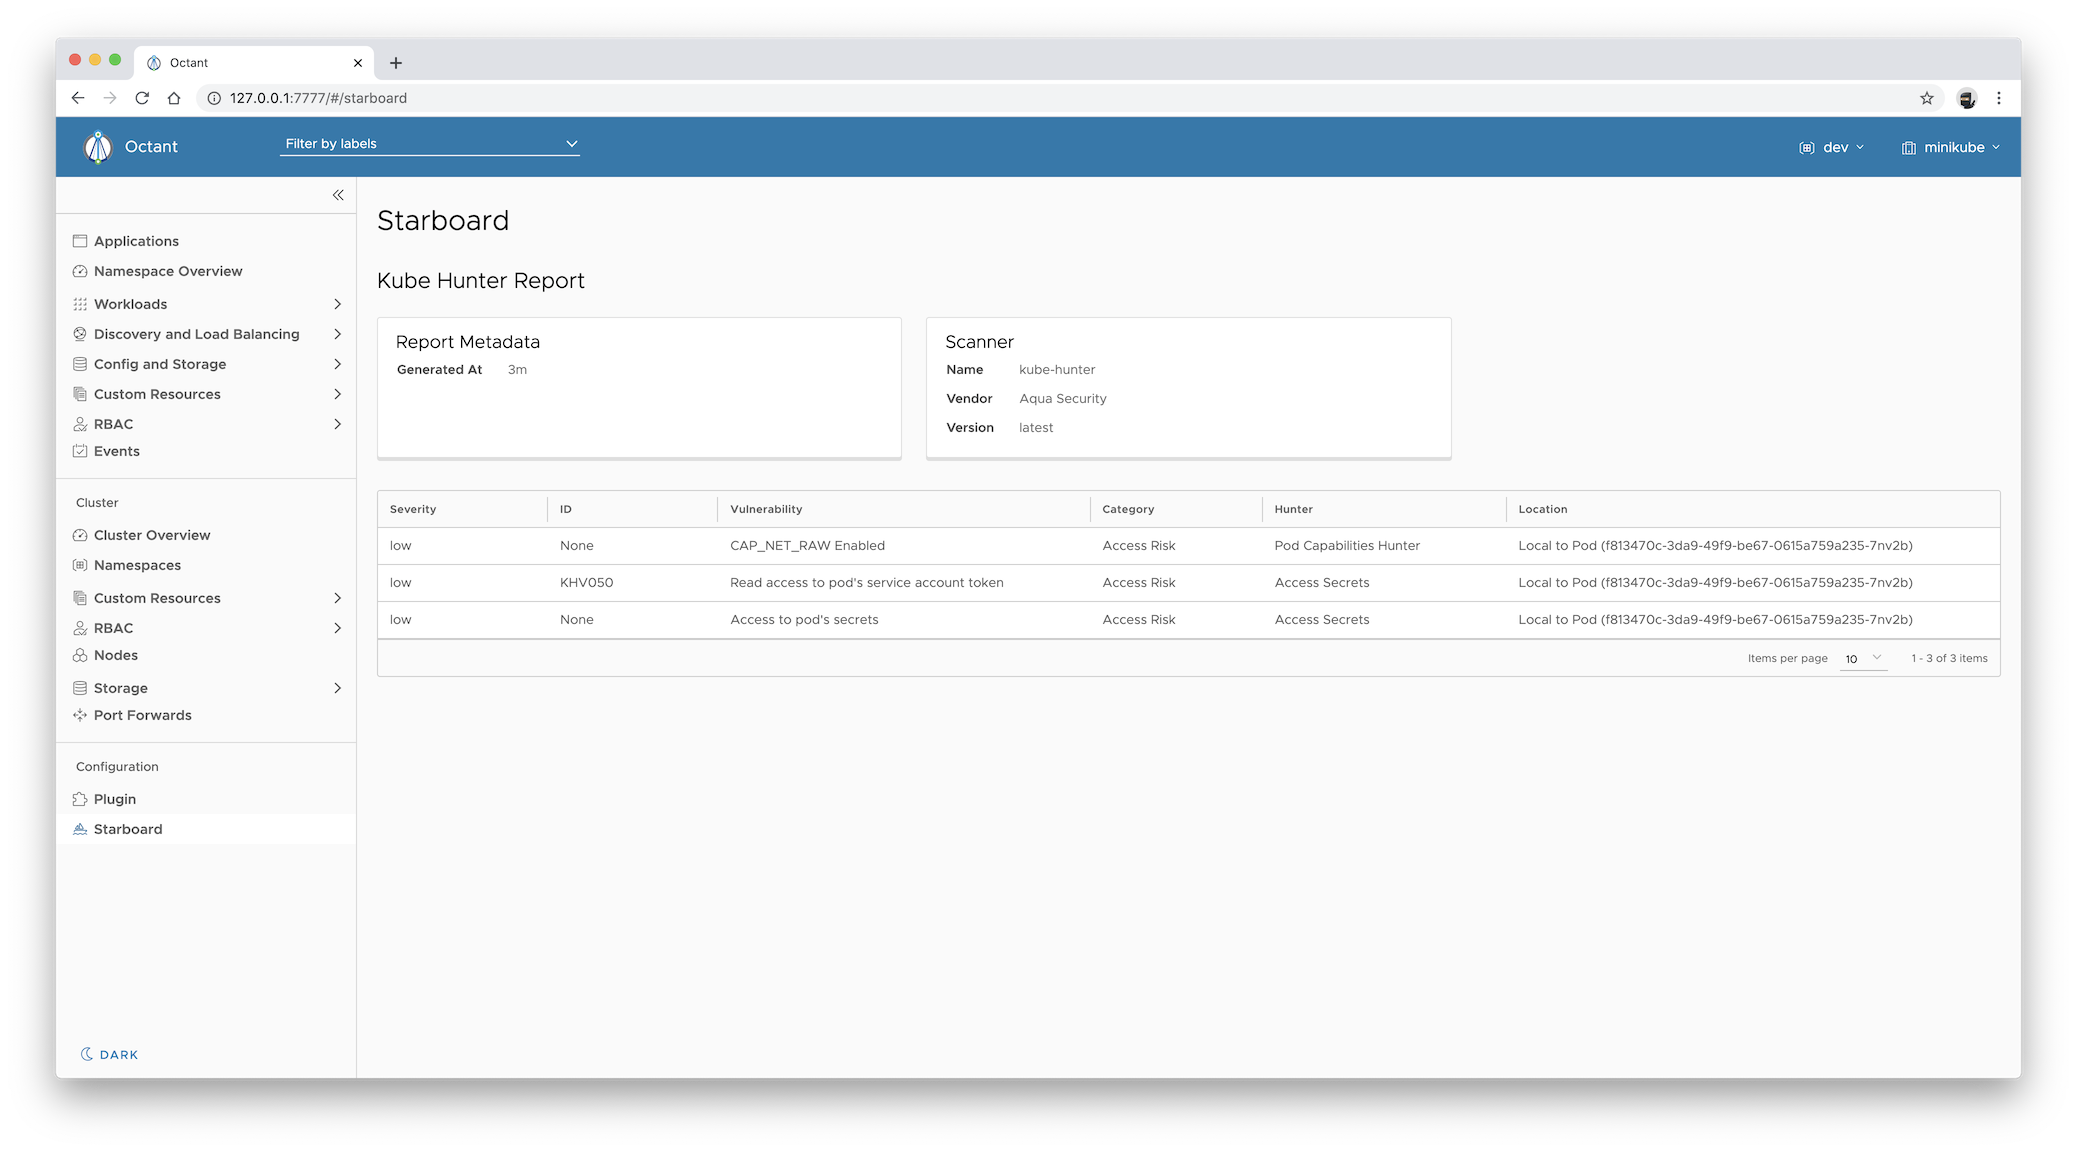
Reports generated by kube-hunter are represented by kubehunterreports.aquasecurity.github.io resources. To display
the latest kube-hunter report:
-
Expand Starboard.
The report displayed in the Starboard pane is equivalent of getting the
kubehunterreportsresource:$ kubectl get kubehunterreports.aquasecurity.github.io \ --selector starboard.resource.kind=Cluster,starboard.resource.name=cluster \ --output yaml
Run the following command to remove the plugin:
rm -f $OCTANT_PLUGIN_PATH/starboard-octant-plugin
where $OCTANT_PLUGIN_PATH is the default plugins location respected by Octant. If not set, it defaults to the
$HOME/.config/octant/plugins directory.
This repository is available under the Apache License 2.0.


