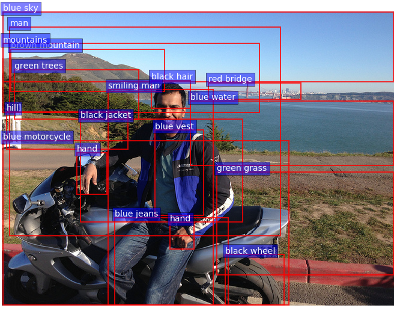
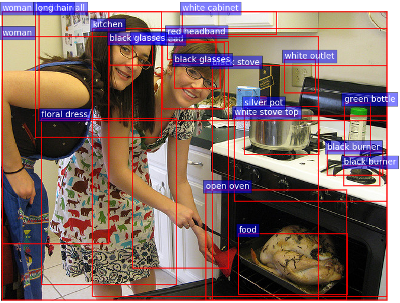
This code implements a bottom-up attention model, based on multi-gpu training of Faster R-CNN with ResNet-101, using object and attribute annotations from Visual Genome.
The pretrained model generates output features corresponding to salient image regions. These bottom-up attention features can typically be used as a drop-in replacement for CNN features in attention-based image captioning and visual question answering (VQA) models. This approach was used to achieve state-of-the-art image captioning performance on MSCOCO (CIDEr 117.9, BLEU_4 36.9) and to win the 2017 VQA Challenge (70.3% overall accuracy), as described in:
- Bottom-Up and Top-Down Attention for Image Captioning and Visual Question Answering, and
- Tips and Tricks for Visual Question Answering: Learnings from the 2017 Challenge.
Some example object and attribute predictions for salient image regions are illustrated below.
Note: This repo only includes code for training the bottom-up attention / Faster R-CNN model (section 3.1 of the paper). The actual captioning model (section 3.2) is available in a separate repo here.
If you use our code or features, please cite our paper:
@article{Anderson2017up-down,
author = {Peter Anderson and Xiaodong He and Chris Buehler and Damien Teney and Mark Johnson and Stephen Gould and Lei Zhang},
title = {Bottom-Up and Top-Down Attention for Image Captioning and Visual Question Answering},
journal = {arXiv preprint arXiv:1707.07998},
year = {2017}
}
This code is modified from py-R-FCN-multiGPU, which is in turn modified from py-faster-rcnn code. Please refer to these links for further README information (for example, relating to other models and datasets included in the repo) and appropriate citations for these works. This README only relates to Faster R-CNN trained on Visual Genome.
bottom-up-attention is released under the MIT License (refer to the LICENSE file for details).
For ease-of-use, we make pretrained features available for the entire MSCOCO dataset. It is not necessary to clone or build this repo to use features downloaded from the links below. Features are stored in tsv (tab-separated-values) format that can be read with tools/read_tsv.py.
10 to 100 features per image (adaptive):
- 2014 Train/Val Image Features (120K / 23GB)
- 2014 Testing Image Features (40K / 7.3GB)
- 2015 Testing Image Features (80K / 15GB)
36 features per image (fixed):
- 2014 Train/Val Image Features (120K / 25GB)
- 2014 Testing Image Features (40K / 9GB)
- 2015 Testing Image Features (80K / 17GB)
Both sets of features can be recreated by using tools/genenerate_tsv.py with the appropriate pretrained model and with MIN_BOXES/MAX_BOXES set to either 10/100 or 36/36 respectively - refer Demo.
-
ImportantPlease use the version of caffe contained within this repository. -
Requirements for
Caffeandpycaffe(see: Caffe installation instructions)
Note: Caffe must be built with support for Python layers and NCCL!
# In your Makefile.config, make sure to have these lines uncommented
WITH_PYTHON_LAYER := 1
USE_NCCL := 1
# Unrelatedly, it's also recommended that you use CUDNN
USE_CUDNN := 1- Python packages you might not have:
cython,python-opencv,easydict - Nvidia's NCCL library which is used for multi-GPU training https://github.com/NVIDIA/nccl
Any NVIDIA GPU with 12GB or larger memory is OK for training Faster R-CNN ResNet-101.
- Clone the repository
git clone https://github.com/peteanderson80/bottom-up-attention/-
Build the Cython modules
cd $REPO_ROOT/lib
make
-
Build Caffe and pycaffe
cd $REPO_ROOT/caffe
# Now follow the Caffe installation instructions here:
#   http://caffe.berkeleyvision.org/installation.html

# If you're experienced with Caffe and have all of the requirements installed
# and your Makefile.config in place, then simply do:
make -j8 && make pycaffe
-
Download pretrained model, and put it under
data\faster_rcnn_models. -
Run
tools/demo.ipynbto show object and attribute detections on demo images. -
Run
tools/genenerate_tsv.pyto extract bounding box features to a tab-separated-values (tsv) file. This will require modifying theload_image_idsfunction to suit your data locations. To recreate the pretrained feature files with 10 to 100 features per image, set MIN_BOXES=10 and MAX_BOXES=100. To recreate the pretrained feature files with 36 features per image, set MIN_BOXES=36 and MAX_BOXES=36 use this alternative pretrained model instead. The alternative pretrained model was trained for fewer iterations but performance is similar.
-
Download the Visual Genome dataset. Extract all the json files, as well as the image directories
VG_100KandVG_100K_2into one folder$VGdata. -
Create symlinks for the Visual Genome dataset
cd $REPO_ROOT/data
ln -s $VGdata vg
-
Generate xml files for each image in the pascal voc format (this will take some time). This script also does basic cleanup of the visual genome data. The final filtering is done by specifying the dataset vocab in training. E.g.
data/genome/1600-400-20contains vocabs for 1600 object, 400 attribute and 20 relation classes. The related code for this lives inlib/datasets. Relation labels can be included in the data layers but are currently not used.cd $REPO_ROOT ./data/genome/setup_vg.py
-
Please download the ImageNet-pre-trained ResNet-100 model manually, and put it into
$REPO_ROOT/data/imagenet_models -
You can train your own model using
./experiments/scripts/faster_rcnn_end2end_multi_gpu_resnet_final.sh(see instructions in file). The train (95k) / val (5k) / test (5k) splits are indata/genome/{split}.txtand have been determined usingdata/genome/create_splits.py. To avoid val / test set contamination when pre-training for MSCOCO tasks, for images in both datasets these splits match the 'Karpathy' COCO splits.Trained Faster-RCNN snapshots are saved under:
output/faster_rcnn_resnet/vg/Logging outputs are saved under:
experiments/logs/ -
Run
tools/review_training.ipynbto visualize the training data and predictions.
-
The model will be tested on the validation set at the end of training, or models can be tested directly using
tools/test_net.py, e.g.:./tools/test_net.py --gpu 0 --imdb vg_1600-400-20_val --def models/vg/ResNet-101/faster_rcnn_end2end_final/test.prototxt --cfg experiments/cfgs/faster_rcnn_end2end_resnet.yml --net data/faster_rcnn_models/resnet101_faster_rcnn_final.caffemodel > experiments/logs/eval.log 2<&1Mean AP is reported separately for object prediction and attibute prediction (given ground-truth object detections). Test outputs are saved under:
output/faster_rcnn_resnet/vg_1600-400-20_val/<network snapshot name>/
| objects mAP@0.5 | objects weighted mAP@0.5 | attributes mAP@0.5 | attributes weighted mAP@0.5 | |
|---|---|---|---|---|
| Faster R-CNN, ResNet-101 | 10.2% | 15.1% | 7.8% | 27.8% |
Note that mAP is relatively low because many classes overlap (e.g. person / man / guy), some classes can't be precisely located (e.g. street, field) and separate classes exist for singular and plural objects (e.g. person / people). We focus on performance in downstream tasks (e.g. image captioning, VQA) rather than detection performance.

