openhab-itho-fan
Summary
Arjen Hiemstra created and sells an addon for an itho CVE fan. This makes it controlable by WiFi and of course a home automation system. This is an implementation for openHAB including a widget. It's small, so intended use is a small page (phone) or a tiled dashboard. The latter is my setup,so for this it's tested. Most difficult in widgets is responsive behaviour. So it may be required to change CSS to match your needs.
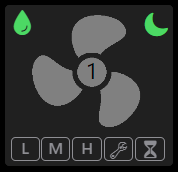
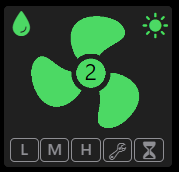
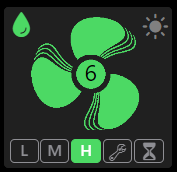
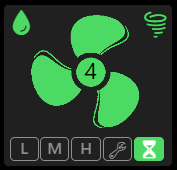
left to right, nightmode, daymode, manual set and auto humidity mode.
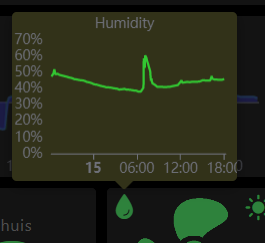
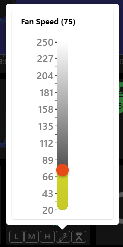
left to right, 24 hours humidity graph and free manual setting
Features
- Depending on the speed the fan will show 1 of 7 images.
- Below 30 it's shows grey (off, assuming you never completelly turn it off)
- Between 30-70, it's on (green) with no stripes
- Between 70-110, it's on, one stripe
- Between 110-150, it's on, two stripes
- Between 150-190, it's on, three stripes
- Between 190-230, it's on, four stripes
- Above 230, it's on, five stripes
- In the center of the fan the speed is shown
- It will show in % using the itho addon range 0-254
- It can go below 20 but I read not all fans will keep turning at a very low setting. This is a safe value.
- It has a low, medium, high button.
- This will set the corresponding speed (as set in the itho addon)
- The chosen button will light up green (also when it's set by the remote!)
- It had a timer button
- This will set the fan to the high setting for a limited time (as set in the itho addon)
- As long as the timer is active, the button will light up green (also when it's set by the remote)
- (although it's the high setting, the high button will remain gray in this case)
- It had a setup (wrench) button
- It will show a popup screen you can use to manually set a value between 20 and 254
- If it happens to be the low/medium/high (+-5), this button will show green
- Any other value will make the setup/wrench button green
- It had a humidity icon
- Between 40 and 60% (recommended values for health) it will be green, else gray
- Pressing it will show a 24 hour humidity graph (new!)
- It had a auto control icon
- If it shows a moon, it's in night mode. If the icon is green with according speed. If gray a manual change had been made.
- If it shows a sun, it's in day mode. If the icon is green with according speed. If gray a manual change had been made.
- If it shows a tornado, it spinned up for humidity. If the icon is green with according speed. If gray a manual change had been made (timer button will also be green).
- It has an auto settings
- All configurable (incl. disabling) by rule variables
- Day and Night setting for fan speed
- Automatic spin up while/after cooking/showering (and prevent on/off loops)
- Reset of manual input to default day/night speed
Versions/releases
- 0.1 - Initial version
- 1.0 - First release of complete set with thing, widget and rules
It new at the moment, so work in progress. Expect changes.
- done in 1.0 - Next addition will be a rule to automaticly control fan when showering or at day/night.
- done in 1.0 - A popup graph with 24 hours humidity and/or speed.
- done in 1.0 - The current setup uses the web api with a refresh of 30 seconds. Command is sent immediatelly but the widget is delayed on updating.
- Showing timer countdown (maybe in circle around 'fan' axis?
- Press day/night icon to restore normal day/night settings?
- split day in morning/afternoon/evening?
- humidity level in indicator?
Preperation
- Have an openhab installation 😁
- Own an itho central ventilation unit 😁
- Buy and install the Itho CVE RFT WiFi add-on, see documentation
- To use all features, also buy/install the 866 mhz radio controller and humidity sensor
- If you own it, add your remote(s) to the addon (not the itho box).
- When installing the above you can choose a host name (WiFi settings), remember it. The manual assumes 'fan'
- Install in openhab the http binding, see documentation
- Install in openhab the jsonpath transformation, see documentation
- Install in openHAB the javascript scriping engine, see documentation
- This installs the new ECMAscript 2021+ version with OH libraries that somewhere in the future will replace the old (now default) js-script. If you would like to stick to the default build-in version you'll have to change the rules a bit
Create thing
- Create a new thing
- Choose the HTTP binding
- Don't use GUI but move to tab code
- Copy and paste the yaml in the thing folder of this project
- Save the thing
- Don't close it
Create equipment
- If it's closed, navigate to your fan thing
- Move to the tab 'channels'
- Use button 'Add equipment to model
- Select all channels and add-on
- Openhab will create/add equipment and items
(Optional) Slider to set speed
When opening the current_speed it can't be controlled with the default GUI. You can configure a slider to make this possible
- Open the item current_speed
- Choose 'add metadata'
- Add 'State Description' and add a min of 20, a max of 250, a step of 5 (or whatever you like) and save
- Add 'Default Standalone Widget' , choose 'oh-slider-card' and save
- Usually you have to close and reopen the item. Now a slider appears you can use to change the speed of the fan
Widget installation
- Copy all images in the project folder widget-images to your openhab configuration 'html' folder
- Add a new widget
- Remove default code
- Copy and past the yaml in the widget code of this project and save
Refresh Rule installation
openHAB doesn't update loaded charts (even when in popups). The trick is to add a key to the f7-chart dependend on a periodically changing item. Since the popop shows a day chart every hour is more than enough. You might already have encountered this challenge. So there's two options:
- If you already have such an item. Look in the chart yaml for the key: = "fan" + items.timertick_hour.state and replace it with your item.
- If this is the first time you need this
- Create a new rule
- Give it a name and label (I used timertick for both, but it doesn't matter what you choose)
- Save it
- Now change from the GUI config to the code tab
- Replace code with the timertick_rule yaml in folder rules
- save it
- run it (this will create the 'timertick_hour' item and initialize it.
Automating Ventilation Rule installation (optional)
Optional, if you want no automatic change to ventilation settings you can skip this. This will (also) result in somewhat delay when using widget buttons
- Create a new rule
- Give it a name and label (I used timertick for both, but it doesn't matter what you choose)
- Save it
- Now change from the GUI config to the code tab
- Replace code with the fan_rule yaml in folder rules
- save it
Widget usage/configuration
- Add a new widget to your dashboard/page
- Set the props and save
- Easiest is selecting only the equipment (items will be found on default names)
- If you chose other names for the items, you can also select the seperate items
- set low, medium and high according to the values in the itho addon system setup
Usage
- Add the widget 'widget_fan' to your dashboard or page. Remember it's intended for tiled dashboards (so small)
- Set the props of the widget
- Option 1 : Only set the equipment items (don't change seperate items)
- Option 2 : Only set (all!) the seperate items (don't set equipment item)
- Set values for low/medium/high speeds (same as in GUI of add-on)
- You're done
- Press L, M or H button to change speed to low, medium or high setting
- Press hourglass to temporally increase speed (accoding to high setting and timer1)
- Press wrench to set another speed (slider will show)
- Icons will change according to settings, remember. The fan will respond immediatelly, the GUI with a 30 second delay (according to thing update frequency)
- If you installed the fan rule, you can change automation settings at the start of the script
- scriptName : scriptname is used in logging
- group : Used to find fan items
- nightSpeed : Nightspeed, integer value or low/medium/high
- daySpeed : Dayspeed, integer value or low/medium/high
- humidSpeed : Speed for ventilation when humid or low/medium/high or timer1/timer2/timer3
- dayStart : Hour day mode starts (>=)
- nightStart : Hour night mode starts (>=)
- resetMinutes : Minutes manual command can reset to default day/night settings (-1 disable)
- humidityTreshold : %humidity rise to start
- delayFanStart : Minutes to start fan AFTER humidity raises over treshold
- delayFanEnd : Minutes to keep fan turning after humidity fan start (ignored when speed set to timer1/timer2/timer3)
- delayFanNextStart : Minutes wait for next start
Versions
0.9 Initial version 1.0 First release (added humidity graph, auto setting rule and layout improvements)
Code
The code is pretty standard. Things you might find interesting for changes
- It uses the the web api at api.html (documentation in the webpages of the add-on itself)
- api.html?get=ithostatus (get most values in json format)
- api.html?get=currentspeed (get speed in plaintext)
- api.html?command=low/medium/high/timer1 (set speed to fixed value or timer)
- api.html?speed=0-254 (set speed at given value)
- api.html?get=queue (undocumented api, returns json with timers)
- Range openHab accepts for speed can be changed in metadata of the current_speed item
- Since the settings for low/medium/high can't be retrieved from the api (as far as I know) the widget takes them as input parameters
- Most manual/ gui behaviour is 'programmed' in the widget
- The widget uses a trick to allow both the equipment as seperate items using the default values and concatenating them in the formulas
- Like items[props.fan+props.speed].state
- If the equipment 'fan' is given it adds the default item names 'fan' + '_current_speed'
- If the items are given it adds '' + 'fan_current_speed'
- Of cource, if both are supplied this trick won't work
- Embedded popovers in a widgets are a bit strange
- Add a popoverOpen to the caller, create a unique name. Start with a "."!
- Add a slot with a f7-popover in the calling item
- Give it a class with the unique name, but without the first "." (and if present replace the other point by a space)!
- Now they should connect/work. Always save before testing, openHAB will leave the widgetscreen when misconfigured.
- If you're lazy, add your low/medium/high speed as a default. I used mine 😃
- OpenHAB charts don't update/refresh when loaded. The trick is to add a key dependend on a item that changes periodically. I've got two items for 15 minutes and a hour called timertick and timertick hour. If you put a key: = "fan" + items.timertick_hour.state (name must be unique) in the f7-card the chart will reload/refresh. This also applies to popups with charts (they're loaded hidden)
- Automatic behaviour is programmed in the rule. Code is commented to explain
- Rules in ECMAscript allow 'let' but don't use it at main level (alway var).
- Reason is the script object is reused. You can take advantage of this by placing variables on the this object. They will become in memory vars that can be used over executions
- The rule it triggered by CRON and change on current_speed. The latter is set by the rule so a bit of logic is present to prevent execution loops
- The rule also helps the GUI by resetting the command item. If it's 'low' it means low has been sent to addon (and applied) but the result had not been read by openHAB (max 30 secs delay). When applied it will be 'X'
