This is a fork of https://github.com/ChrisTopherTa54321/foto2vam
Splits on commit 047e1d3e9eea07a7664b498cdc26a791381f5891
Download models from here, and place them inside models directory.
each model and corresponding json file must be together.
Install anaconda, put binaries in path and create a new environment named foto2vam.
Open a command prompt session in the root directory of this repo, then run
activate && activate foto2vam
pip install -r requirements.txt
after everything is installed, place a default look's json (any look you want the body of) in Sample\default.json
Now just run run.cmd file in the same command prompt window you activated foto2vam in.
you will not need to install pip dependencies again, in future you can run it via
activate && activate foto2vam
run
place real faces inside a folder in input folder, and output will be inside output folder.
Original Author's instructions
In order to train you need to run modded VaM and use Tools/TrainSelf.py to communicate with VaM. In order to run this
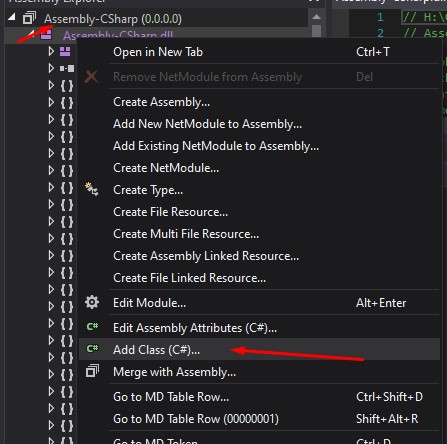
successfully you must first modify the main game assembly to get past scripting limitations. Using dnSpy or a similar
program add the following class to your main assembly Assembly-CSharp: VamMod
Paste the content in there, press Compile then File -> Save Module.
Now you can launch the game. Once the default scene is loaded, go to Edit mode, and in session plugins, add VamPlugin to the scene. There is no UI, you can check the logs to confirm it is working:
Creating Foto2VamServer

(Filename: C:\buildslave\unity\build\Runtime/Export/Debug.bindings.h Line: 43)

Foto2VamServer Created
Once VaM is ready, you can run the self trainer. Make sure you have setup the correct python path (use conda environments)
and ensure you have installed dependencies pip install -r requirements-train.txt
Additionally you must place cuda in the path, and put this directory in your PYTHONPATH. Look at setup-env
file for reference.
The final piece are training arguments. train.cmd has the full list.
- configFile - is the main json configuration file, please look at example configuration files in models folder.
- outputFile - the name of the file where the model will be saved
- seedImagePath - path to read seed images, these must be normalized images, best to use from inputs foto2vam has already processed during a normal run
- tmpDir - a temporary directory to store buffer files, recommended to use a RAMDisk to avoid disk wear and tear
- seedJsonPath - a directory with a few look jsons, can be any
- trainingDataCache - name of a cache file to store tmp data during training and be able to resume training
- pydev - whether to run this with debugging capabilities, only use when debugging in something with pydev support such as pycharm
The configuration file looks like bellow:
{
    "baseJson": "arijoon_1/base.json",
    "inputs": [{
            "name": "encoding",
            "params": [
                { "name": "angle", "value": "0" }
            ]
        },
        {
            "name": "encoding",
            "params": [
                { "name": "angle", "value": "35" }
            ]
        },
        {
            "name": "eye_mouth_ratio",
            "params": [
                { "name": "angle", "value": "0" }
            ]
        },
        ...
    ],
    "outputs": [{
        "name": "json",
        "params": []
    }]
}
baseJson is the look json you have created. You can create your own, by opening a look in vam and setting the toggle
animatable on any morph you would like to be trainable. Additionally you can define minJson and maxJson files that
set minimum and maximum values for each trainable morph
you can also do math operations within a prams section, consult the original author post for instructions on how to do so. Alternatively you can look at param_generator and add your math there like I have.
The rest of the process is trial and error, you can try to plot your accuracy and loss by manually capturing it in every section.
Read TrainSelf.py to get a better understanding of how this all works and modify as needs be.
Each landmark has w which is it's first axis (x) and h which is it's second axis (y), so for example to get the distance between eyes you can use right_eye.w - left_eye.w
I have added debugging capability for both Visual studio code and Pycharm. I personally switched to Pycharm as VsCode cannot debug multiprocess python application, and if you wish to do so, it's best to switch to IDEA based, just make sure to edit the debug configuration
