For questions, you can always join my Discord server and talk to me there.
This repository is a mirror of https://git.griefed.de/Griefed/ServerPackCreator, mainly used for issue reporting and release distribution.
ServerPackCreator creates a server pack from any given Forge, Fabric, Quilt, LegacyFabric and NeoForge modpack.
Whenever you are working on an update to your modpack, you simply run ServerPackCreator and BAM! You've got yourself a server pack for your new modpack version.
ServerPackCreator is a passion project on which I am working in my spare time. It is also the main reason for why I got into programming in the first place. Patience with issues and support is appreciated!
I started getting into Java programming in February 2021, when I was working on an update for one of my Minecraft modpacks, Survive Create Prosper 4, and got tired and bored with manually creating a server pack everytime I wanted to update and test something, or just release a new server pack for the new modpack version.
The thought "There must be a way to automate this, or at least make it less tedious..." was the spark which sent me off into the world of programming. And here we are.
-
You are still expected to be knowledgeable about your modpack, server packs in general, server administration and managing your Java installations. ServerPackCreator is not intended to take all the work off your shoulders!
-
When using alpha, beta or in-dev version of ServerPackCreator, it is advised to make a backup of your ServerPackCreator-directory in your home-directory. Things will break with alpha releases, stuff may break when using beta releases. If you distribute server packs generated with a pre-release (alpha, beta) of ServerPackCreator, you do so at your own risk. I will not be held responsible for errors in your server pack caused by you using a pre-release.
- TL;DR: Don't use test to ship to prod!
There are two kinds of pre-releases: Alphas and Betas
- Alphas: Missing features, incomplete features, almost guaranteed to have bugs / errors
- Betas: Feature complete, probably contains bugs / errors
| CLI | GUI |
|---|---|
 |
 |
Each way of using ServerPackCreator has its advantages and disadvantages. Depending on your environment, it may be better to use one way over the other. This section highlights some of the advantages and disadvantages of each version to help you decide which way you are going to use. Note: All three ways are supported by the .jar-file. Which one is started depends on the CLI arguments used and your environment.
| Advantages | Disadvantages |
|---|---|
| No need for a graphical environment. Can be used on a server to generate a server pack for immediate use. | Gathering of information for a configuration file is tedious. |
Step-by-Step generation of a configuration-file with the use of the -cgen argument. Generated config will be used immediately afterwards. |
No convenience features file folder-browsing or jumping to the generated server pack after generation. |
| Load and edit an existing configuration. Editing is limited to base values of a given configuration. Not editable via CLI are script settings as well as any potentially installed plugin configuration. | Debugging in case of a broken/erroring configuration file can be time consuming. Careful reading of logs is required. |
| Manual editing of the configuration-file in case you want to change it. | |
| Unable to edit start script placeholders and variables |
| Advantages | Disadvantages |
|---|---|
| Browse the filesystem for folders and file required by the configuration. | Requires a graphical environment. |
| Setting up a configuration by browsing the filesystem and selecting your Minecraft and modloader versions from a list. | |
| Browsing the generated server pack after generation has finished. | |
| Loading and saving different configurations for quick generation of multiple server packs in short succession. | |
| Edit the configuration in the GUI. No manual file-editing required. | |
| Edit start script placeholders and values |
- Exclude clientside-only mods
- Automatically by letting ServerPackCreator scan the mods of your modpack for their sideness
- Manually by configuring a list mods which ServerPackCreator will filter out according to your input and the chosen filter.
- Add files and directories in your server pack.
- Files and directories in your modpack
- Files and directories from your computer
- Add a server icon
- Server icons are automatically scaled down, or up, to 64x64!
- Specify a custom one, or use a default provided by ServerPackCreator.
- Change the default to your liking if you intend on using the same icon across multiple server packs!
- Add a server.properties
- Ship your server pack with default settings!
- Specify a custom one, or use a default provided by ServerPackCreator.
- Change the default to your liking if you intend on using the same icon across multiple server packs!
- Many modloaders supported
- Forge
- Fabric
- LegacyFabric
- Quilt
- NeoForge
- Use Minecraft snapshots and pre-releases
- Per default, only regular releases enabled
- Let ServerPackCreator install the modloader-server for your server pack, for immediate testing and debugging after generation!
- Let ServerPackCreator generate a ZIP-archive, for immediate upload to places like CurseForge (after you've tested your server pack, of course 😉)
- Configure commandline arguments with which to start the Minecraft server
- Does your modpack require a lot of RAM? Well, tell ServerPackCreator to create the start scripts with
-Xms8G -Xmx8Gor similar values! - Aikars flags are available, too. If you like 'em, use 'em.
- Does your modpack require a lot of RAM? Well, tell ServerPackCreator to create the start scripts with
- Create your own start-script templates
- Add additional functionality to your servers start scripts
- Use placeholders in your templates, to be replaced with custom values
- Example: placeholder
SPC_FLYNN_LIVES_SPCin the templates can be replaced with a value configured on a per-server pack basis, i.eNow that's a big door
- Example: placeholder
- Plugins!
- ServerPackCreator allows you to use plugins to add new features in various places.
- An example plugins is available with every release, and the source code for it can be found in this repository, at Example Plugin
- Report a bug / ask for a feature / ask for an improvement / request a documentation improvement:
- There's a Wiki available which goes into further detail for many of ServerPackCreators available aspects:
- The same as the Wiki, but as a file should you prefer it. 😊
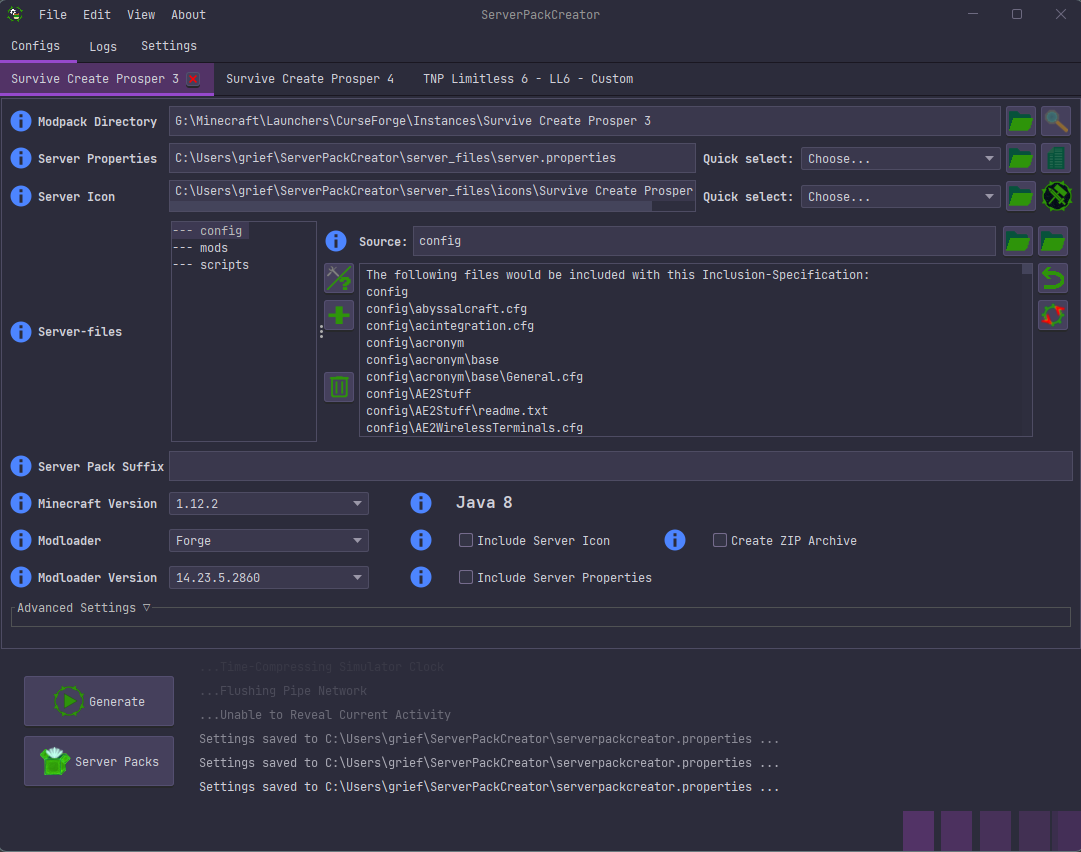
The first time you start ServerPackCreator, you will be asked whether you want to see a small step-by-step guide. Said guide will show you the most important parts in configuring your server pack.
Should you at any point want to revisit said guide, simply hit About -> Step-By-Step Guide in the menu at the top.
- Using the JAR-file release requires Java 21.
- Working internet connection recommended.
The installers ship their own Java installations.
ATTENTION: I can not and will not guarantee that ServerPackCreator will work flawlessly with any other Java version other than version 17. Things may break at random, at any place, if a different Java version is used. You are welcome to try and use any other version, but do not report issues back to me if you do encounter problems when running ServerPackCreator with a more recent Java version.
The plugin-section shows an excerpt from the README of the example plugin README. Check out the repository of the example plugin, linked below, for more details.
This repository contains an example plugin. Available at Example Plugin
ServerPackCreator provides several extension endpoints for pf4j plugins, to add additional functionality. This example plugin demonstrates an implementation for all available extension endpoints of ServerPackCreator.
The example plugin demonstrates how extension for ServerPackCreator are implemented, one small example for every extension point available in ServerPackCreator.
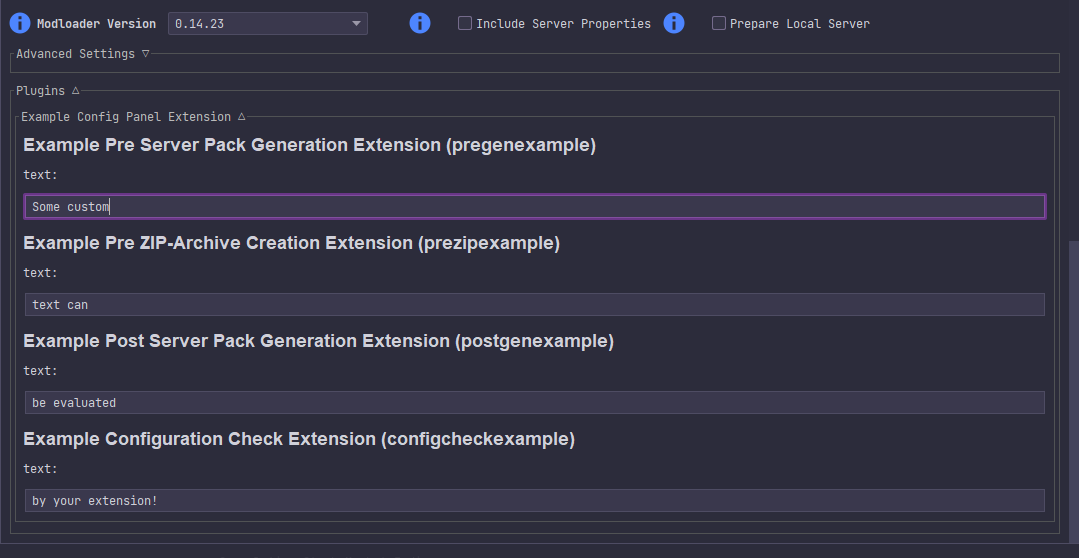
The configuration panel is intended to let you add a panel in which you, or the user of your plugin, may configure something for any of the extensions added by your plugin.
The above example lets you configure four text-fields, one for each extension point used during server pack configuration checking and server pack generation. More on this in Configuration Check Extension.
Extension configurations are saved to the serverpackcreator.conf of the server pack and re-loaded along with everything else, like the Minecraft version, modloader and modloader version etc.
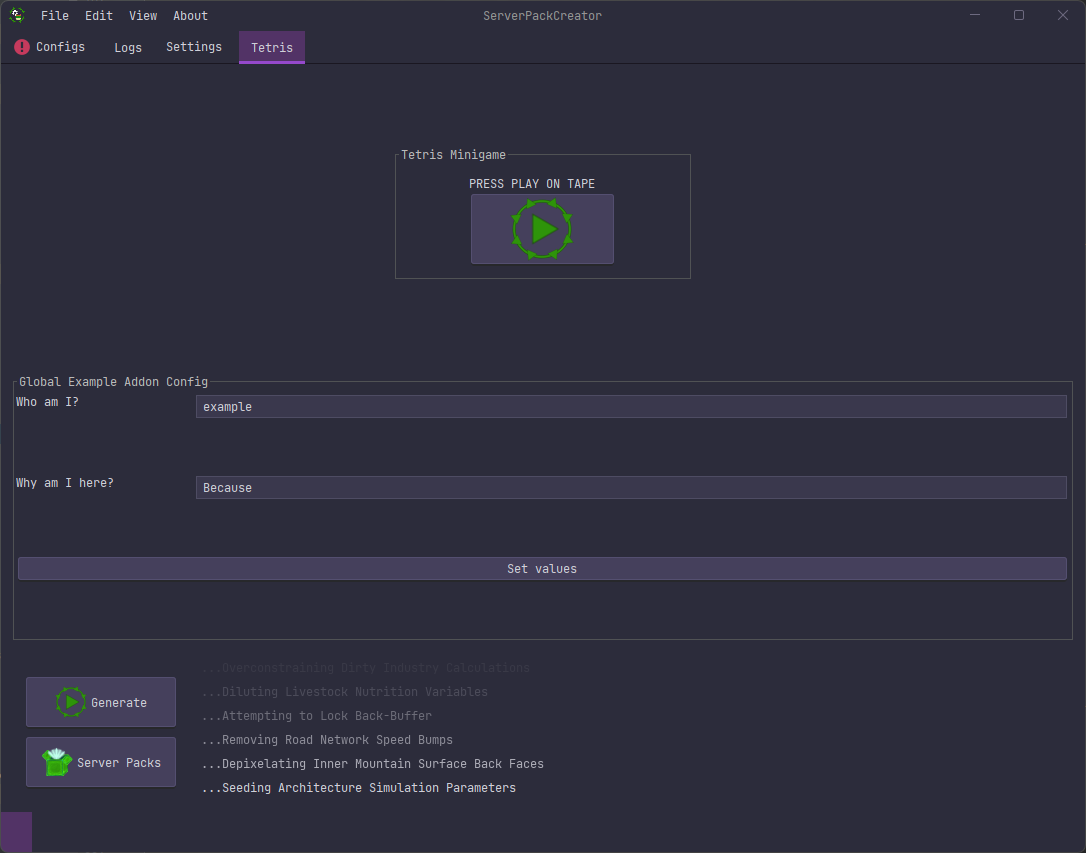
Tab extensions allow you to add whole tabs to the GUI of ServerPackCreator. These additional tabs are intended to let you add text-fields and such, which allow you to configure your global plugin configuration. You may add anything you want to it. The sky is the limit!
The above example adds a button which, when pressed, opens a minimalistic Tetris game in a new window. It's not supposed to be actually that entertaining, but rather to demonstrate that you can do what you want inside your tab.
Below the big button are some text-fields which allow you to change some values of the global plugin-wide configuration. Global plugin-configurations are handed to you by ServerPackCreator when the tab is instantiated.
Global plugin-configurations are passed to every extension, along with any available extension-specific configuration, automatically, so you don't have to worry about anything other than actually saving changes you made in the tab.
Maybe have a timer auto-save every few seconds? Your tab, your choice! 😁
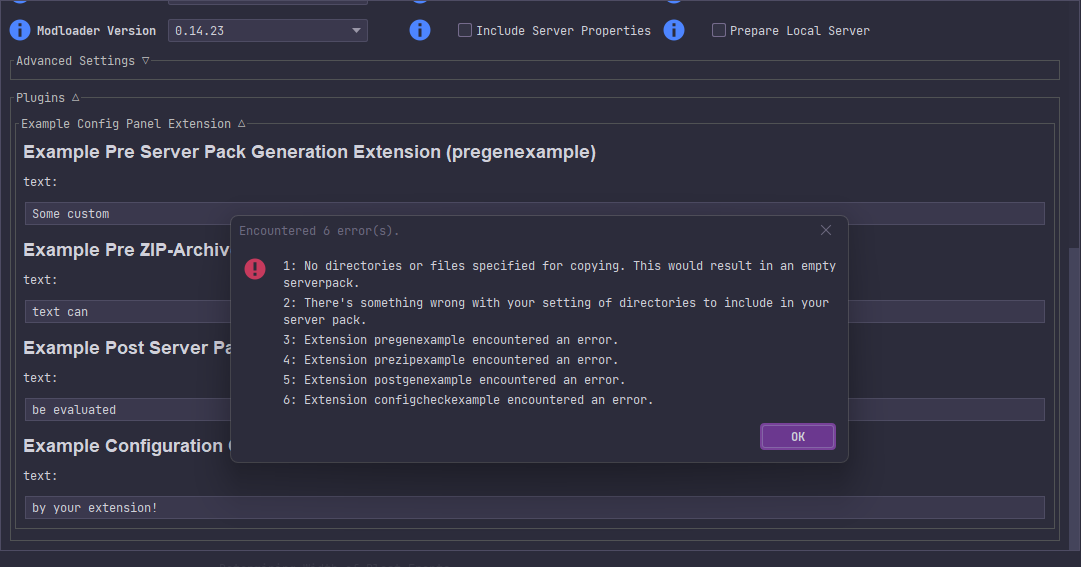
The configuration check extension point allows you to run your own config checks, be that on any of the already available data from the server pack config tab, or your own data from the configuration panel, or your own tab, or whatever else you may want to check.
The above example simply checks whether the string in text of the passed CommentedConfig in a list
of passed configs contains text. If it does, then we add a custom error message to the list of errors encountered
during configuration checks.
That list is then displayed to the user after the configurations checks have all run.
Make use of this extension point in combination with the Configuration Panel Extension and/or Tab Extension in order to check user input for any errors!
The Pre Server Pack Generation extensions run, as the name implies, right before the generation of a server pack really begins. You may use this to prepare the environment for any of the tailing extensions.
The above example shows the run of a PreGen extension, with the global plugin configuration as well as the extension-specific extension passed to it by ServerPackCreator.
The Pre Server Pack ZIP-archive Creation extensions run, as the name implies, right before the creation of the server packs ZIP-archive is, or would be, started. Want to add any files to the ZIP-archive? Or make sure some file doesn't make it into the ZIP-archive?
The above example shows the run of a PreZip extension, with the global plugin configuration as well as the extension-specific extension passed to it by ServerPackCreator.
The Post Server Pack Generation extensions run, as the name implies, after the generation of a server pack has finished. Want to add any files to the server pack, but don't want them to end up in the ZIP-archive? Maybe download, install and configure DynMap with some render-data? This would be the place to do that!
The above example shows the run of a PreGen extension, with the global plugin configuration as well as the extension-specific extension passed to it by ServerPackCreator.
See now why the ConfigPanel, ConfigCheck and Tab extensions are so nice to have? The possibilities are (almost) endless!😁
Some people need additional functionality for their server packs, or have some additional wishes for them. Some of those things may not fit into the core functionality of ServerPackCreator itself.
It may also be that it is such a niche feature, that I either don't have the time to code it in, or simply don't want to. Maybe it doesn't fit into the overall design of ServerPackCreator, too. Who knows, it could be any of those reasons or another.
Hence, the plugin functionality.
This allows people to write their own plugins to expand the functionality of ServerPackCreator with their own features as they see fit.
A curated list of officially acknowledged plugins can be found here (redirects to GitHub Pages)
How to get your own plugin into this list:
If you have written your own plugin for ServerPackCreator and you would like to see it added here, please open an issue over at ServerPackCreator, using the Documentation template.
For a plugin to be accepted, you must at least provide:
- The name of and link to the repository, and therefore the plugin.
- The owner of the repository, and therefore the plugin.
- The branch of the repository where the main code resides in.
- A description of the plugin.
- If you've used the installer to acquire ServerPackCreator, use the shortcut created by the installer to run ServerPackCreator. The installers provide their own Java runtime, so you do not need to install Java separately.
- If you've downloaded the JAR-file, and depending on how your Java installation is set up, you may be able to simply run the JAR via double-click or other methods, or you may need to run it from the commandline.
There are a couple of arguments which may or may not be helpful for you, depending on how you plan on using ServerPackCreator:
| Argument | Description |
|---|---|
-help |
Print ServerPackCreators help to commandline. |
-update |
Check whether a newer version of ServerPackCreator is available. |
-cgen |
Run ServerPackCreators configuration generation. |
-cli |
Run ServerPackCreator in commandline-mode. If no graphical environment is supported, this is the default ServerPackCreator will enter, even when starting ServerPackCreator with no extra arguments at all. |
-web |
Run ServerPackCreator as a webservice. The webservice will be reworked in version 6. |
-gui |
Run ServerPackCreator with our GUI. If a graphical environment is supported, this is the default ServerPackCreator will enter, even when starting ServerPackCreator with no extra arguments at all. |
--setup |
Set up and prepare the environment for subsequent runs of ServerPackCreator. This will create/copy all files needed for ServerPackCreator to function properly from inside its JAR-file and setup everything else, too. |
If you wish to run ServerPackCreator with your locale (if it is already supported), you can either:
- Run
java -jar ServerPackCreator-X.X.X.jar -lang yourLocalefor examplejava -jar ServerPackCreator-X.X.X.jar -lang en. This will create the lang.properties-file with your specified locale. - Running
java -jar ServerPackCreator-x.x.x.jarwithout-lang enor any other language will either set the locale toenby default, or use the already defined locale from theserverpackcreator.properites-file. - Modify the
serverpackcreator.properties-file and set your locale like thislang=yourLocalefor examplelang=en
If you want to contribute translations to ServerPackCreator, check out the i18n-directory containing already available translations to see how they are set up. Then, make your changes, test them, and open a pull request on GitHub according to the Contribution-Guidelines.
Say you want to translate ServerPackCreator to german.
You would need to add the file <Module_Name>_de_DE.properties in the following places:
serverpackcreator-api\src\commonMain\i18n- Prefix:
Api_
- Prefix:
serverpackcreator-cli\src\main\i18n- Prefix:
Cli_
- Prefix:
serverpackcreator-gui\src\main\i18n- Prefix:
Gui_
- Prefix:
serverpackcreator-plugin-example\src\main\i18n- Prefix:
Example_
- Prefix:
serverpackcreator-updater\src\main\i18n- Prefix:
Updates_
- Prefix:
English translations for each can be found at:
In the english properties for the Gui, for example, you will see entries like
menubar.gui.menu.file=File
menubar.gui.menu.edit=Edit
menubar.gui.menu.view=View
menubar.gui.menu.about=About
menubar.gui.menu.help=Help
So, in order to translate them to german, in your Gui_de_DE.properties-file, you would add
menubar.gui.menu.file=Datei
menubar.gui.menu.edit=Bearbeiten
menubar.gui.menu.view=Ansicht
menubar.gui.menu.about=Info
menubar.gui.menu.help=Hilfe
To make these available whilst coding, rebuild the project. The i18n4k-plugin will
generate the necessary code, which will, in turn, then be available for you to use and test. Alternatively, you can run the
Gradle task generateI18n4kFiles to generate the translation-code.
Then, either in your serverpackcreator.properties set de.griefed.serverpackcreator.language=de_DE or launch
ServerPackCreator with the argument -lang=de_DE.
Voilà! The menubar will now have german translations!
Java documentation available at:
- https://griefed.pages.griefed.de/ServerPackCreator/ or
- https://griefed.github.io/ServerPackCreator/ or
- https://griefed.gitlab.io/ServerPackCreator/
Read contributions before considering contributing to ServerPackCreator.
A short excerpt:
If you want to contribute to ServerPackCreator, then the following procedure must be adhered to:
- Fork ServerPackCreator
- Create a new branch in your fork, following one of the following naming schemes:
- The end of each branch name bust be suffixed with a one-word description fitting the changes made. Examples:
- griefed_chore_readme
- griefed_perf_curseforgemodpack
- griefed_feat_ziparchive
- For more details on what the naming scheme entails, see
.releaserc.ymlin the base directory of the repository or scroll down to the Commits-section.- Schemes:
- your_username_breaking_
- your_username_build_
- your_username_chore_
- your_username_ci_
- your_username_docs_
- your_username_feat_
- your_username_fix_
- your_username_perf_
- your_username_refactor_
- your_username_revert_
- your_username_style_
- your_username_test_
- your_username_other_
- Make your changes to your new branch:
- Try to keep the changes atomic, so they best fit the name of the branch.
- Follow conventional commit messages. See Commits-section for more details. Example:
- feat: Allow upload of modpack-export zip-archive to web-frontend
- refactor: Use apache commons-io for copying, instead of Files
- Open an issue on the main repository:
- Issue title: Your Username - Branch type (e.g. feat) - Short description of your changes. Example:
- Griefed - feat - Allow upload of modpack-export zip-archive to web-frontend
- Issue description: Fill in the sections the template provide.
- Submit the new issue
- I will then create a new branch in the main repository, with the same name as your branch, to which you will then create a pull request to.
- If checks and tests pass, or any changes necessary have been made, the pull request is ready to be merged etc., I will merge it to your main repository branch.
- I can then merge your main repository branch into main/master/whatever locally, push these changes to my GitLab instance, which will in turn push these changes to GitHub.
- Done!
This is the only way to ensure that any changes made to ServerPackCreator always arrive on my GitLab instance first, then on GitHub. Since I want to stay independent of GitHub and their architecture, I have to make use of my own GitLab installation. Hence, this procedure. So, if one day, GitHub vanishes, we still can provide people with ServerPackCreator from my GitLab instance.
None of this would have been possible without the excellent IDEs by JetBrains. They have kindly provided this open source project with an All Products Pack license. Additionally, ej-Technologies has provided an open-source license for JProfiler for ServerPackCreator, which allows me to resolve performance bottlenecks, pin down memory leaks and understand threading issues. Huge shoutout and thank you!
| JetBrains | IntelliJ IDEA | WebStorm | YouTrack | JProfiler |
|---|---|---|---|---|
 |
  |

This project would not be possible without these awesome groups, creators and developers and their wonderful libraries they have kindly provided to people such as me.


