for Android & iOS by Arttitude 360
This React Native module provides a wrapper to add Paystack Payments to your React Native application using the Paystack Android Mobile SDK and the Paystack iOS Mobile SDK libraries.
You can pull in react-native-paystack via npm:
npm install react-native-paystack --saveOR
yarn add react-native-paystack- For
RN <=0.39use version 2+ e.g. react-native-paystack@2.2.0 - For
RN >=0.40use version 3+ e.g. react-native-paystack@3.1.0
react-native link react-native-paystack - (iOS only): The next steps are necessary for iOS at this time as publishing to NPM seems to break symlinks contained in the Paystack iOS framework shipped with this package, thus causing XCode build errors.
- Download a fresh copy of the
Paystack iOS frameworkfrom their releases page on Github. - Extract
Paystack.frameworkfrom the downloaded zip. - In XCode's "Project navigator", right click on project name folder ➜
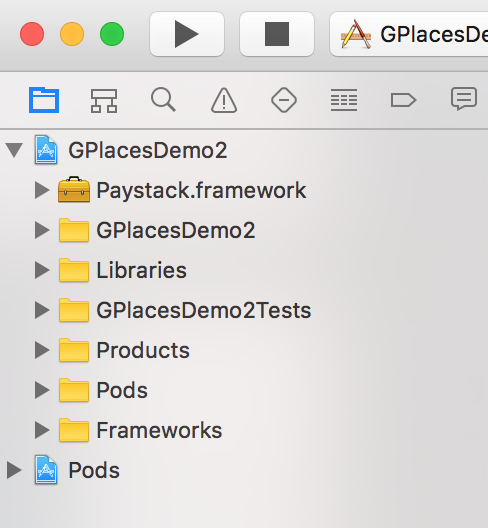
Add Files to <Your-Project-Name>. EnsureCopy items if neededandCreate groupsare checked and select your copy ofPaystack.framework. - Your files tree in XCode should look similar to the screenshot below:
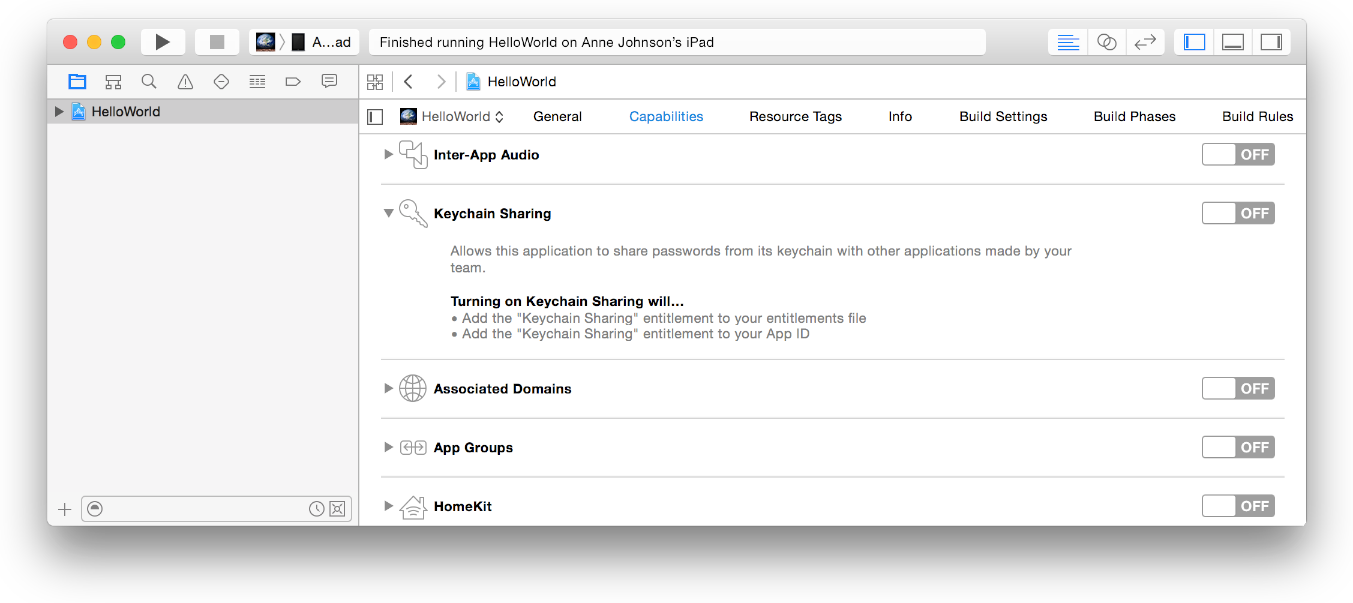
- If you are working with XCode 8+, to allow encryptions work properly with the Paystack SDK, you may need to enable
Keychain Sharingfor your app. In the Capabilities pane, if Keychain Sharing isn’t enabled, toggle ON the switch in the Keychain Sharing section.
- The following steps are optional, should be taken if you have not run
react-native link react-native-paystackalready. - In XCode's "Project navigator", right click on project name folder ➜
Add Files to <...>. EnsureCopy items if neededandCreate groupsare checked - Go to
node_modules➜react-native-paystack/ios➜ addRNPaystack.xcodeproj.
- The following steps are optional, should be taken if you have not run
react-native link react-native-paystackalready. - Add the following in your
android/settings.gradlefile:
include ':react-native-paystack'
project(':react-native-paystack').projectDir = new File(rootProject.projectDir, '../node_modules/react-native-paystack/android')- Add the following in your
android/app/build.gradefile:
dependencies {
    ...
    compile project(':react-native-paystack')
}- Add the following in your
...MainApplication.javafile:
import com.arttitude360.reactnative.rnpaystack.RNPaystackPackage;

@Override
protected List<ReactPackage> getPackages() {
  return Arrays.<ReactPackage>asList(
      new MainReactPackage(),
      ...
      new RNPaystackPackage() //<-- Add line
  );
}- For ios, edit your
AppDelegate.mfile and import the Paystack framework:
#import <Paystack/Paystack.h>
...
- (BOOL)application:(UIApplication *)application didFinishLaunchingWithOptions:(NSDictionary *)launchOptions
{
  ...

  [Paystack setDefaultPublicKey:@"INSERT-PUBLIC-KEY-HERE"];
  ...

}- For Android, add the following tag in your
android/app/src/main/AndroidManifest.xmlfile:
<meta-data android:name="co.paystack.android.PublicKey" android:value="INSERT-PUBLIC-KEY-HERE"/>It's a cinch to charge a card token using the react-native-paystack module. This is the recommended or the most-preferred workflow favored by the folks at Paystack. Initiate a new transaction on your server side using the appropriate Paystack endpoint - obtain an access_code and complete the charge on your mobile application. Pls note, the SDK assumes you are responsible for building the card form/UI.
RNPaystack.chargeCardWithAccessCode(cardParams);To be more elaborate, cardParams is a Javascript Object representing the card to be charged and RNPaystack.chargeCardWithAccessCode() returns a Javascript Promise like:
import RNPaystack from 'react-native-paystack';

chargeCard() {

	RNPaystack.chargeCardWithAccessCode({
      cardNumber: '4123450131001381',
      expiryMonth: '10',
      expiryYear: '17',
      cvc: '883',
      accessCode: '2p3j42th639duy4'
    })
	.then(response => {
	  console.log(response); // do stuff with the token
	})
	.catch(error => {
	  console.log(error); // error is a javascript Error object
	  console.log(error.message);
	  console.log(error.code);
	})

}| Argument | Type | Description |
|---|---|---|
| cardNumber | string | the card number as a String without any seperator e.g 5555555555554444 |
| expiryMonth | string | the card expiry month as a double-digit ranging from 1-12 e.g 10 (October) |
| expiryYear | string | the card expiry year as a double-digit e.g 15 |
| cvc | string | the card 3/4 digit security code as a String e.g 123 |
| accessCode | string | the access_code obtained for the charge |
An object of the form is returned from a successful token request
{
	reference: "trx_1k2o600w"
}Using the react-native-paystack module, you can start and complete a transaction with the mobile Paystack Android and iOS SDKs. With this option, you pass both your charge and card properties to the SDK - with this worklow, you initiate and complete a transaction on your mobile app. Note that as with charging with an access_code, the SDK assumes you are responsible for building the card form/UI.
RNPaystack.chargeCard(chargeParams);To be more elaborate, chargeParams is a Javascript Object representing the parameters of the charge to be initiated and RNPaystack.chargeCard() returns a Javascript Promise like:
import RNPaystack from 'react-native-paystack';

chargeCard() {

	RNPaystack.chargeCard({
      cardNumber: '4123450131001381',
      expiryMonth: '10',
      expiryYear: '17',
      cvc: '883',
      email: 'chargeIOS@master.dev',
      amountInKobo: 150000,
      subAccount: 'ACCT_pz61jjjsslnx1d9',
    })
	.then(response => {
	  console.log(response); // card charged successfully, get reference here
	})
	.catch(error => {
	  console.log(error); // error is a javascript Error object
	  console.log(error.message);
	  console.log(error.code);
	})

}| Argument | Type | Description |
|---|---|---|
| cardNumber | string | the card number as a String without any seperator e.g 5555555555554444 |
| expiryMonth | string | the card expiry month as a double-digit ranging from 1-12 e.g 10 (October) |
| expiryYear | string | the card expiry year as a double-digit e.g 15 |
| cvc | string | the card 3/4 digit security code as e.g 123 |
| string | email of the user to be charged | |
| amountInKobo | integer | the transaction amount in kobo |
| currency (optional) | string | sets the currency for the transaction e.g. USD |
| plan (optional) | string | sets the plan ID if the transaction is to create a subscription e.g. PLN_n0p196bg73y4jcx |
| subAccount (optional) | string | sets the subaccount ID for split-payment transactions e.g. ACCT_pz61jjjsslnx1d9 |
| transactionCharge (optional) | integer | the amount to be charged on a split-payment, use only when subAccount is set |
| bearer (optional) | string | sets which party bears paystack fees on a split-payment e.g. 'subaccount', use only when subAccount is set |
| reference (optional) | string | sets the transaction reference which must be unique per transaction |
An object of the form is returned from a successful charge
{
	reference: "trx_1k2o600w"
}Verify a charge by calling Paystack's REST API with the reference obtained above. An authorization_code will be returned once the card has been charged successfully. Learn more about that here.
Parameter:
- reference - the transaction reference (required)
Example
$ curl https://api.paystack.co/transaction/verify/trx_1k2o600w \
   -H "Authorization: Bearer SECRET_KEY" \
   -H "Content-Type: application/json" \
-X GETPerhaps needless to say, this module leverages the Paystack Android SDK and the Paystack IOS SDK for all the heavy liftings.
- 1.0.12: Initial version supporting Android.
- 1.1.1: Android library upgrade and initial iOS support.
- 2.0.0: A couple of breaking changes have been introduced, see [Old Docs](./Old Docs.md) for previous documentations.
- 2.0.0: Upgraded to v2.0 of the Paystack Android SDK.
- 2.0.0: Unified APIs across both platforms (iOS & Android).
- 2.0.0: Methods now return Javascript Promises on both platforms.
- 2.1.1: Upgraded to v2.1+ of both the Paystack iOS and Android SDKs.
- 2.1.1: Added support for
chargeCardon both platforms. - 2.1.1: Added support for
subscriptionsandsplit-payments. - 3.1.0: Retired support for
getTokenon both platforms. - 3.1.0: Added support for
chargeCardWithAccessCodeon both platforms. - 3.1.0: Upgraded to v3.*+ of both the Paystack iOS and Android SDKs.
This should be The MIT License (MIT). I would have to get back to you on that!

