- Understand the purpose of a form
- Write an HTML
formtag - Define the
GETvsPOSTHTTP methods - Write HTML
formdata elements
Up to this point, all of the HTML elements we've seen are used to display data to users. This is great, but what happens when we want to get information from our users? In order to get user information we need to write HTML forms. We will learn to write them in this lesson.
Forms gather user information. They're just like surveys you might fill out at a supermarket or a questionnaire you'd fill out at the doctor's office.
Let's suppose that you're the owner of a dog walking business that needs a way to gather information from clients. You would use an HTML form to collect information like:
- owner's name
- owner's address
- dog's name
- dog's age
- walking frequency
You collect this information in HTML tags called inputs located within the
form tag. You will also code a "Submit" button so the client can say "OK! I'm
done!" We'll discuss inputs in more detail below.
When the owner fills out the form's inputs and clicks "Submit," a record of their responses will be sent to a server where the information can be stored. Once the server has the information stored, software can be written to use the server's information to create newsletters, login accounts, or invitations to client-appreciation parties.
To store the information, we need a language like Ruby, PHP, or Java. We won't
be covering storage and usage in this lesson. Writing code to handle things
like that is "back-end engineering." Luckily, all those languages are
designed to receive the information sent by an HTML form.
Let's write an HTML form. We'll use the form tag.
The starting element in an HTML form is the <form> tag. The form element
wraps all the input elements that will collect our users' information inside
of them. We will cover input elements in great detail after finishing
discussing the attributes within a form tag.
The form tag's first attribute, action, decides where the user information
is sent. This is typically the URL of a server. This server will run the Ruby,
PHP, or Java (or other!) code required to store the information the form
sends.
The second attribute, method, sets the HTTP method the browser will use to
send the user information to the server. You can think of "HTTP method" as
being like an envelope type. Some envelopes are good for documents, others are
good for confidential letters, and yet others are good for overseas mail. The
HTTP methods used in forms are GET and POST.
While you won't write the "back-end" code here, we'll describe what you see as
a user when an HTML author chooses GET versus POST.
Below we see the form example code for making a GET request.
<form action="http://example.com/process-user.php" method="GET">
  <input type="text" name="owner-name" />
  <input type="text" name="dog-name" />
  <input type="text" name="favorite-toy" />
  <input type="submit" value="submit" />
</form>
When the user clicks the submit button, their responses in the input fields
are captured and labeled using the name attributes from each element. The
browser stores this information behind the scenes like this:
owner-name=Bob+Barkley&dog-name=SirBarksALot&favorite-toy=ballThis is known as the Query String. The browser then attaches the Query
String onto the location listed in the form's action attribute after a ?
to create a URL that looks like this:
http://example.com/process-user.php?owner-name=Bob+Barkley&dog-name=SirBarksALot&favorite-toy=ballThe browser then goes to this new URL. The server then uses back-end programming to use the information in the Query String to change what it will show.
When a Query String is added to a URL, it's a great solution for filtering the information that comes back. Forms are a nice way for users to add those filters without typing them in by hand. You've probably seen this on the internet.
Here, Amazon uses a form tag with method of GET to filter their huge
store. They filter based on matches of the
<input type="text" name="field-keywords">. We typed in "dog toys" into that
text field input.
While this is a great method for things like search, this is bad for passwords,
obviously! A Query String with password=ByronBestPoodle will stand out!
When you need to send your response in a way that doesn't leak information, you
want your form to use the POST HTTP method.
ADVANCED: An advanced concept is that a
GETrequest is "idempotent." That means the browser can run it repeatedly without changing information on the back-end. We can ask for a filtered list of dog toys again and again and again by hitting Refresh again and again and again. Nothing changes on the server if we do that.
Below we see the same form example code for making a POST request.
<form action="http://example.com/process-user.php" method="POST">
  <input type="text" name="owner-name" />
  <input type="text" name="dog-name" />
  <input type="text" name="favorite-toy" />
  <input type="submit" value="submit" />
</form>
It's the same form you would write for a GET-method form, but with the
method attribute changed.
When the user clicks the submit button, their responses in the input fields
are captured and labeled using the name attributes from each element. The
browser stores this information like this:
owner-name=Bob+Barkley&dog-name=SirBarksALot&favorite-toy=ballA POST is like a secure envelope. We can't see the information being sent.
That's why POST is the right call when sending sensitive information like
passwords or national IDs. The user's browser is not redirected in this
case. We can't show you a screenshot of what this looks like because, well,
there's nothing to show. Usually after a successful POST, the web site will
send you to a page that says "Thanks for your purchase" or "Thanks for joining
our site."
ADVANCED: An advanced concept is that a
POSTrequest is not "idempotent." If the browser runs it repeatedly, it will change data on the back end. Submitting payment for a credit card is not idempotent. Each refresh will take money out of your bank account! That's why many finance sites say "Don't refresh this page while we process your request."
Now that we know how to write a form tag and we understand the HTTP action
that goes in its action attribute, let's talk about different ways we can ask
for information within our form by choosing the right input.
What is an input?
Think about a doctor's questionnaire: sometimes they ask you to
fill-in-the-blank, sometimes they ask you to mark checkboxes next to symptoms,
and other times they ask you to write a short answer. They ask all these
different types of questions within the same questionnaire or form. All of
those types of questionnaire prompts have a cousin in an HTML input. A
fill-in-the-blank is an <input type="text">. A short essay's twin is <input type="textarea">.
The rest of this lesson will be spent introducing you to the input elements.
Creating an input tag with type="text" gives our users a place to type
in a single line of text. It looks like this:
<input type="text" name="owner-name" placeholder="Full Name" />The placeholder attribute puts some dummy text into the element. That text
will be replaced when the user starts filling it in. The name attribute
gives our input a name.
Here's a screenshot:
Generally, HTML form attributes should not contain spaces. Common exceptions to
this rule are placeholder and class. If you're not sure whether or not your
attribute can contain a space, check out this article.
You might have noticed we sneaked an extra tag in, the label tag. When
writing forms, we don't want to describe what goes in the form by using p
tags. We can more meaningfully "tie" descriptive text (that is, a label) to an
input field using the label tag. The id attribute of the input is
provided to the label's for attribute and the browser knows to put them
close to each other.
Labels are necessary on HTML forms. They make our site better for those using assistive devices. It makes our site accessible, which means more users can use our site.
Why do we put both labels and placeholders? First, not all browsers and assistive devices support placeholder attributes. Labels help assistive devices help users who need them more easily enter data. Again, it's part of our desire to create an inclusive and accessible web.
Creating an input tag with type="password" gives our users a place to type
information that will not be displayed by the browser. Most of the time
browsers put * or dots instead of the character. This is useful when private
information is entered, so your password isn't displayed for others to see.
<label for="password">What's the password?</label>
<input
  type="password"
  id="password"
  name="password"
  placeholder="Enter your password here"
/>
Here's a screenshot:
Creating an input tag with type="tel" behaves like a text field, but will
bring up the numeric keypad on supported mobile devices.
<label for="tel">Where should E.T. ™ Phone Home?</label>
<input id="tel" type="tel" name="phone" placeholder="Phone Number" />Here's a screenshot:
Creating an input tag with type="submit" creates a submit button that, when
clicked, will do something with a user's form data. The value attribute
holds the text that will appear on the button.
<input type="submit" value="Let me walk your dog!" />Here's a screenshot:
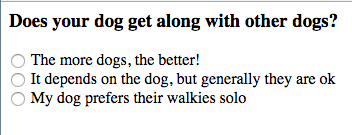
Radio inputs show users many options. But radio buttons allow users to select
only one. You will set different value attributes for each radio button, but
they must have the same name attribute.
<h3>Does your dog get along with other dogs?</h3>
<input type="radio" name="plays-well-with-others" value="high" /> The more dogs,
the better!<br />
<input type="radio" name="plays-well-with-others" value="medium" /> It depends
on the dog, but generally they are ok<br />
<input type="radio" name="plays-well-with-others" value="low" /> My dog prefers
their walkies solo<br />
Here's a screenshot:
Checkboxes are like radio buttons...but you can choose more than one.
<h3>What are your dogs favorite toys?</h3>
<input type="checkbox" name="toy-1" value="kong" /> Kong <br />
<input type="checkbox" name="toy-2" value="stuffed-animals" />Stuffed Animals<br />
<input type="checkbox" name="toy-3" value="rope-toys" />Rope Toys<br />
<input type="checkbox" name="toy-4" value="squeaky-toys" />Squeaky Toys<br />
<input type="checkbox" name="toy-5" value="balls" />Balls, Frisbees, anything a
dog can fetch!<br />
Here's a screenshot:
This is pretty advanced!
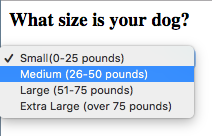
Select menus create a drop-down menu. Inside the select tag you use option
tags to create a menu. Inside the option tag you say what will be shown in
the menu. In the value option you say what will be sent as part of the Query
String. For the example below the Query String would contain size="small".
<h3>What size is your dog?</h3>
<select name="size">
  <option value="small" selected>Small(0-25 pounds)</option>
  <option value="medium">Medium (26-50 pounds)</option>
  <option value="large">Large (51-75 pounds)</option>
  <option value="x-large">Extra Large (over 75 pounds)</option>
</select>
Here's a screenshot:
Textarea elements are useful if we want our users to be able to be able to write multiple lines of text. For example, if we wish to allow our clients to write special notes for their dogs, we can let them write as much or as little as they like.
<h3>Any other things we should know about your dog?</h3>
<textarea name="message"></textarea>
Here's a screenshot:
We use HTML forms to collect data from users. Start with a form element. Give
it an action and method, probably POST. Inside the form add several
input elements. Use the best input for the data you're requesting. Make
sure that your inputs are clearly labeled. If you follow these guidelines
you'll soon be getting all the user data you can handle!


