This repository demonstrates how to read BIM 360 Assets data with Viewer SDK.
Uses Data Management to list hubs, projects and files. Uses Viewer to show models and extensions to create toolbar buttons and panels. The sample implements the following features in the BIM360AssetExtension.js:
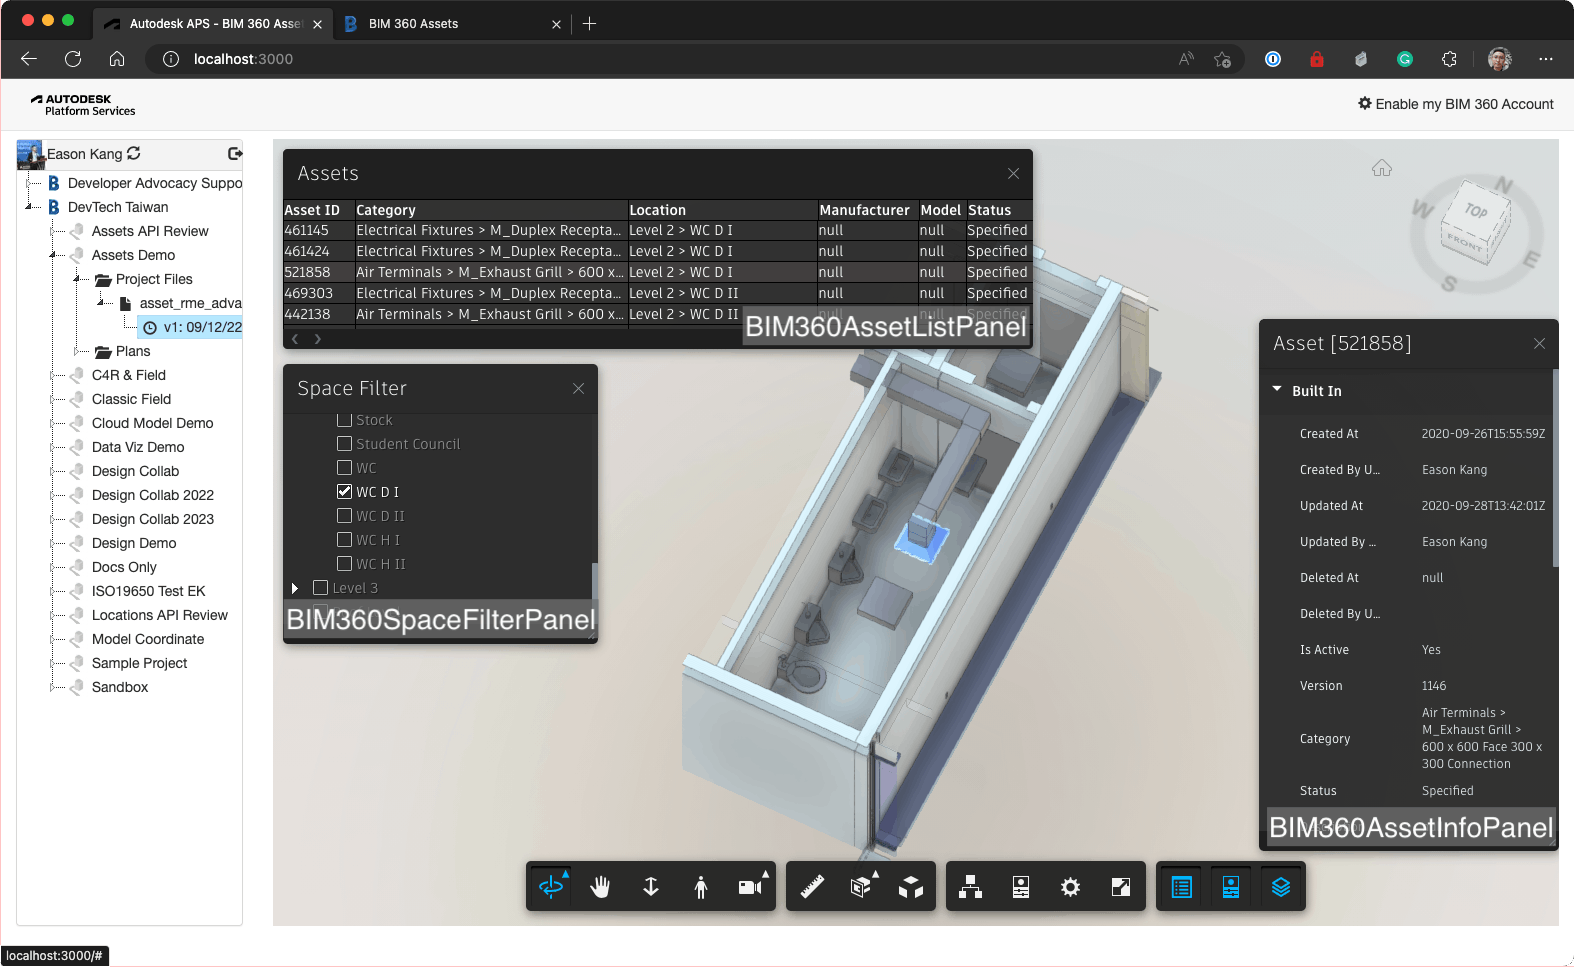
- BIM360AssetListPanel: Lists BIM 360 Assets on a data table with pagination support on the panel
- BIM360AssetInfoPanel: Display asset data of selected object from BIM 360 Assets module.
- BIM360SpaceFilterPanel: Lists levels and rooms of the RVT model in a tree hierarchy, and it can apply proper section box (filter) to the model upon checked level or room to bring better view for assets.
This picture shows the functionalities of the BIM360AssetExtension from left-bottom side to right side accordingly are BIM360SpaceFilterPanel, BIM360AssetListPanel and BIM360AssetInfoPanel. The view is activating the level filter (sectioning) of the BIM360SpaceFilterPanel and showing the selected air terminal's asset info from the BIM360 Assets service by BIM360AssetInfoPanel.
This picture shows similar functionalities as the above one does, but the view activates the room filter of the BIM360SpaceFilterPanel where the selected air terminal is located instead.
Here is the video demonstrating how this sample works quickly. First, it shows data of BIM360 Assets on the BIM360 Web UI, then go to the viewer sample to open BIM360AssetListPanel, BIM360AssetInfoPanel and BIM360SpaceFilterPanel sequentially, and data shown on the BIM360AssetListPanel is the same as we see on the BIM360 Web UI.
Click here or click on the above picture to view the video
Note: Demo video comes with subtitle. Click CC of YouTube video player button while playing the video and configure it with the options below for better video-watching experience:
-
The BIM360 Locations API is read-only, so you will need to set up extra properties in the Revit model. Please check Import sample data for the detail instructions. However, ACC Locations API supports both read and write. If you run this sample with ACC projects, you can create nodes by API.
-
This sample support models of Revit 2018 and later only due to the supports of the AecModelData and Master views.
aps-assets-viewer.autodesk.io, and follow instructions of the Work with the sample model to import up sample data.
- APS Account: Learn how to create a APS Account, activate your subscription, and create an app at this tutorial.
- BIM 360 Account: must be Account Admin to add the app integration. Learn about provisioning.
- Visual Studio: Either Community 2022+ (Windows) or Code (Windows, MacOS).
- .NET basic knowledge with C#
- JavaScript basic knowledge with jQuery
Check the SampleFiles folder for the sample RVT file and sample data before running the app. It includes the following:
-
asset_rme_advanced_sample_project.rvt: The sample Revit file includes assets with preset Revit shared parameters (
Asset ID,Asset Location, andAsset Category) that can be used to initialize your BIM360 Assets demo project. -
asset-rme-advanced-sample-project-locations-import.xlsx: The sample spreadsheet file includes a location break down hierarchy data (e.g., levels and rooms) of the sample Revit model for setting up your project's BIM360 Locations service.
-
asset-rme-advanced-sample-project-assets-import.xlsx: The sample spreadsheet file includes assets data extracted from the sample Revit model.
-
DynamoScripts: It contains two Dynamo scripts for setting up your Revit models and preparing data spreadsheet files for importing into BIM360 Assets.
-
ListAssetLocation.dyn: Lists locations data (levels & rooms) and export to spreadsheet file (
asset_location_data_export.csv) for setting up your BIM360 Locations data, but since Locations API is not yet publicly released yet (still in private beta currently) -
ListElementsByRooms.dyn: Creates necessary Revit shared parameters (
Asset ID,Asset LocationandAsset Category) and set up their values for Mechanical Equipments, Air Terminals, Electric Fixtures, Electrical Equipments, Lighting Devices, and Lighting Fixtures, then export those parameter values spreadsheet file (asset_data_export.csv) for setting up your BIM360 Assets data.
-
Note: There should have rooms that existed inside the Revit models before executing the scripts.
Follow the following steps to set up your BIM360 Assets module to run this viewer sample:
-
Activate the Assets module of your BIM360 project inside the project admin.
-
Go to Asset service management page of the project admin, and click on the Locations, then follow the instructions of Import Locations from Excel to import
asset-rme-advanced-sample-project-locations-import.xlsx. -
Go to Custom Attributes of the Asset service management page, and create a text type custom attribute called
External Id. -
Go to the Asset module page of your project, and follow instruction here to import
asset-rme-advanced-sample-project-assets-import.xlsx. -
Upload
asset_rme_advanced_sample_project.rvtto theProject Filefolder of your Document Management module.
Click here or click on the above picture to view the video
-
Open your Revit models and run both Dynamo scripts,
ListAssetLocation.dynandListElementsByRooms.dyn, to initialize request parameters and data for BIM360 Assets, then you will get two spreadsheet files,asset_location_data_export.csvandasset_data_export.csv. (See Sample files for the script details) -
Save the changes of your Revit model made by the Dynamo scripts.
-
Replace contents of both
asset-rme-advanced-sample-project-locations-import.xlsxandasset-rme-advanced-sample-project-assets-import.xlsxwith the contents of the twoCSVfiles you got from step 1. -
Activate the Assets module of your BIM360 project inside the project admin.
-
Go to Asset service management page of the project admin, and click on the Locations, then follow the instructions of Import Locations from Excel to import your
locations-import.xlsxwith changes made from step 3. -
Go to Custom Attributes of the Asset service management page, and create a text type custom attribute called
External Id. -
Go to the Asset module page of your project, and follow instruction here to import your
assets-import.xlsxwith changes made from step 3. -
Upload your Revit model with changes made from step 2 to the
Project Filefolder of your Document Management module.
Clone this project or download it. It's recommended to install GitHub desktop. To clone it via command line, use the following (Terminal on MacOSX/Linux, Git Shell on Windows):
git clone https://github.com/autodesk-platform-services/aps-bim360-assets-viewer
Visual Studio (Windows):
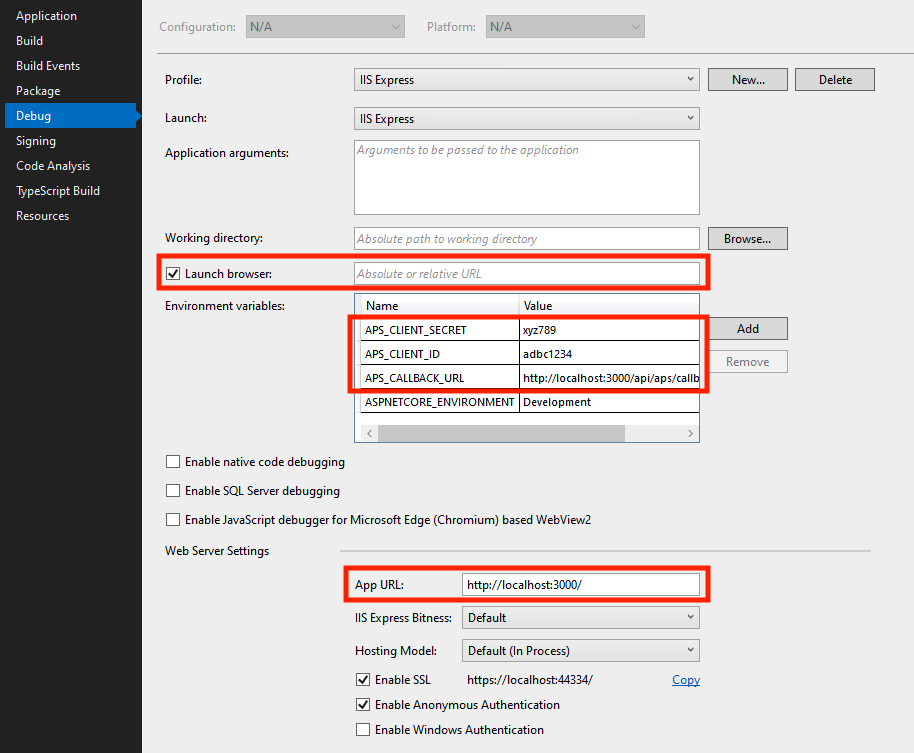
Right-click on the project, then go to Debug. Adjust the settings as shown below.
Visual Studio Code (Windows, MacOS):
Open the folder, at the bottom-right, select Yes and Restore. This restores the packages and creates the launch.json file. See Tips & Tricks for .NET on MacOS.
At the .vscode\launch.json, find the env vars and add your APS Client ID, Secret and callback URL. Also define the ASPNETCORE_URLS variable. The end result should be as shown below:
"env": {
    "ASPNETCORE_ENVIRONMENT": "Development",
    "ASPNETCORE_URLS" : "http://localhost:3000",
    "APS_CLIENT_ID": "your id here",
    "APS_CLIENT_SECRET": "your secret here",
    "APS_CALLBACK_URL": "http://localhost:3000/api/aps/callback/oauth",
},
Run the app. Open http://localhost:3000 to view your files. It may be required to Enable my BIM 360 Account (see app top-right).
To deploy this application to Heroku, the Callback URL for APS must use your .herokuapp.com address. After clicking on the button below, at the Heroku Create New App page, set your Client ID, Secret and Callback URL for APS.
Watch this video on how deploy samples to Heroku.
Documentation:
Tutorials:
Blogs:
- APS Blog
- Field of View, a BIM focused blog
Related samples:
- Checkout these awesome samples to import/extort assets configurations while following Work with your models to import assets data:
This sample uses .NET and works fine on both Windows and MacOS, see this tutorial for MacOS.
-
Cannot see my BIM 360 projects: Make sure to provision the APS App Client ID within the BIM 360 Account, learn more here. This requires the Account Admin permission.
-
Error setting certificate verify locations error: may happen on Windows, use the following:
git config --global http.sslverify "false" -
Enable SVF2 Support : (SVF2 support is enabled by default) You must use viewer v7.36 & newer versions to support loading hidden fragments (e.g., Rooms) in SVF2, then change codes as below:
- Change viewer's env and api to
env: 'AutodeskProduction2'andapi: 'streamingV2'like below in bim360assets/wwwroot/js/APSViewer.js#L31var options = { //env: 'AutodeskProduction', //api: 'derivativeV2' + (atob(urn.replace('_', '/')).indexOf('emea') > -1 ? '_EU' : ''), env: 'AutodeskProduction2', api: 'streamingV2' + (atob(urn.replace('urn:', '').replace('_', '/')).indexOf('emea') > -1 ? '_EU' : ''), getAccessToken: getAPSToken };
- Ensure
skipHiddenFragments: falseis added to the options of Viewer3D#loadDocumentNode in bim360assets/wwwroot/js/BIM360AssetExtension.js#L1637this.viewer.loadDocumentNode( doc, masterViewBubble, { ids: roomDbIds, modelNameOverride: 'Room Only Model', keepCurrentModels: true, skipHiddenFragments: false, globalOffset: this.viewer.model.getGlobalOffset() } );
- Change viewer's env and api to
This sample is licensed under the terms of the MIT License. Please see the LICENSE file for full details.
Eason Kang in/eason-kang-b4398492/, Developer Advocacy and Support Team


