Multi-signature functionality for StarkNet.
This repo contains highly experimental code which relies on other highly experimental code. Expect rapid iteration. Do not use in production.
The current version contains all basic multisig functionality. This version consists of three pieces:
- Cairo contract code
- Unit tests for testing all the multisig functionality
- A very rough UI for testing a multisig
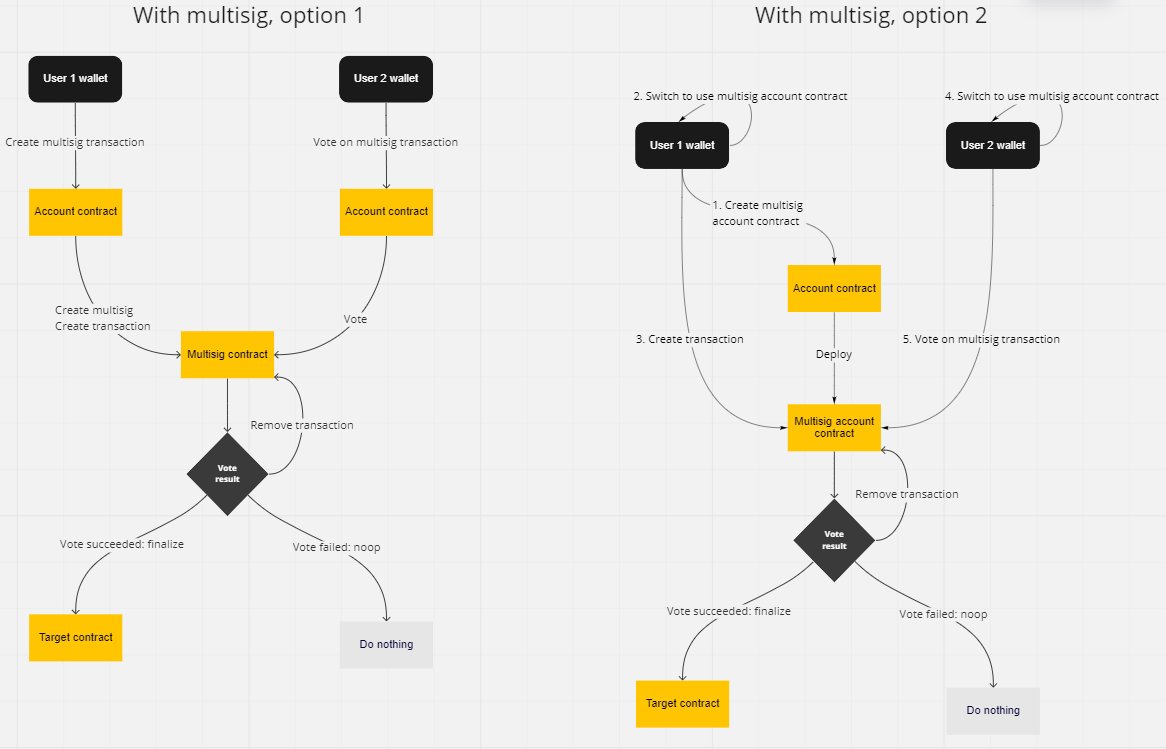
The current version supports only on-chain multi-signatures. The multisig is a separate contract, which is called through your regular account contract (wallet).
Unfortunately, the current version is not very user-friendly nor pretty. But it provides all on-chain multisig functionality.
You can test in the alpha network (Goerli). It may take 10 minutes (or more) for a transaction to go through, depending on the network conditions.
Using the Goerli network means you operate on Goerli through a separate StarkNet alpha network. You do not interact directly with the Goerli network.
You can test the multisig with an arbitrary target contract. You can target any existing contract's function, with any parameters.
You can specify how many signers need to confirm any transaction, and how many signers there are in total.
If you want to have a fresh start, just refresh your browser window. No data is stored between sessions.
You do not need any assets in your wallets in order to use this functionality. StarkNet does not currently enforce fees and subsidises Goerli fees.
The UI can be found at http://starknet-multisig.vercel.app.
How to use:
- If you don't have it yet, get a StarkNet wallet (Braavos wallet or the Argent X browser extension (not the regular Argent wallet!)). Change the network to Goerli. Create some accounts
- Choose whether to create a new multisig or use an existing one. If you choose to create a new one:
- Choose what the threshold is and how many signers there can be in total. The threshold states how many signers have to sign a transaction before it can be executed. The total number of signers states how many signers the contract supports in total.
- Enter signer addresses
- Deploy the multisig
- If you choose to use an existing multisig:
- Enter the multisig's address
- If you want to create a new multisig transaction:
- Enter the target contract address
- Enter the target function name
- Enter the target function parameters. See below for more details
- Confirm the latest transaction with at least the threshold amount of signer accounts
- You can see the latest transaction's data. Unfortunately the function selector is a hash of the original function name and it can't be reversed. Also possible addresses are in integer format.
- Once the latest transaction has enough confirmations, execute the latest transaction with any of the signer accounts
You should wait for each transaction to get status "ACCEPTED_ON_L2" (or L1) before proceeding with the next transaction. This can take some time. It may also take a bit of time for the UI to receive the latest data from the blockchain after a transaction has passed, so be patient.
There are very few UI validations currently. Put sensible data in if you want to get sensible data out.
Currently no sensible error messages are retrieved. If some of your transactions are rejected, you can click the transaction to try to figure out what went wrong - it will open blockchain explorer Voyager for you, for the transaction.
For functions with a single parameter, simply enter the parameter. For multiple parameters, you should separate the parameters by space. For example: 5 6 34 if the function takes in three parameters.
If your function takes in an array parameter you have to flatten the array and provide its length before the values. So, for example, if your array is [5, 6, 34] you should enter parameters 3 5 6 34.
All parameters need to be in integer format. If you need for example a string parameter, you need to convert it first. If you need to use Uint256 types, remember that they require two parameters: low and high bits (see below example).
A typical use case would be for the multisig to contain some valuable assets. For testing this kind of realistic scenario you can use any StarkNet ERC-20 token.
Probably easiest would be to use TST token: https://braavos.app/faucet/
Here's how you could test the use case:
- Create the multisig
- Mint yourself some tokens. You can see those in your wallet as TEST Token.
- Send some of those tokens to the multisig (so the multisig contract holds the tokens)
- Create a transaction for the multisig to send some of the tokens elsewhere (to a new wallet, for example). You should use the following parameters:
- Target contract address:
0x7394cbe418daa16e42b87ba67372d4ab4a5df0b05c6e554d158458ce245bc10(the contract address of the test token) - Target function name:
transfer - Target function parameters: target address (who should receive the tokens) and amount. Note that the amount is
Uint256type, so if you want to transfer 5 tokens you have to enter5 0. So the full parameters could be something like:0x123 5 0
- Target contract address:
- Confirm and execute the transaction
In near future we'll get here:
- A clearer UI
- Possibly an option to use an account contract as multisig
- Possibly off-chain signatures
The current implementation uses Option 1 in the following image. Option 2 is in our roadmap for near future.
Created by Equilibrium.
If you have any question, feel free to poke LauriP#8728 at StarkNet Discord.
