Using Home Assistant, a wifi plug, an ESP, a telegram bot, and some python scripts to automatically notify the occupants of the home when the laundry is done.

- Monitor the washing machine until it finishes the cycle
- Send Telegram alerts to the person that started the wash cycle
- Announces that the laundry is done on Google Home speakers
- Repeat the alerts until the washer door is opened
- Warn if the washer door is closed after a cycle (the door should stay open to prevent mildew)

- Home Assistant
- ESPHome installed as an Add-On to Home Assistant
- An ESP8266-based wifi plug with energy monitoring. I used this one.
- Another ESP8266 development board for the control panel
- Character LCD display with an i2c interface, such as this one.
- Magnetic reed sensor to read the door position
- ESPSense library
The wifi smart plug will be designed to work with Tuya/Smart Life out of the box.
We will convert this to use ESPHome.
- Create a new device in ESPHome. Give it a good name, and just select 'Generic ESP8266' for the type.

- Configure your wifi credentials.
- Finish the configuration and wait for it to build.
- Download the binary file. Click the hamburger menu next to your ESPHome node and select Compile.

-
Click 'Download Binary' and save the .bin file.
-
Using a laptop running Linux with wifi, follow the steps here: tuya-convert
You'll be using tuya-convert to install this custom firmware on your smart plug. You'll only need to do this once -- future updates will be done directly from ESPHome via an OTA update. Make sure to place your .bin file into the 'files' directory after installing but before running tuya-convert, and select this .bin. -
If you did everything correctly, the Node will turn green in ESPHome and you should be able to see logs from it.
-
You'll need a way to place files on the Home Assistant configuration. You can use SSH or the File Browser add-on.
-
Place the espsense.h file in the 'config/esphome' directory.
-
Select the plug node you created earlier, and click 'Edit'. Replace the configuration with the plug configuration from this file.
-
Change your wifi SSID and the name of the plug to the one from the earlier config.
-
Click 'Upload'. The new configuration will be compiled and uploaded to your smart plug.
-
Switch to the 'Integrations' section in Home Assistant. There will now be a new option to add a new integration with the name of your smart plug.
-
You should now see the smart plug available in Home Assistant. Try turning it on and off!
-
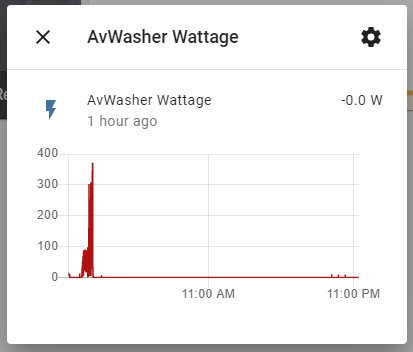
Plug your washing machine into this plug.
My washer uses 0W when it is off and after the wash cycle completes, yours may be different.

- Add another node to ESPHome. I am using a NodeMCU ESP8266, so I selected this as the type.
- Edit the configuration to match this file
- Compile the script and download the .bin file.
- I used the NodeMCU Flash Tool to flash this .bin onto my ESP. You'll only need to do this once -- future updates are done via OTA.
I wired the buttons as follows:
LCD Character Display
GND > GND pinVCC > Vin pinSDA > D2SCL > D1
Buttons
Button 1 > D0Button 2 > D3Button 3 > D4Button 4 > D6Button 5 > D7Door Sensor > pin 10(not pictured)
Wire the other side of each button to GND. Pressing the button will 'pull down' the data pin to ground.

I'm using Helper entities in Home Assistant to store the state of the laundry system, such as who started the wash, etc.
These can be found under Configuration > Helpers.
| Name | Entity ID | Type |
|---|---|---|
| LaundryDone | input_boolean.laundrydone | Toggle |
| LaundryInUse | input_boolean.laundryinuse | Toggle |
| LaundryLine1 | input_text.laundryline1 | Text |
| LaundryLine2 | input_text.laundryline2 | Text |
| LaundryLine3 | input_text.laundryline3 | Text |
| LaundryLine4 | input_text.laundryline4 | Text |
| laundrystartedat | input_datetime.laundrystartedat | Date and/or time |
| LaundryUser | input_text.laundryuser | Text |
| LaundryZeroCount | input_number.laundryzerocount | Number |
At this point, when you change the value of Laundry Line 1, the updated text should appear on your LCD display within a second.
-
To use Python Scripts, you'll need to enable them. Edit the
configuration.yamlfile and add this line:python_script:That's it! Important: Restart Home Assistant.
-
Create a directory at
config/python_scripts -
Copy the files from the python_scripts directory into there.
-
Modify the files to match the entity IDs you created earlier, specifically for your plug, which is probably not called 'avwasher'.
-
Use the
Developer Toolspage in Home Assistant to perform apython_script.reloadservice call. This will refresh all the scripts.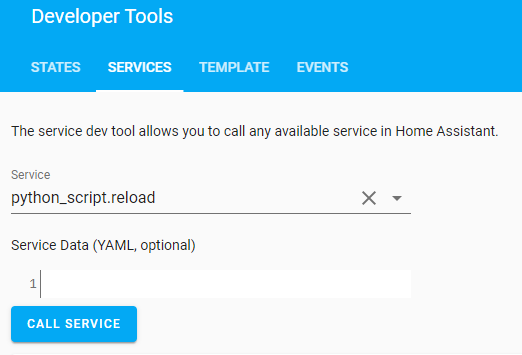

You can test if your python scripts are working by performing a python_script.start_laundry service call.
You should see the name appear on the LCD screen.
These automations cause the button presses to trigger the python scripts. You can use the Home Assistant UI to create these, but I've included the YAML versions so you can just paste them in.

You'll need to change the device_id to match your device.
- button?.yaml: These automations trigger the start of the laundry from the button press.
Create one of these for each laundry user. - button-done.yaml: This is for the last button, which indicates that the laundry cycle is complete.
- check-laundry.yaml: This automation is called every 5 seconds, to see if the laundry is done, and to update the display.
- laundry-done.yaml: After the laundry is done but is still in the washer, this reminder is sent every 10 minutes.
- door-sense.yaml: If the laundry is done, and the washer door is opened, this clears the laundry system.
- no-smell.yaml: If the door is closed when the laundry system is inactive, this will send an alert to the last laundry user, telling them to open the door.
If you want to use Telegram to notify, you'll need to set this up.
Otherwise, you can replace Telegram with your preferred notification strategy.

If you've never used Telegram, it an excellent messenger with more features than any other, and features an amazing bot platform.
-
Talk to BotFather and create a new Telegram bot. Retrieve the API token.
-
Edit your
configuration.yamland add the following. Add all the chat IDs you want this bot to be able to talk to. (If you don't know your Chat ID, there'll be a guide linked here soon)telegram_bot: - platform: polling api_key: (your key here) allowed_chat_ids: - 123456789Restart Home Assistant.
-
Search your bot on telegram and click the 'Start' button. Without doing this, your bot won't be able to message you.
-
Edit the Python scripts with the Telegram ID of all the people to contact.
In the next update, the system will track the total energy usage of your wash cycle and let you know how much it cost for that load.
