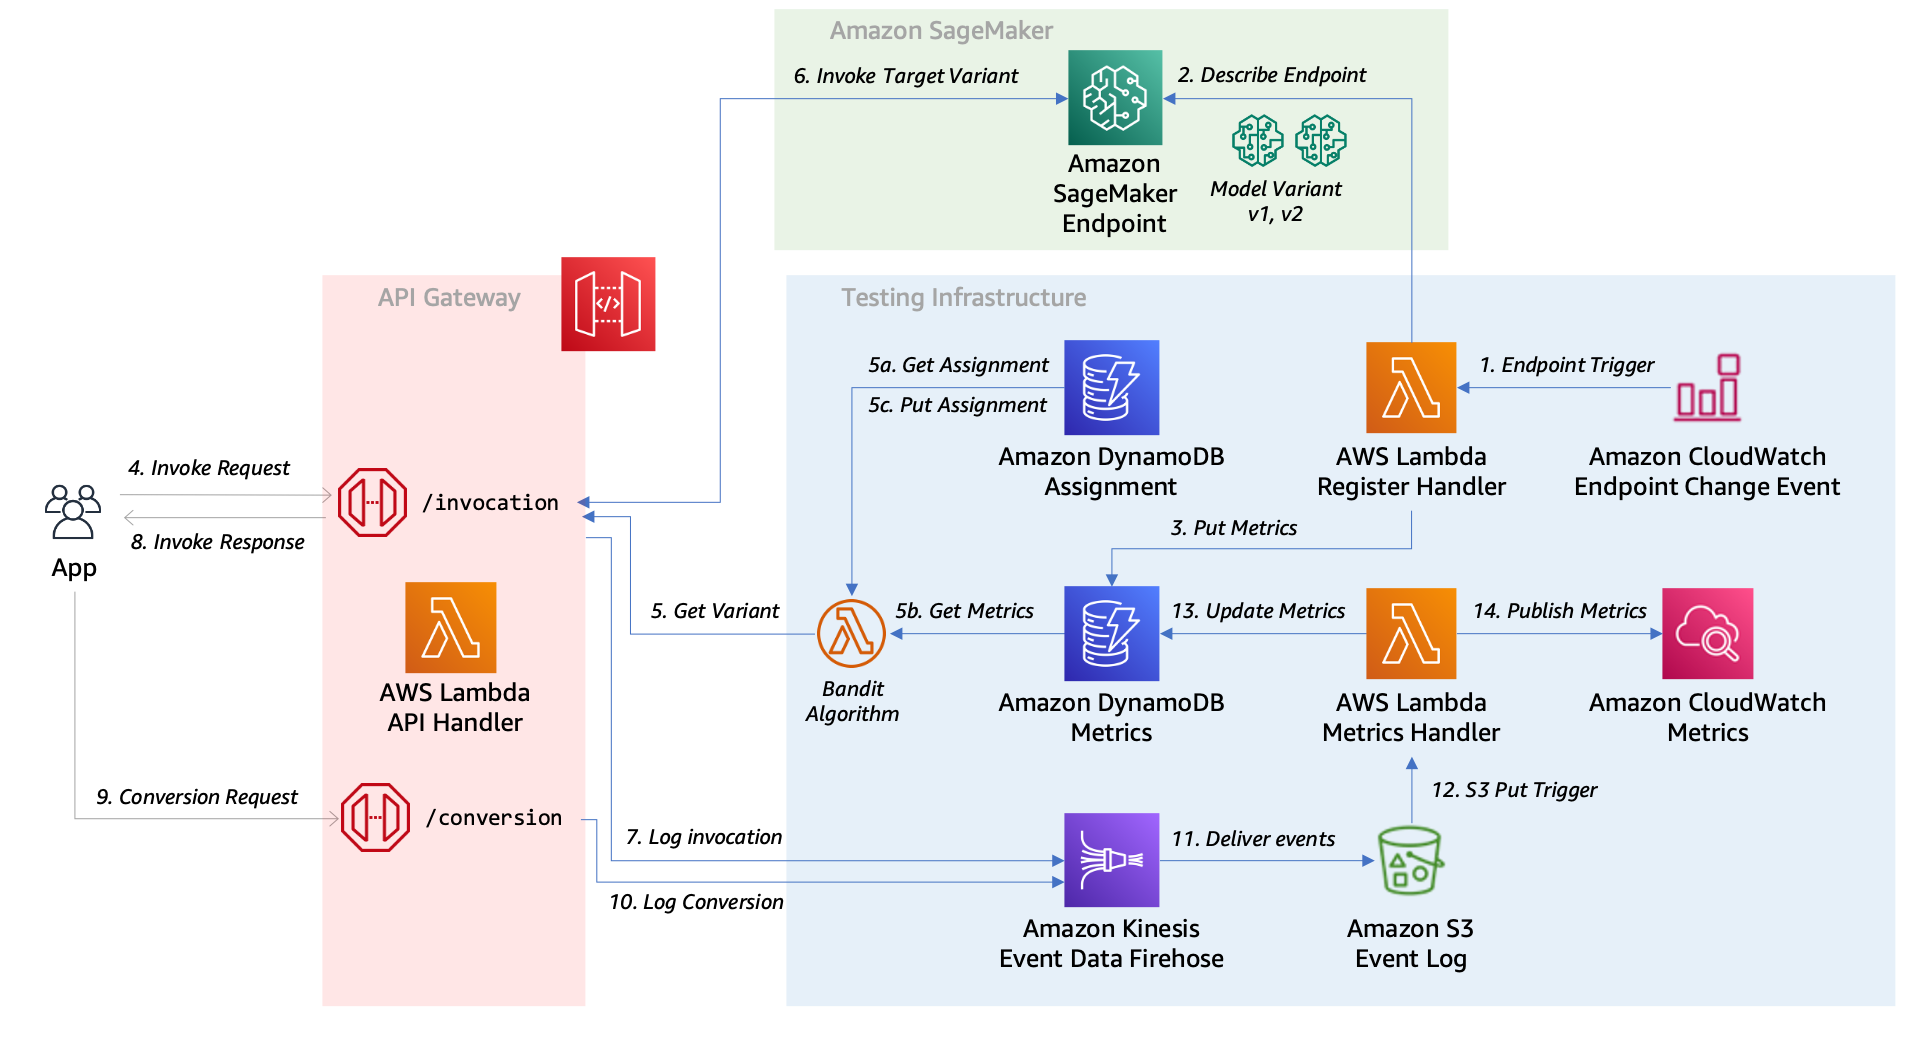
This sample demonstrates how to setup an Amazon SageMaker MLOps deployment pipeline for A/B Testing of machine learning models.
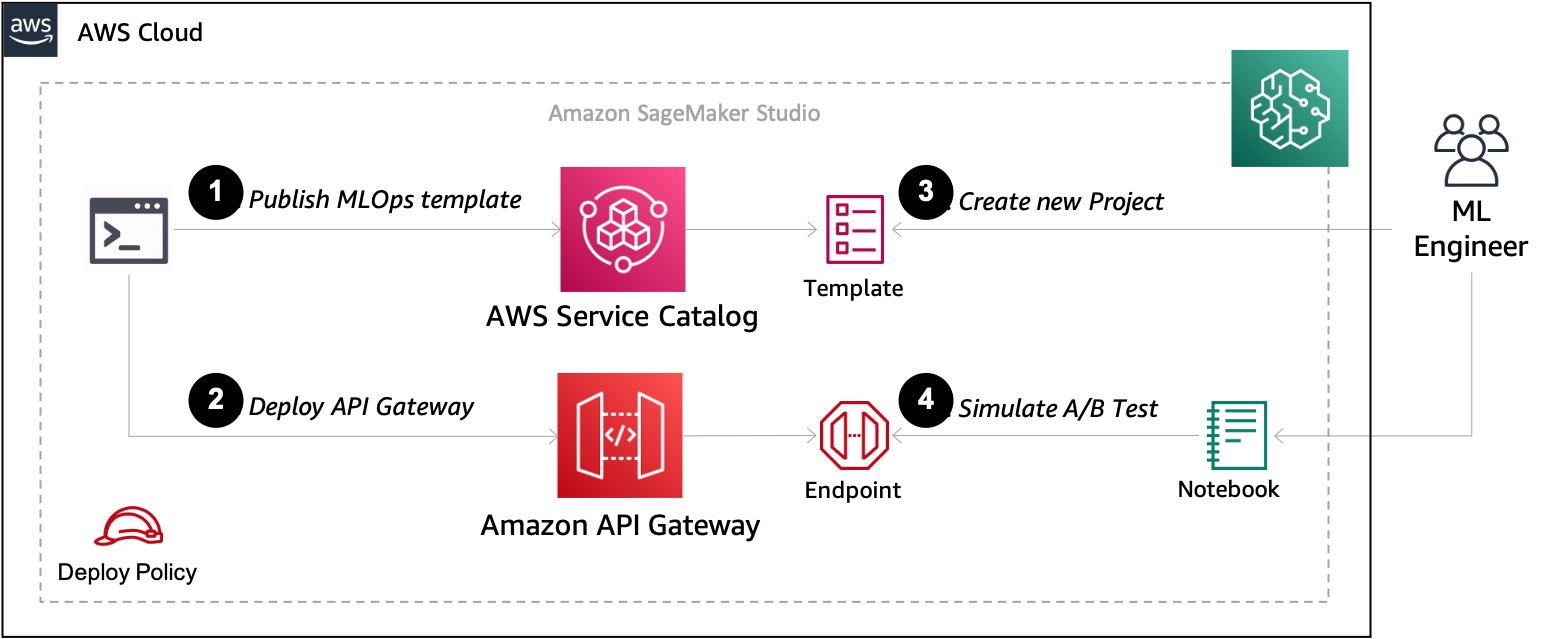
The following are the high-level steps to deploy this solution:
- Publish the SageMaker MLOps Project template in the AWS Service Catalog
- Deploy the Amazon API Gateway and Testing Infrastructure
- Create a new Project in Amazon SageMaker Studio
Once complete, you can Train and Deploy machine learning models for A/B Testing in the sample notebook provided.
To get started first, clone this repository.
git clone https://github.com/aws-samples/amazon-sagemaker-ab-testing-pipeline.git
cd amazon-sagemaker-ab-testing-pipeline
This project uses the AWS Cloud Development Kit CDK. To get started with AWS CDK you need Node.js 10.13.0 or later.
Install the AWS CDK Toolkit globally using the following Node Package Manager command.
npm install -g aws-cdk
Run the following command to verify correct installation and print the version number of the AWS CDK.
cdk --version
This project uses AWS CDK with python bindings to deploy resources to your AWS account.
The cdk.json file tells the CDK Toolkit how to execute your app.
This project is set up like a standard Python project. The initialization
process also creates a virtualenv within this project, stored under the .venv
directory. To create the virtualenv it assumes that there is a python3
(or python for Windows) executable in your path with access to the venv
package. If for any reason the automatic creation of the virtualenv fails,
you can create the virtualenv manually.
To manually create a virtualenv on MacOS and Linux:
python3 -m venv .venv
After the init process completes and the virtualenv is created, you can use the following step to activate your virtualenv.
source .venv/bin/activate
If you are a Windows platform, you would activate the virtualenv like this:
.venv\Scripts\activate.bat
Once the virtualenv is activated, you can install the required dependencies.
pip install -r requirements.txt
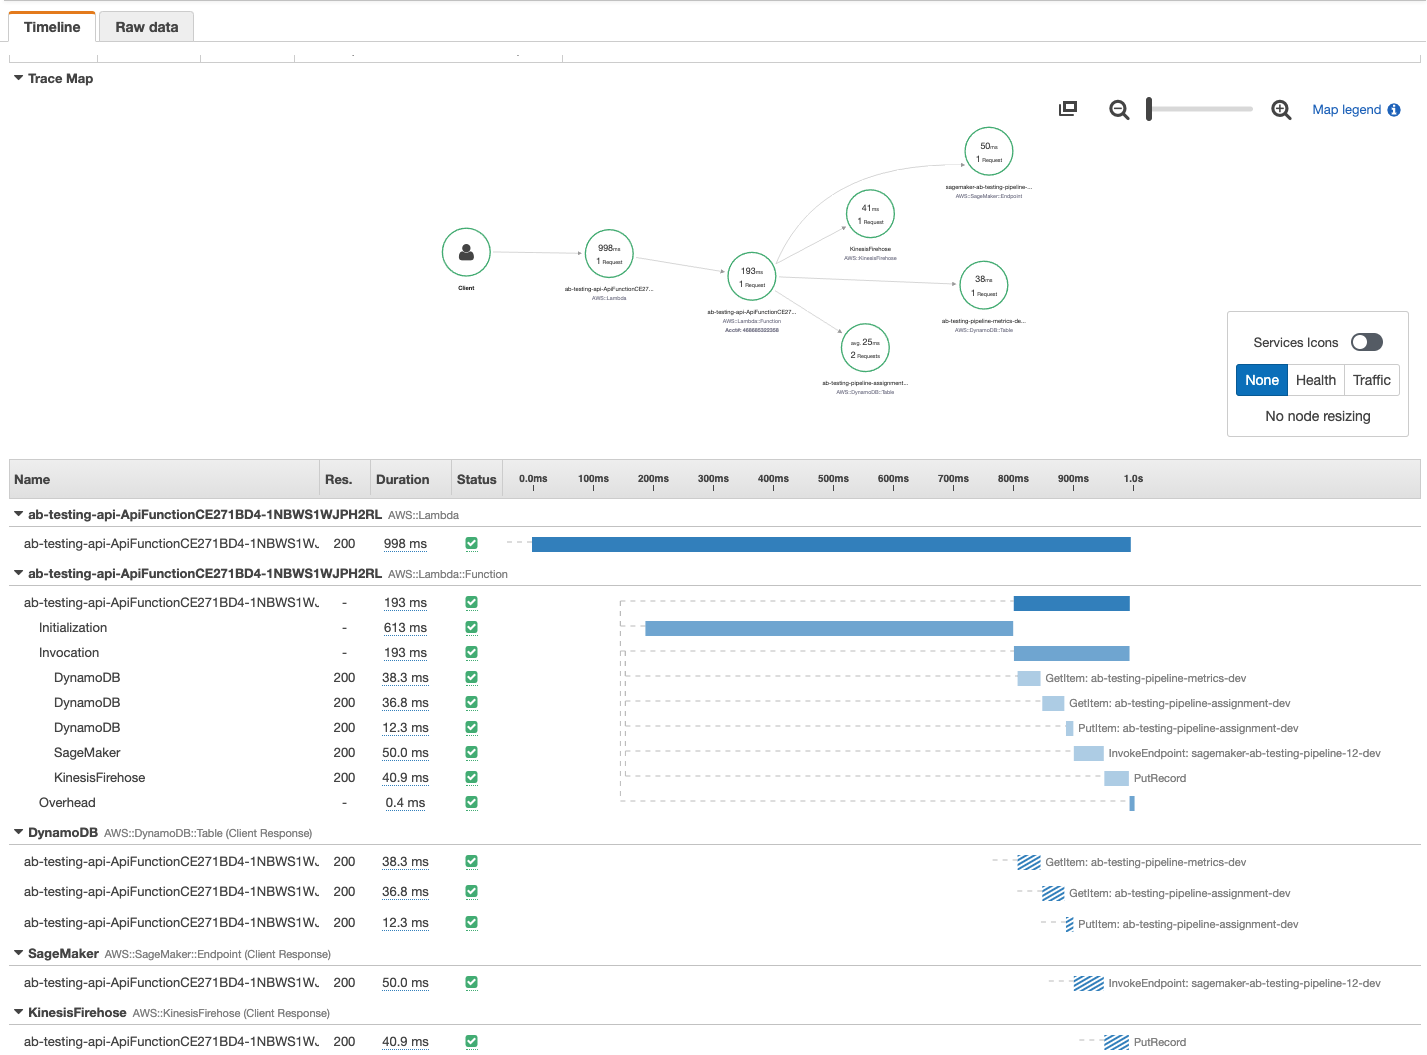
In order to support AWS X-RAY as part of our python function we require additional python libraries.
Run the following command to pip install the AWS X-Ray SDK for Python into the layers folder.
sh install_layers.sh
This will enabling sample request to visualize the access patterns and drill into any specific errors.
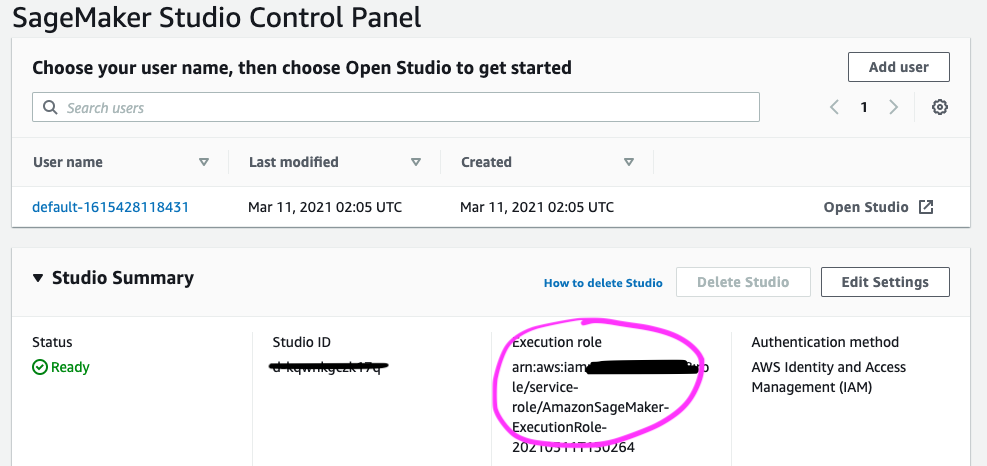
AWS CDK requires permissions create AWS CloudFormation Stacks and the associated resources for your current execution role. If you have cloned this notebook into SageMaker Studio, you will need to add an inline policy to your SageMaker Studio execution role. You can find your user's role by browsing to the Studio dashboard.
Browse to the IAM section in the console, and find this role.
Then, click the Add inline policy link, switch to to the JSON tab, and paste the following inline policy:
{
    "Version": "2012-10-17",
    "Statement": [
        {
            "Effect": "Allow",
            "Action": [
                "apigateway:*"
            ],
            "Resource": "arn:aws:apigateway:*::/*"
        },
        {
            "Action": [
                "dynamodb:*"
            ],
            "Effect": "Allow",
            "Resource": "arn:aws:dynamodb:*:*:table/ab-testing-*"
        },
        {
            "Action": [
                "lambda:*"
            ],
            "Effect": "Allow",
            "Resource": [
              "arn:aws:lambda:*:*:function:ab-testing-api-*",
              "arn:aws:lambda:*:*:layer:*"
            ]
        },
        {
            "Action": [
                "firehose:*"
            ],
            "Effect": "Allow",
            "Resource": "arn:aws:firehose:*:*:deliverystream/ab-testing-*"
        },
        {
            "Action": [
                "s3:*"
            ],
            "Effect": "Allow",
            "Resource": [
                "arn:aws:s3:::cdktoolkit-*",
                "arn:aws:s3:::ab-testing-api-*"
            ]
        },
        {
            "Action": [
                "cloudformation:*",
                "servicecatalog:*",
                "events:*"
            ],
            "Effect": "Allow",
            "Resource": "*"
        },
        {
            "Effect": "Allow",
            "Action": [
                "logs:*"
            ],
            "Resource": "arn:aws:logs:**:*:log-group:ab-testing-api-*"
        },
        {
            "Effect": "Allow",
            "Action": [
                "iam:CreateRole",
                "iam:DeleteRole"
            ],
            "Resource": "arn:aws:iam::*:role/ab-testing-api-*"
        },
        {
            "Effect": "Allow",
            "Action": [
                "iam:GetRole",
                "iam:PassRole",
                "iam:GetRolePolicy",
                "iam:AttachRolePolicy",
                "iam:PutRolePolicy",
                "iam:DetachRolePolicy",
                "iam:DeleteRolePolicy"
            ],
            "Resource": [
              "arn:aws:iam::*:role/ab-testing-api-*",
              "arn:aws:iam::*:role/service-role/AmazonSageMaker*"
            ]
        }
    ]
}
Click Review policy and provide the name CDK-DeployPolicy then click Create policy
If this is the first time you have run the CDK, you may need to Bootstrap your account. If you have multiple deployment targets see also Specifying up your environment in the CDK documentation.
cdk bootstrap
You should now be able to list the stacks by running:
cdk list
Which will return the following stacks:
ab-testing-apiab-testing-pipelineab-testing-service-catalog
In this section you will publish the AWS Service Catalog template and Deploy the API and Testing infrastructure.
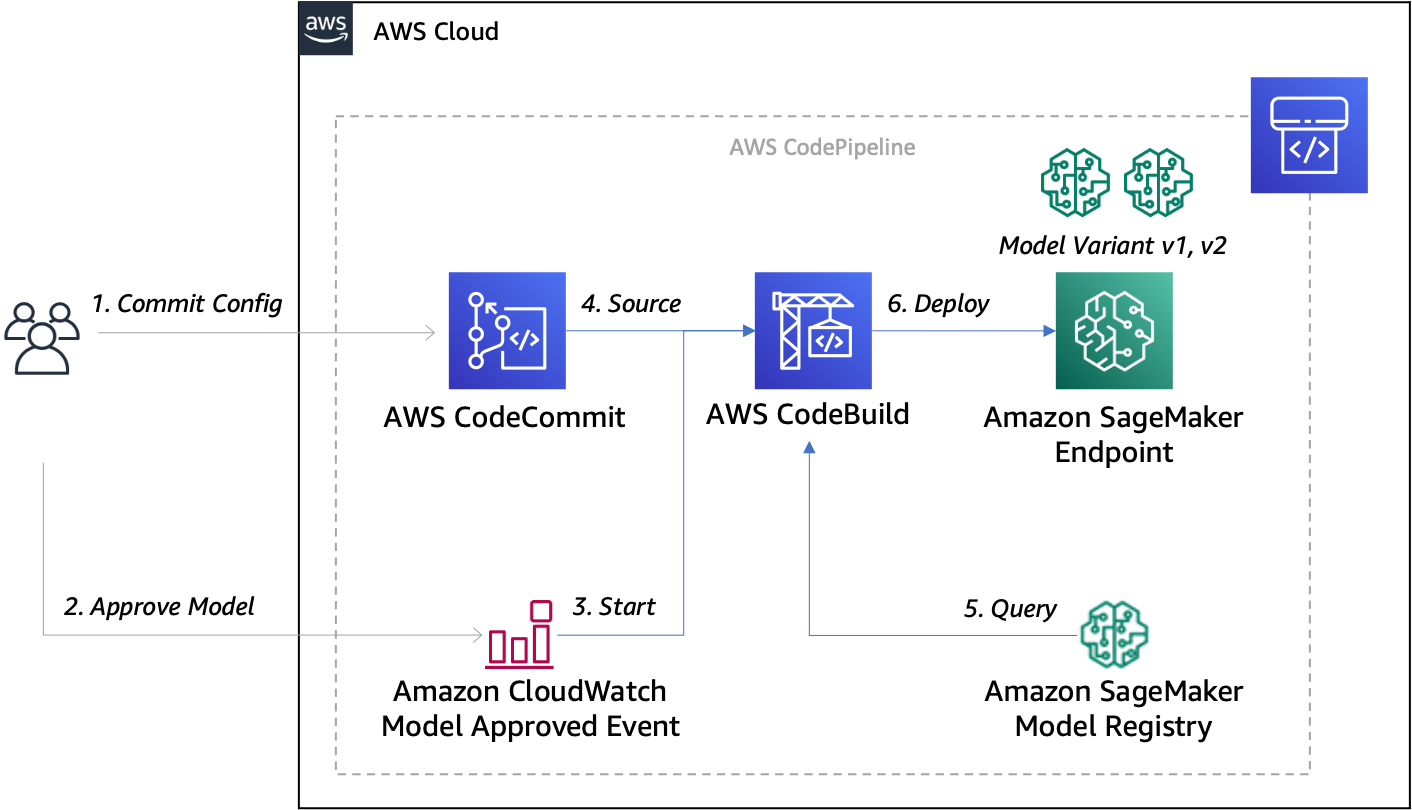
In this step you will create a Portfolio and Product to provision a custom SageMaker MLOps Project template in the AWS Service Catalog and configure it so you can launch the project from within your SageMaker Studio domain. See more information on customizing the template, or import the template manually into the AWS Service Catalog.
Resources include:
- AWS CodeCommit seeded with the source from the deployment_pipeline.
- AWS CodeBuild to produce AWS CloudFormation for deploying the Amazon SageMaker Endpoint.
- Amazon CloudWatch Event to trigger the AWS CodePipeline for endpoint deployment.
Run the following command to deploy the MLOps project template, passing the required ExecutionRoleArn parameter. You can copy this from your SageMaker Studio dashboard as show above.
export EXECUTION_ROLE_ARN=<<sagemaker-studio-execution-role>>
cdk deploy ab-testing-service-catalog \
    --parameters ExecutionRoleArn=$EXECUTION_ROLE_ARN \
    --parameters PortfolioName="SageMaker Organization Templates" \
    --parameters PortfolioOwner="administrator" \
    --parameters ProductVersion=1.0
This stack will output the CodeCommitSeedBucket and CodeCommitSeedKey which you will need when creating the Amazon SageMaker Studio project.
NOTE: If you are seeing errors running the above command ensure you have Enabled SageMaker project templates for Studio users to grant access to these resources in Amazon S3.
In this step you will deploy an Amazon API Gateway and supporting resources to enable dynamic A/B Testing of any Amazon SageMaker endpoint that has multiple production variants.
Resources include:
- Amazon API Gateway and AWS Lambda functions for invocation.
- Amazon DynamoDB table for user variant assignment.
- Amazon DynamoDB table for variant metrics.
- Amazon Kinesis Firehose, Amazon S3 Bucket and AWS Lambda for processing events.
- Amazon CloudWatch Event and AWS Lambda to register in service Amazon SageMaker Endpoints.
Run the following command to deploy the API and testing infrastructure with optional configuration.
cdk deploy ab-testing-api
This stack will output the ApiEndpoint which you will provide to the A/B Testing sample notebook.
You’re done! Now it’s time to create a project using this template.
Once your MLOps project template is registered in AWS Service Catalog you can create a project using your new template.
- Switch back to the Launcher
- Click New Project from the ML tasks and components section.
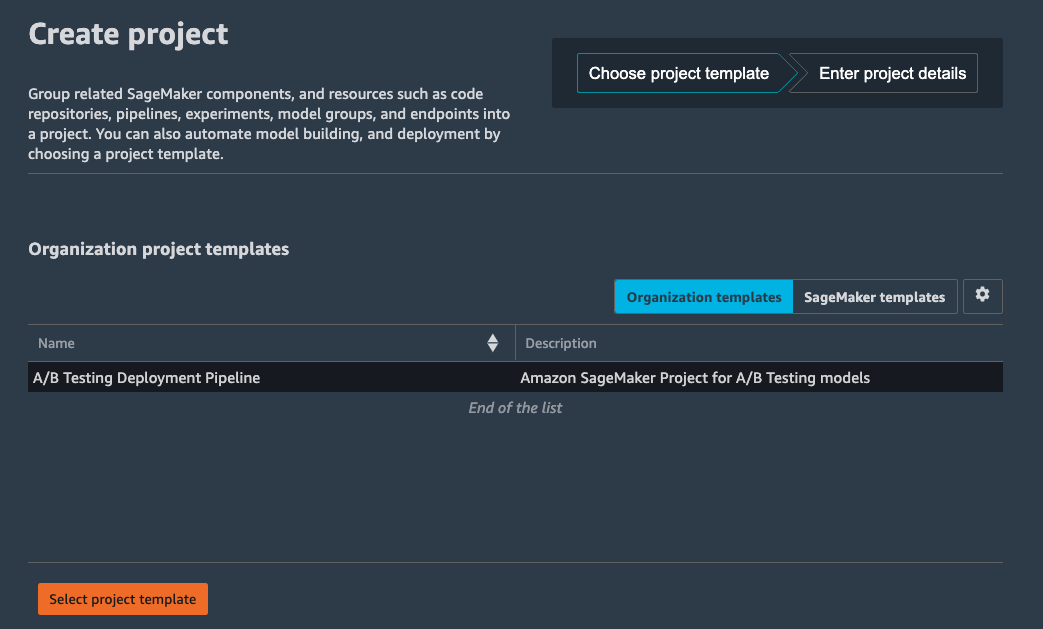
On the Create project page, SageMaker templates is chosen by default. This option lists the built-in templates. However, you want to use the template you published for the A/B Testing Deployment Pipeline.
- Choose Organization templates.
- Choose A/B Testing Deployment Pipeline.
- Choose Select project template.
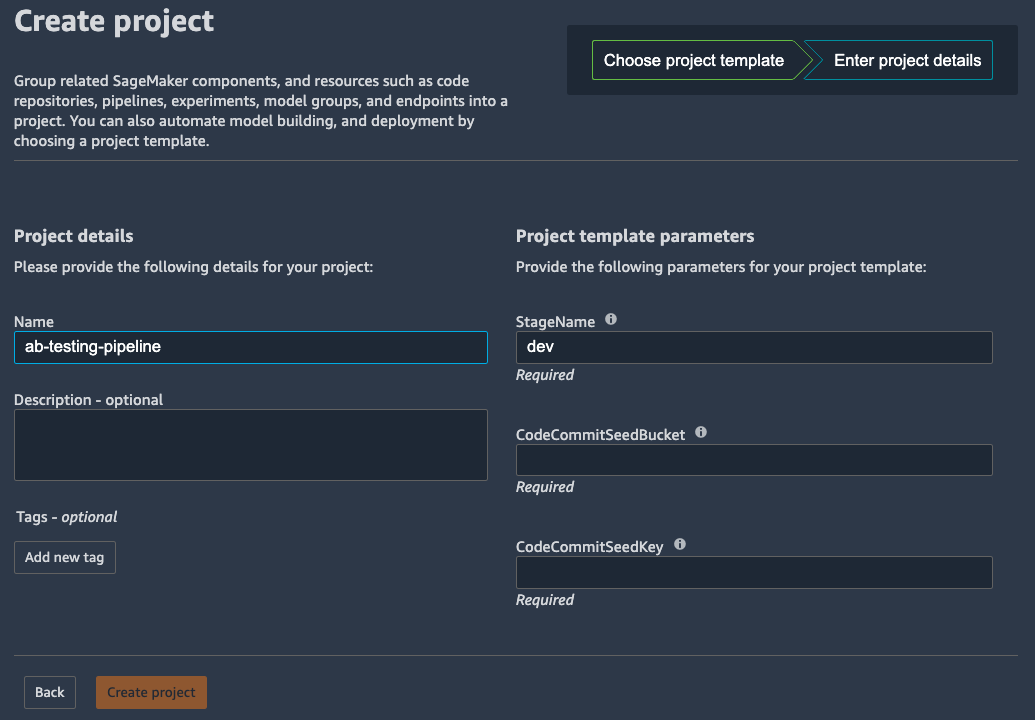
- In the Project details section, for Name, enter ab-testing-pipeline.
- The project name must have 32 characters or fewer.
- In the Project template parameters
- For StageName, enter
dev - For CodeCommitSeedBucket, enter the
CodeCommitSeedBucketoutput from theab-testing-service-catalogstack - For CodeCommitSeedKey, enter the
CodeCommitSeedKeyoutput from theab-testing-service-catalogstack
- Choose Create project.
NOTE: If you have recently updated your AWS Service Catalog Project, you may need to refresh SageMaker Studio to ensure it picks up the latest version of your template.
In the following sections, you will learn how to Train, Deploy and Simulate a test against our A/B Testing Pipeline.
Now that your project is ready, it’s time to train, register and approve a model.
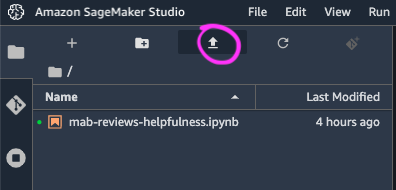
- Download the Sample Notebook to use for this walk-through.
- Choose the Upload file button
- Choose the Jupyter notebook you downloaded and upload it.
- Choose the notebook to open a new tab.
This notebook will step you through the process of
- Download a dataset
- Create and Run an Amazon SageMaker Pipeline
- Approve the model.
- Create a Amazon SageMaker Tuning Job.
- Select the best model, register and approve the second model.
Once the second model has been approved, the MLOps deployment pipeline will run.
See the Deployment Pipeline for more information on the stages to run.
With the Deployment Pipeline complete, you will be able to continue with the next stage:
- Test the multi-variant endpoint
- Evaluate the accuracy of the models, and visualize the confusion matrix and ROC Curves
- Test the API by simulating a series of
invocation, and recording rewardconversion. - Plot the cumulative reward, and reward rate.
- Plot the beta distributions of the course of the test.
- Calculate the statistical significance of the test.
This section outlines cost considerations for running the A/B Testing Pipeline. Completing the pipeline will deploy an endpoint with 2 production variants which will cost less than $6 per day. Further cost breakdowns are below.
- CodeBuild – Charges per minute used. First 100 minutes each month come at no charge. For information on pricing beyond the first 100 minutes, see AWS CodeBuild Pricing.
- CodeCommit – $1/month if you didn't opt to use your own GitHub repository.
- CodePipeline – CodePipeline costs $1 per active pipeline* per month. Pipelines are free for the first 30 days after creation. More can be found at AWS CodePipeline Pricing.
- SageMaker – Prices vary based on EC2 instance usage for the Notebook Instances, Model Hosting, Model Training and Model Monitoring; each charged per hour of use. For more information, see Amazon SageMaker Pricing.
- The ten
ml.c5.4xlargetraining jobs run for approx 4 minutes at $0.81 an hour, and cost less than $1. - The two
ml.t2.largeinstances for production hosting endpoint costs 2 x $0.111 per hour, or $5.33 per day.
- The ten
- S3 – Low cost, prices will vary depending on the size of the models/artifacts stored. The first 50 TB each month will cost only $0.023 per GB stored. For more information, see Amazon S3 Pricing.
- API Gateway - Low cost, $1.29 for first 300 million requests. For more info see Amazon API Gateway pricing
- Lambda - Low cost, $0.20 per 1 million request see AWS Lambda Pricing.
Once you have cleaned up the SageMaker Endpoints and Project as described in the Sample Notebook, complete the clean up by deleting the Service Catalog and API resources with the AWS CDK:
- Delete the Service Catalog Portfolio and Project Template
cdk destroy ab-testing-service-catalog
- Delete the API and testing infrastructure
Before destroying the API stack, is is recommend you empty and delete the S3 Bucket that contains the S3 logs persisted by the Kinesis Firehose.
cdk destroy ab-testing-api
The FAQ page has some answers to questions on the design principals of this sample.
See also the OPERATIONS page for information on configuring experiments, and the API interface.
See CONTRIBUTING for more information.
This library is licensed under the MIT-0 License. See the LICENSE file.
