This repository provides AI/ML service(MachineLearning model serving) modernization solution using Amazon SageMaker, AWS CDK, and AWS Serverless services.
A guide and demonstration of this solution can be found in:
Other "Using AWS CDK" series can be found in:
This repository is basically a CDK-Project, but it is organized as follows so that MLDevOps(ML Scientist + SW Developer + Infra Operator) can collaborate.
- bin/stack directory: for Infra Operator
- codes/lambda directory: for SW Developer
- models/model-a: for ML Scientist
- config/app-config.json: a place where all developer(MLDevOps) can collaborate, Configuration Driven Development approach can coordinate each other's interfaces through configuration.
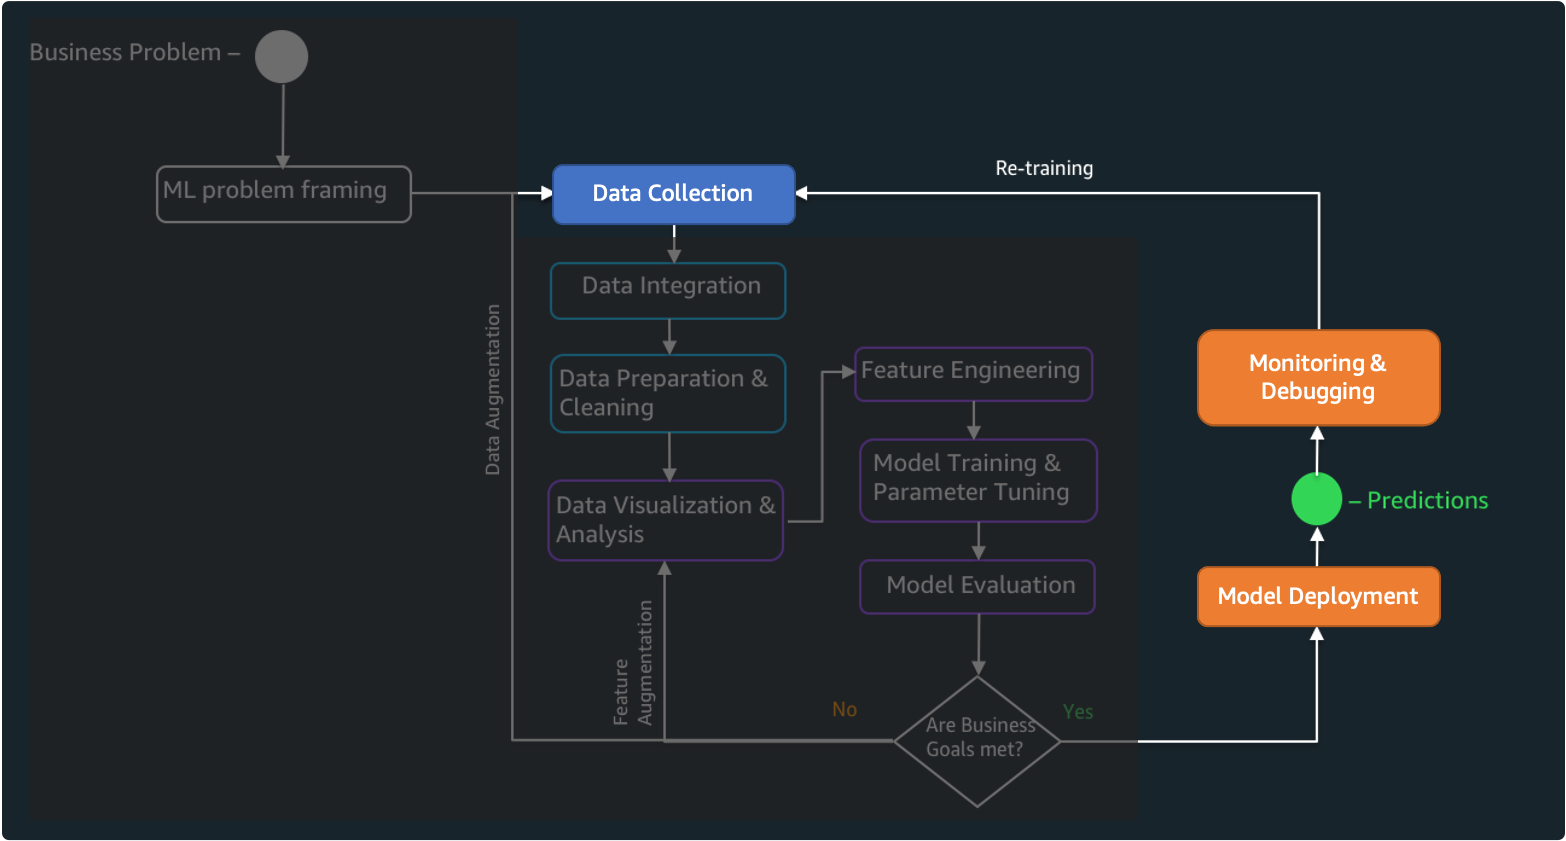
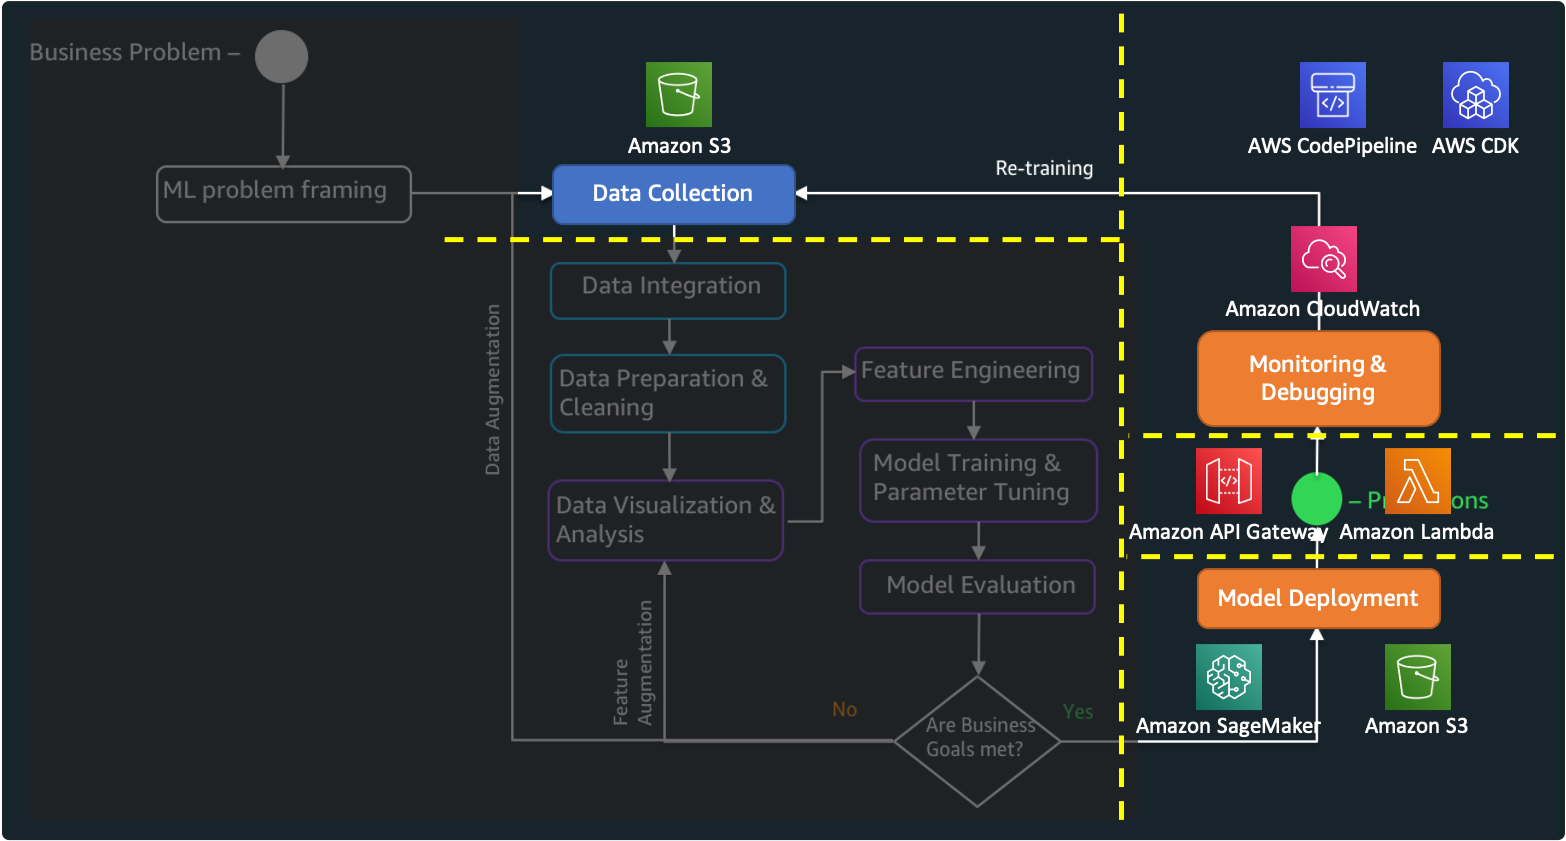
When considering AI/ML services development & operation (DevOps), there are various considerations other than model serving. For example, A/B testing, monitoring, data collection, etc. should be considered together for continuous service improvement. To meet these considerations, this solution covers the areas highlighted in the figure below.
- Model Deployment: Models Archiving, Multiple Models Serving, Realtime Prediction
- Monitoring & Debugging: Endpoint Testing, Resource Monitoring
- Data Collection: Inference History Logging
In order to agile development and operation of such complex AI/ML services, we approach from Application Modernization perspective, which can be summarized into features such as:
- Application Architecture: Modular Microservices
- Software Delivery: Automation, Abstraction, & Standardization
- Data Strategy: Decoupled & Purpose Built
- Operations: As Serverless as Possible
- Management & Governance: Programmatic Guardrails
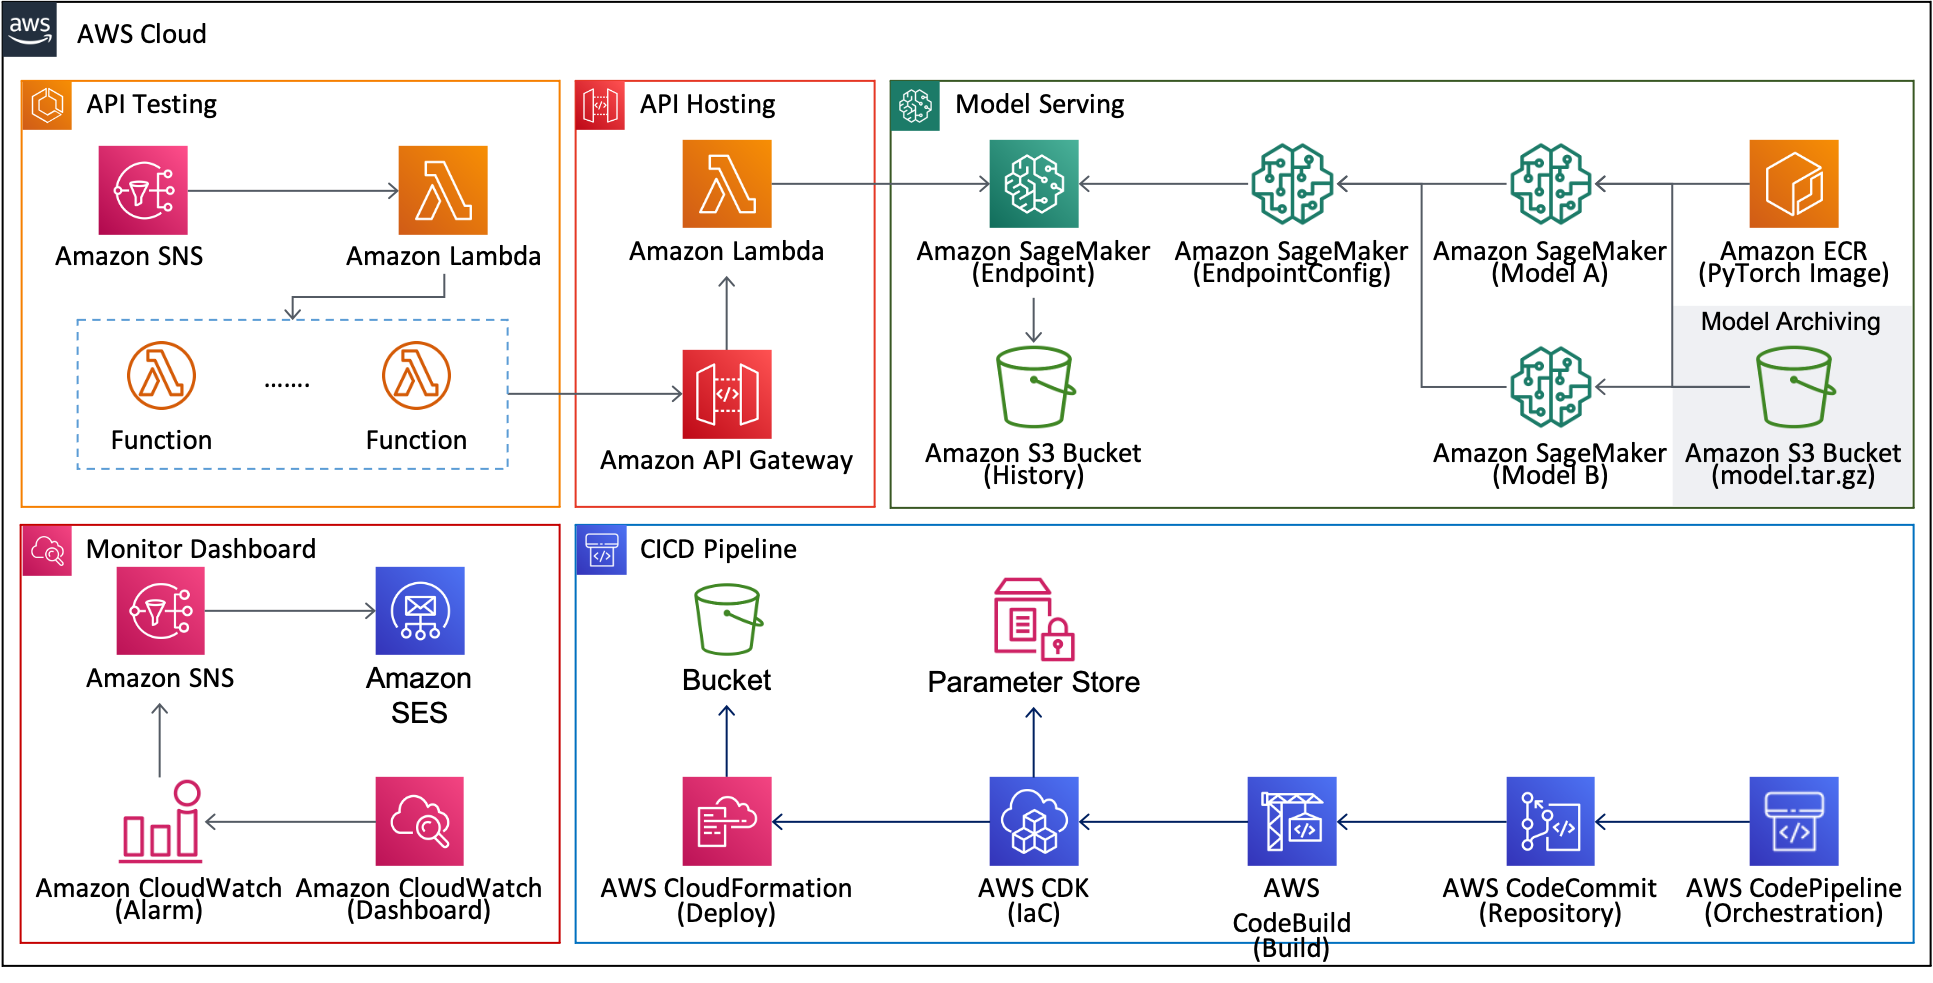
Finally, we can design the architecture by placing the following services in the right place.
- Application Architecture: as small as possible and divide it into the multiple stacks
- Software Delivery: CICD-based and IaC-based automation deploy
- Data Strategy: individual storage selection for each logging purpose
- Operations: only serverless and container
- Management & Governance: monitoring & testing
Basically this architecture is designed to provide a realtime endpoint using ML models. In this architecture, Application Modernization approach was applied to develop and operate agile and stable services.
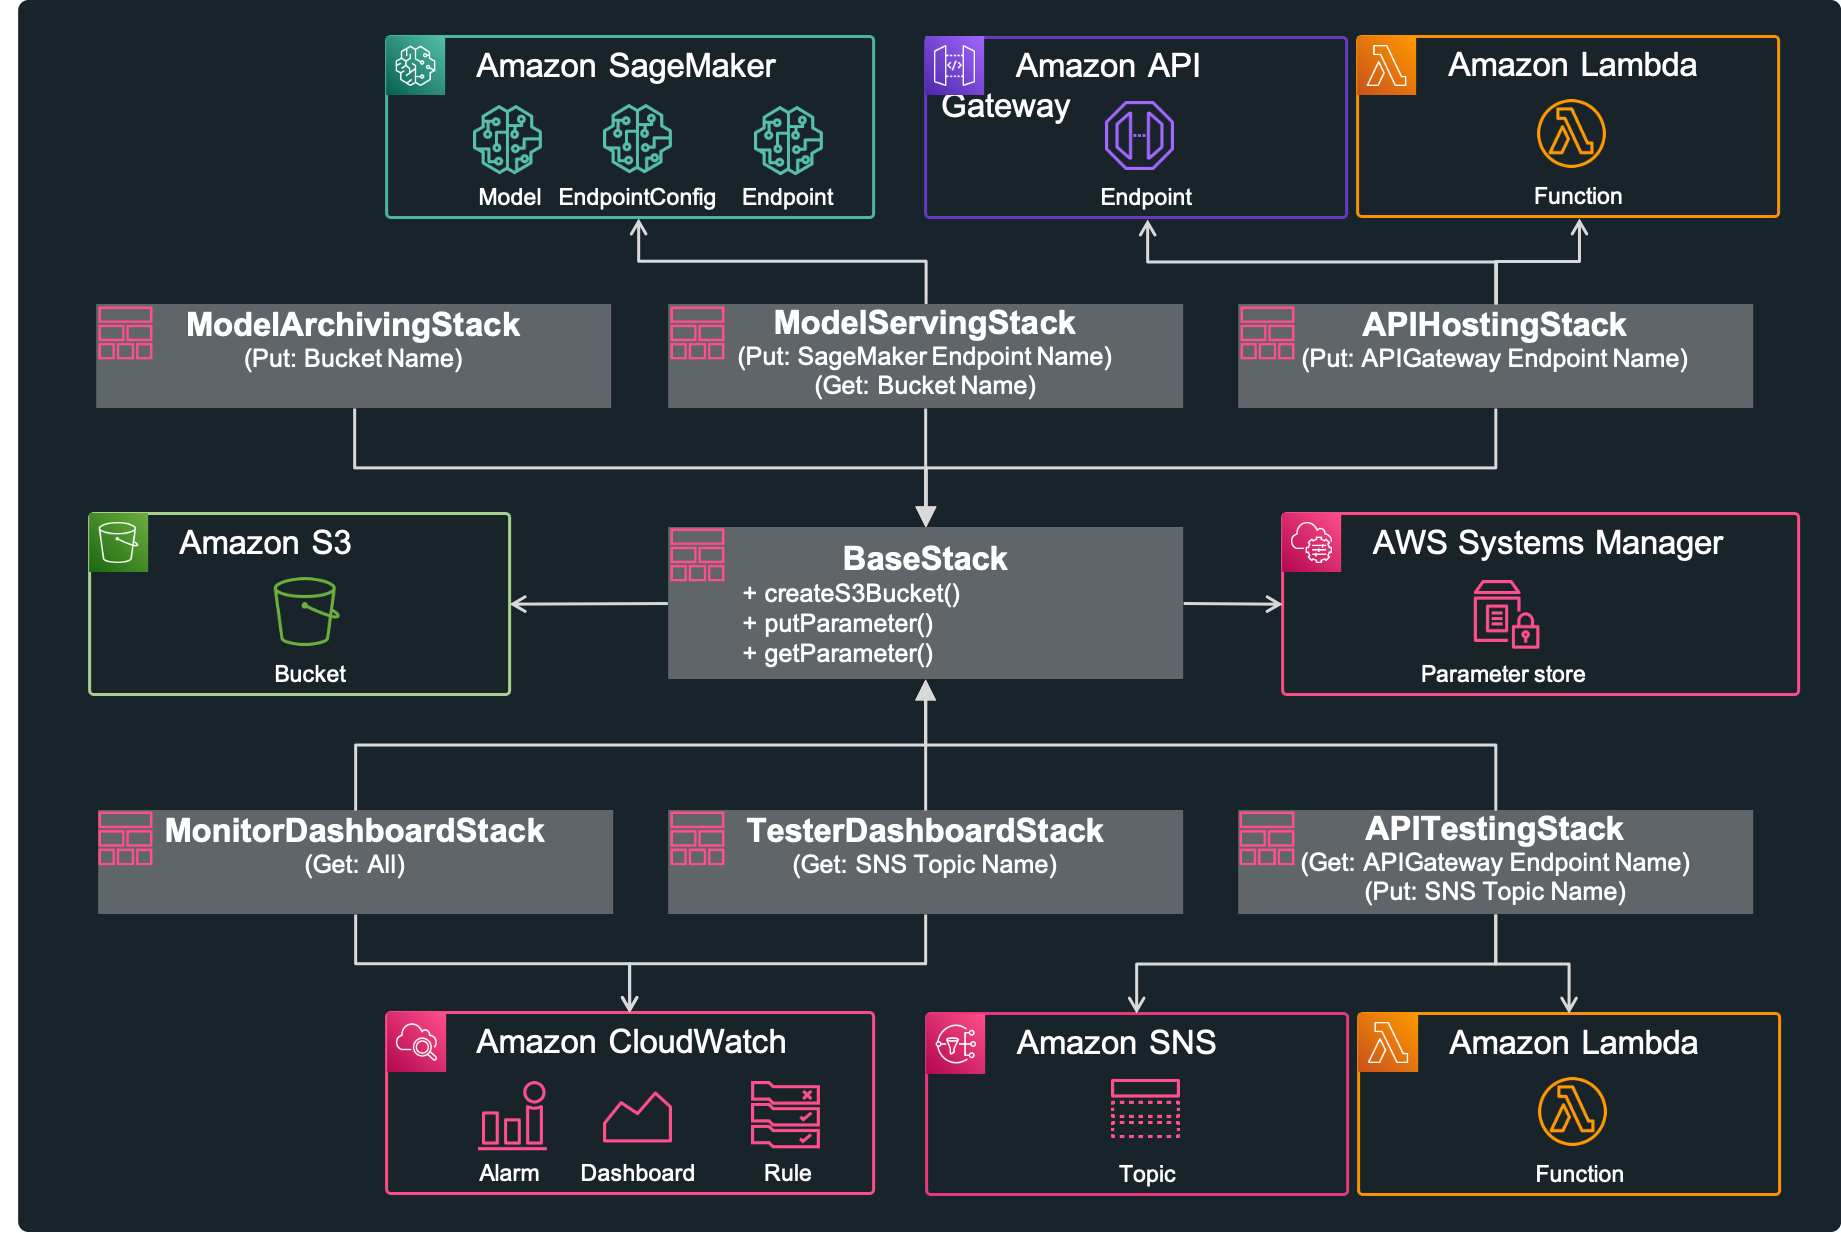
Each stack provides the follwing functions. In particular, the common functions of each stack are provided through BaseStack class by utilizing the characteristics of an object-oriented programming. Parameters such as resource name/ARN are shared between each stack through Parameter Store in AWS Systems Manager.
- Model Archiving Stack: Model Bucket Creation, model.tar.gz file Uploading
- Model Serving Stack: Models Loading, Multiple Models(A/B Testing) Serving, Inference Input/Output Logging
- API Hosting Stack: Serverless API Endpoint & Http Request Handling
- Monitor Dashboard: Serverless Resource Monitoring & Alarm
- CICD Pipeline: Continuous Integration & Continuous Deploy
- API Testing: Serverless Tester Agent
- Tester Dashboard: Testing State Monitoring
AWS services used are as follows:
- Amazon SageMaker: the most comprehensive ML service, which helps data scientists and developers to prepare, build, train, and deploy high-quality machine learning(ML) models quickly by bringing together a broad set of capabilities purpose-built for ML
- Amazon API Gateway: a fully managed service that makes it easy for developers to create, publish, maintain, monitor, and secure APIs at any scale
- Amazon Simple Storage Service(S3): object storage built to store and retrieve any amount of data from anywhere
- Amazon Lambda: a serverless computing which run code without thinking about servers
- Amazon Simple Notification Service(SNS): a fully managed messaging service for both application-to-application (A2A) and application-to-person (A2P) communication
- Amazon Simple Email Service(SES): a cost-effective, flexible, and scalable email service that enables developers to send mail from within any application
- Amazon CloudWatch: a monitoring and observability service built for DevOps engineers, developers, site reliability engineers (SREs), and IT managers
- Amazon System Manager Parameter Store: secure, hierarchical storage for configuration data management and secrets management
- AWS CodePipeline: a fully managed continuous delivery service that helps you automate your release pipelines for fast and reliable application and infrastructure updates
- AWS CloudFormation: an easy way to model a collection of related AWS and third-party resources, provision them quickly and consistently, and manage them throughout their lifecycles, by treating infrastructure as code
- AWS Cloud Development Kit(CDK): an open source software development framework to define your cloud application resources using familiar programming languages
Becuase this solution assumes that the model is previously provided by data scientists, ML model training and tuning is outside the scope of this solution. So we use the simple example model for the purpose of model serving. We will use Pytorch-based text classification model which is provided in pytorch/text.
In any directory, execute the following commands to train model and finally get ML model file(model.pth) and vocabulary file(vocab.pth). These commands train Text-Classification model using AG_NEWS dataset under CPU environment. This model takes text as input and classifies one of the following four labels.
- 1: 'World'
- 2: 'Sports'
- 3: 'Business'
- 4: 'Sci/Tech'
If you are not ready for pytorch, please refer to this installation guide. In this repository, pytorch version is 1.8.0, torchtext version is 0.9.0.
git clone https://github.com/pytorch/text.git torchtext
cd torchtext/examples/text_classification/
mkdir .data
python3 train.py AG_NEWS --device cpu --save-model-path  model.pth --dictionary vocab.pth
Finally copy model script(model.py) and training outputs(model.pth, vocab.pth) into models/model-a/src directory of this repository.
cp ./model.py ../../../amazon-sageMaker-model-serving-using-aws-cdk/models/model-a/src/code/
cp ./model.pth ./vocab.pth ../../../amazon-sageMaker-model-serving-using-aws-cdk/models/model-a/src/
This is a intermediate tree view in "models/model-a/src" directory.
models
└── model-a
    ├── src
    │   ├── code
    │   │   ├── inference.py
    │   │   ├── model.py       <--- this file is from pytorch/text
    │   │   └── requirements.txt
    │   ├── model.pth          <--- this file is from pytorch/text
    │   └── vocab.pth          <--- this file is from pytorch/text
    └── test
        ├── input_data.json
        ├── test_local_model.py
        └── test_remote_model.py
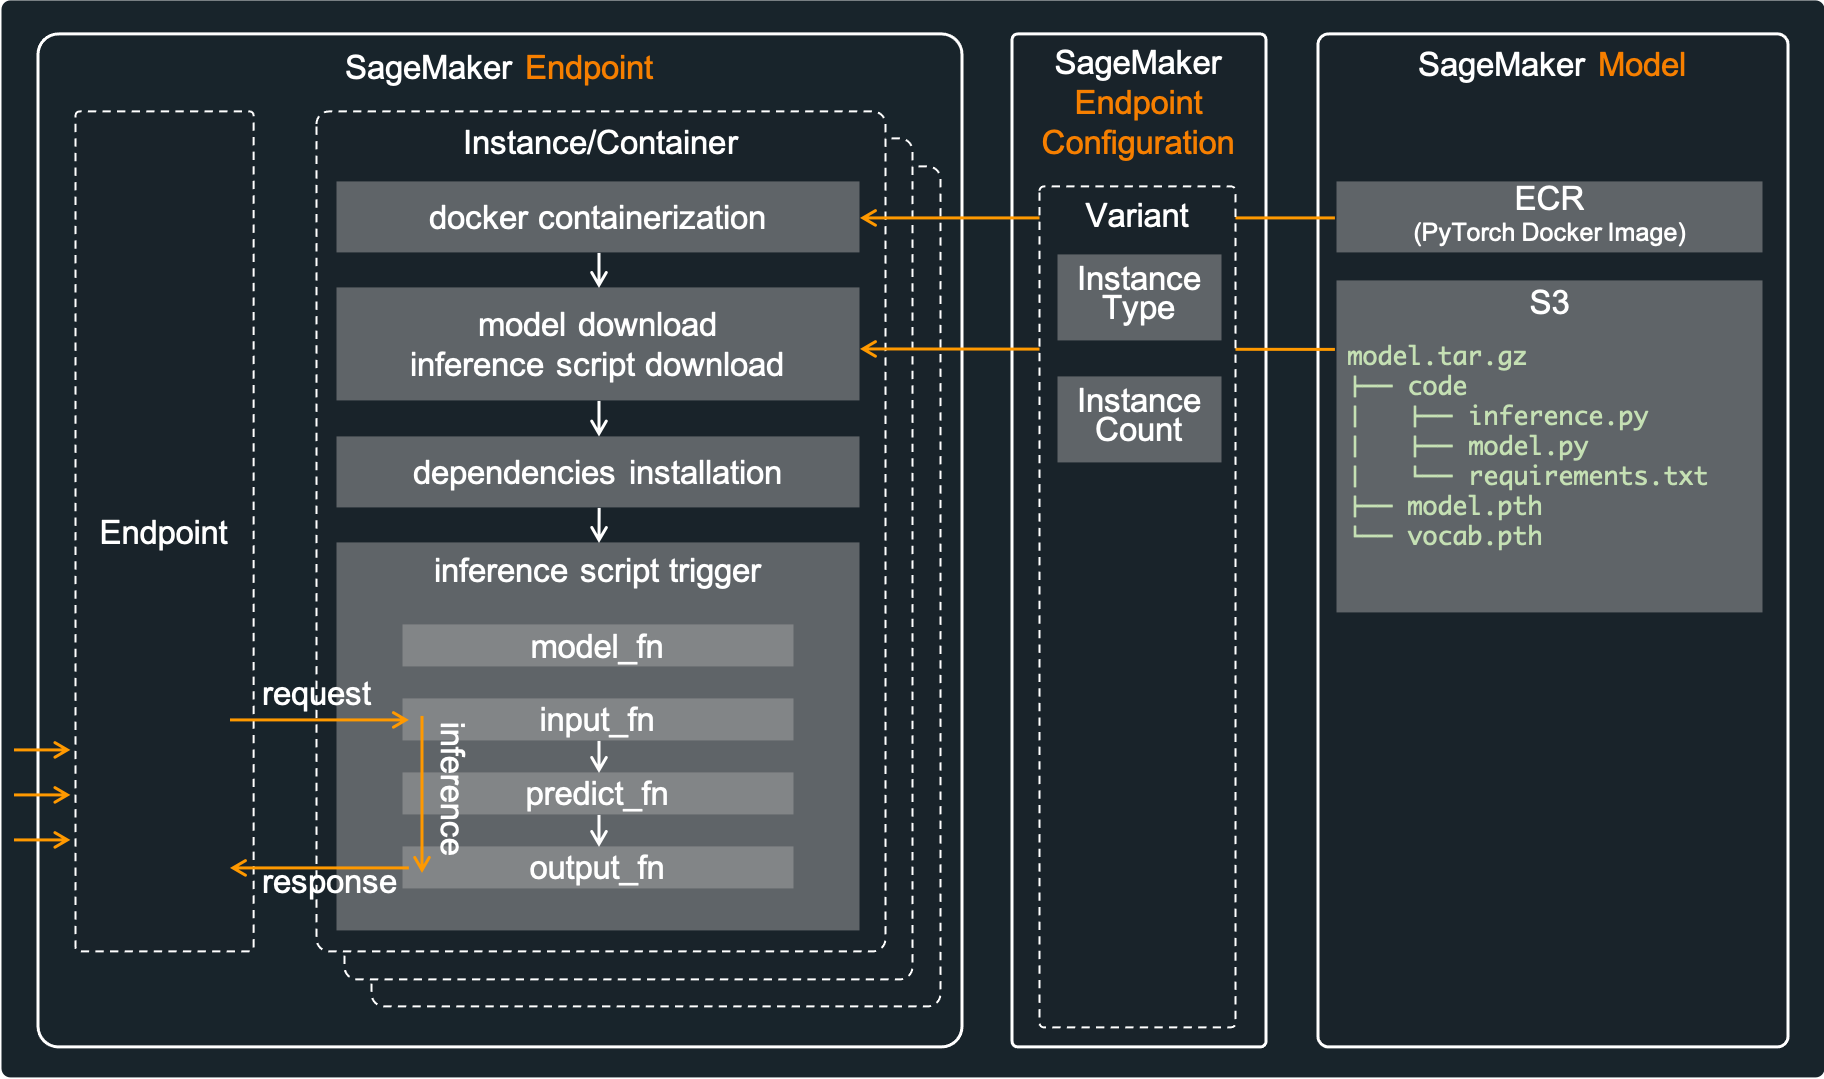
To create SageMaker Endpoint(realtime inference), We need to prepare two, the first is the model file(in here model.pth, vocab.pth) and the second is the associated script codes(in here inference.py, model.py). If we compress and upload these two into Amazon S3, Amazon SageMaker will load inference.py and call methods(model_fn, input_fn, predict_fn, output_fn) implemented in this file. And SageMaker install the additional dependecies using requirements.txt file. The figure below shows the abstract flow. Please check SageMaker Python SDK - Deploy PyTorch Models for more details.
Now, let's test this model and inference scripts locally. It is very important to verify locally before deployment. Execute the following commands in root directory of this repository.
cd models/model-a/test
python3 test_local_model.py
...
...
-------------------------------------------------------------------
[tc-001]: result==>{"success": "true", "label": 1}
[tc-001]: completed==>The new president has called for an emergency conference for international cooperation.
-------------------------------------------------------------------
[tc-002]: result==>{"success": "true", "label": 2}
[tc-002]: completed==>Baseball is one of the most popular sports in the United States.
-------------------------------------------------------------------
[tc-003]: result==>{"success": "true", "label": 3}
[tc-003]: completed==>Stock investing has higher returns in the long run.
-------------------------------------------------------------------
[tc-004]: result==>{"success": "true", "label": 4}
[tc-004]: completed==>The development of science accelerated the development of mankind.
Finally compress these files to upload into Amazon S3. Execute the following command in root directory of this repository. This command will create model.tar.gz in "models/model-a/model", which will be uploaded to Amazon S3 through AWS CDK(ModelArchivingStack) later.
sh script/pack_models.sh This is a final tree view in "models/model-a/src" directory. Please make a note of that path(models/model-a/model) as it will be referenced later in How to configure step.
models/
└── model-a
    ├── model
    │   └── model.tar.gz
    ...
...To efficiently define and provision serverless resources, AWS CDK is utilized. Because AWS CDK uses familiar programming languages for modeling modern applications, we can provision in a safe, repeatable manner through AWS CloudFormation.
Because this solusion is implemented in CDK, we can deploy these cloud resources using CDK CLI. Among the various languages supported, this solution used typescript. Because the types of typescript are very strict, with the help of auto-completion, typescrip offers a very nice combination with AWS CDK.
Caution: This solution contains not-free tier AWS services. So be careful about the possible costs. Fortunately, serverless services minimize cost if not used(Amazon SageMaker's Endpoint is not serverless).
First of all, AWS Account and IAM User is required. And then the following must be installed.
- AWS CLI: aws configure --profile [profile name]
- Node.js: node --version
- AWS CDK: cdk --version
- jq: jq --version
Please refer to the kind guide in CDK Workshop.
First of all, enter your project basic configuration in the follwoing document: config/app-config.json. Fill in your project's "Name", "Stage", "Account", "Region", "Profile(AWS CLI Credentials)" in "Project" according to your environments.
{
    "Project": {
        "Name": "TextClassification",
        "Stage": "Demo",
        "Account": "75157*******",
        "Region": "us-east-2",
        "Profile": "cdk-demo"
    },
    ...
    ...
}
If you don't know AWS Account/Region, execute the following commands to catch your AWS-Account.
aws sts get-caller-identity --profile [your-profile-name]
...
...
{
    "Account": "[account-number]",
    "UserId": "[account-id]",
    "Arn": "arn:aws:iam::12345678912:user/[iam-user-id]"
}
And then execute the following commands to set up CDK-Project. For details, please check setup_initial.sh file.
sh ./script/setup_initial.sh Let's check stacks included in this CDK-Project before provisining. Execute the following command. The prefix "TextClassificationDemo" can be different according to your setting(Project Name/Stage).
cdk list
...
...
TextClassificationDemo-APIHostingStack
TextClassificationDemo-APITestingStack
TextClassificationDemo-CICDPipelineStack
TextClassificationDemo-ModelArchivingStack
TextClassificationDemo-ModelServingStack
TextClassificationDemo-MonitorDashboardStack
TextClassificationDemo-TesterDashboardStack
Each item in "Stack" of app-config.json represents a stack of the same name. Each stack performs the follwoing roles:
- TextClassificationDemo-ModelArchivingStack: create S3 Bucket, and upload model.tar.gz into S3 Bucket
- TextClassificationDemo-ModelServingStack: create SageMaker Model, EndpointConfiguration, Endpoint, and Inference Input/Output Logging(Data capture)
- TextClassificationDemo-APIHostingStack: create API Gateway and Lambda Function
- TextClassificationDemo-MonitorDashboardStack: create CloudWatch Dashboard, Alarm, SNS, and SES
- TextClassificationDemo-CICDPipelineStack: create CodePipeline, CodeBuild
- TextClassificationDemo-APITestingStack: create SNS and Lambda Functions
- TextClassificationDemo-TesterDashboardStack: create CloudWatch Dashboard to present test results
Now, everything is ready, let's provision all stacks using AWS CDK. Execute the following command which will deploy all stacks in order of subordination.
sh script/deploy_stacks.shFor testing, execute the following command, which will send SNS message and finally the lambda functions will be executed to call API Gateway.
sh script/trigger_tests.sh
...
...
{
    "MessageId": "e78906f5-4544-5e19-9191-5e9ea2a859bd"
}
The number of tester lambda(TestClientCount) can be modified. Just change TestClientCount in app-config.json, and then deploy TextClassificationDemo-APITestingStack again.
...
        "APITesting": {
            "Name": "APITestingStack",

            "SNSTopicName": "TestTrigger",

            "LambdaFunctionName": "TestTrigger",
            "TestClientCount": 5
        },
...
And test duration(DurationInSec), and test interval(IntervalInSec) can be modified according to your test scenario. Please change input_data.json in script directory which is the message of SNS.
...
{
    "Config": {
        "IntervalInSec": 10,
        "DurationInSec": 600
    },
...
...After a while, go to CloudWatch Dashboard(TextClassificationDemo-MonitorDashboard, TextClassificationDemo-TesterDashboard) and check the results.
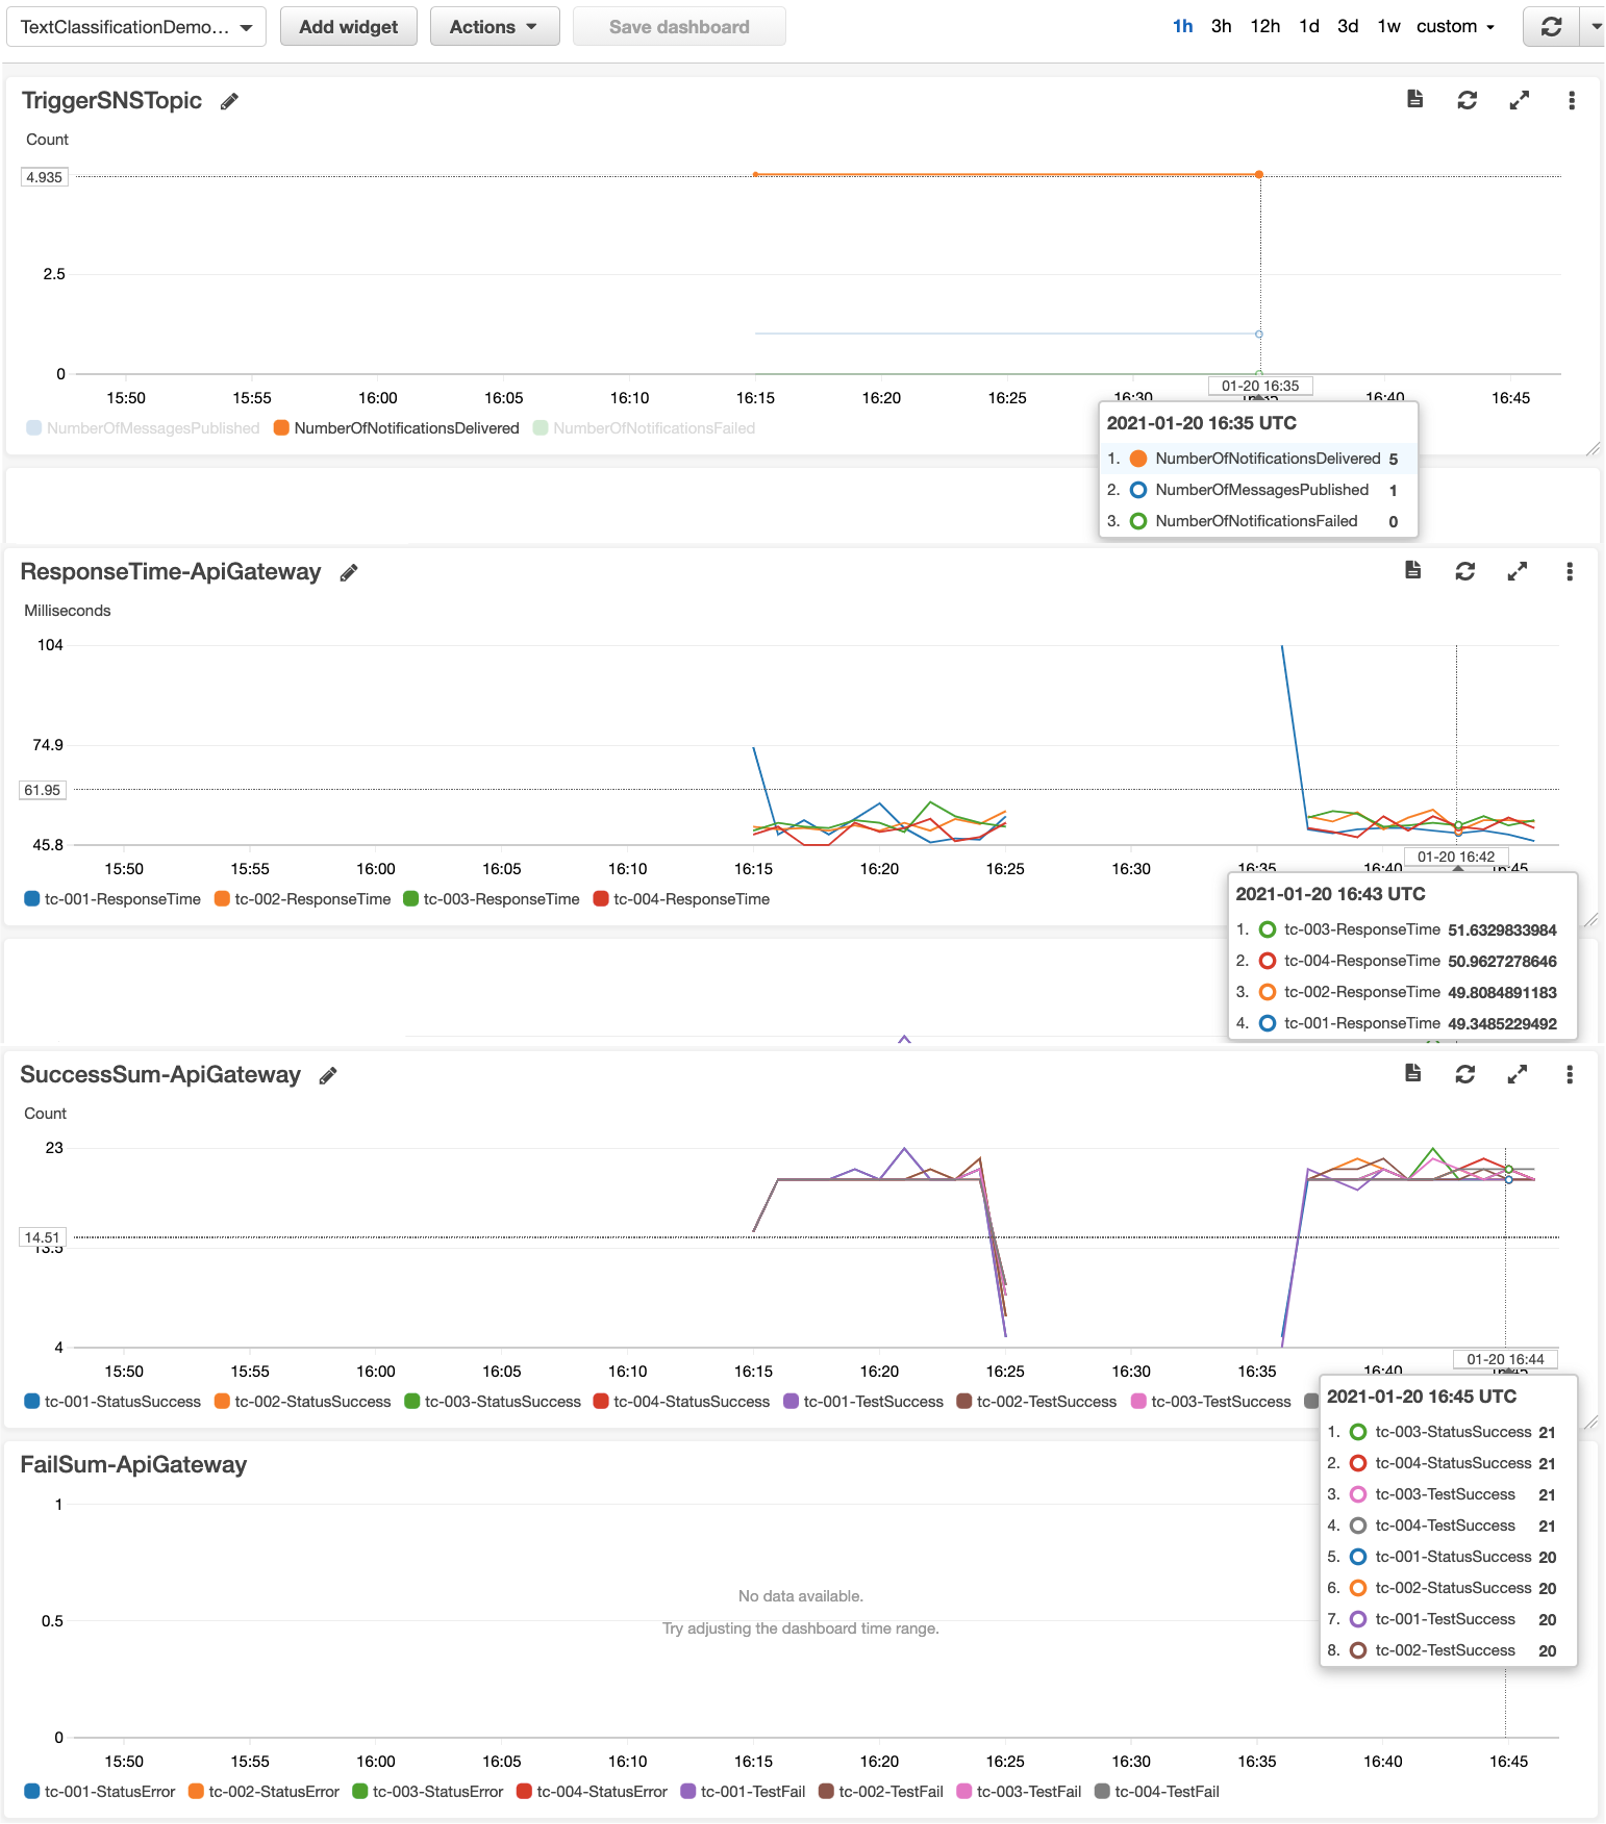
TextClassificationDemo-TesterDashboard
This dashboard describes testing status. In the dashboard below, 1 SNS message was pulished and 5 lambda functions received that. ResponseTime-ApiGateway, SuccessSum-ApiGateway, and FailSum-ApiGateway are custom metrics sent by TesterLambda. this dashboard show that response time is about 0.05ms(this metric can be different according your environment). It can be seen that all test cases were successful, and none failed.
TextClassificationDemo-MonitorDashboard
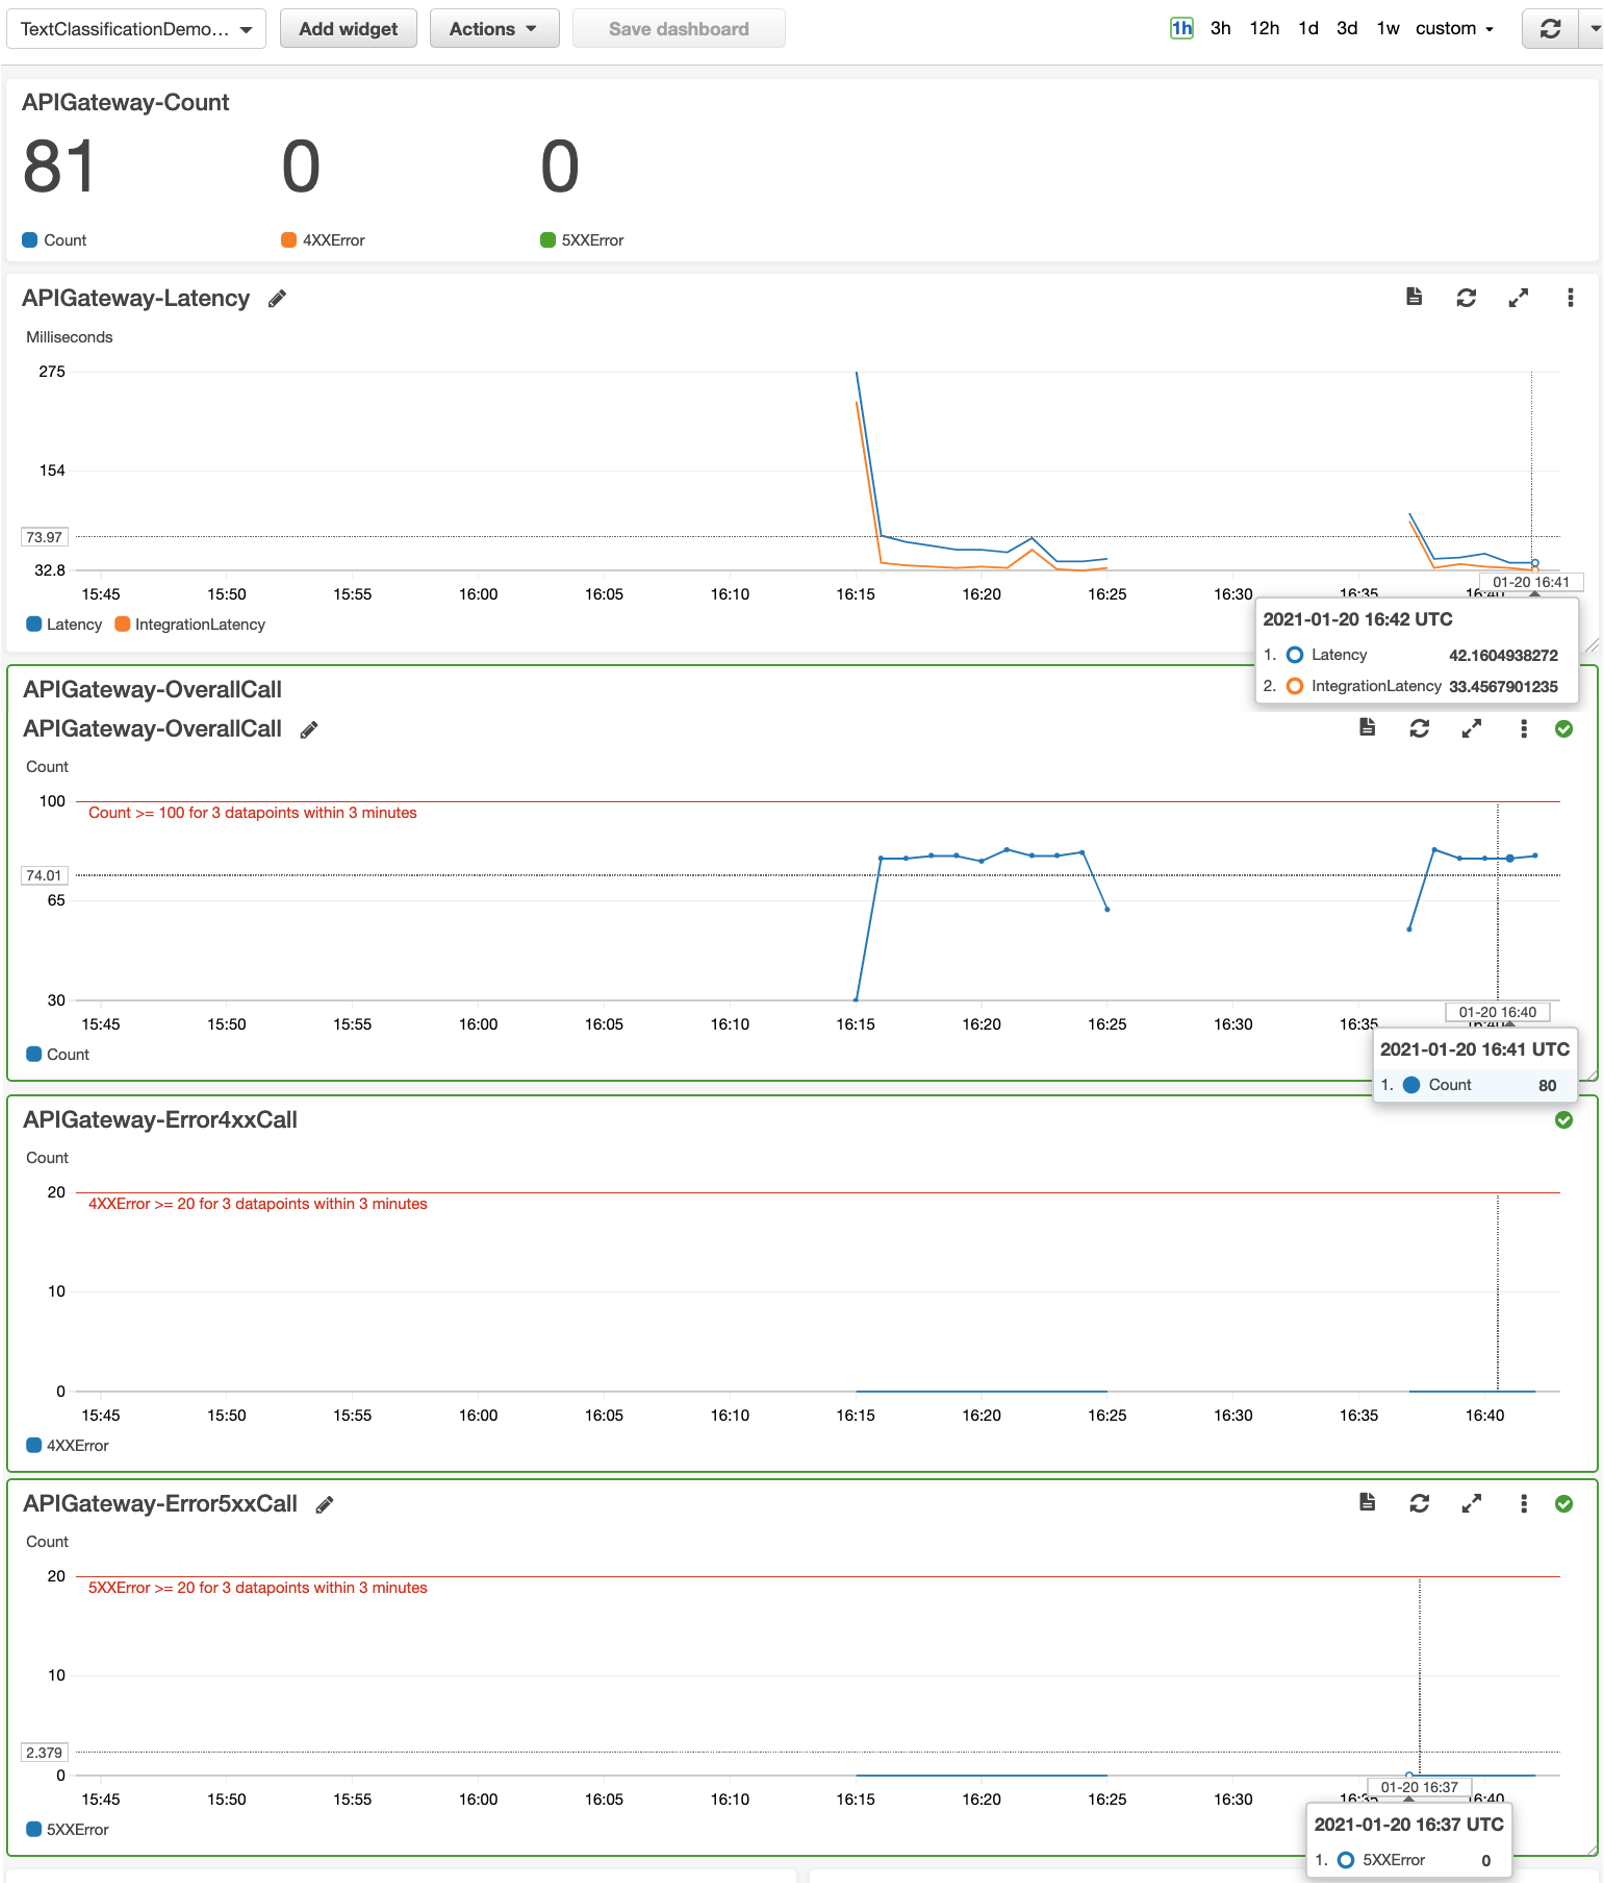
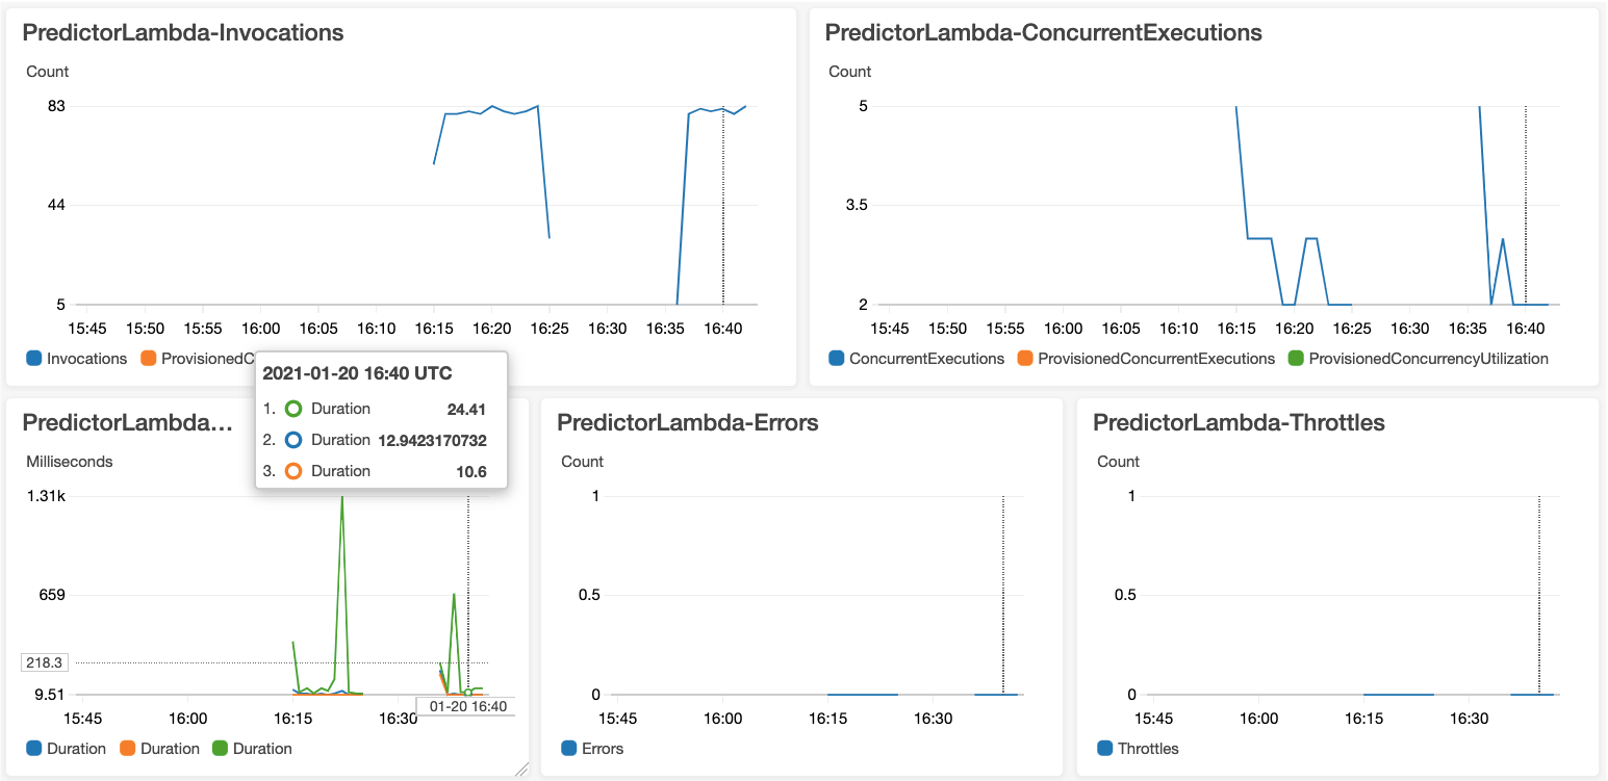
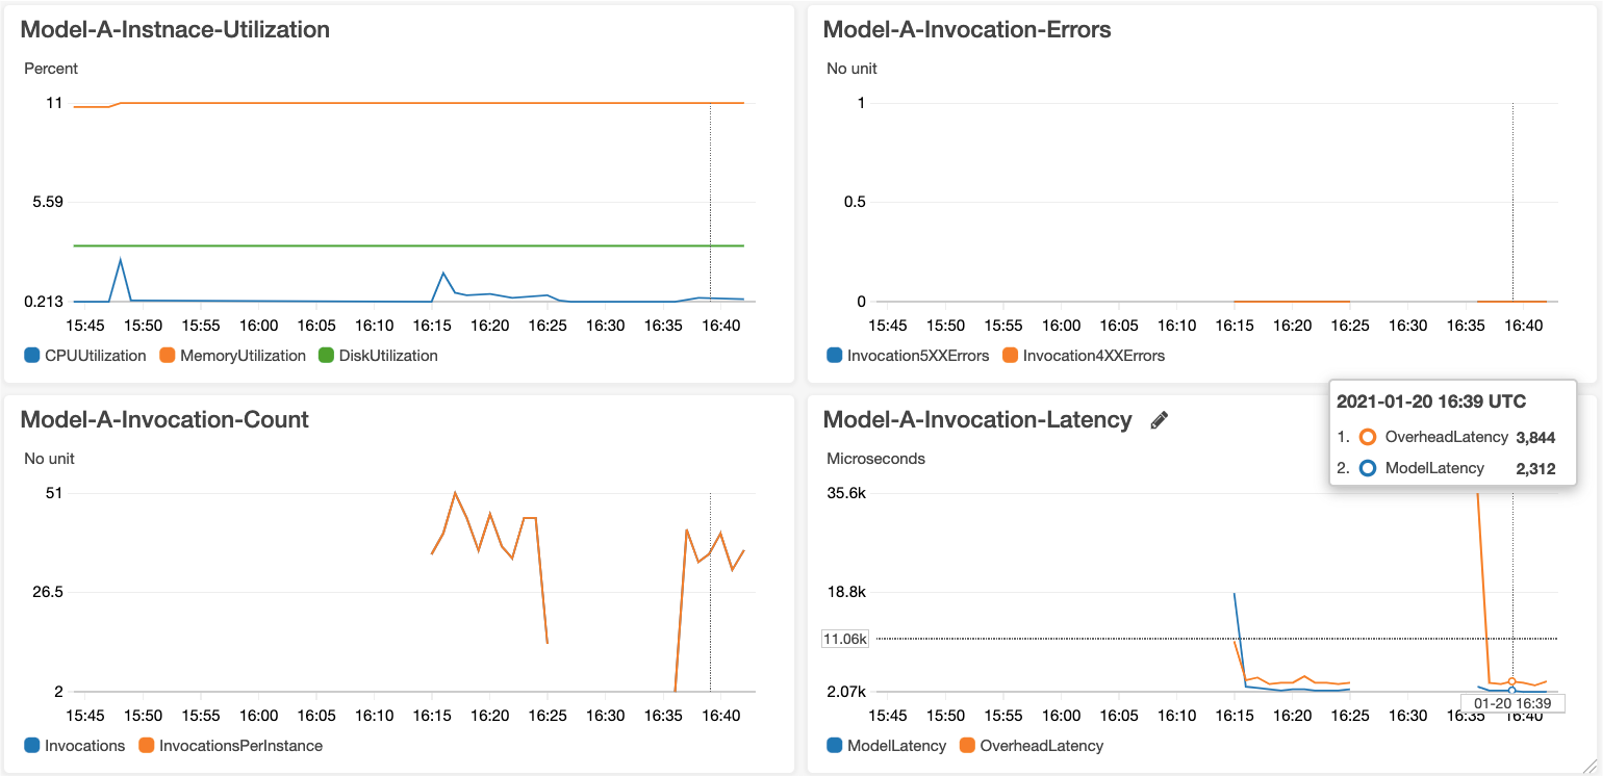
This dashboard is the current status of all resources. The following picture shows realtime status of API Gateway, Lambda function, and SageMaker Endpoint.
MonitorDashboard-SageMaker-Endpoint
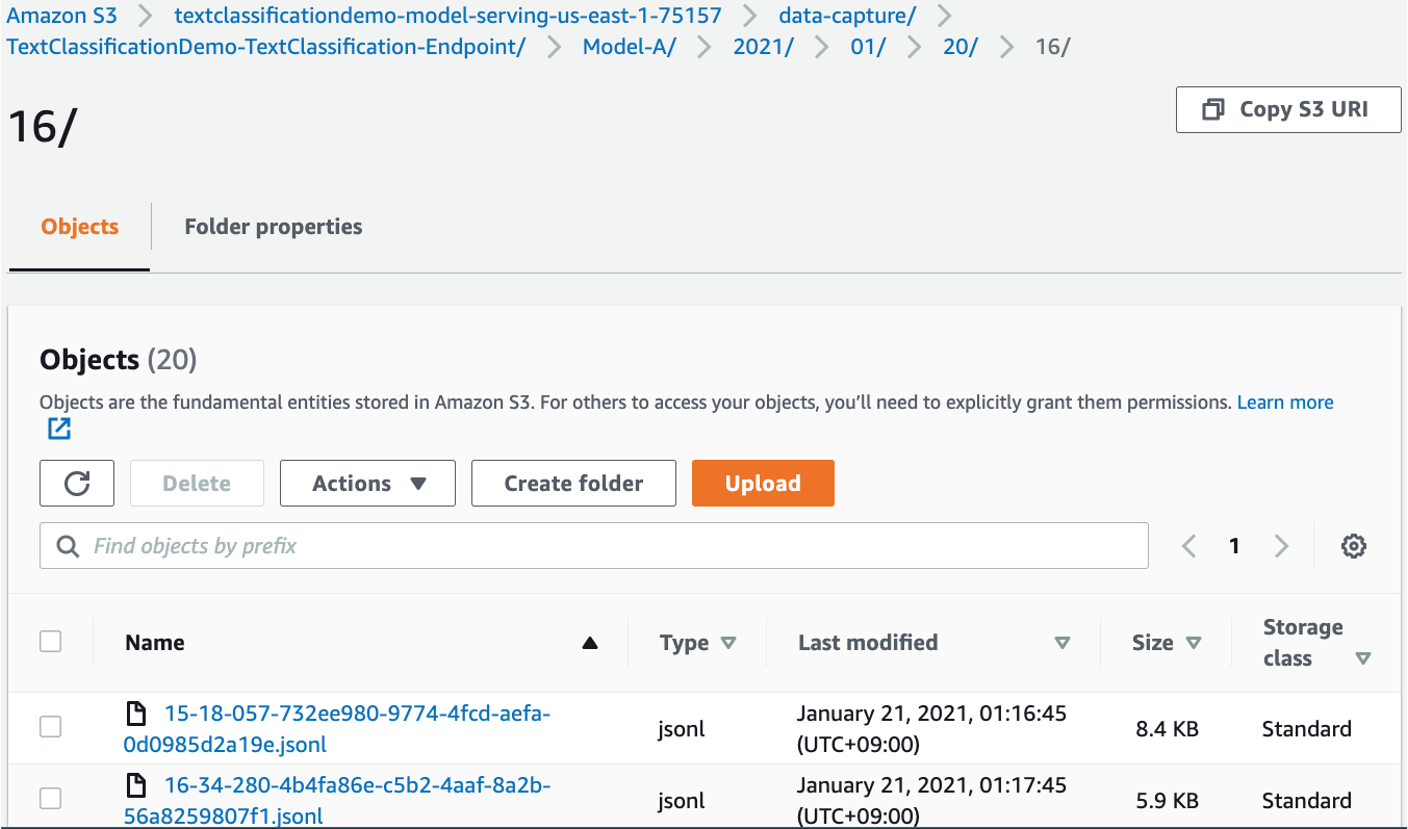
Inference History Logging - S3 Bucket
The following picture shows the logging results in S3 Bucket.
Also alarm threshold(ApiGatewayOverallCallThreshold, ApiGatewayError4xxCallThreshold, ApiGatewayError5xxCallThreshold) can be modified according to your operation scenario. Just change these items in app-config.json, and then deploy TextClassificationDemo-MonitorDashboard.
And change SES subscription email address in config/app-config.json, which will send subscription confirmation mail to "SubscriptionEmails".
...
        "MonitorDashboard": {
            "Name": "MonitorDashboardStack",

            "DashboardName": "MonitorDashboard",

            "SubscriptionEmails": ["abc@amazon.com", ....],
            "ApiGatewayOverallCallThreshold": 100,
            "ApiGatewayError4xxCallThreshold": 20,
            "ApiGatewayError5xxCallThreshold": 20
        },
...
Finally deploy and test again like this. *script/deploy_stacks.sh will deploy only changed stacks such as TextClassificationDemo-APITestingStack, TextClassificationDemo-TesterDashboardStack, TextClassificationDemo-MonitorDashboard.
sh script/deploy_stacks.sh
sh script/trigger_tests.shAfter initial deployment, you can change to a new model file(ModelS3Key, ModelLocalPath) or change deployment settings(InstanceCount, InstanceType). If you change these settings, you must change ModelName, EndpointConfigName. This is mandantory, because SageMaker Model/EndpointConfig does not support to edit these values. In other words, changing these names will delete the previous Model/EndpointConfig and creat a new Model/EndpointConfig. If you have already model.tar.gz file in S3 Bucket so you don't need upload a local model.tar.gz file, keep ModelLocalPath empty.
      "ModelServing": {
            "Name": "ModelServingStack",

            "ModelList": [
                {
                    "ModelName":   "Model-A-20210117a", <-- change ModelName if ModelS3Key or ModelDockerImage is modified, and then change EndpointConfigName also
                    "ModelS3Key":     "models/model-a/model",
                    "ModelDockerImage": "763104351884.dkr.ecr.us-east-2.amazonaws.com/pytorch-inference:1.8.1-cpu-py36-ubuntu18.04",

                    "VariantName": "Model-A",
                    "VariantWeight": 1,
                    "InstanceCount": 1,
                    "InstanceType": "ml.c4.xlarge",

                    "AutoScalingEnable": false,
                    "AutoScalingMinCapacity": 1,
                    "AutoScalingMaxCapacity": 3,
                    "AutoScalingTargetInvocation": 70
                }
            ],

            "EndpointConfigName":   "TextClassification-20210117c", <--- change EndpointConfigName if ModelName or VariantName or VariantWeight or InstanceCount or InstanceType
            "BucketBaseName": "model-serving",

            "EndpointName":      "TextClassification",
            "Deploy": true
}We can activate/deactivate auto-scaling feature of SageMaker Endpoint. Since this is a runtime option, you can activate/deactivate it while SageMaker Endpoint has been provisioned in advance. Therefore, you can deploy it as false at the time of initial deployment and then set it to true from the next time. For more details, please check this document.
        "ModelServing": {
            "Name": "ModelServingStack",

            "ModelList": [
                {
                    "ModelName":   "Model-A-20210117a",
                    ...
                    ...

                    "AutoScalingEnable": false,  <--- this is a option to activate/deactivate auto-scaling
                    "AutoScalingMinCapacity": 1,
                    "AutoScalingMaxCapacity": 3,
                    "AutoScalingTargetInvocation": 70
                },
                {
                    "ModelName":   "Model-B-20210117a",
                    ...
                    ...

                    "AutoScalingEnable": false,  <--- this is a option to activate/deactivate auto-scaling
                    "AutoScalingMinCapacity": 2,
                    "AutoScalingMaxCapacity": 4,
                    "AutoScalingTargetInvocation": 50
                }
            ],

            ...
            ...
},After preparing a new folder(models/model-b/model), add it to app-config.json like this:
In ModelArchivingStack
        "ModelArchiving": {
            "Name": "ModelArchivingStack",

            "BucketBaseName": "model-archiving",
            "ModelList": [
                {
                    "ModelLocalPath": "models/model-a/model",
                    "ModelS3Key":     "models/model-a/model"
                },
                {
                    "ModelLocalPath": "models/model-b/model",
                    "ModelS3Key":     "models/model-b/model"
                }
            ]
        }
In ModelServingStack
"ModelServing": {
            "Name": "ModelServingStack",

            "ModelList": [
                {
                    "ModelName":   "Model-A-20210117a",
                    "ModelS3Key":     "models/model-a/model",
                    "ModelDockerImage": "763104351884.dkr.ecr.us-east-2.amazonaws.com/pytorch-inference:1.8.1-cpu-py36-ubuntu18.04",

                    "VariantName": "Model-A",
                    "VariantWeight": 1,
                    "InstanceCount": 1,
                    "InstanceType": "ml.c4.xlarge",

                    "AutoScalingEnable": false,
                    "AutoScalingMinCapacity": 1,
                    "AutoScalingMaxCapacity": 3,
                    "AutoScalingTargetInvocation": 70
                },
                {
                    "ModelName":   "Model-B-20210117a",
                    "ModelS3Key":     "models/model-b/model",
                    "ModelDockerImage": "763104351884.dkr.ecr.us-east-2.amazonaws.com/pytorch-inference:1.8.1-cpu-py36-ubuntu18.04",

                    "VariantName": "Model-B",
                    "VariantWeight": 1,
                    "InstanceCount": 1,
                    "InstanceType": "ml.m4.xlarge",

                    "AutoScalingEnable": false,
                    "AutoScalingMinCapacity": 2,
                    "AutoScalingMaxCapacity": 4,
                    "AutoScalingTargetInvocation": 50
                }
            ],

            "EndpointConfigName":   "TextClassification-20210117c",
            "BucketBaseName": "model-serving",

            "EndpointName":      "TextClassification",
            "Deploy": true
        },
Don't forget to execute pack_models.sh to compress model files. In pack_models.sh file, the following item must be changed.
# MODEL_ROOT=models/model-a
MODEL_ROOT=models/model-b
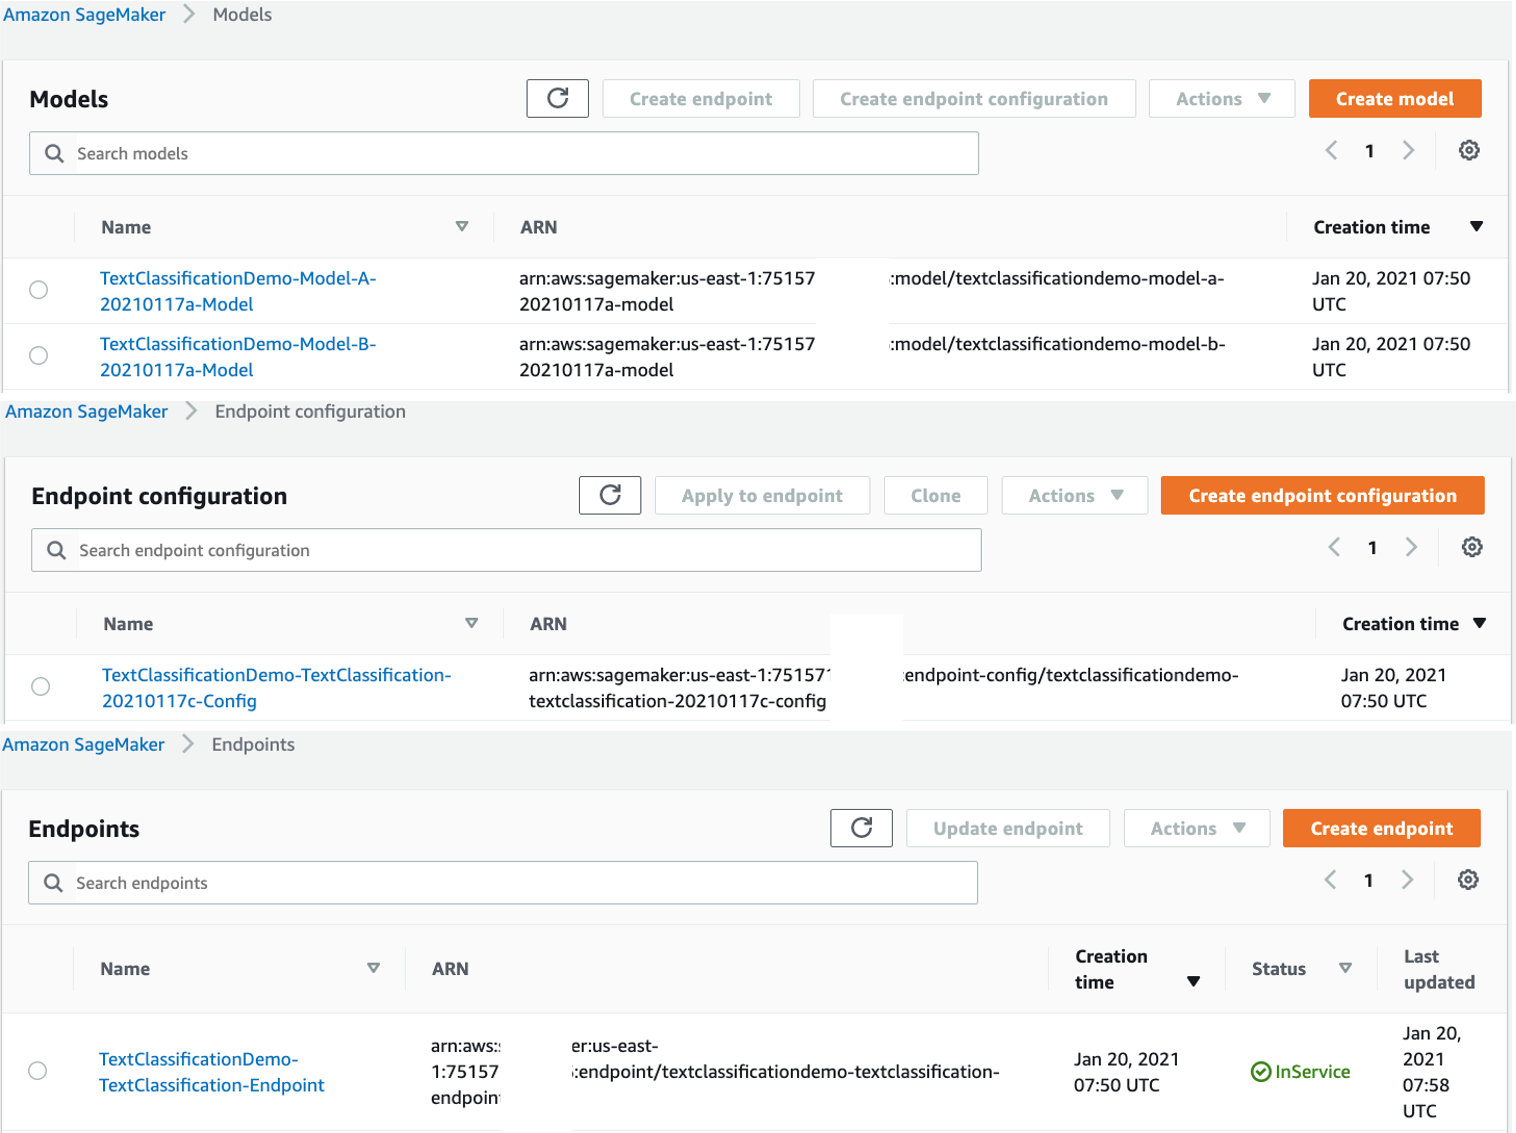
This picture is a result of multiple(A/B Testing) model serving in SageMaker.
The cdk.json file tells the CDK Toolkit how to execute your app.
And the more usuful CDK commands are
cdk listlist up CloudFormation Stackscdk deploydeploy this stack to your default AWS account/regioncdk diffcompare deployed stack with current statecdk synthemits the synthesized CloudFormation templatecdk destroyremove resources
Execute the following command, which will destroy all resources except S3 Buckets. So destroy these resources in AWS web console manually.
sh script/destroy_stacks.shSee CONTRIBUTING for more information.
This library is licensed under the MIT-0 License. See the LICENSE file.

