To automate document-based business processes, we usually need to extract specific, standard data points from diverse input documents: For example, vendor and line-item details from purchase orders; customer name and date-of-birth from identity documents; or specific clauses in contracts.
In human-readable documents, both layout and text content are important to extract meaning: So accuracy may be disappointing when using text-only methods (like regular expressions or entity recognition models), position-only methods (like template-based models), or manual combinations of the two.
This sample and accompanying blog post demonstrate trainable, multi-modal, layout-aware document understanding on AWS using Amazon SageMaker and open-source models from Hugging Face Transformers - optionally integrated with Amazon Textract.
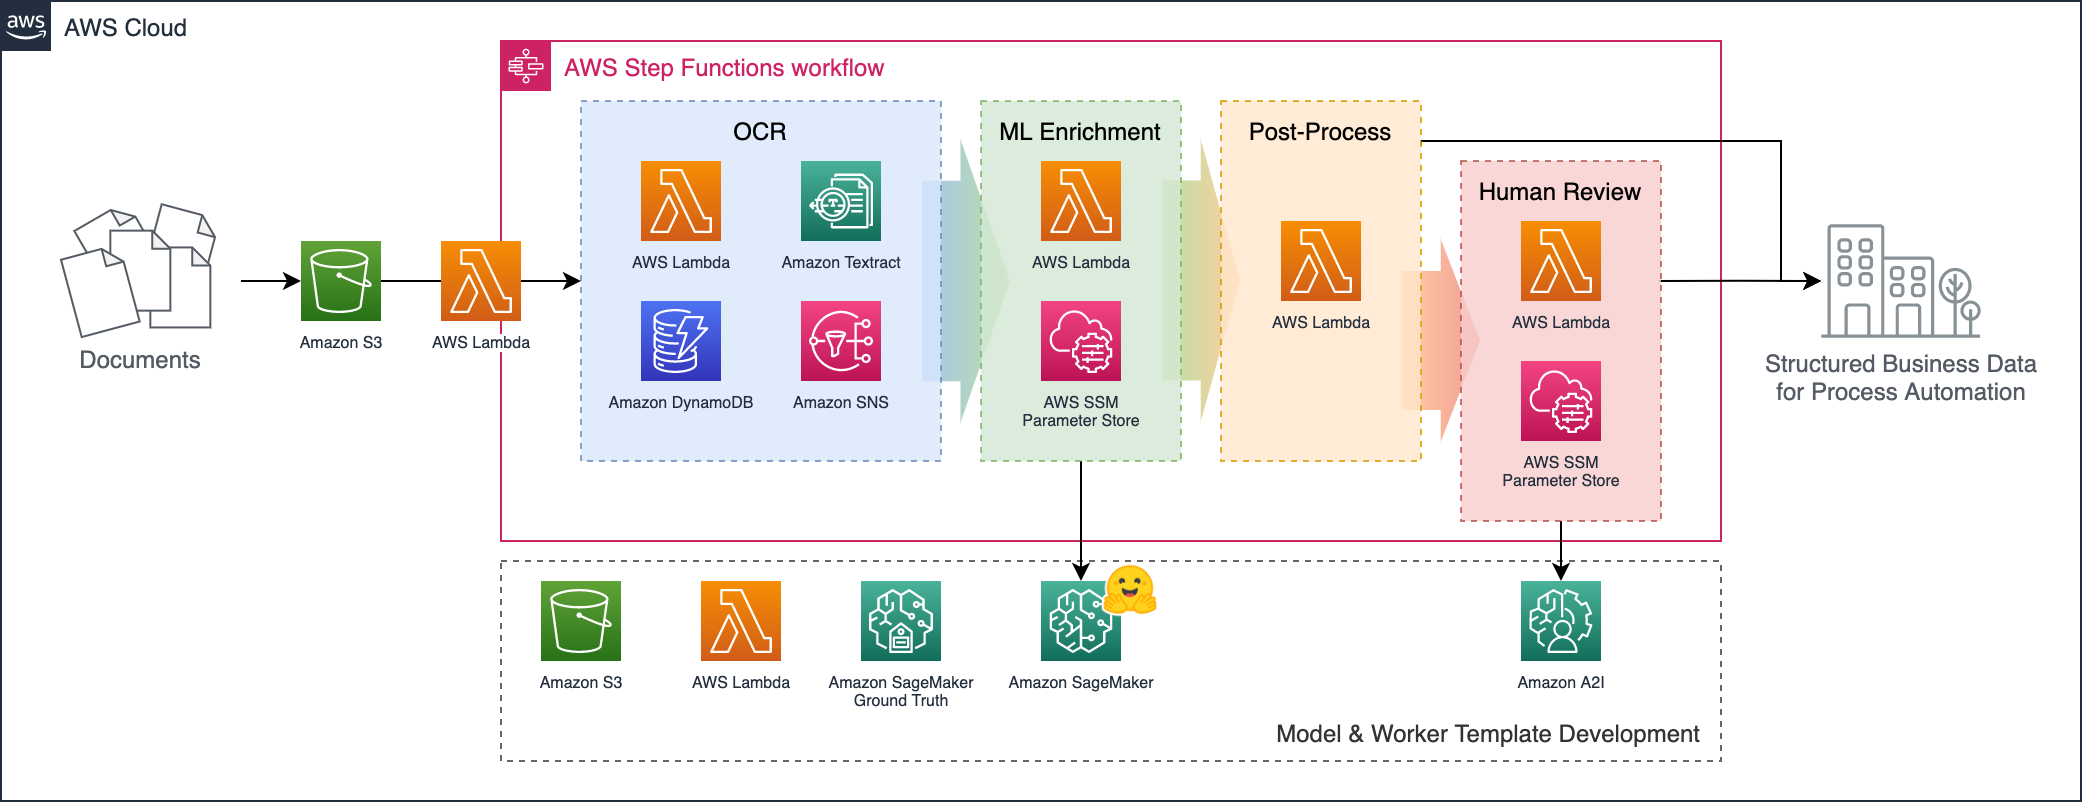
This sample sets up a document processing pipeline orchestrated by AWS Step Functions, as shown below:
Documents uploaded to the input bucket automatically trigger the workflow, which:
- Extracts document data using Amazon Textract (or an alternative OCR engine).
- Enriches the Textract/OCR JSON with extra insights using an ML model deployed in SageMaker.
- Consolidates the business-level fields in a post-processing Lambda function.
- (If any expected fields were missing or low-confidence), forwards the results to a human reviewer.
In the provided example, input documents are specimen credit card agreements per this dataset published by the US Consumer Finance Protection Bureau (CFPB).
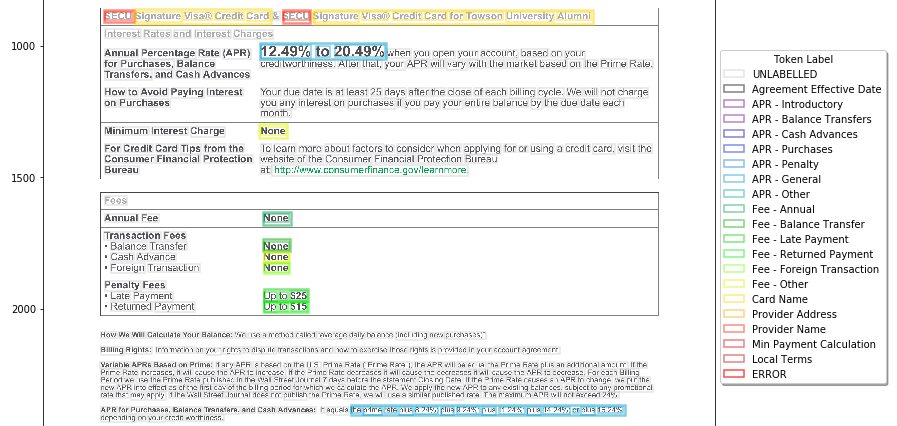
We define a diverse set of "fields" of interest: from short entity-like fields (such as provider name, credit card name, and effective date), to longer and more flexible concepts (like "minimum payment calculation method" and "terms applicable to local areas only").
Bounding box ananotations are collected to train a SageMaker ML model to classify the words detected by Amazon Textract between these field types - using both the content of the text and the location/size of each word as inputs:
From this enriched JSON, the post-processing Lambda can apply simple rule-based logic to extract and validate the fields of interest.
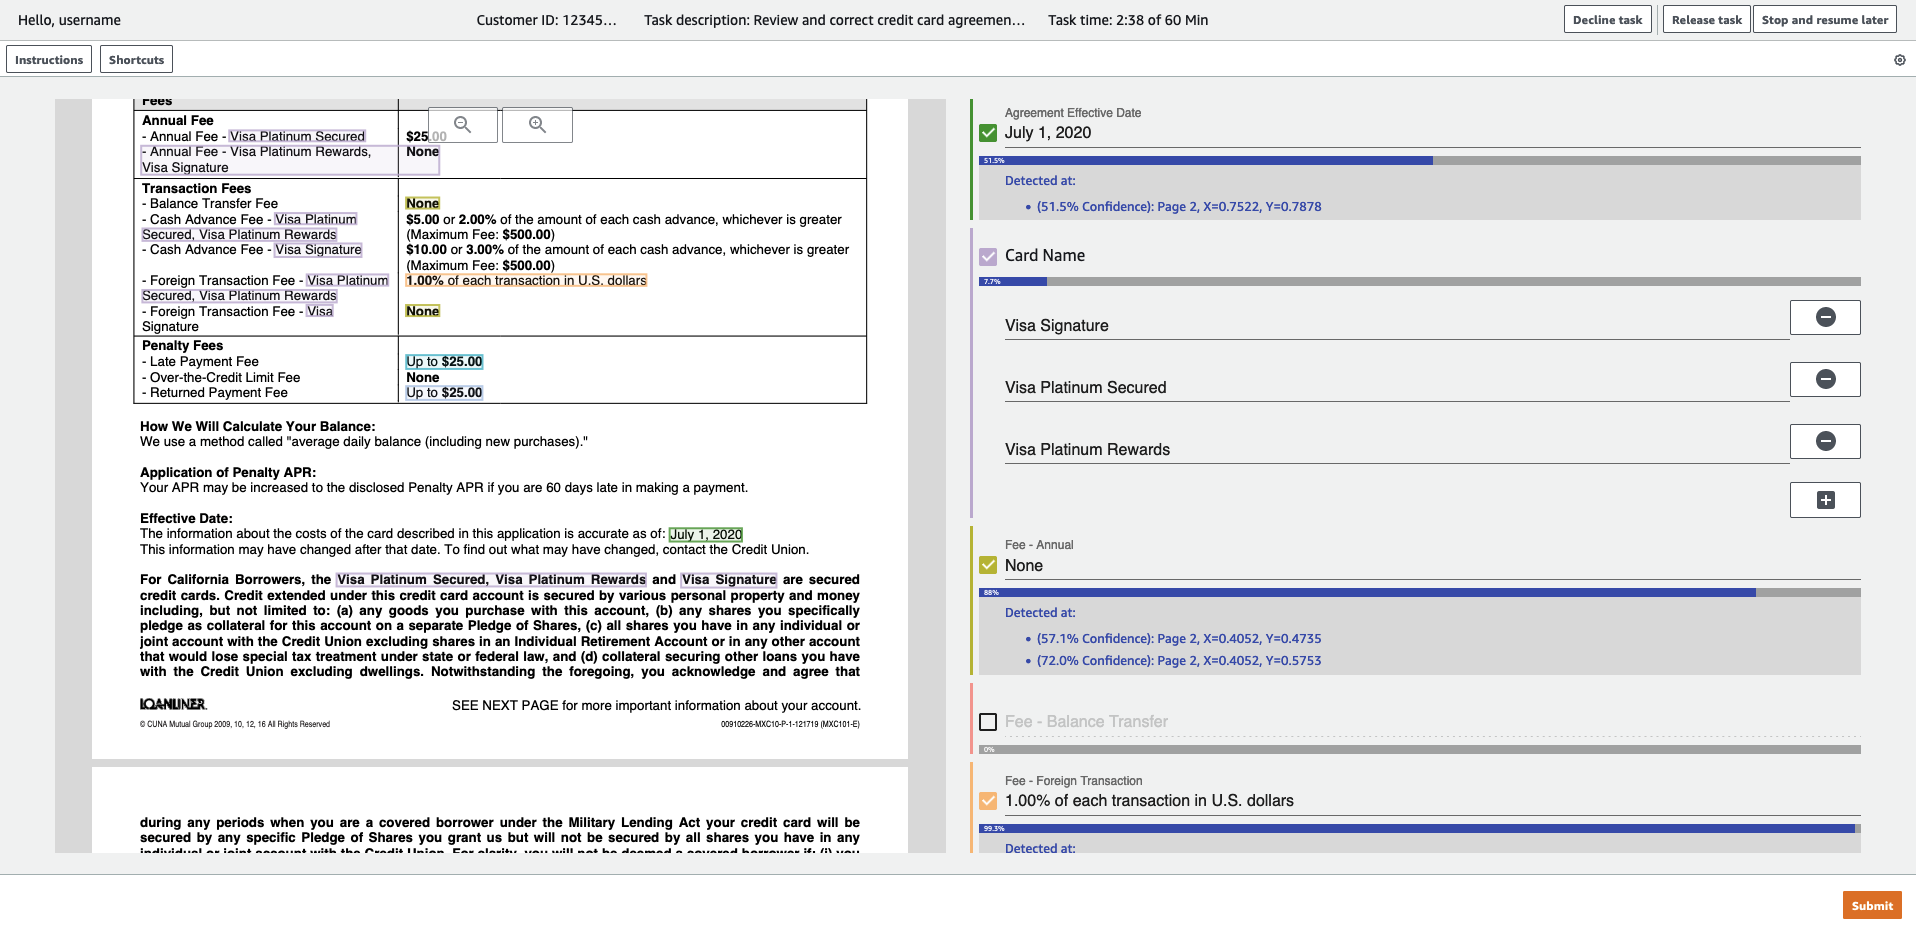
For any documents where required fields could not be detected confidently, the output is forwarded to human review using Amazon Augmented AI (A2I) with a customized task template UI:
By orchestrating the process through AWS Step Functions (rather than point-to-point integrations between each stage for example), we gain the benefits that the overall flow can be graphically visualized and individual stages can be more easily customized. A wide range of integration options are available for adding new stages and storing results (or triggering further workflows) from the output:
To deploy this sample you'll need access to your target AWS Account with sufficient permissions to deploy the various resources created by the solution (which includes IAM resources).
Skipping local setup
Steps 0-3 below are for locally building and deploying the CDK solution and require setting up some developer-oriented tools. If you can't do this or prefer not to, you can deploy the following "bootstrap" CloudFormation stack and skip to step 4:

⚠️ Note before using this option:
- This bootstrap stack grants broad IAM permissions to the created AWS CodeBuild project role for deploying the sample - so it's not recommended for use in production environments.
- If using the 'Launch Stack' button above, remember to check it opens the Console in the correct AWS Region you want to deploy in and switch regions if necessary.
- If CDK deployment itself takes longer than 60 minutes for some reason (e.g. customization, alternative configuration), the bootstrap stack will time out and fail. We think this shouldn't happen in normal usage, but if you see it: Remove the
CodeBuildCallbacksetting in your own copy of .infrastructure/attp-bootstrap.cfn.yaml, and please let us know in the GitHub issues!
The bootstrap stack pretty much runs the following steps 0-3 for you in an AWS CodeBuild environment, instead of locally on your computer:
Step 0: Local build prerequisites
To build and deploy this solution, you'll first need:
- The AWS CDK (v2), which depends on NodeJS.
- Python v3.8+
- Docker installed and running (which is used for bundling Python Lambda functions).
- You can see the discussion here on using podman as an alternative with CDK if Docker Desktop licensing is not available for you.
- (Optional but recommended) consider using Poetry rather than Python's built-in
pip.
CDK Lambda Function bundling uses container images hosted on Amazon ECR Public, so you'll likely need to authenticate to pull these. For example:
# (Always us-east-1 here, regardless of your target region)
aws ecr-public get-login-password --region us-east-1 | docker login --username AWS --password-stdin public.ecr.aws
You'll also need to bootstrap your AWS environment for CDK with the modern template if you haven't already. For example:
# Assuming your AWS CLI Account and AWS_REGION / AWS_DEFAULT_REGION are set:
export CDK_NEW_BOOTSTRAP=1
cdk bootstrap
🚀 To try the solution out with your own documents and entity types: Review the standard steps below first, but find further guidance in CUSTOMIZATION_GUIDE.md.
Step 1: Set up and activate the project's virtual environment
If you're using Poetry, you should be able to simply run (from this folder):
poetry shellOtherwise, you can instead run:
# (Create the virtual environment)
python3 -m venv .venv
# (Activate the virtual environment)
source .venv/bin/activate
Depending on your setup, your Python v3 installation may simply be called python instead of python3. If you're on Windows, you can instead try to activate by running .venv\Scripts\activate.bat.
Step 2: Install project dependencies
Once the virtual environment is active, install the required dependencies by running:
# For Poetry:
poetry install --no-root
# ...OR, without Poetry:
pip install -e .[dev]
Step 3: Deploy the solution stacks with CDK
To deploy (or update, if already deployed) all stacks in the solution to your default AWS Region, with default configuration, run:
cdk deploy --all
# To skip approval prompts, you can optionally add: --require-approval never
Some aspects of the solution can also be configured by setting environment variables before running cdk deploy. See cdk_app.py and the Customization Guide for details, but the defaults are a good starting point.
Note that some AWS Regions may not support all services required to run the solution, but it has been tested successfully in at least
ap-southeast-1(Singapore),us-east-1(N. Virginia), andus-east-2(Ohio).
You'll be able to see the deployed stacks in the AWS CloudFormation Console.
Step 4: Set up your notebook environment in Amazon SageMaker
The solution stack does not automatically spin up a SageMaker notebook environment because A) there are multiple options and B) users may have an existing one already.
If you're able, we recommend following the instructions to onboard to SageMaker Studio for a more fully-featured user experience and easier setup.
If this is not possible, you can instead choose to create a classic SageMaker Notebook Instance. If using a classic notebook instance:
- Instance type
ml.t3.mediumand volume size30GBshould be sufficient to run through the sample - This repository uses interactive notebook widgets, so you'll need to install extension
@jupyter-widgets/jupyterlab-managereither through the extensions manager UI (Settings > Enable Extension Manager) or by attaching a lifecycle configuration script customizing the install-lab-extension template to to reference this particular extension.
Whichever environment type you use, the execution role attached to your Notebook Instance or Studio User Profile will need some additional permissions beyond basic SageMaker access:
- Find your deployed OCR pipeline stack in the AWS CloudFormation Console and look up the
DataSciencePolicyNamefrom the Outputs tab. - Next, find your studio user's or notebook instance's SageMaker execution role in the AWS IAM Roles Console
- Click the Attach policies button to attach the stack's created data science policy to your SageMaker role.
⚠️ Warning: The managedAmazonSageMakerFullAccesspolicy that some SageMaker on-boarding guides suggest to use grants a broad set of permissions. This can be useful for initial experimentation, but you should consider scoping down access further for shared or production environments.In addition to the
DataSciencePolicycreated by the stack, this sample assumes that your SageMaker execution role has permissions to:
- Access the internet (to install some additional packages)
- Read and write the SageMaker default S3 bucket
- Train, and deploy models (and optionally perform automatic hyperparameter tuning) on GPU-accelerated instance types - and invoke the deployed endpoint to test the model
- Create SageMaker Ground Truth labeling jobs
- Create task templates and workflow definitions in Amazon A2I
To learn more about security with SageMaker, and get started implementing additional controls on your environment, you can refer to the Security section of the SageMaker Developer Guide - as well as this AWS ML Blog Post and associated workshops.
Once your environment is set up, you can:
- Open JupyterLab
- For SageMaker Studio, click "Open Studio" and then create a JypyterLab Space. Check your space has at least 30GB storage configured (update the space if needed), and then run it.
- For a Notebook Instance, click 'Open JupyterLab' for the relevant NBI from the SageMaker console.
- Open a system terminal window in JupyterLab
- (If you're on a new SageMaker Notebook Instance, move to the Jupyter root folder with
cd ~/SageMaker) - Clone in this repository with:
git clone https://github.com/aws-samples/amazon-textract-transformer-pipelineStep 5: Follow through the setup notebooks
The Python notebooks in the notebooks/ folder will guide you through the remaining activities to annotate data, train the post-processing model, and configure and test the solution stack. Open each of the .ipynb files in numbered order to follow along.
Amazon Textract is a service that automatically extracts text, handwriting, and some structured data from scanned documents: Going beyond simple optical character recognition (OCR) to identify and extract data from tables (with rows and cells), and forms (as key-value pairs).
Many document understanding tasks can already be tackled with Amazon Textract and the Amazon Comprehend AI service for natural language processing. For example:
- With the Forms and Tables APIs, Amazon Textract can extract key-value pairs and data tables from documents with no training required.
- With Amazon Textract Queries, users can ask simple natural-language questions to guide extraction of specific data points from a page.
- With Amazon Comprehend native document NER, users can train layout-aware models to extract entities from documents.
- Amazon Textract provides purpose-built APIs for some common document types like invoices and receipts and driving licenses and passports.
This sample demonstrates layout-aware entity recognition, similar to Amazon Comprehend trained with PDF document annotations. In general, users should consider fully-managed AI service options before selecting a more custom SageMaker-based solution like the one shown here. However, this sample may be interesting to users who want:
- To process documents in languages not currently supported by Comprehend PDF/document entity recognition - or Amazon Textract Queries.
- To customize the modelling tasks - for example for joint entity recognition + document classification, or question answering, or sequence-to-sequence generation.
- To integrate new model architectures from research and open source.
- To use the end-to-end pipeline already set up here for model training, deployment, and human review.
For this demo we selected the credit card agreement corpus as a good example of a challenging dataset with lots of variability between documents, and realistic commercial document formatting and tone (as opposed to, for example, academic papers).
We also demonstrated detection of field/entity types with quite different characteristics: From short values like annual fee amounts or dates, to full sentences/paragraphs.
The approach should work well for many different document types, and the solution is designed with customization of the field list in mind.
However, there are many more opportunities to extend the approach. For example:
- Rather than token/word classification, alternative 'sequence-to-sequence' ML tasks could be applied: Perhaps to fix common OCR error patterns, or to build general question-answering models on documents. Training seq2seq models is discussed further in the Optional Extras notebook.
- Just as the BERT-based model was extended to consider coordinates as input, perhaps source OCR confidence scores (also available from Textract) would be useful model inputs.
- The post-processing Lambda function could be extended to perform more complex validations on detected fields: For example to extract numerics, enforce regular expression matching, or even call some additional AI service such as Amazon Comprehend.
See CONTRIBUTING for more information.
This library is licensed under the MIT-0 License. See the LICENSE file. Included annotation datasets are licensed under the Creative Commons Attribution 4.0 International License. See the notebooks/data/annotations/LICENSE file.


