For licensing information refer to LICENSE file
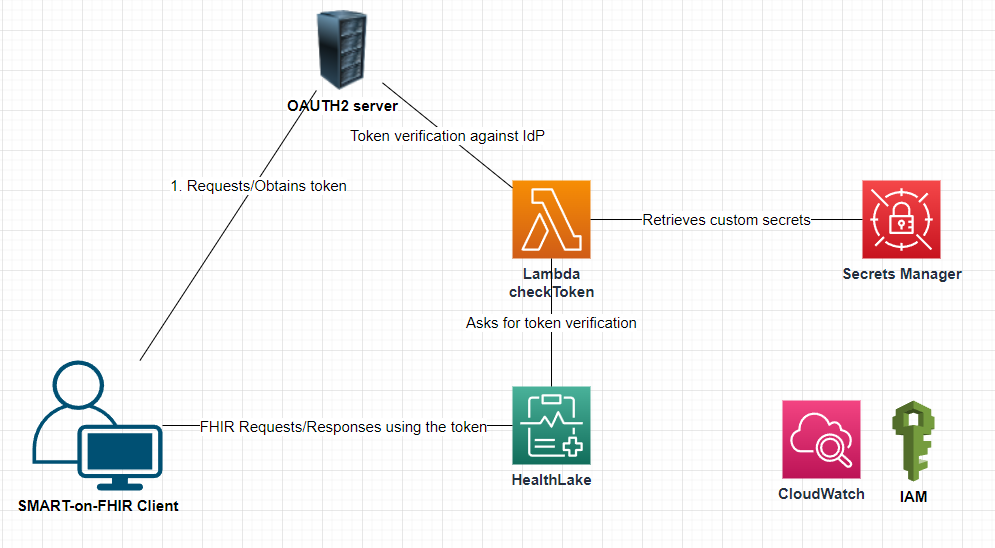
This package deploys on AWS an SMART-on-FHIR (SoF) enabled HealthLake (HL) datastore and the related infrastructure:
- the SoF-enabled datastore
- the Lambda function called by the HealthLake datastore
- the IAM roles and permissions necessary for HL, Lambda
- the Secrets Manager secret which stores the confidential information (such as client_id, client_secret, api_secret, logging level etc.)
You may use the IdP OAuth2 provider of your choice for this software. This software was tested and can work with an IdP OAuth2 provider, such as ORY OAuth2 service.
CHECK the documentation for more information about deploying a SMART-on-FHIR HealthLake datastore
Clone the repository to your local computer:
git clone https://github.com/aws-samples/aws-healthlake-smart-on-fhir.git
cd aws-healthlake-smart-on-fhir
Install the dependencies:
npm install
cd lambda
npm install
Open the cdk.context.json file and update the fields.
account - your AWS account number
region - the region in which these resources will be deployed
tagName & tagValue - the name and the value that each resource will be tagged with
prefix - the prefix to be added to each resource in the stacks
datastoreName - the name of the HealthLake datastore to be created
preloadData - determines whetehr the Healtlake datastore will be empty or pre-populated with data. If true the preloadDataType parameter must be set
preloadDataType - the type of data that will prepopulate the Healthlake datastore (surrently only SYNTHEA is supported)
clientId - the client ID used to authenticate against the OAUTH2 server
clientSecret - the client secret used to authenticate against the OAUTH2 server
authEndPoint - the base url for the OAUTH2 server
authEndpointToken - the url for requesting a token from the OAUTH2 server
authEndpointIntrospect - the url for introspecting a token with the OAUTH2 server
srvAPIKey - the API Key required by the third party - in case of using an OAuth2 service that requires such API key
lambdaConcurentExecutions - the number of concurent execution for the lambda function called by HealthLake to verify tokens
lambdaEnhancedLogging - boolean. If this is set to true, the lambda function will create more entries in the CloudWatch logs, AND WILL LOG THE SECRET VALUE OF THE IDP. However, no PHI/PII will be logged. After deployment, the value can be changed (true/false) in AWS Secret Manager console*.
Also, in the cdk.json file remove or adjust the value of profile and requireApproval attributes
To deploy the resources in AWS simply issue the command:
cdk synth --all
cdk deploy --all
To remove all the resources created in the previous section, navigate to the repository folder in a command/console window on your computer and issue:
cdk destroy --all
[!WARNING] This will remove the datastore, all the data stored in it and the adjacent resources. This operation will cause irreversible data loss!
HealthLake will invoke the checkToken Lambda function automatically, for every API call received.
However, for testing or validation purposes the Lambada function(s) can be run manually too, following the instructions below:
- In the AWS console open the Lambda console and navigate to the *prefix-*checkToken function
- go to Test tab and create an event with the following structure:
{
    "datastoreEndpoint": "https://healthlake.us-east-1.amazonaws.com/datastore/<datastore-id>/r4/",
    "bearerToken": "<oauth2-token>",
    "operationName": "SearchWithGet"
}
where datastore-id is the datastoreID of the deployed HealthLake datastore, and the oauth2-token is the token to be verified
- Give the event a name, Save it and then click Test
- in the Log Output section you should see the answer from the OAuth2 Server/service
-
What if the response is "Timeout during custom Idp execution."
The Lambda function returned the token verification response back to the HealthLake datastore in more than 1 second (1000 ms) from receiving of the request (or never returned it). This is common when the Lambda function has a cold start. Make sure that the lambda function is inquired periodically, or increase the computational capacity and/or lambda's lambdaConcurrentExecutions parameter to minimize the total lambda function execution time. -
How can I monitor the execution flow of the lambda function?
Set the "lambdaEnhancedLogging" parameter to "true" (including the quotes) for enhanced logging and verify the log entries in AWS CloudWatch --> Log Groups console. After deployment you can change the value back to "false" in AWS Secret Manager console. WARNING!!! Turning the enhanced logging on wil cause the secret and other sensitive information to be recorded in the CloudWatch logs. -
How can I monitor HealthLake activity? The API calls and metrics are recorded in CloudWatch. Please see details in this article.
-
How can I protect my data in the HealthLake datastore?
Do not run cdk command with destroy parameter. See also this article -
What is the format of the response HealthLake expects from the Lambda function? A successful response accepted by HealthLake from the Lambda function has the following format. See more details here.
{
    "authPayload": {
        "iss": "https://main-oauth2-server-link.com/oauth2/token",
        "aud": "datastore-endpoint-uri",
        "iat": 1700584500,
        "nbf": 1700584500,
        "exp": 1700588100,
        "isAuthorized": true,
        "scope": "system/*.*"
    },
    "iamRoleARN": "arn:aws:iam::123456789012:role/sof-hl-Role-for-HealthLake"
}
* NOTE: by default the Secret Manager's permissions only allow access to the Lambda function. In order to change the value of lambdaEnhancedLogging parameter, you need to change the resource permissions of the secret as follows:
- Log into the AWS console with a user account with modifying permissions rights
- Navigate to Secrets Manager -> SOF-HL
- Scroll to Resource permissions section and click Edit permissions
- In the Statement [] array, add another object of the following structure.
{
    "Sid" : "AdminAccessAllowModification",
    "Effect" : "Allow",
    "Principal" : {
      "AWS" : "arn:aws:iam::AWS_ACCOUNT:user/CURRENT_USER"
    },
    "Action" : "secretsmanager:*",
    "Resource" : "SECRET_ARN"
}- Replace AWS_ACCOUNT with your account number, CURRENT_USER with the ARN of the user you are logged in and SECRET_ARN with the ARN of the SOF-HL secret found in the Secret details section.
- In the Condition section of the SOFSecretManagerDeny add your userId so the condition statement will look similar to this:
"Condition" : {
      "StringNotLike" : {
        "aws:userId" : ["AROA4XXXXXXXXXXXXXXXX:*", "AROA4XXXXXXXXXXXXXXXX:*"]
      }
}- Click Save
- Now you should be able to modify the lambdaEnhancedLogging parameter to true/false value
