This repository holds a sample code for a PySpark - based Machine Learning model workflow. From the initial read of the raw data to creating predictions using a trained model. The architecture is based on Amazon EMR clusters and leverages CloudFormation Template to spinoff.
Ensuring the security and reliability of your solution is our top priority. As such, we have designed our solution to be compatible with various security configurations, enabling you to apply measures that best suit your organization’s specific requirements. To strengthen the security of your solution, we recommend adhering to the best practices for Amazon EMR, which you can find in the following guide here. This will assist you in creating a resilient and secure infrastructure for data processing and analytics.
Our solution utilizes Amazon S3 for data storage, offering high scalability, availability, and performance. To bolster the security of your data buckets in Amazon S3, we advise following the best practices outlined in this comprehensive guide here. Implementing these measures will ensure the secure storage and handling of your data.
Moreover, we understand the importance of preparedness against unforeseen circumstances. In light of this, we recommend considering a disaster recovery solution to safeguard your data and ensure continuity of your operations. Guidance for creating an effective disaster recovery solution can be found in this detailed resource here.
Before you get started, make sure you have the following prerequisites:
-
Active AWS account
-
Familiarity with Python, and basic understanding of PySpark
-
IAM Role to be used for the EMR Instance with permissions to read and write to S3( see more details here. Basic understanding of Amazon EMR service
-
S3 bucket inside your AWS account with downloaded datasets
-
Amazon VPC and a subnet available with user tag:
for-use-with-amazon-emr-managed-policies = true(see more info on it here)
The solution will require an S3 bucket with datasets and an S3 bucket for the code inputs/outputs (can be the same bucket). If you want to know how to create an S3 bucket in a secure way head over to AWS documentation on security best practices for Amazon S3.
Before running the steps automatically with the use of Cloud Formation Template it is worth to walk through the manual process in order to understand the details. We start with going to the EMR console and creating new cluster:
In order to configure the cluster we do the following:
- select Spark from Application bundle
- For test data we need a primary and only 1 core instance, it is worth to use Spot instances for cost saving if you are running development workloads. In our testing we used m4.xlarge instances, but this choice depends on the size of your data.
- For Networking choose the VPC and subnet you have for this task
- Security configurations are standard, default Service and IAM roles were used
- Cluster logs - it is worth to keep the logs, simply check the “Publish cluster-specific logs to Amazon S3” box in Cluster Logs section
- Bootstrap Actions - in order to install the prerequisites provide S3 location where the bootstrap.sh file is stored.
Next, when creating EMR cluster we need to specify the steps we want it to perform. In our case we have 4 steps:
- Data preprocessing
- Feature engineering for training
- Feature engineering for validation
- Model training
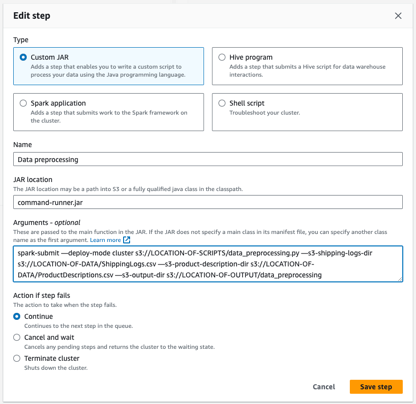
These steps are sequential, meaning that you cannot do next step without finishing the previous one and order matters. For this we cannot leverage the EMR parallelisation of steps, all the steps must be completed in order. All the steps are configured by selecting the Type, providing Name, JAR location, Arguments and Action if step fails. For all the steps in our case the Type is Customised JAR, JAR location is command-runner.jar, Action if step fails is Terminate Cluster. The steps differ in Name and Arguments.
For this step the following Arguments are provided:
spark-submit —deploy-mode cluster s3://LOCATION-OF-SCRIPTS/data_preprocessing.py —s3-shipping-logs-dir s3://LOCATION-OF-DATA/ShippingLogs.csv —s3-product-description-dir s3://LOCATION-OF-DATA/ProductDescriptions.csv —s3-output-dir s3://LOCATION-OF-OUTPUT/data_preprocessing
In order to run the step the locations have to be modified.
After completion of data preprocessing we can run the feature engineering. For the training arguments are as follows:
spark-submit —deploy-mode cluster s3://LOCATION-OF-SCRIPTS/feature_engineering.py —s3-dataframe-dir 3://LOCATION-OF-OUTPUT/data_preprocessing/training —s3-output-dir s3://LOCATION-OF-OUTPUT/feature_engineering/training
Same script can be run on validation dataset with the following arguments:
spark-submit —deploy-mode cluster s3://LOCATION-OF-SCRIPTS/feature_engineering.py —s3-dataframe-dir s3://LOCATION-OF-OUTPUT/data_preprocessing/validation —s3-output-dir s3://LOCATION-OF-OUTPUT/feature_engineering/validation —s3-pipeline-model-dir s3://LOCATION-OF-OUTPUT/feature_engineering/training/pipeline_model
For validation step we are also saving the pipeline model in order to be able to reuse it with new data and have consistency.
Last step conducted is model training. The arguments are as follows:
spark-submit —deploy-mode cluster s3://LOCATION-OF-SCRIPTS/model_training.py —s3-training-dataset-dir s3://LOCATION-OF-OUTPUT/feature_engineering/training/dataframe —s3-validation-dataset-dir s3://LOCATION-OF-OUTPUT/feature_engineering/validation/dataframe —s3-output-dir s3://LOCATION-OF-OUTPUT/model_training —model-type gbt —model-params "{'maxIter': 32}"
After creating all 4 steps and configuring all the other parameters as mentioned above hit the Create cluster button and the EMR Cluster will be created. For our testing the 4 steps took about 15 minutes to complete. After the cluster completed all the tasks you can check if the provided S3 location has been populated with the outputs from the steps.
Once you ar familiar with how the steps work in an EMR Cluster you might want to speed up the spin-on process by leveraging a CloudFormation Template. In order to use it head over to CloudFormation console and create new stack (with new resources). In the first panel select Template is ready and provide either S3 location or upload the template. (see screenshot below).
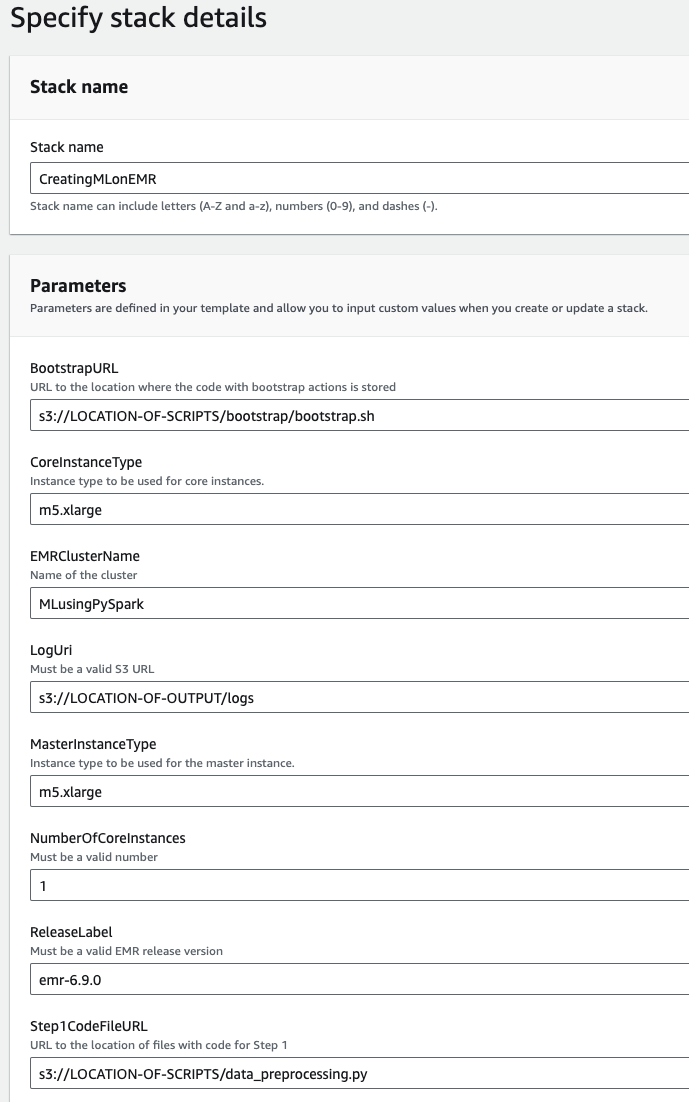
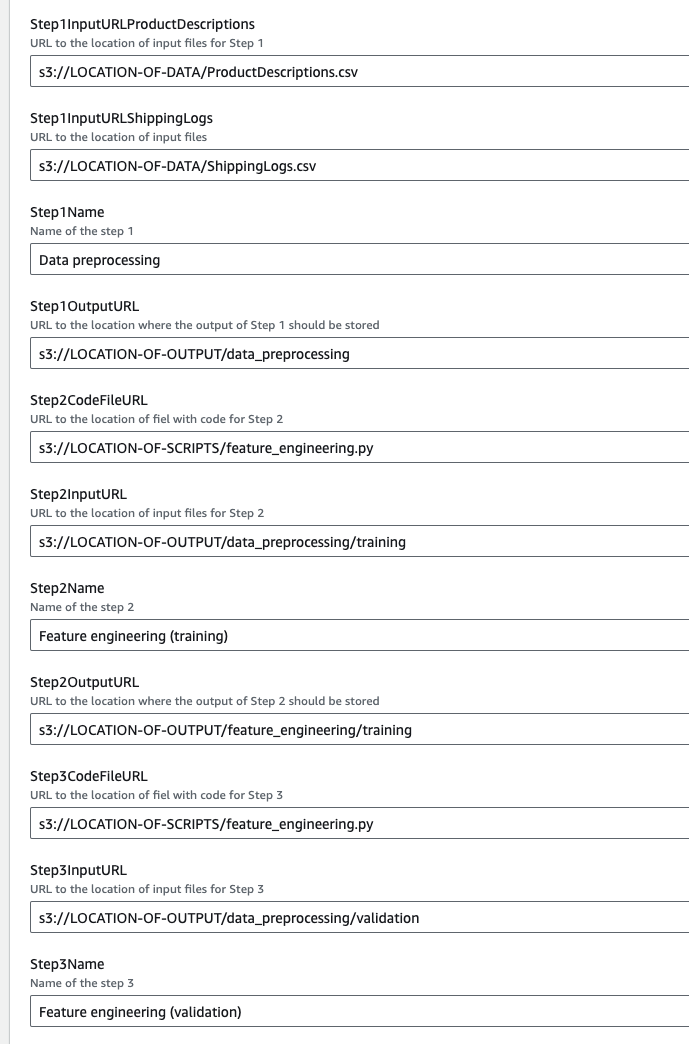
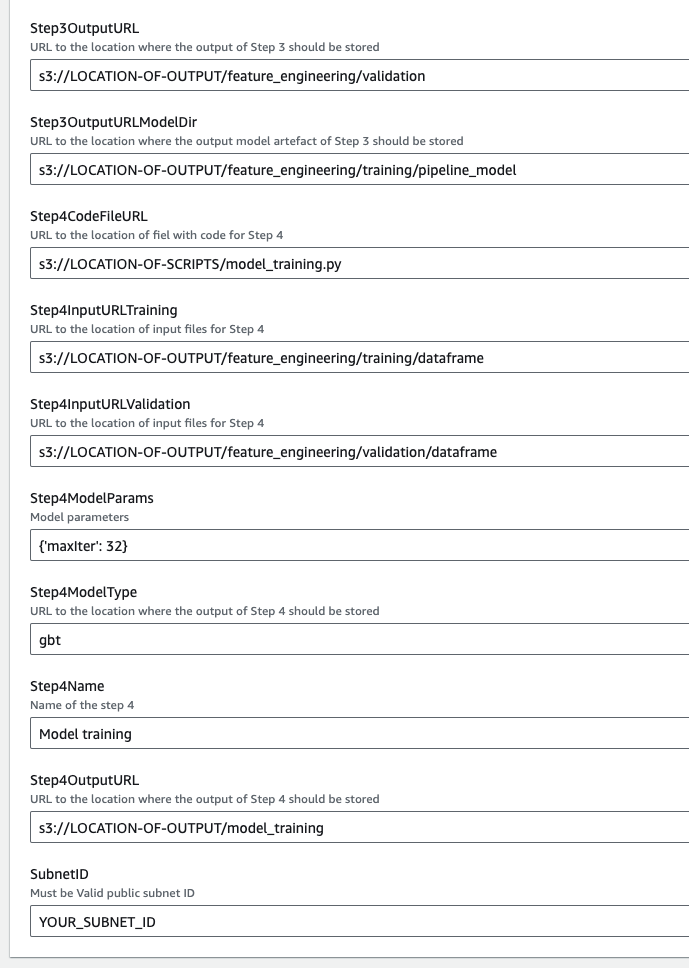
Hit Next and you will open the template where you have to fill the fields with corresponding S3 locations. The data you have to provide is the same as with manual process but here it is more user-friendly and easy. Below is the full body of the template with sample entries.
After filling all the fields select Next. In the Configure stack options step you can create Tags, Stack Policies etc. In our case we leave them as default. Hit Next, review the provided inputs and if everything looks correct select Submit. This will start the creation of your stack. You can follow the progress of stack creation in the CloudFormation console. Once the stack will be created it’s status will change to CREATE_COMPLETE. As with the manual process you can check if the steps run properly by analysing the outputs in S3 location specified.
In order to make this cluster part of your Infrastructure as Code (IaC) Templates a CDK (Cloud Development Kit) implementation of the cluster has been prepared to be used. You can find the code under cdk_mlops directory. In order to use it, you have to provide the S3 locations and subnet ID in the cdk_mlops/cdk_mlops_stack.py script. Once you edit your inputs, you can simply run cdk deploy command and the infrastructure will be provisioned. If you have not worked with CDK before you can find step by step explanation here.


