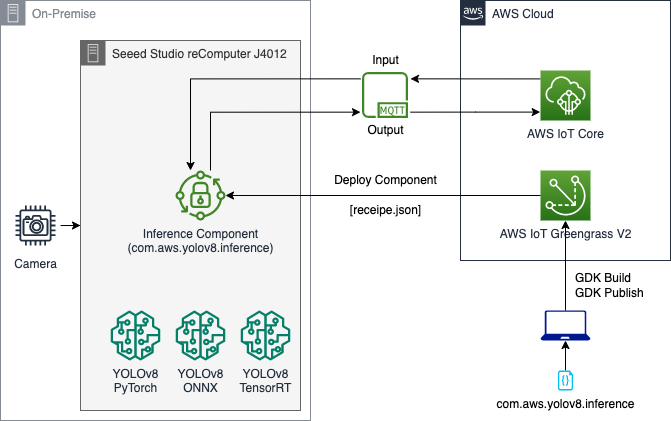
This aim of this project is to deploy a YOLOv8* PyTorch/ONNX/TensorRT model on an Edge device (NVIDIA Orin or NVIDIA Jetson) and test it. The project utilizes AWS IoT Greengrass V2 to deploy the inference component. It utiliizes MQTT message to start/pause/stop inference and also to generate output and push it to AWS Cloud.
(*) NOTE: YOLOv8 is distributed under the GPLv3 license.
For YOLOv8 TensorFlow deployment on SageMaker Endpoint, kindly refer to the GitHub and the Blog on YOLOv8 on SageMaker Endpoint
For YOLOv5 TensorFlow deployment on SageMaker Endpoint, kindly refer to the GitHub and the Blog on YOLOv5 on SageMaker Endpoint
- Use the script
install_dependencies.shscript on the Edge device to install the right dependencies. - Curently Seeed Studio reComputer J4012 comes with JetPack 5.1 and uses CUDA 11.4.
$ chmod u+x install_dependencies.sh
$ ./install_dependencies.sh
- Use the Blog to provision an edge device like NVIDIA Jetson with IoT Greengrass V2.
- Alternatively, you can use the following script and run in the Edge Device:
[On Edge Device] $ git clone https://github.com/aws-samples/deploy-yolov8-on-edge-using-aws-iot-greengrass $ cd deploy-yolov8-on-edge-using-aws-iot-greengrass/utils/ $ chmod u+x provisioning.sh $ ./provisioning.sh- The
provisioning.shscript only works for Ubuntu based system. - It would prompt for AWS Credentials which can be bypassed if already configured by clicking Enter.
- It would prompt for providing name of
IoT Thing&IoT Thing Groupand if not entered, would take default values. - Once completed, the
IoT Thingand itsIoT Thing Groupwould be available on the AWS Console.
- The
- Download YOLOv8 models on the Edge Device. Convert the models to ONNX and TensorRT if required:
- There is a suite of models to select from:
- Detection (yolov8n.pt, yolov8m.pt, yolov8l.pt, yolov8s.pt, yolov8x.pt)
- Segmentation (yolov8n-seg.pt, yolov8m-seg.pt, yolov8l-seg.pt, yolov8s-seg.pt, yolov8x-seg.pt)
- Classification (yolov8n-cls.pt, yolov8m-cls.pt, yolov8l-cls.pt, yolov8s-cls.pt, yolov8x-cls.pt)
- Download the PyTorch models as follows and also convert into ONNX:
[On Edge Device] $ pip3 install ultralytics $ echo 'export PATH="/home/$USER/.local/bin:$PATH"' >> ~/.bashrc $ source ~/.bashrc $ cd {edge/device/path/to/models} [FOR PYTORCH MODELS] $ MODEL_HEIGHT=480 $ MODEL_WIDTH=640 $ yolo export model=[yolov8n.pt OR yolov8n-seg.pt OR yolov8n-cls.pt] imgsz=$MODEL_HEIGHT,$MODEL_WIDTH [FOR ONNX MODELS] $ MODEL_HEIGHT=480 $ MODEL_WIDTH=640 $ yolo export model=[yolov8n.pt OR yolov8n-seg.pt OR yolov8n-cls.pt] format=onnx imgsz=$MODEL_HEIGHT,$MODEL_WIDTH - In order to run TensorRT models, it is advisable to convert the ONNX models to TensorRT models using the following methods directly on the Edge Device:
[On NVIDIA based Edge Device]
$ apt-get install tensorrt
$ echo 'export LD_LIBRARY_PATH=$LD_LIBRARY_PATH:/usr/local/cuda/targets/aarch64-linux/lib' >> ~/.bashrc
$ echo 'alias trtexec="/usr/src/tensorrt/bin/trtexec"' >> ~/.bashrc
$ source ~/.bashrc
$ trtexec --onnx={absolute/path/edge/device/path/to/models}/yolov8n.onnx --saveEngine={absolute/path/edge/device/path/to/models}/yolov8n.trt
- There is a suite of models to select from:
(2.1) How to build/publish/deploy component on the Edge Device from a Personal Laptop or EC2 Instance?
- Get started with cloning the repository on a Personal Laptop / EC2 Instance which is Configured to AWS as follows:
[On Personal Laptop / EC2 Instance - Configured to AWS] $ git clone https://github.com/aws-samples/deploy-yolov8-on-edge-using-aws-iot-greengrass - Export the following variables in the Personal Laptop / EC2 Instance terminal:
[On Personal Laptop / EC2 Instance - Configured to AWS] $ export AWS_ACCOUNT_NUM="ADD_ACCOUNT_NUMBER" $ export AWS_REGION="ADD_REGION" $ export DEV_IOT_THING="NAME_OF_OF_THING" $ export DEV_IOT_THING_GROUP="NAME_OF_IOT_THING_GROUP" - Edit the right model location and the camera/local_video to be used in the
components/com.aws.yolov8.inference/recipe.jsonas follows:"Configuration": { "event_topic": "inference/input", "output_topic": "inference/output", "camera_id": "0", OR "samples/video.mp4", "model_loc": "{absolute/path/edge/device/path/to/models}/yolov8n.trt" OR "{absolute/path/edge/device/path/to/models}/yolov8n.onnx" OR "{absolute/path/edge/device/path/to/models}/yolov8n.pt" } - Install GDK for Greengrass Development:
[On Personal Laptop / EC2 Instance - Configured to AWS] $ python3 -m pip install -U git+https://github.com/aws-greengrass/aws-greengrass-gdk-cli.git@v1.2.0 [Install jq for Linux] $ apt-get install jq [Install jq for Linux] $ brew install jq - Build/Publish/Deploy the component as follows:
[On Personal Laptop / EC2 Instance - Configured to AWS] $ cd utils/ $ chmod u+x deploy-gdk-build.sh $ ./deploy-gdk-build.sh - After a few seconds, the component will be published to the AWS Account and will be deployed in the designated Edge device.
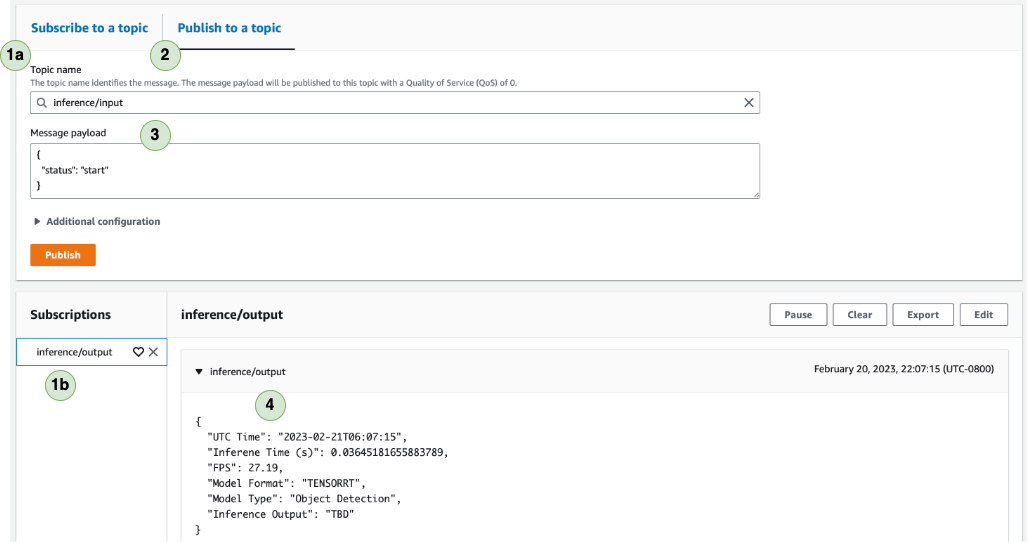
- From AWS Console, go to AWS IoT Core and select MQTT test client.
a. Subscribe to the topic
inference/output. b. The subscribed topic should be shown in the active subscriptions. - Select Publish to a topic and select
inference/input. - Select
start,pauseorstopfor starting/pausing/stopping inference. - Once the inference starts, you can see the output returning to the console.
(2.3) YOLOv8 Comparison on various NVIDIA Edge Devices (Pre-Processing + Inference + Post-Processing):
------------------------------------------------------------------------------
|    Model    |      NVIDIA      |     YOLOv8n (ms)    |   YOLOv8n-seg (ms)  |
|    Input    |       Edge       |---------|-----------|---------|-----------|
|   [H x W]   |      Device      | PyTorch |  TensorRT | PyTorch |  TensorRT |
|-------------|------------------|---------|-----------|---------|-----------|
| [640 x 640] |      Seeed       |  27.54  |   25.65   |  32.05  |   29.25   |
| [480 x 640] |      Studio      |  23.16  |   19.86   |  24.65  |   23.07   |
| [320 x 320] | reComputer J4012 |  29.77  |    8.68   |  34.28  |   10.83   |
| [224 x 224] |  Orin NX 16 GB   |  29.45  |    5.73   |  31.73  |    7.43   |
------------------------------------------------------------------------------
- Use the
utils/cleanup_gg.pyto clean the Greengrass Components and Deployment. - Export the following variables in the Personal Laptop / EC2 Instance terminal:
[On Personal Laptop / EC2 Instance - Configured to AWS] $ export AWS_ACCOUNT_NUM="ADD_ACCOUNT_NUMBER" $ export AWS_REGION="ADD_REGION" $ export DEV_IOT_THING="NAME_OF_OF_THING" $ export DEV_IOT_THING_GROUP="NAME_OF_IOT_THING_GROUP" - Run the code as follows to cleanup:
[On Personal Laptop / EC2 Instance - Configured to AWS]
$ cd utils/
$ python3 cleanup_gg.py

