This sample shows you how to deploy IoT Simulator with two CDK stacks;
IoTFaultInjectionSimulatorStack- Control network traffic on your IoT application, to simulate real-world environment where network quality may vary.
- Able to monitor how your IoT application, IoT Core and attached backend services react to different network conditions.
IoTLoadTestingSimulatorStack- Load testing tool that simulates hundreds to millions of IoT devices.
- Able to monitor how IoT Core scales out, MQTT ingestion latency or throttling scenarios.
This sample uses Locust, a modern load testing framework, installed on Amazon Elastic Container Service (ECS) of which workers are configured to send MQTT topic to configured AWS IoT Core endpoint.
It leverages a serverless compute engine Fargate with spot
capacity in IoTLoadTestingSimulatorStack stack or Amazon ECS Linux container instance
if configured IoTFaultInjectionSimulatorStack.
To deploy this sample to your own AWS account, please follow the steps below.
Before you deploy, make sure you install the following tools in your local environment.
- Docker
- Node.js (v14 or newer)
- AWS CLI
Also you need Administrator IAM policy to deploy this sample.
After confirming the parameters, you can proceed to CDK deployment.
First, you need to setup CDK environment by the following command:
npm ci
npx cdk bootstrap
You only need those commands once for your AWS environment (pair of account ID and region.)
Each stack has different ways in terms of deployment. Please select one of below guides to get them up each!
In this mode, you can simulate Network Traffic environment (packet limit, delay, duplicate, corrupt etc.)
When you open cdkconfig.ts, you may be seeing CDK stack class similar to below code snippet.
new IoTFaultInjectionSimulatorStack(app, 'IoTFaultInjectionSimulatorStack', {
  env: {
    // AWS region to deploy this stack to. (Required for defining ALB access logging)
    region: 'ap-northeast-2',
  },
Starting from this class, you may change parameters in it. Below lists up any parameters to use for each this stack.
region: Specify which AWS region to deploy this stack to.mqttWaitTime: Frequency of publishing MQTT message to IoT CoremqttQos: QoS strategy of MQTT (e.g 0, 1, 2)iotCoreEndpoint: IoT Core endpoint you want to send MQTT message to.iotCoreMqttTopic: IoT Core topic you want to send MQTT message to.iotThingName: IoT Core ThingName you want to use.
Now you can deploy your desired CDK stack project.
npx cdk deploy IoTFaultInjectionSimulatorStackDeployment usually takes less than 10 minutes.
After a successful deployment, you can find some stack outputs like below in your terminal:
✅  IoTFaultInjectionSimulatorStack

✨  Deployment time: 345.05s

Outputs:
IoTFaultInjectionSimulatorStack.EcsClusterArn = arn:aws:ecs:ap-northeast-2:238877058502:cluster/IoTFaultInjectionSimulatorStack-ClusterEB0386A7-qrqkA5UvvmmO
IoTFaultInjectionSimulatorStack.LocustTcMasterServiceLoadBalancerDNS07BFB9C9 = IoTFa-Locus-12SMMWMV2A4R1-1361692780.ap-northeast-2.elb.amazonaws.com
IoTFaultInjectionSimulatorStack.LocustTcMasterServiceServiceURL8DCFF8A9 = http://IoTFa-Locus-12SMMWMV2A4R1-1361692780.ap-northeast-2.elb.amazonaws.com
IoTFaultInjectionSimulatorStack.TrafficControlURL = http://IoTFa-LB8A1-DBVYJ7TJWA8I-1059475595.ap-northeast-2.elb.amazonaws.com:4080
IoTFaultInjectionSimulatorStack.WorkerServiceName = IoTFaultInjectionSimulatorStack-LocustTcWorkerServiceE6DBA4C5-copxuxqVTf6C
Stack ARN:
arn:aws:cloudformation:ap-northeast-2:238877058502:stack/IoTFaultInjectionSimulatorStack/0ce865b0-d800-11ed-8c5e-0a71badfd726

✨  Total time: 350.28s
From now on,
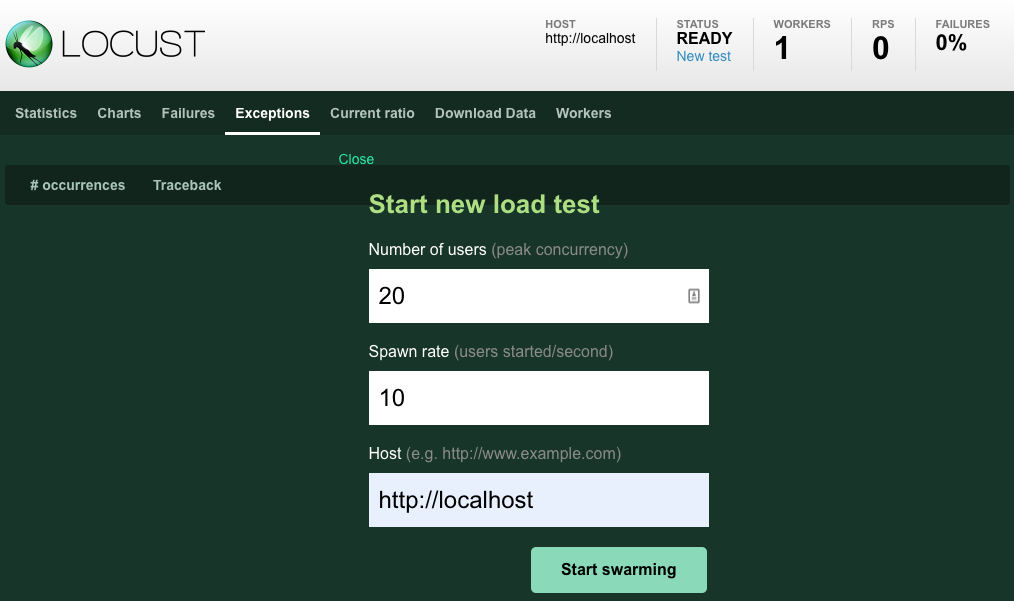
After that, please make sure that you can open the URL in LocustLTMasterServiceServiceURLF6337D0A and view Locust Web GUI like
below image.
In order to dynamically change Network Traffic on worker, we should use tc-controller.py!
Navigate to tc-controller.py, change the BASE_API_URL to the value you found in CDK output, IoTFaultInjectionSimulatorStack.TrafficControlURL.
BASE_API_URL = "<FILL_THIS_PART>" # e.g http://iotfa-lb8a1-15491mhxo6avf-1922776115.ap-northeast-2.elb.amazonaws.com:4080After specifying BASE_API_URL, run the script.
python3.10or higher may have ImportError issue.
virtualenv venv -p $(which python3.8) && source venv/bin/activepip install -r requirements.txtpython3 tc-controller.py
iot-fault-injection-demo.mp4
You can also monitor your IoT client side logs in ECS CloudWatch logs. Navigate to Elastic Container Service, go to woker service similar to IoTFaultInjectionSimulatorStack-LocustTcWorkerServiceXXXXXXXXX, and go to Logs tab. You may detect any malicious code, uncovered network related corner cases in your code if something happens while controlling network traffic.
The stack makes use of docker-tc. Docker
Traffic Control allows to set a rate limit on the container network and can emulate network conditions like delay,
packet loss, duplication, and corrupt for the Docker containers, all that basing only on labels. HTTP API allows to
fetch and pause existing rules and to manually overwrite them, command-line interface is also available.
Followings are the possible options you can apply to Locust worker using tc-controller.py;
Bandwidth Limit- bandwidth or rate limit for the container, accepts a floating point number, followed by a unit, or a percentage value of the device's speed (e.g. 70.5%). Following units are recognized:bit,kbit,mbit,gbit,tbitbps,kbps,mbps,gbps,tbps- to specify in IEC units, replace the SI prefix (k-, m-, g-, t-) with IEC prefix (ki-, mi-, gi- and ti-) respectively
Packet Delay- length of time packets will be delayed, accepts a floating point number followed by an optional unit:s,sec,secsms,msec,msecsus,usec,usecsor a bare number
Packet Loss- percentage loss probability to the packets outgoing from the chosen network interfacePacket Duplicate- percentage value of network packets to be duplicated before queueingPacket corrupt- emulation of random noise introducing an error in a random position for a chosen percent of packets
Now the deployment is completed! You can start to use Locust load tester.
In this stack, you can simulate hundreds of thousands devices and load test to IoT Core Endpoint.
Before deploy, you need to first decide what Stack to deploy to your AWS account. If you decided which stack to deploy, please open cdkconfig.ts and browse to the stack class you want to run.
new IoTLoadTestingSimulatorStack(app, 'IoTLoadTestingSimulatorStack', {
  env: {
    // AWS region to deploy this stack to. (Required for defining ALB access logging)
    region: 'ap-northeast-2',
  },
  ...,
Note that each
IoTLoadTestingSimulatorStackstack has additional parameter,
workerDesiredCount: Please adjust this number depending on the number of devices you want to simulate. If you want to simulate millions of devices, you may have to increase this parameter by >100.
Now you can deploy your desired CDK stack project.
npx cdk deploy IoTLoadTestingSimulatorStackDeployment usually takes less than 10 minutes.
After a successful deployment, you can find some stack outputs like below in your terminal:
IoTLoadTestingSimulatorStack: creating CloudFormation changeset...

 ✅  IoTLoadTestingSimulatorStack

✨  Deployment time: 304.06s

Outputs:
IoTLoadTestingSimulatorStack.EcsClusterArn = arn:aws:ecs:ap-northeast-2:238877058502:cluster/IoTLoadTestingSimulatorStack-ClusterEB0386A7-NLtSdKWk5oQt
IoTLoadTestingSimulatorStack.LocustLTMasterServiceLoadBalancerDNS4DCA9946 = IoTLo-Locus-1TDKKP5MMLWUV-1796556184.ap-northeast-2.elb.amazonaws.com
IoTLoadTestingSimulatorStack.LocustLTMasterServiceServiceURLF6337D0A = http://IoTLo-Locus-1TDKKP5MMLWUV-1796556184.ap-northeast-2.elb.amazonaws.com
IoTLoadTestingSimulatorStack.WorkerServiceName = IoTLoadTestingSimulatorStack-LocustLTWorkerService79BDE724-pk1K3kAb87LN
Stack ARN:
arn:aws:cloudformation:ap-northeast-2:238877058502:stack/IoTLoadTestingSimulatorStack/3f86c240-d7fc-11ed-acf1-0a297bde0576

✨  Total time: 311.17s
From now on,
You need the value of EcsClusterArn and WorkerServiceName in later steps, so it is recommended that you take a note
of those values.
After that, please make sure that you can open the URL in LocustLTMasterServiceServiceURLF6337D0A and view Locust Web GUI like
below image.
Now the deployment is completed! You can start to use Locust load tester.
To avoid incurring future charges, clean up the resources you created.
You can remove all the AWS resources deployed by this sample running the following command:
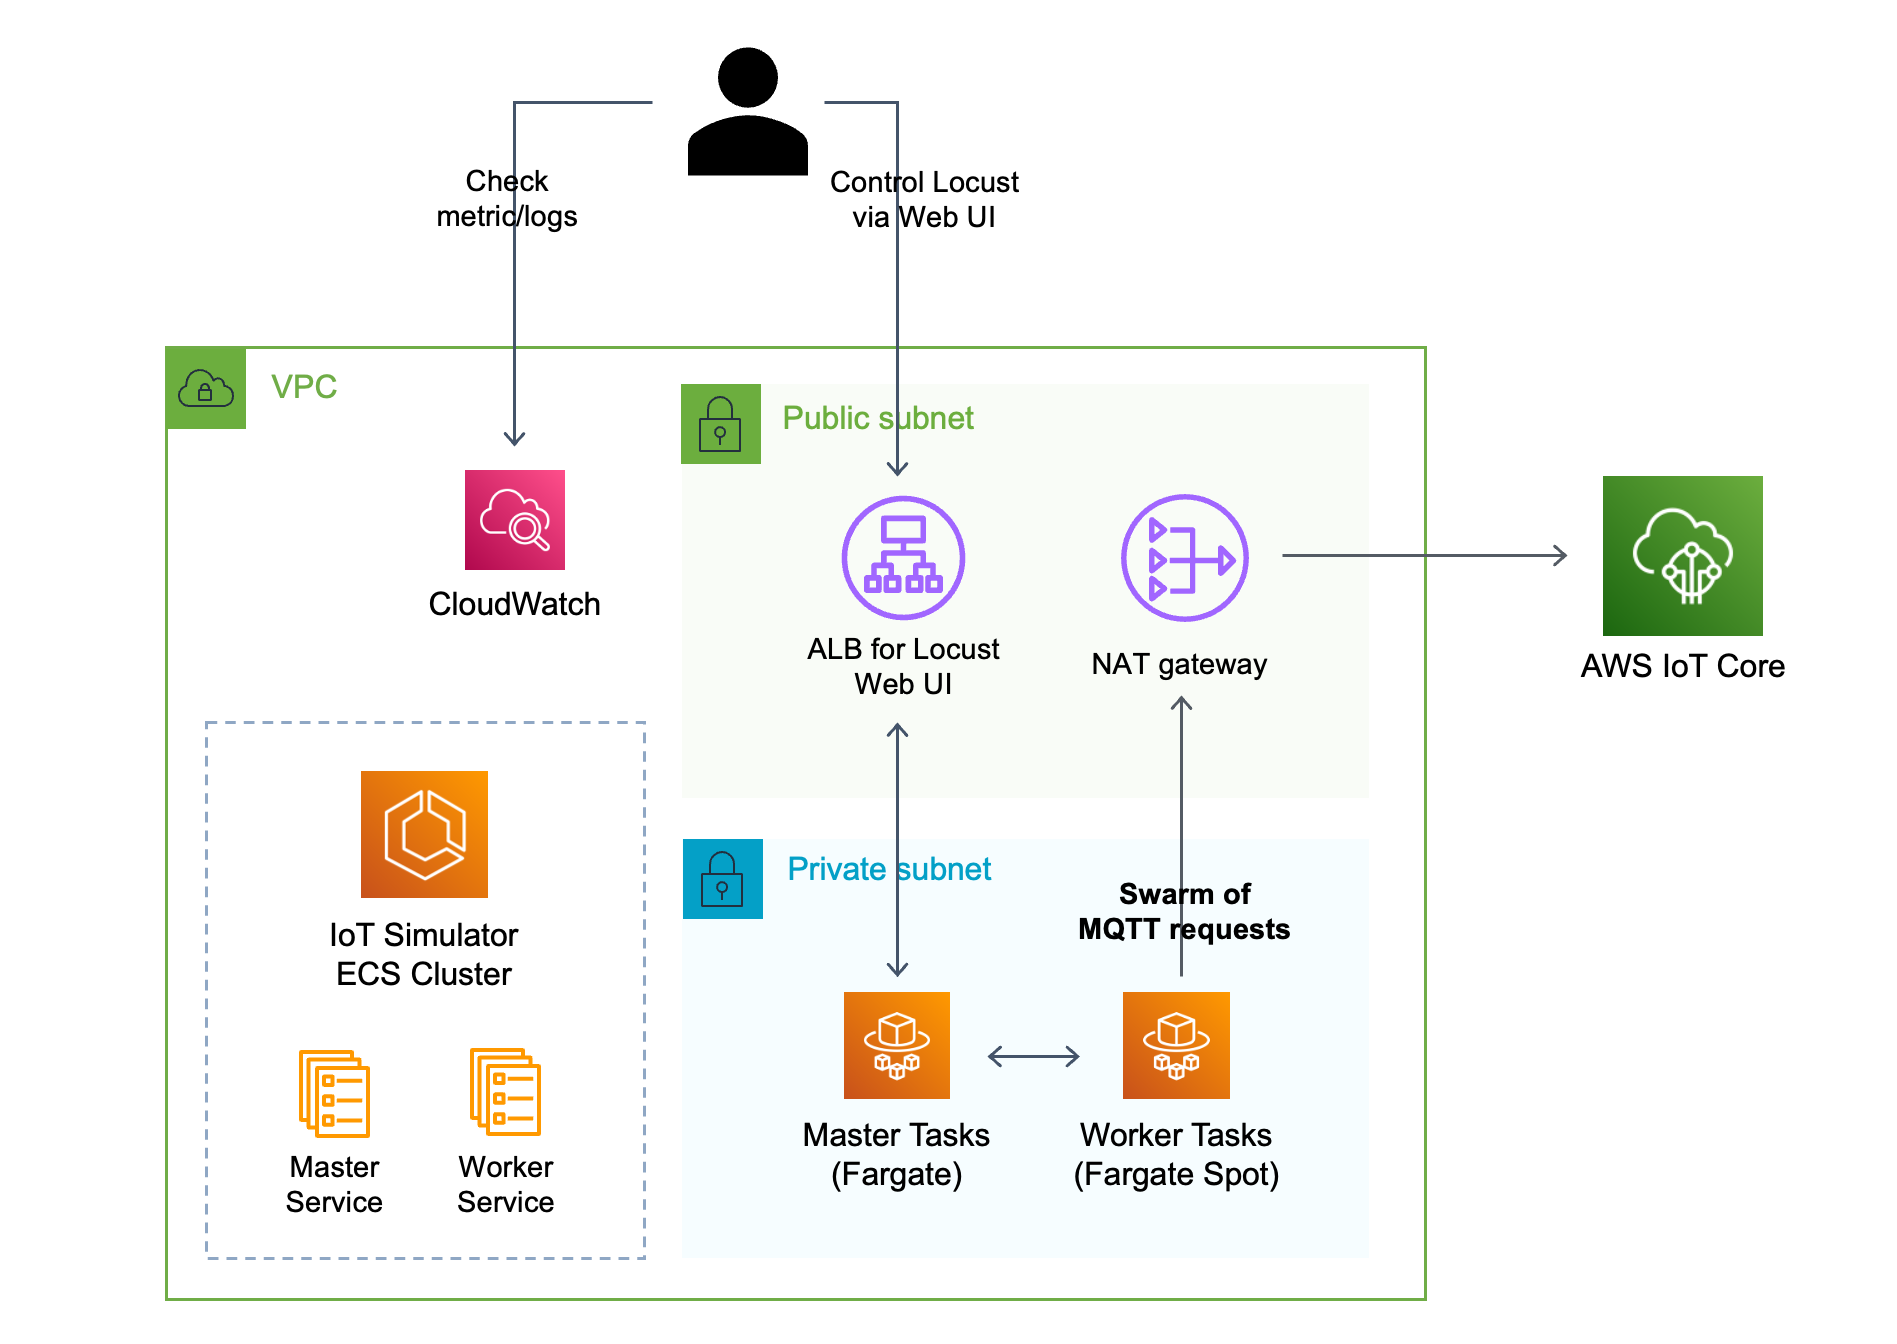
npx cdk destroy --forceWe deploy Locust with distributed mode, so there are two ECS services, master service and worker service. The number of Locust master instance is always one, and it can be accessed via Application Load Balancer.
On the other hand, there can be N Locust worker instances, which is usually the dominant factor of load test infrastructure cost.
In IoTLoadTestingSimulatorStack, we use Fargate spot capacity for worker instances, which allows you to run load test at most
70% cheaper than on-demand capacity. Below is the architecture diagram of this mode.
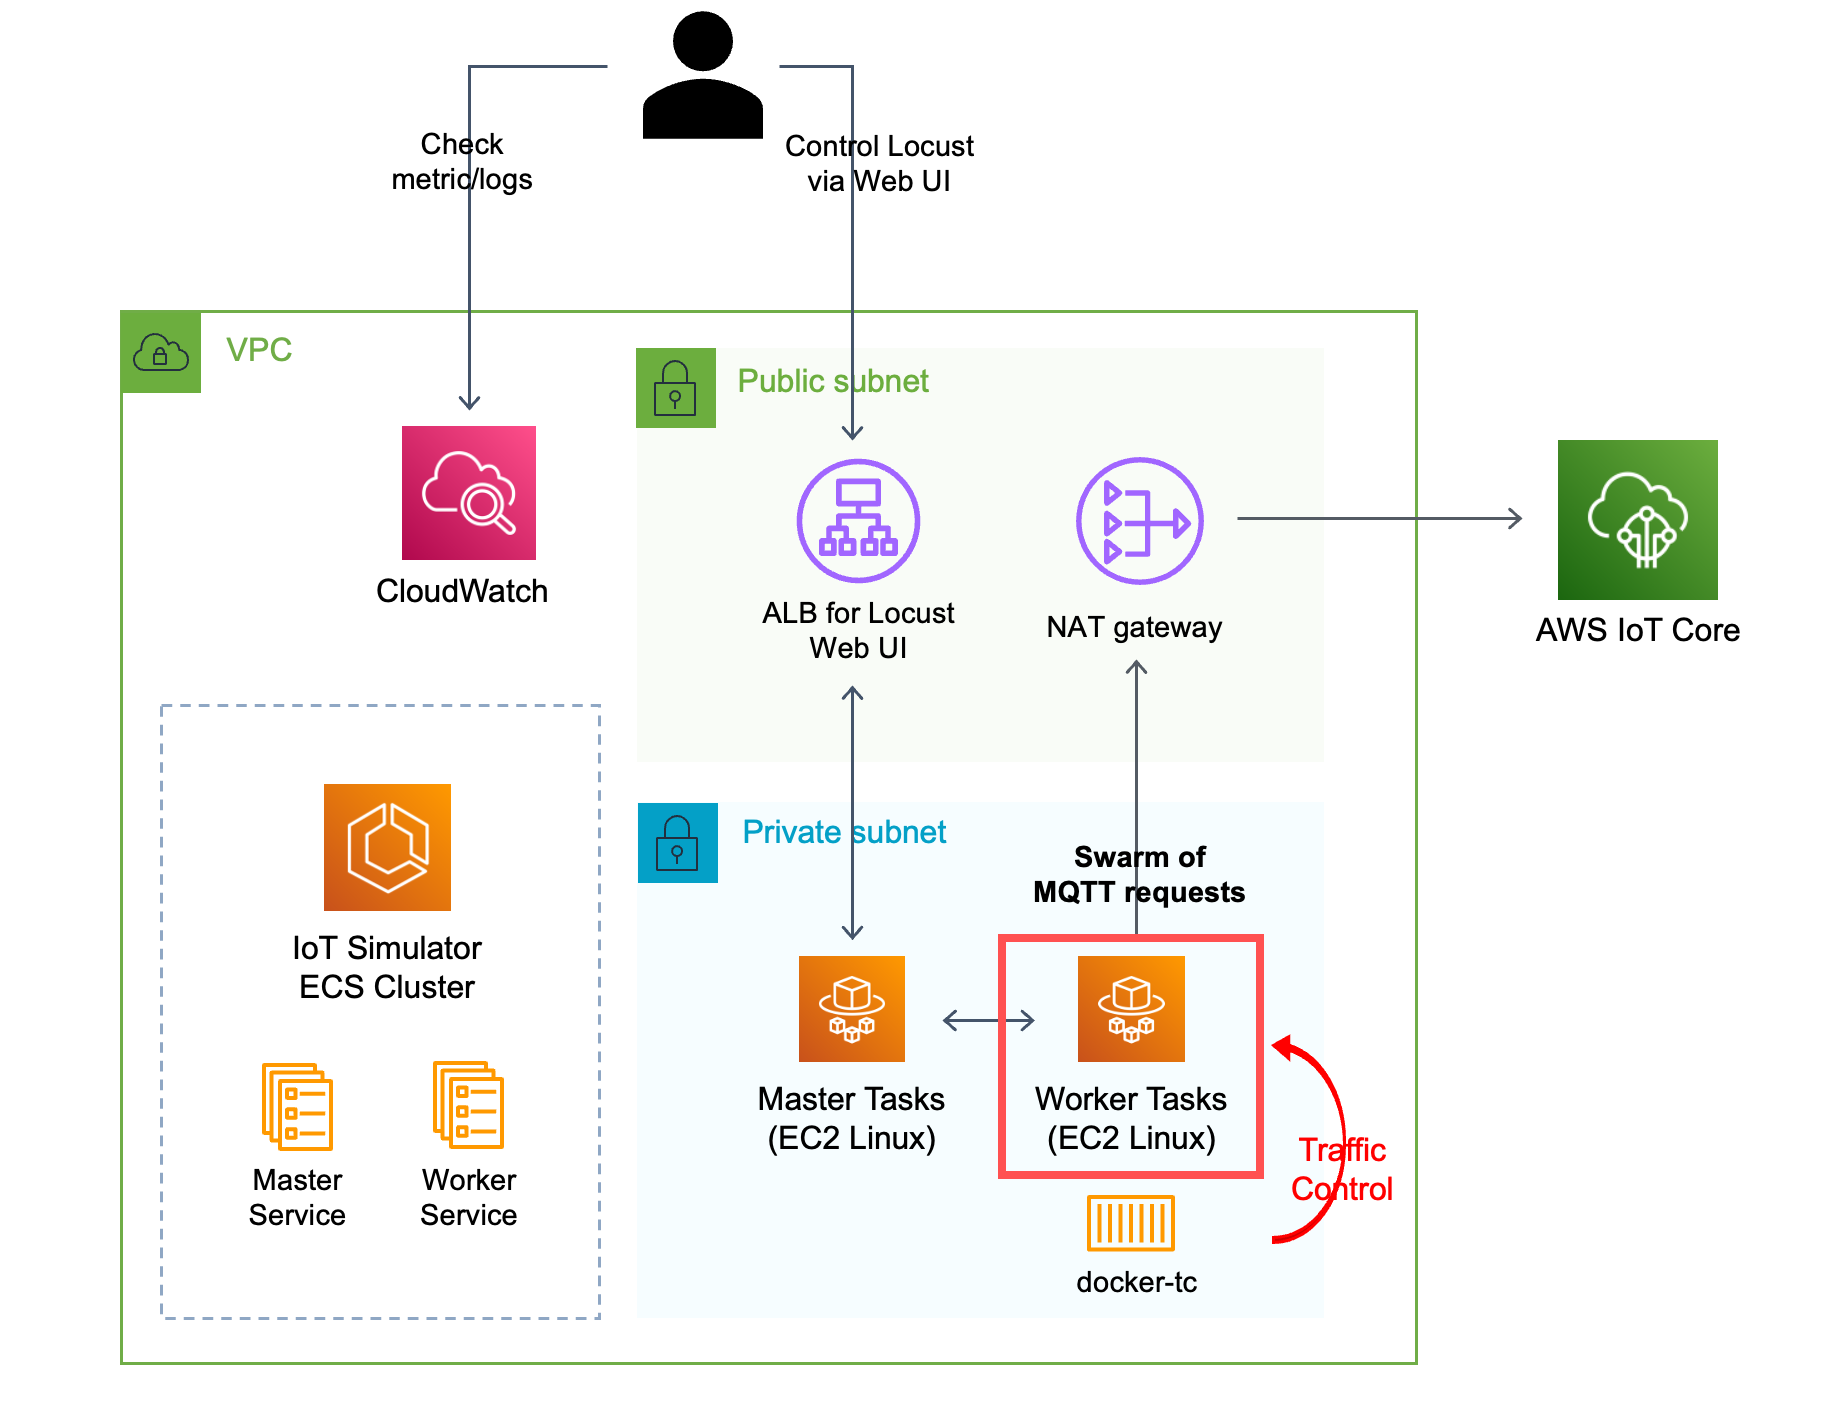
However, if using IoTFaultInjecitonSimulatorStack, we use ECS Linux instance instead of Fargate spot capacity for worker
instances. The reason is because of the docker-tc unique behavior. Following is the detailed information about the
behavior and the reason for using Linux instance.
docker-tcscans all running containers and starts listening for container:start events triggered by Docker Engine. When a new container is up (also a new Swarm service) and containscom.docker-tc.enabledlabel set to1, Docker Traffic Control starts applying network traffic rules according to the rest of the labels fromcom.docker-tc namespaceit finds.- When it scans new container, the docker network should be the custom docker network. If the network of the worker
container is either default network such as
hostorbridge,docker-tcwill not be able to scane the network interface thus not being able to restrict network traffic of that containers. - Since Fargate does not support custom docker network mode, we need to use Linux container to be run with
hostmode, and make that container to launch another locust worker container that has custom docker network. - This work flow can be fixed easily if either Fargate starts support custom docker network OR we modify the source
of
docker-tcand build new image for implementation.
Below is the architecture diagram of this mode.
Note that all the access from Locust workers go through NAT Gateway, which makes it easy to restrict access by IP addresses on load test target servers, because all the Locust workers shares the same outbound IP address among them.
See CONTRIBUTING for more information.
This library is licensed under the MIT-0 License. See the LICENSE file.


