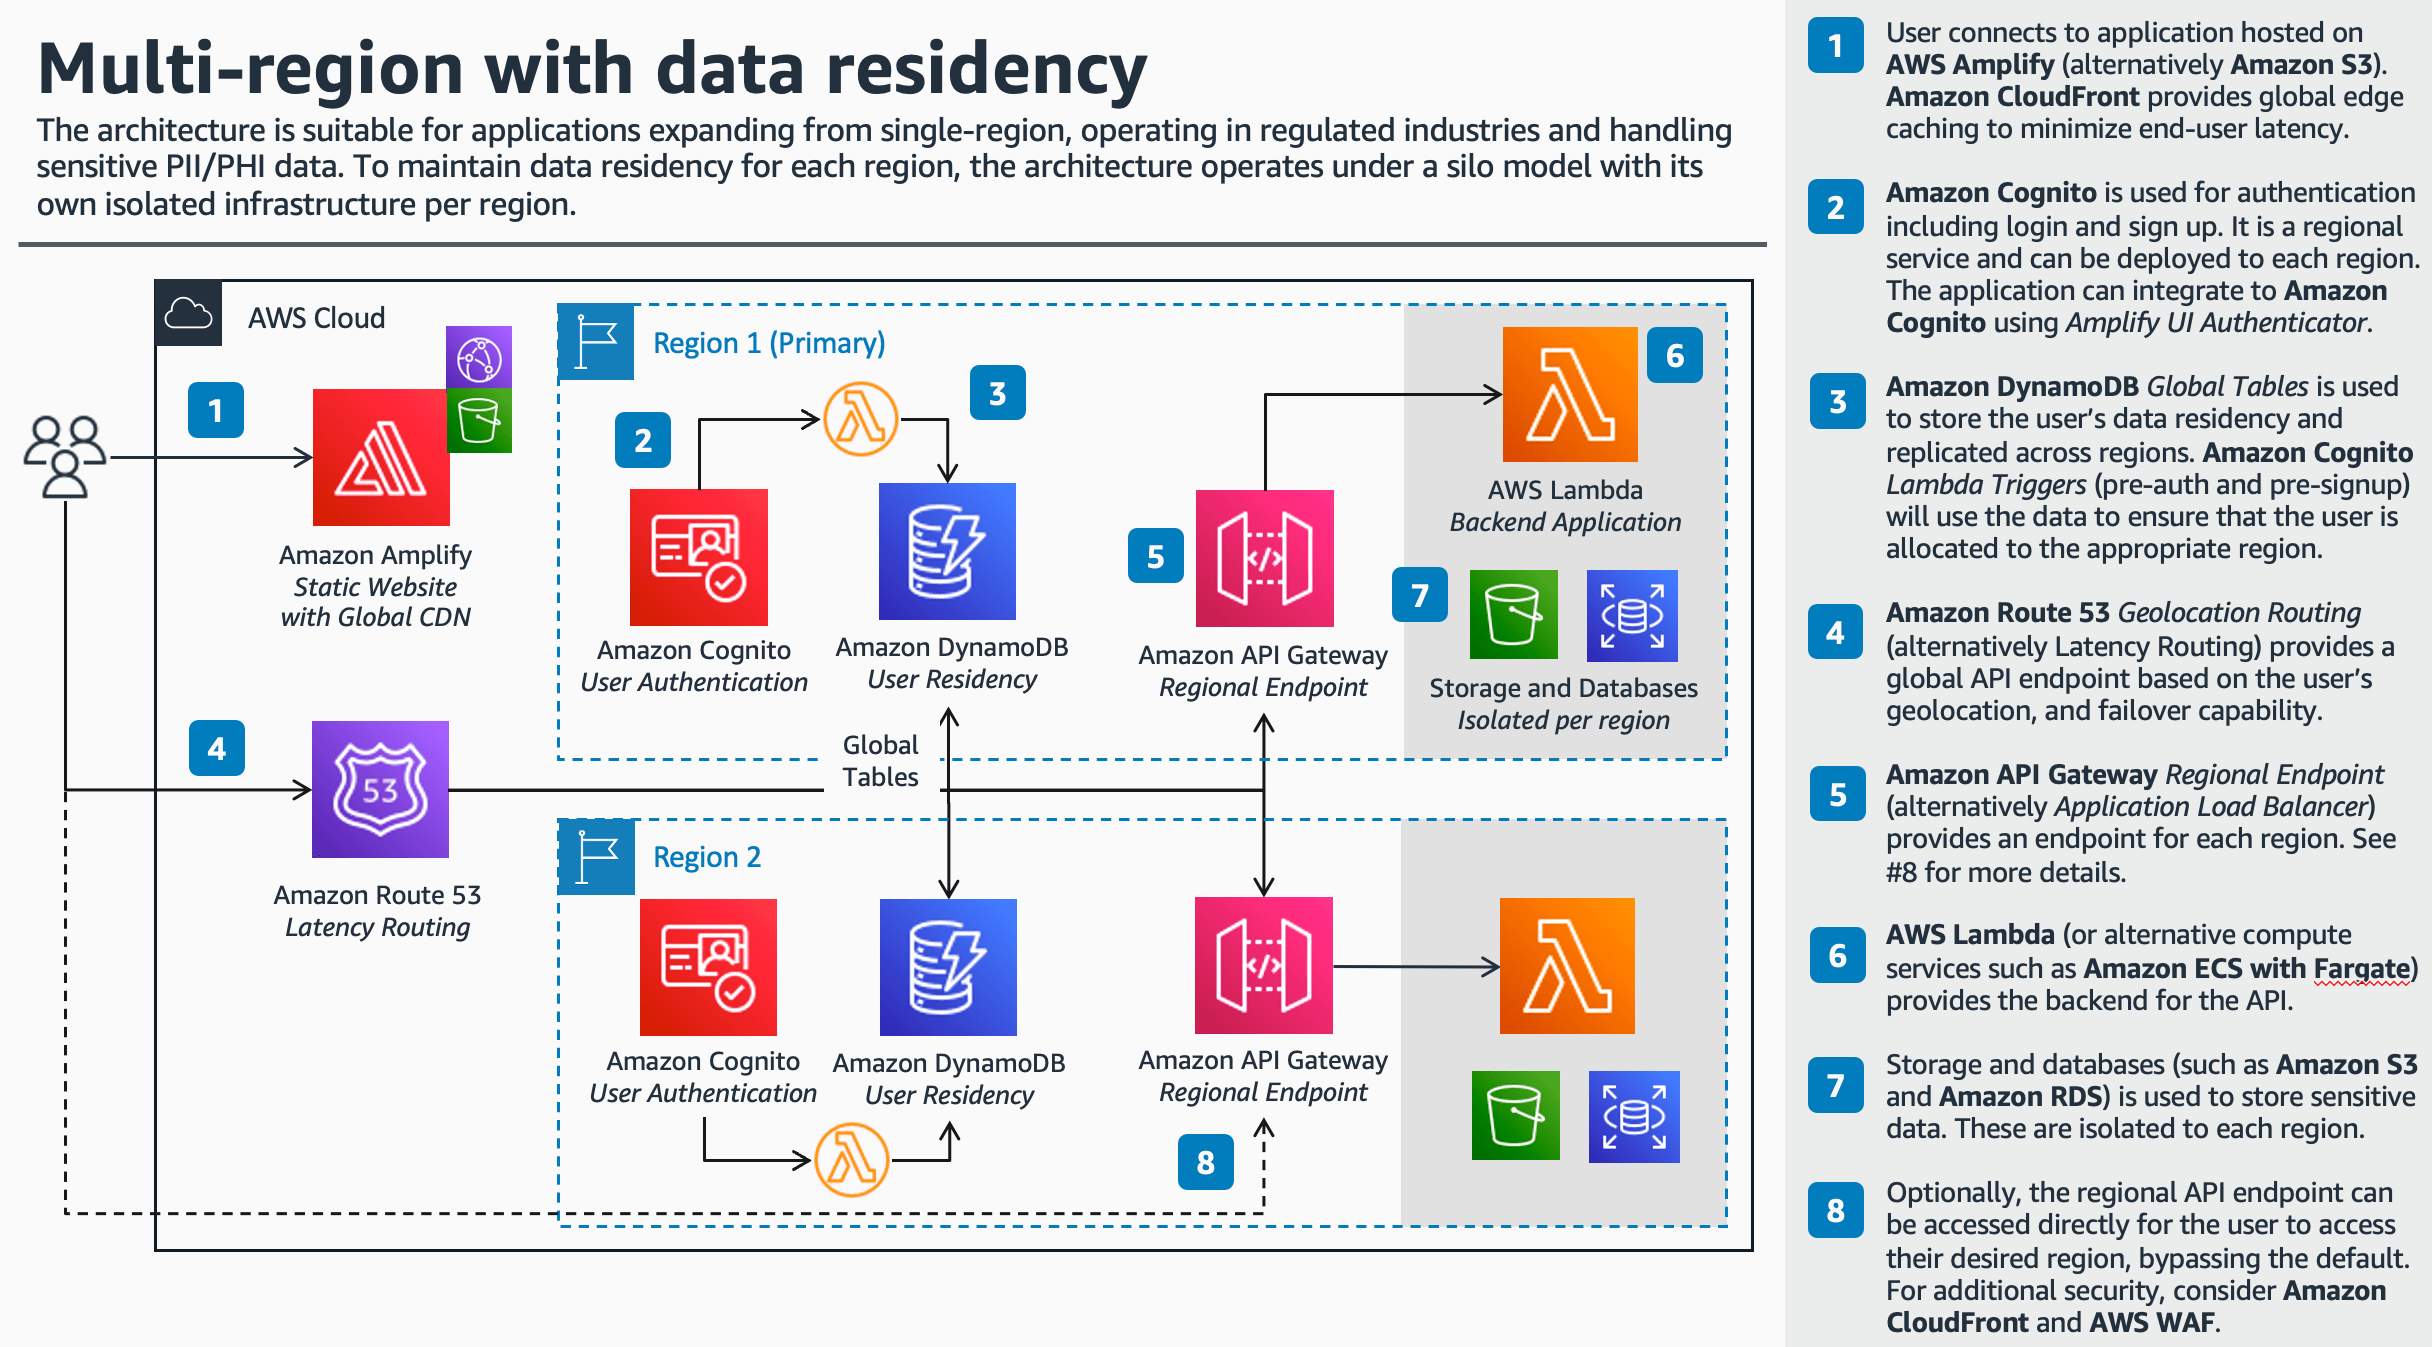
This repository demonstrates how to deploy a multi-region architecture with data residency for sensitive data, such as Personally Identifiable Information (PII) or Personal Health Information (PHI) data. To maintain data residency for each region, the architecture operates under a silo model with its own isolated infrastructure stack per region.
The architecture is suitable for businesses in specific verticals such as Health-care / Life-sciences (HCLS) and FinTech, with business requirements to isolate customer PII/PHI data to a specific region, expanding globally from a single-region architecture, and/or operating in strict regulatory or compliance environments.
For more details, see Scale across borders: build a multi-region architecture while maintaining data residency or Video: Architectures to scale your startup to multiple regions.
-
The solution is for demonstrative purposes only. For production use, please ensure that you consider additional security, such as MFA.
-
The solution will incur costs associated with the resources. To minimize costs, ensure that you clean up after deployment.
In addition to the global API, the repository also comes with a front-end React application:
- Single-region with global edge: The front-end is deployed to a single (primary) region with CloudFront for caching and global edge locations to reduce end-user latency.
- User interface (powered by Amplify UI): The login and sign up experience is built using the Authenticator Amplify UI component. This accelerates the addition of complete authentication flows to your application with minimal boilerplate.
- Global API: By default, it will connect the global API (e.g.
app.mystartup.com) which will automatically route to the user's closest region using Amazon Route 53 Latency-based routing. - Switching countries: In addition, the application allows you to switch countries and connect to the corresponding backend via
<region>.mystartup.com. This is done by fetching the region configuration from the/config/API endpoint andAmplify.configure().
- An AWS account
- Installed and authenticated AWS CLI (authenticate with an IAM user or an AWS STS Security Token)
- Installed and setup AWS Cloud Development Kit (AWS CDK)
- Installed Node.js, TypeScript and git
git clone git@github.com:aws-samples/multi-region-data-residency
2. Open the repository in your preferred IDE and familiarize yourself with the structure of the project.
.
├── cdk             CDK code that defines our environment
├── assets
    └── images      Image assets
└── src
    └── lambda      Handler code of the lambda functions
    └── app         Demo react app
The node.js dependencies are declared in a package.json.
This project contains a package.json file in two different folders:
cdk: Dependencies required to deploy your stack with the CDKsrc: Dependencies required for the Lambda function, i.e. TypeScript types for AWS SDK
Install the required dependencies:
cd cdk && npm install
cd ..
cd src && npm install
Before deploying the stack, a domain-name must be configured in Amazon Route 53 which will be used to configure the CDK stack and related sub-domains for the multi-region deployment.
For testing purposes a new domain can be registered, alternatively you can use an existing domain-name provisioned within your AWS Account, or create a new sub-domain with delegated NS records to Route 53 (e.g myapp.startup.com as a new Public Hosted zone).
Note the Hosted zone ID which will be used in the following step.
Before deploying the CDK stack the following environment variables need to be defined.
Regions - Define which regions to deploy the multi-region stack, for demonstrative purposes, we will deploy to the ap-southeast-2 (Sydney), us-east-2 (Ohio) regions. (This will be displayed as Australia and United States respectively in the user interface on /src/app/App.tsx.)
export REGIONS="ap-southeast-2, us-east-2"
Hosted Zone Id - Specify the hosted zone ID from step 4
export HOSTEDZONEID="Z2938XXZZZ"
Site Domain - Specify the root domain which will be used (e.g mystartup.com)
export SITEDOMAIN="mystartup.com"
AWS Account ID -- Specify the primary AWS Account ID which will be used to deploy the stack
export CDK_DEFAULT_ACCOUNT="YOUR_AWS_ACCOUNT_ID"
Navigate to the src/app folder and build the static React app using:
npm run build
When ready to deploy, navigate to the cdk folder and run the following commands.
cdk synth will synthesize a CloudFormation template from your CDK code. If you haven't worked with CDK in your account before, you need to bootstrap the required resources for the CDK with cdk bootstrap, otherwise skip this step. Note that bootstrapping needs to be performed in every Region you plan to deploy to. You can then deploy the template with cdk deploy.
cdk synth
# replace account id and Region codes (us-east-1 required for SSL certificate)
cdk bootstrap $CDK_DEFAULT_ACCOUNT/us-east-1 $CDK_DEFAULT_ACCOUNT/eu-west-1 $CDK_DEFAULT_ACCOUNT/ap-southeast-2
cdk deploy --all
Connect to the test application e.g. frontend.mystartup.com
When you are done, make sure to clean everything up.
Run the following command to shut down the resources created in this workshop.
cdk destroy --all
There may also some resources that will need to be deleted manually (such as the DynamoDB Global Table).
See CONTRIBUTING for more information.
This library is licensed under the MIT-0 License. See the LICENSE file.

