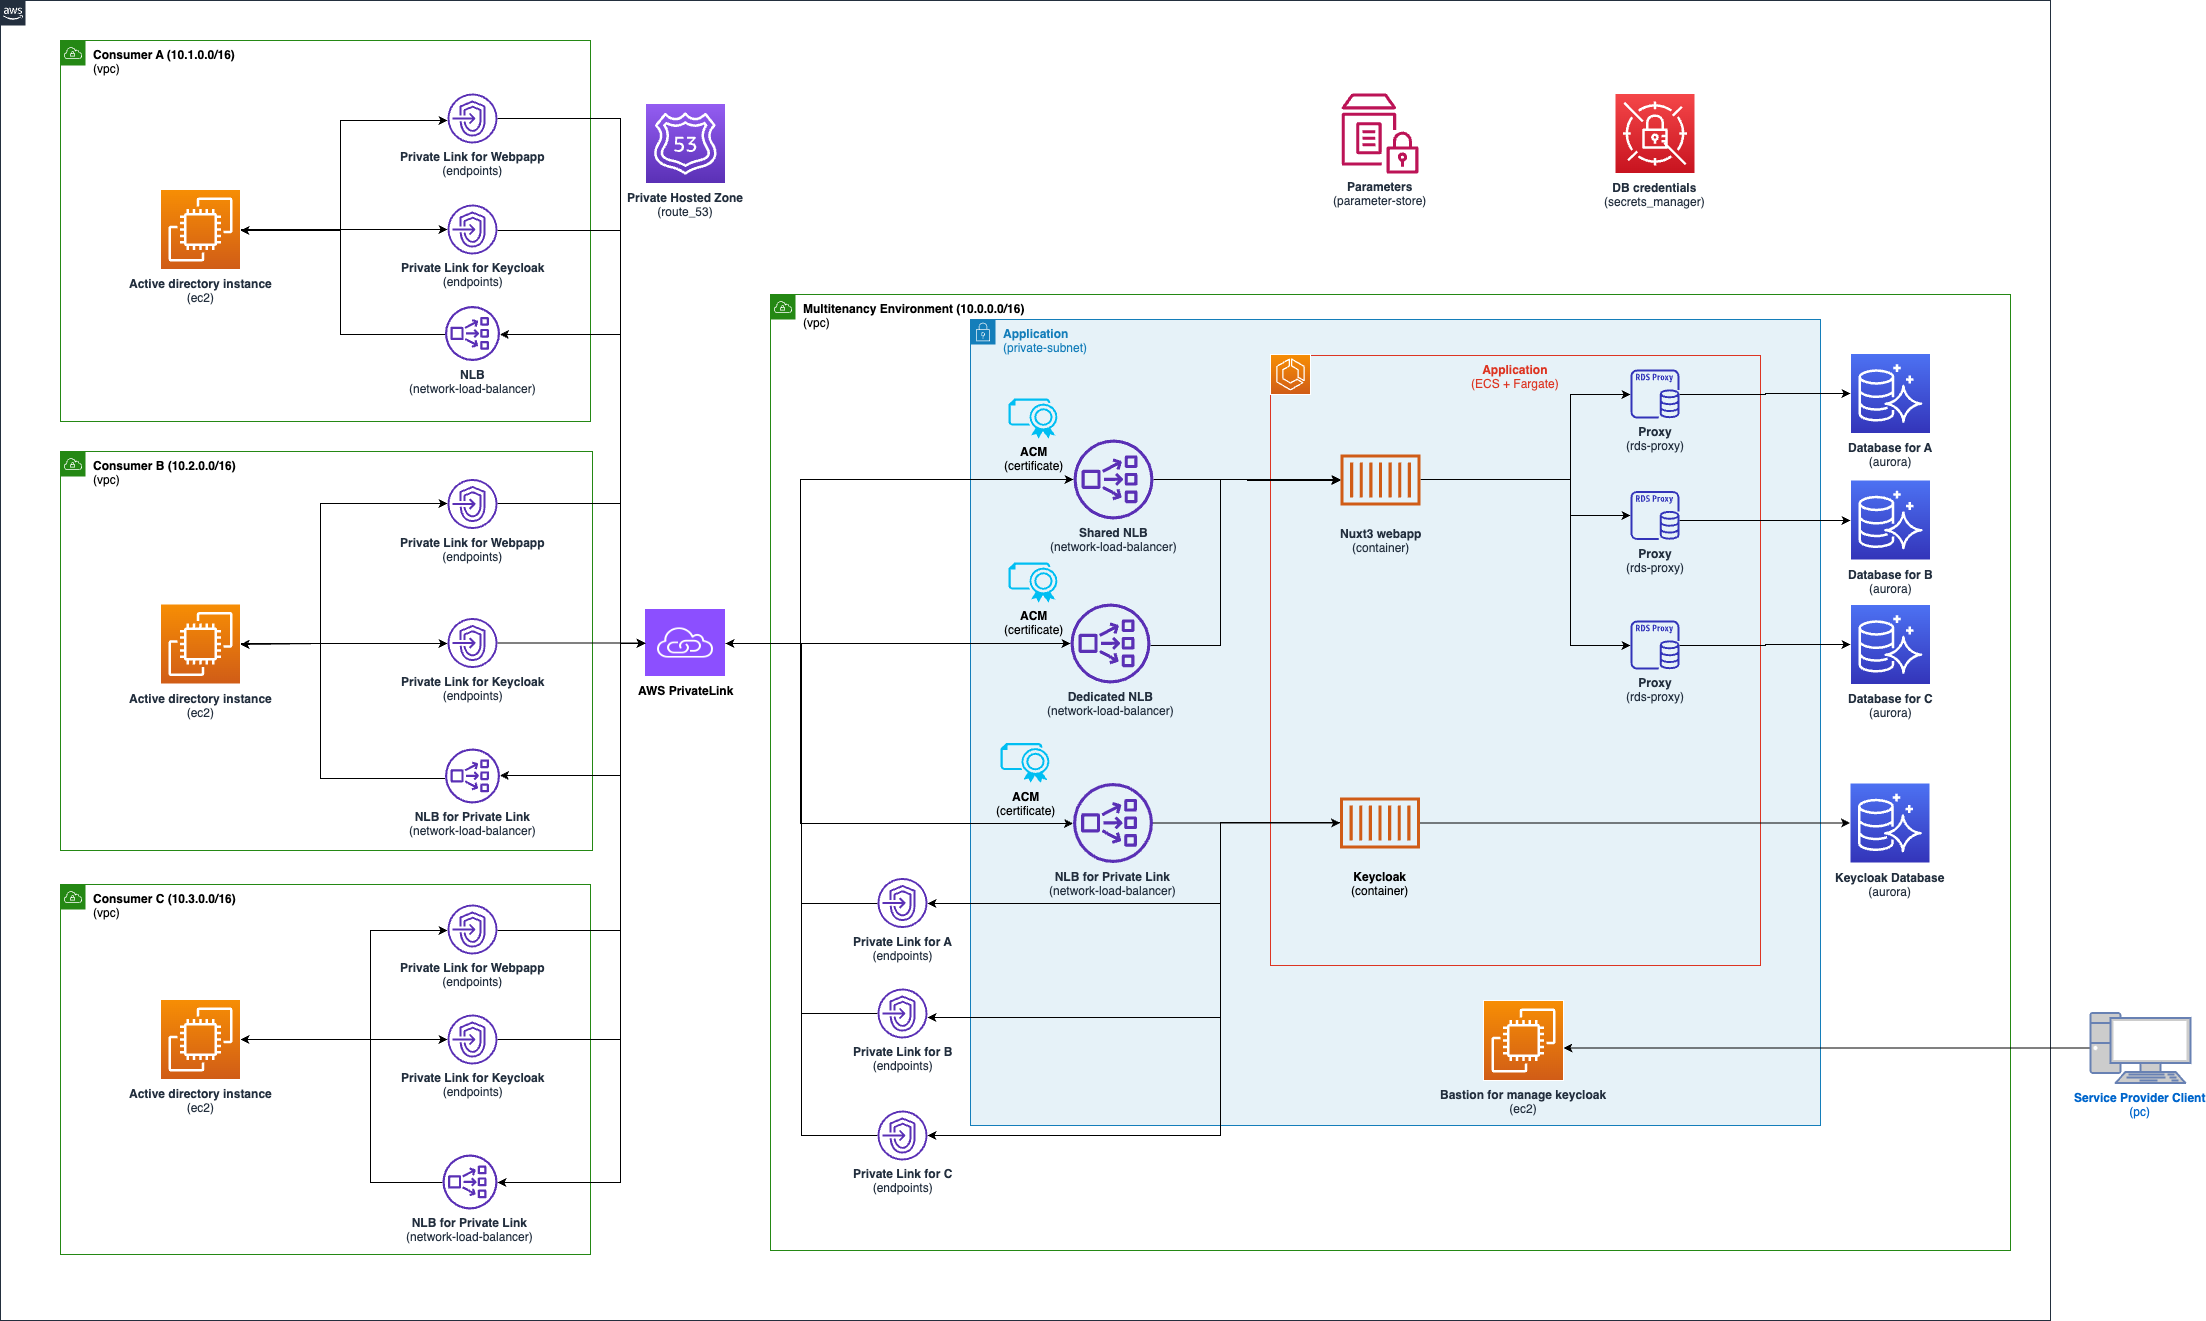
Multi-tenancy strategies have the various isolation concepts like silo, pool and bridge model. Depending on the requirements, the application may require a closed network environment, such as the government systems and high secure systems. This sample can deploy the multi-tenancy application including consumer environments on a closed network. This application isolation concept is like the bridge model. The web and app tier are shared, but the database tier as a silo model is deployed in each tenant. The web application including API created with Nuxt is deployed on Amazon ECS as a container. Also, this application uses Keycloak deployed on Amazon ECS to authenticate the users with LDAP federation via AWS PrivateLink.
This enviroment creates the web application and Keycloak as the authentication. Both applications are deployed on Amazon ECS as a container, and these databases are deployed on Amazon Aurora Serverless v2. Each consumer environment can access to these applicaton via Amazon PrivateLink and Network Load Balancer(NLB). In case of enabling dedicated in a consumer enrivoment(Consumer C environment enables dedicated as default), the consumer enviroment accesses to the web application via the dedicated NLB (Other enviroments use the shared NLB).
This enviroment creates single instance for Active directory on each Amazon VPC. Need to setup Active Directory Domain Services (AD DS) and DNS via AWS Systems Manager Fleet Manager. Please read the following AD setup in each instance.
- Create AWS Account
- Setup AWS CLI and profile
- Install Docker Desktop
- Install Node.js >=
18.18.2 - Createing and importing the following certificates in AWS Certificate Manager (ACM). Please see Importing certificates into AWS ACM if you need.
- Keycloak (
keycloak.multitenancy.com) - Keycloak for Admin console(
admin.keycloak.multitenancy.com) - Web application
- Shared NLB (
*.nuxt3.keycloak.multitenancy.com) - Dedicated NLB (
c-corp.keycloak.multitenancy.com)
- Shared NLB (
- Keycloak (
At first, add your aws profile to profile in cdk.json.
Change the following values in config.ts as you need before executing the deployment command.
Important thing is you need to change the values of acmCertificateArn to your arn of ACM in keyCloakApp and nuxtApp.
Please see the config doc if you check the properties in detail.
Depending your zoneName, change the authUrl like https://keycloak.yourZoneName in the nuxt.config.ts.
runtimeConfig: {
    public: {
      authUrl: 'https://keycloak.multitenancy.com',
      stripeKey: '',
}- Install the dependencies
npm ciExecute the follwing
bootstrapcommand if you deploy it for the first time. Please see Boostrapping.npm run cdk bootstrap
- Deploy AWS resources
npm run cdk deployYou can see migrationLambdaCommand in the Outputs as follows after deployoing it.
aws lambda invoke --function-name MigrationLambda-lambda --cli-binary-format raw-in-base64-out file://lambda/payload.json response.json --profile <Your profile>To invoke the above lambda command, you can create the posts table and insert dummy data into the table in the database as this sample has the lambda function for migration database and dummy data.
Register the certificates in each instance as follows
keycloak-manage-instance- Keycloak (
keycloak.multitenancy.com) - Keycloak for Admin console(
admin.keycloak.multitenancy.com)
- Keycloak (
a-corp-ad-demo- Keycloak (
keycloak.multitenancy.com) - Shared NLB (
*.nuxt3.keycloak.multitenancy.com)
- Keycloak (
b-corp-ad-demo- Keycloak (
keycloak.multitenancy.com) - Shared NLB (
*.nuxt3.keycloak.multitenancy.com)
- Keycloak (
c-corp-ad-demo- Keycloak (
keycloak.multitenancy.com) - Dedicated NLB (
c-corp.keycloak.multitenancy.com)
- Keycloak (
Setup Active Directory Domain Services (AD DS) and DNS with Server Manager. Also,setup domain controller.
After completing the setup, add users with Active Directory Users and Computers. Important thing is to add keycloak as a user for ldap authentication with Keycloak.
You can access to the admin console in Keycloak via keycloak-manage-instance instance with Fleet Mangaer. Using the keypair of KeyclaokManagedInstanceKeyId in the Outputs and connecting the instance.
Keycloak admin username and password are stored in AWS Secrets Manater, so please copy and use these secrets from accessing to KeycloakAdmin in the Secrets Manager.
Craete a Realm and Client using the name of CorpList as follows.
- Set
name-authas Realm ID - Set
name-webappas Client ID.
(e.g. a-corp-auth and a-corp-webapp if you define the name of CorpList as a-corp)
You can also change these IDs as you like by configuring the initOptions in keycloak.client.ts
const initOptions: KeycloakConfig = {
  url: runtimeConfig.public.authUrl,
  realm: `${subDomain}-auth`,
  clientId: `${subDomain}-webapp`,
};Need to fill the DNS name of the vpc endpoint in Connection URL to setup LDAP in Keycloak. You can use the DNS name of KeycloakLdapForXXX in the Outputs as follows.
your-alias-dev-multitenant-app-InfraStack.KeycloakLdapForACorp = vpce-xxxx.vpce-svc-xxxxx.ap-northeast-1.vpce.amazonaws.com
your-alias-dev-multitenant-app-InfraStack.KeycloakLdapForBCorp = vpce-yyyy.vpce-svc-yyyy.ap-northeast-1.vpce.amazonaws.com
your-alias-dev-multitenant-app-InfraStack.KeycloakLdapForCCorp = vpce-zzzz.vpce-svc-zzzz.ap-northeast-1.vpce.amazonaws.comnpm run cdk destroySee CONTRIBUTING for more information.
This code is licensed under the MIT-0 License. See the LICENSE file.
