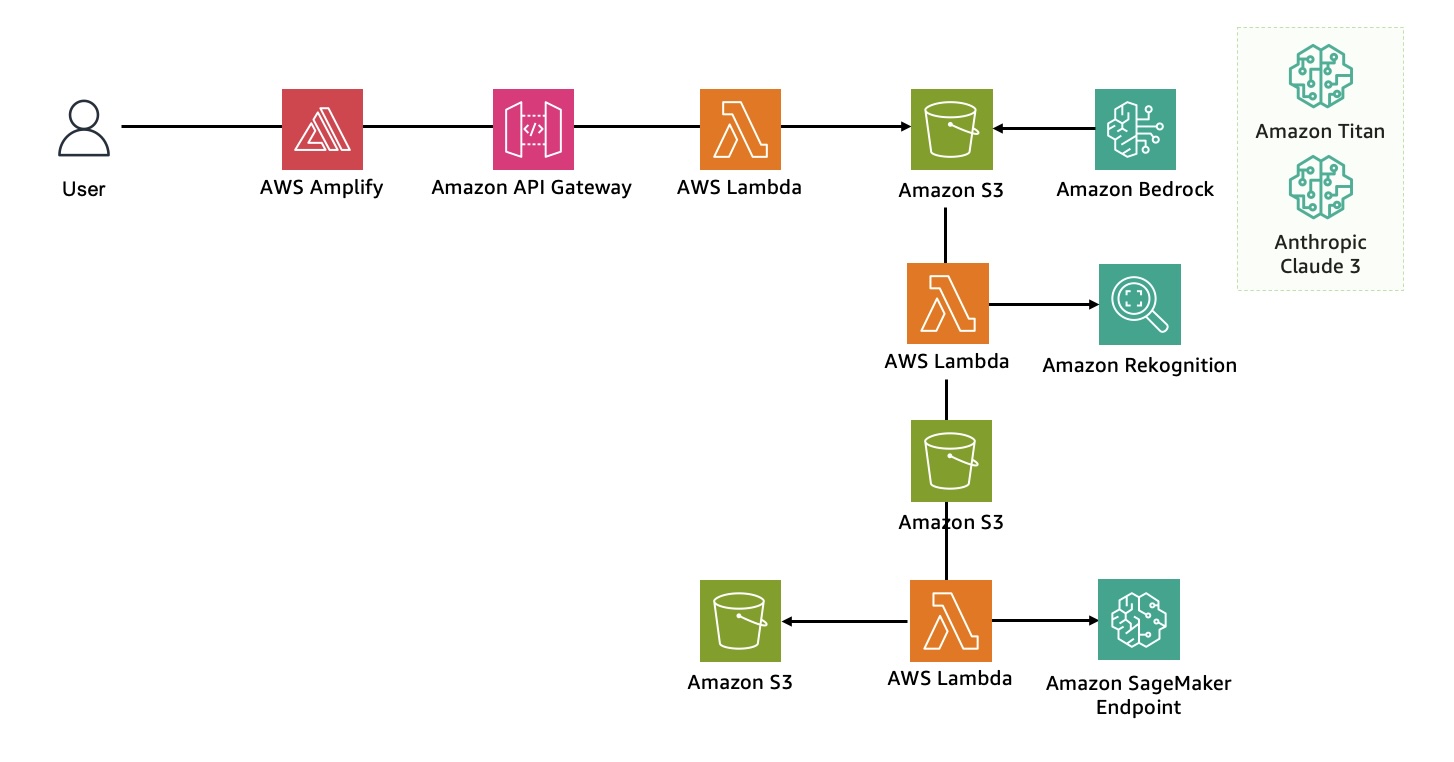
This repository is a sample project that utilizes Amazon Bedrock for generative AI, to create images of historical figures. It then uses a SageMaker Endpoint to synthesize these images with users' selfie photos, producing composite results.
This showcase demonstrates the integration of various AWS AI services for creative image generation and manipulation.
Key Components:
- AWS Amplify: Provides frontend application hosting (using React).
- Amazon API Gateway + AWS Lambda: Used as backend API endpoints for image retrieval and upload.
- Amazon Bedrock: A managed service that utilizes foundation models through APIs. It uses the Amazon Titan Image Generator model for image generation and the Claude 3.0 Sonnet model for descriptions.
- Amazon SageMaker: Deploys the necessary model as an Endpoint to process image synthesis requests.
- Amazon Rekognition: Detects faces in images and videos, and crops the relevant facial areas.
Important
- You have installed the latest version of AWS CDK
- You have an AWS account
- You have the necessary permissions to create and manage AWS resources
- You must use a region where Amazon Bedrock is supported.
- Clone the repository:
https://github.com/aws-samples/sample-generative-ai-gallery.git
-
Move backend directory:
cd backend -
Create a virtual environment:
python3 -m venv .venv source .venv/bin/activate -
Install the required dependencies:
pip install -r requirements.txt -
Configure your AWS credentials:
aws configure -
Prepare deploy CDK:
cdk bootstrap aws://<account id>/<your-aws-region> -
Update the
cdk.context.jsonfile with your aws region, and other configuration details.{ "s3_base_bucket_name": "genai-gallery", "s3_base_images_path": "images/base/", "s3_face_images_path": "images/face/", "s3_masked_face_images_path": "images/masked-face/", "s3_swapped_face_images_path": "images/swapped-face/", "s3_result_images_path": "images/result/", "pillow_layer_arn": "arn:aws:lambda:{your-aws-region}:770693421928:layer:Klayers-p38-Pillow:10", "numpy_layer_arn": "arn:aws:lambda:{your-aws-region}:770693421928:layer:Klayers-p38-numpy:13" } -
Deploy CDK stacks:
cdk deploy --require-approval never --all
-
If step 1 is completed successfully, You will receive output similar to the following. The URL of the Amazon API Gateway Endpoint will be output to
ApiGatewayStack.ApiGatewayUrl, so record that address and use it for frontend deployment.✅ ApiGatewayStack ✨ Deployment time: 68.13s Outputs: ApiGatewayStack.GenAIGalleryImageApiEndpoint2DF4C2F5 = https://xxxxx.execute-api.us-east-1.amazonaws.com/prod/ ApiGatewayStack.ApiGatewayUrl = https://xxxxx.execute-api.us-east-1.amazonaws.com/prod/ Stack ARN: arn:aws:cloudformation:us-east-1:xxxxx:stack/ApiGatewayStack/14bb1380-4566-11ef-ac05-0e7a94e90b7d -
In the
.envfile of the frontend folder, replace the{your backend Amazon API Gateway endpoint url}part ofREACT_APP_API_ENDPOINT={your backend Amazon API Gateway endpoint url}with the API Gateway Endpoint URL mentioned above.REACT_APP_API_ENDPOINT=https://xxxxx.execute-api.us-east-1.amazonaws.com/prod/ -
If you were in the backend directory, move to the frontend directory using the command below.
cd ../frontend -
Install the required dependencies:
npm install -
Run the application using the command below:
npm start
Important
Please be mindful of the costs for all deployed resources. Make sure to delete resources after you are finished using them.
If using cli and CDK, please cdk destroy. If not, access CloudFormation and then delete all stacks manually.
This library is licensed under the MIT-0 License. See the LICENSE file.

