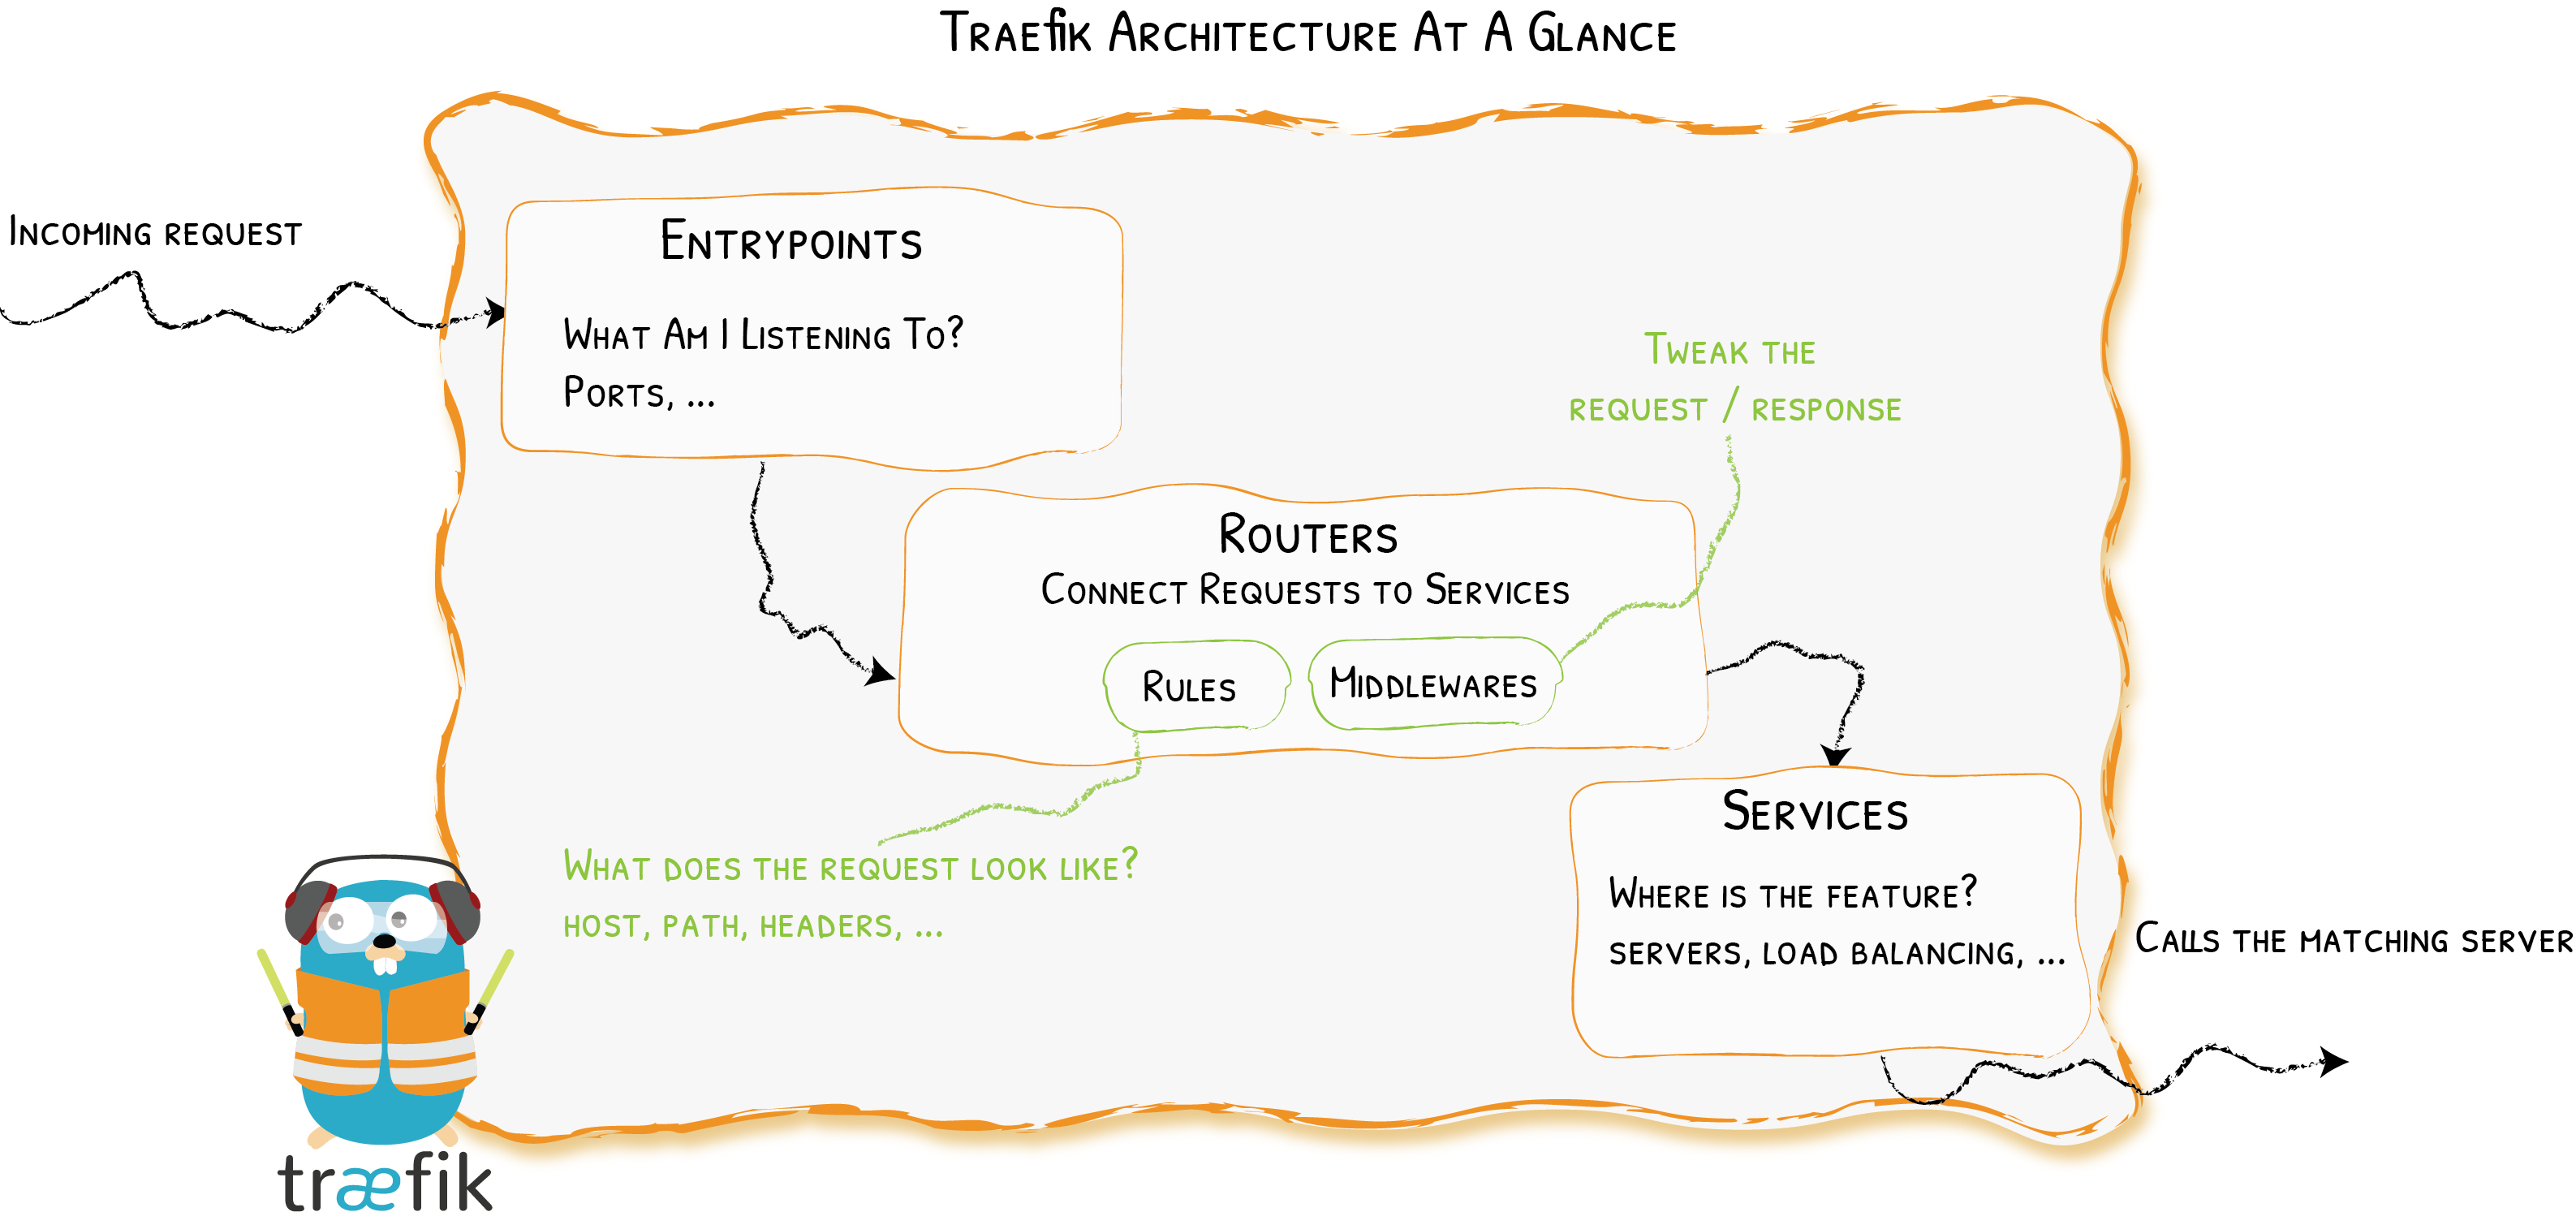
Traefik是整个系统的网关大门,负责拦截并路由每个传入的请求,它不需要像Nginx这类反向代理一样需要一个配置文件来配置所有可能路由,而是实时的通过服务发现来自动更新路由规则,由服务自己告诉它该服务负责处理哪些请求。
Traefik的架构设计:
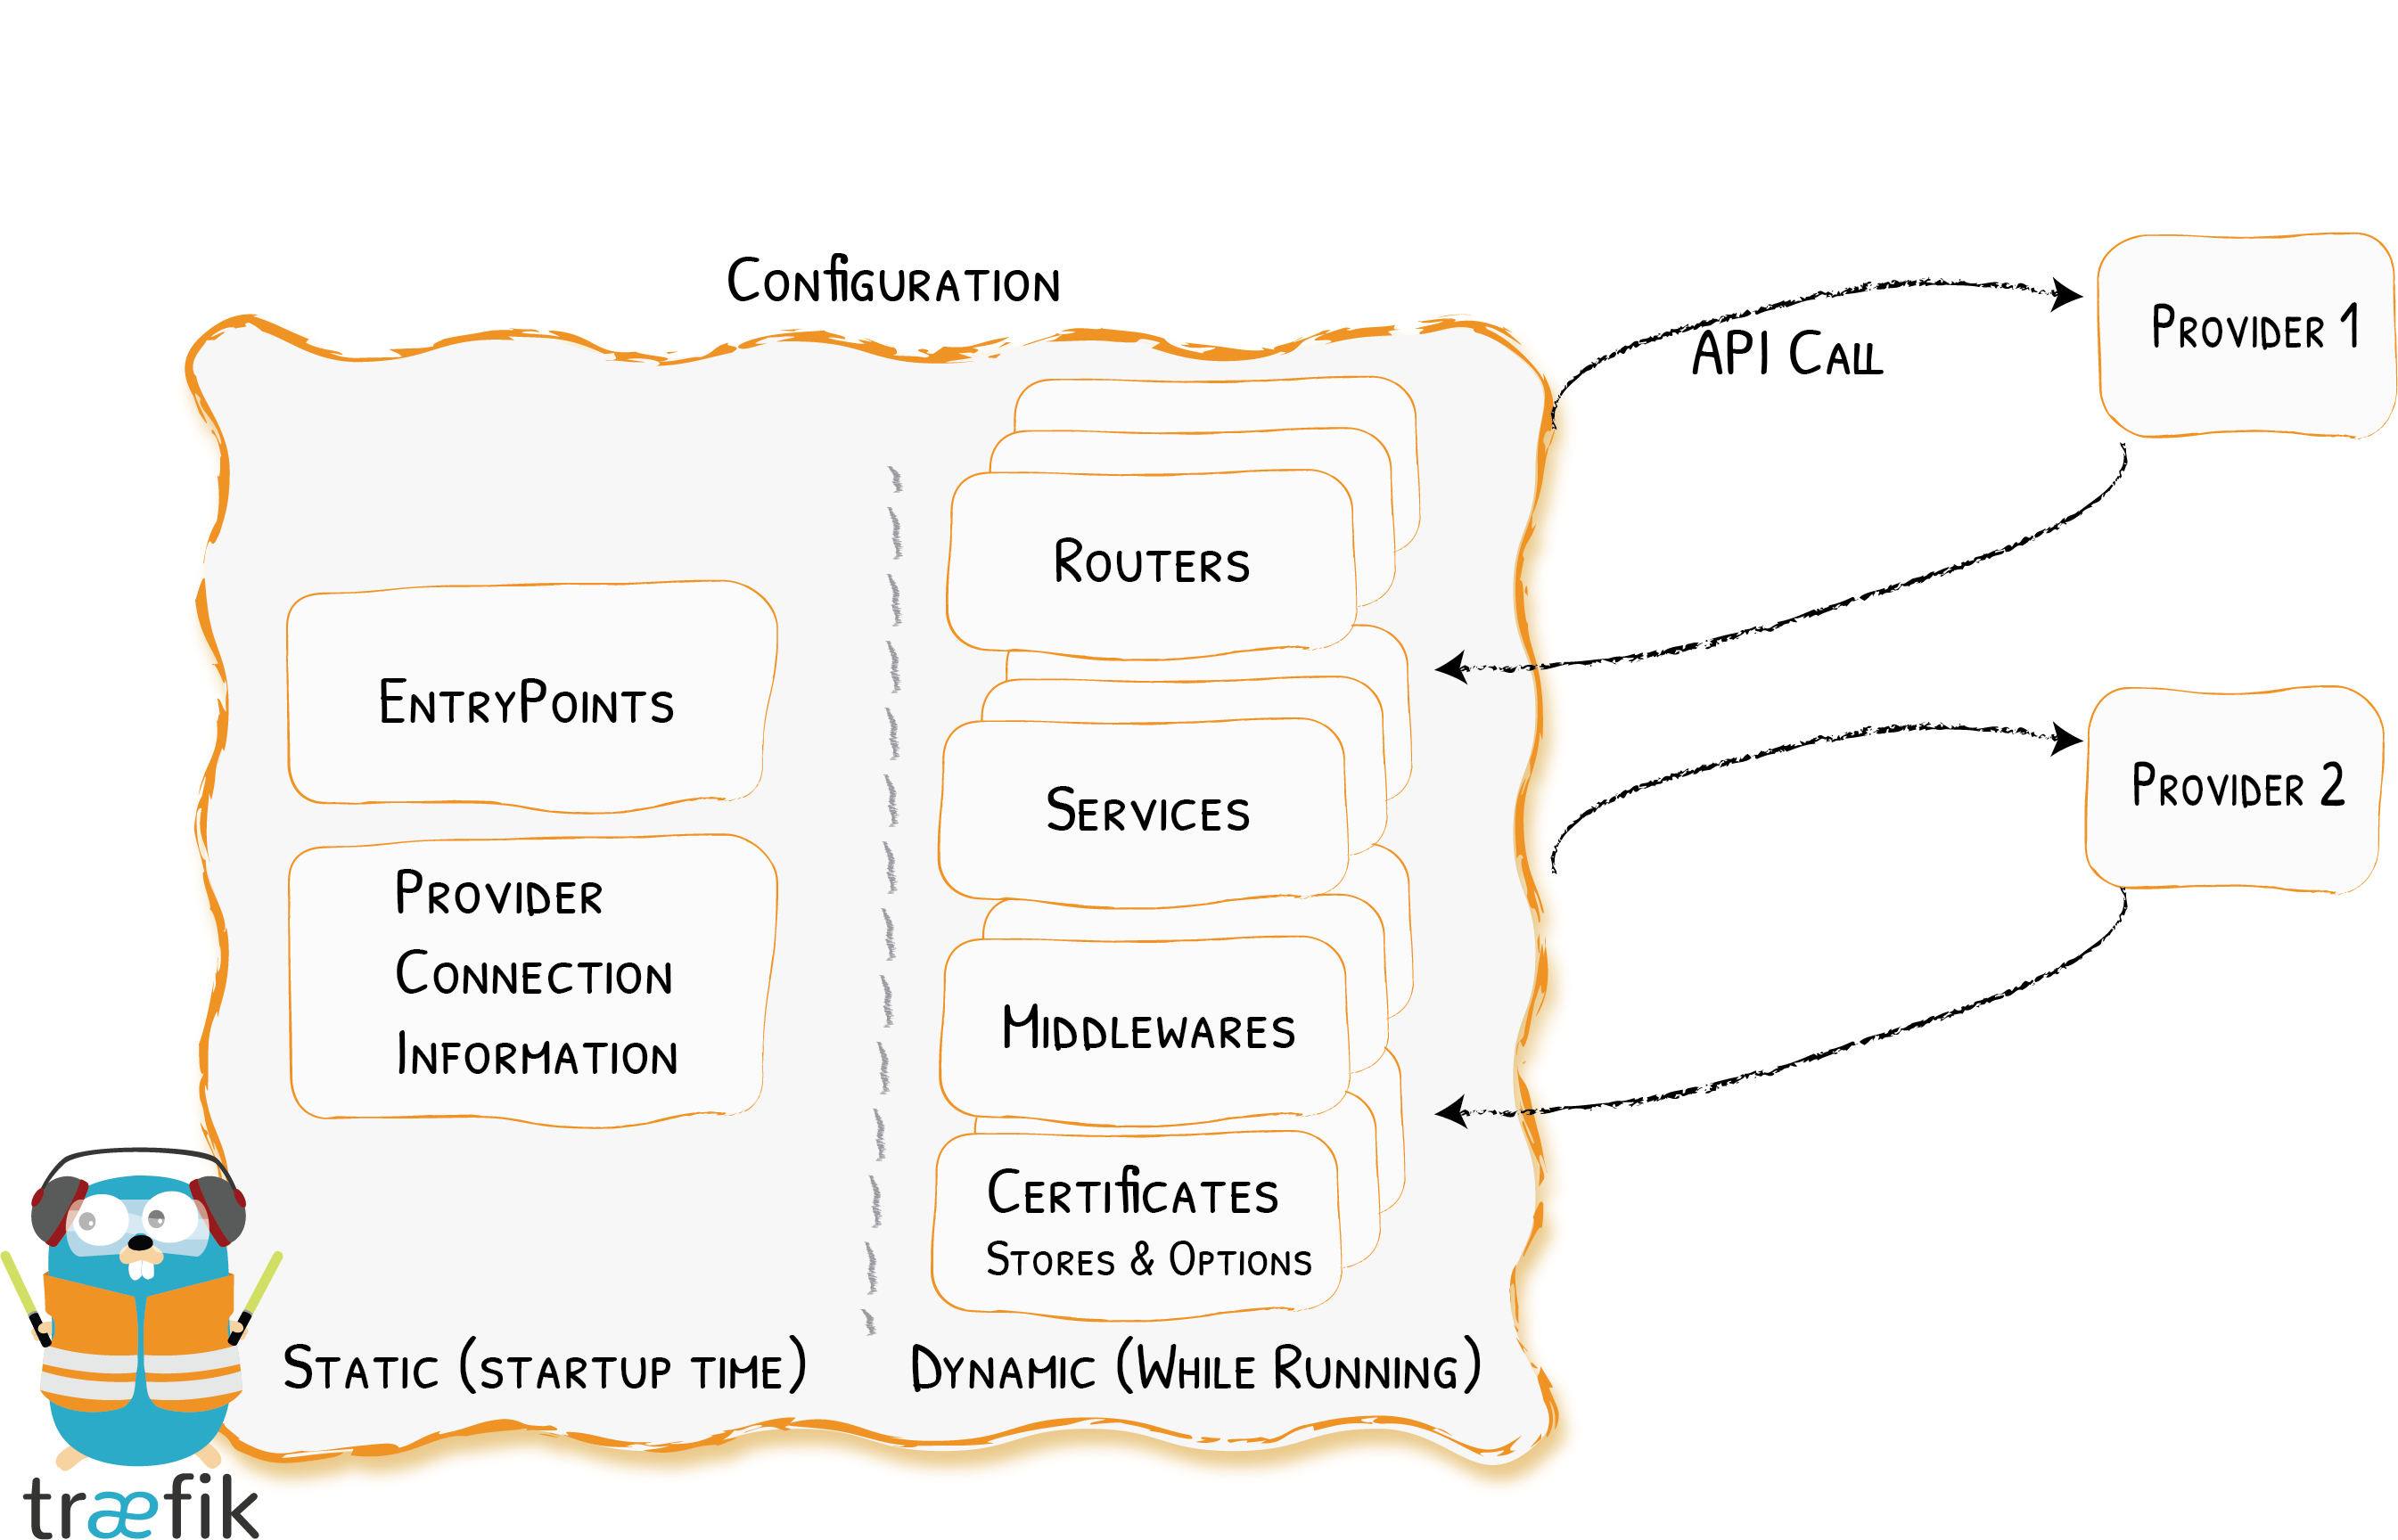
Traefik的配置分为静态配置和动态配置,静态配置是Traefik实例的启动配置;动态配置由Provider自己提供,这里包含了定义系统如何处理请求的所有内容,此配置可以被无缝热加载。
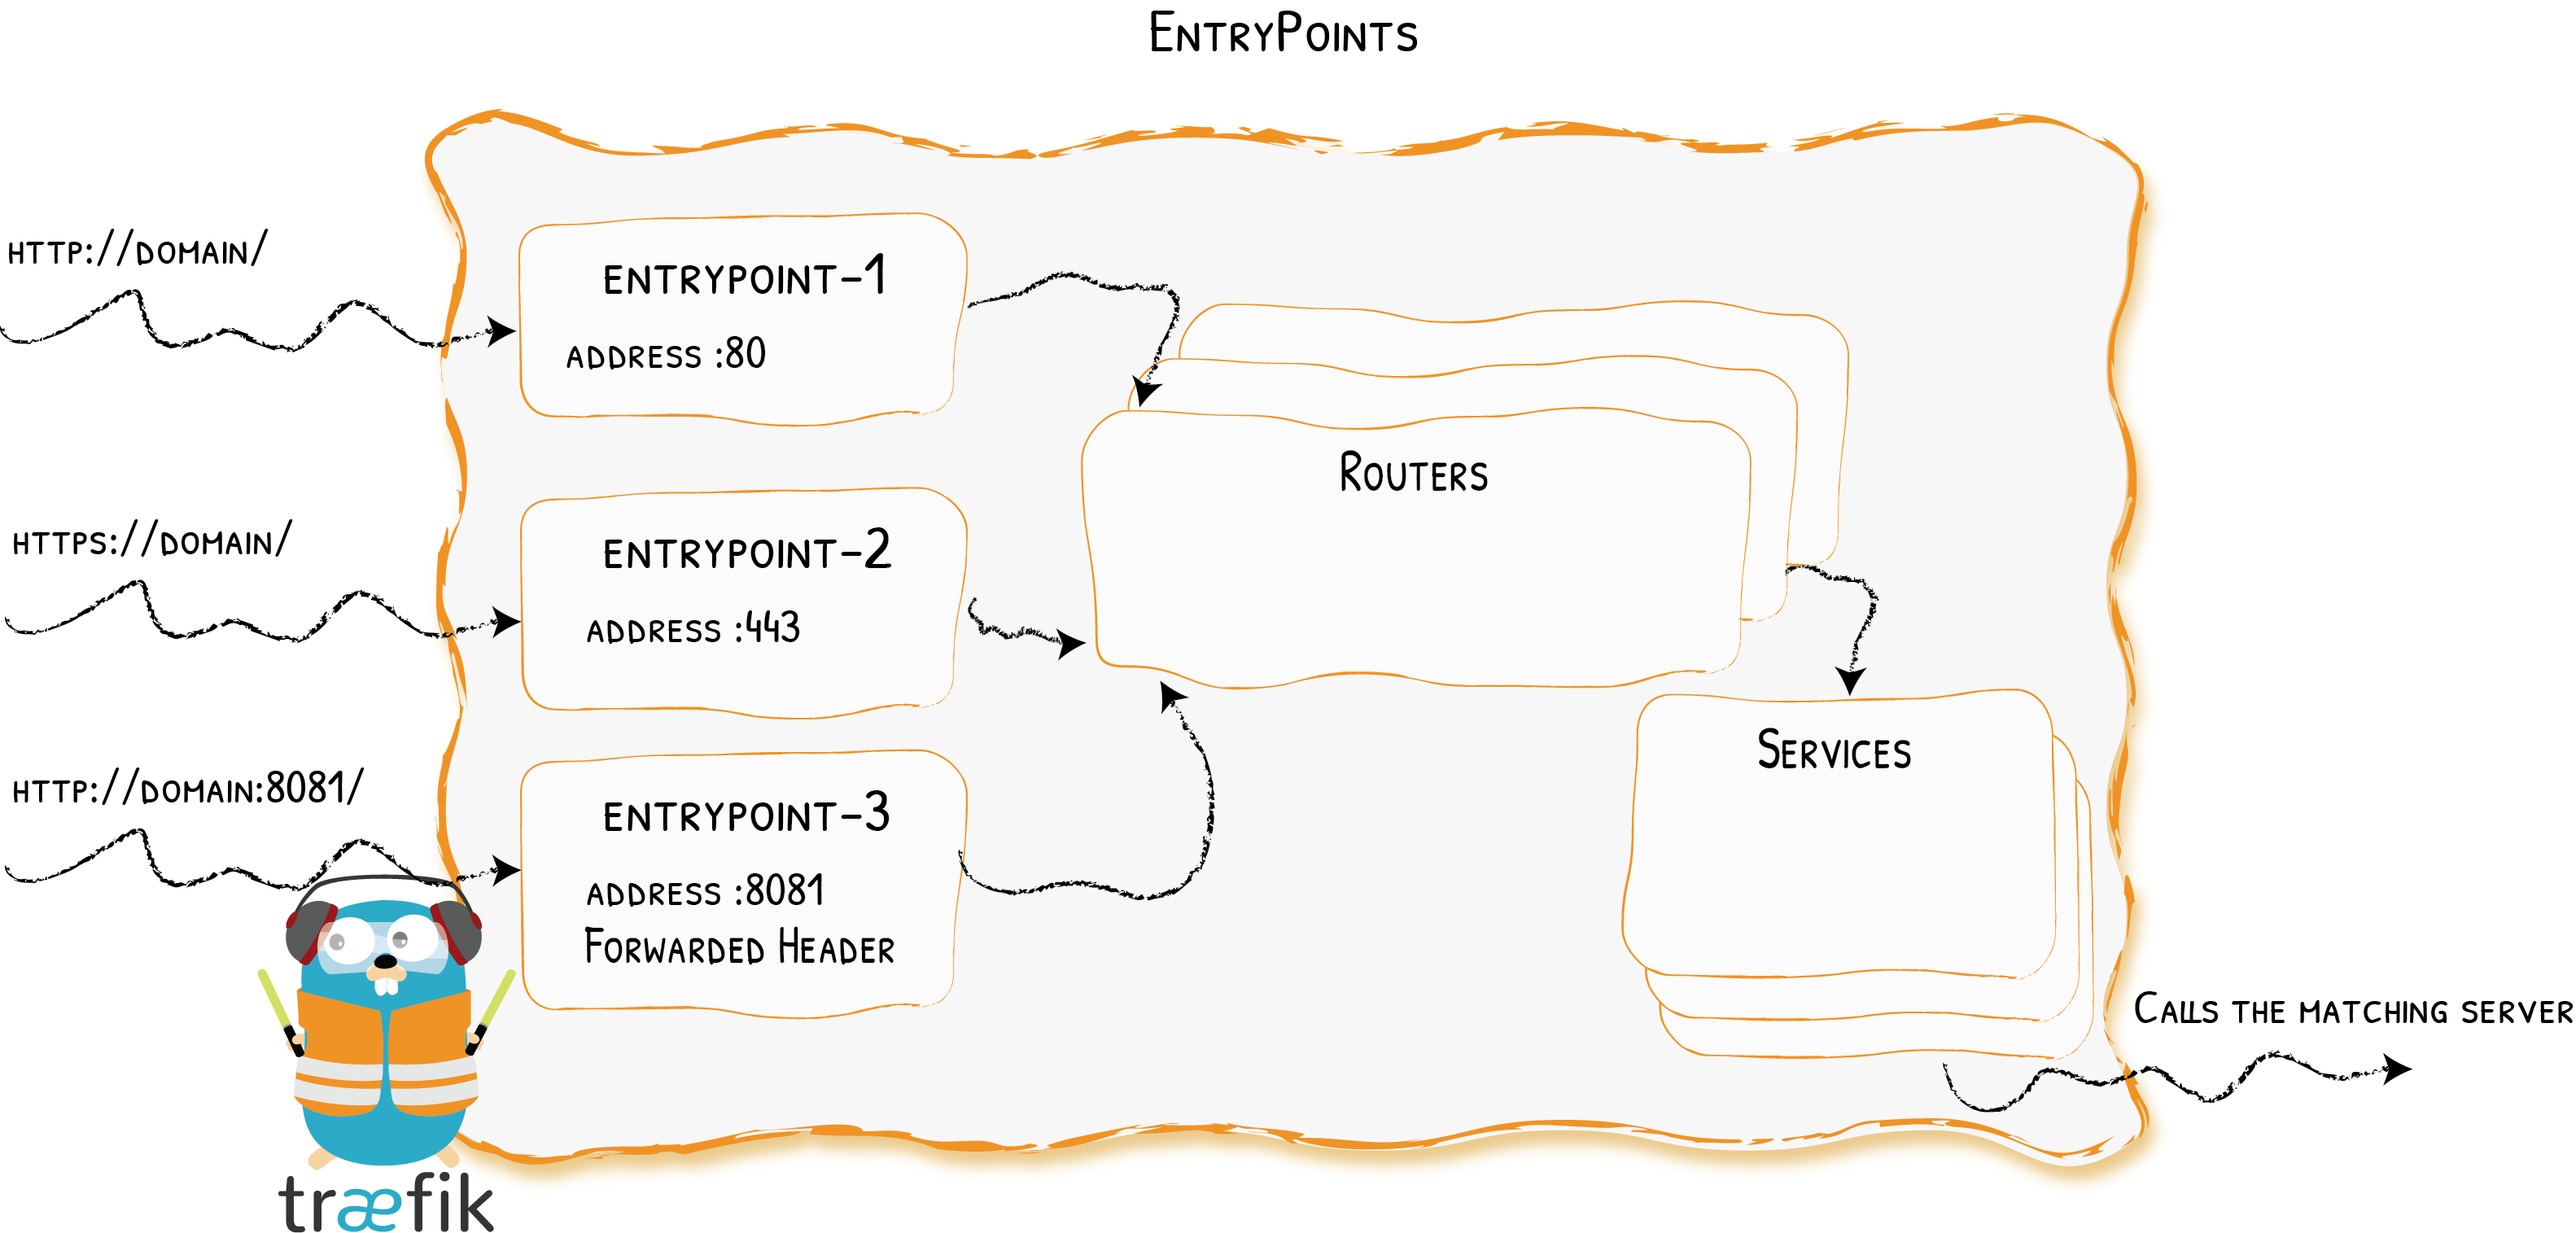
监听请求端口
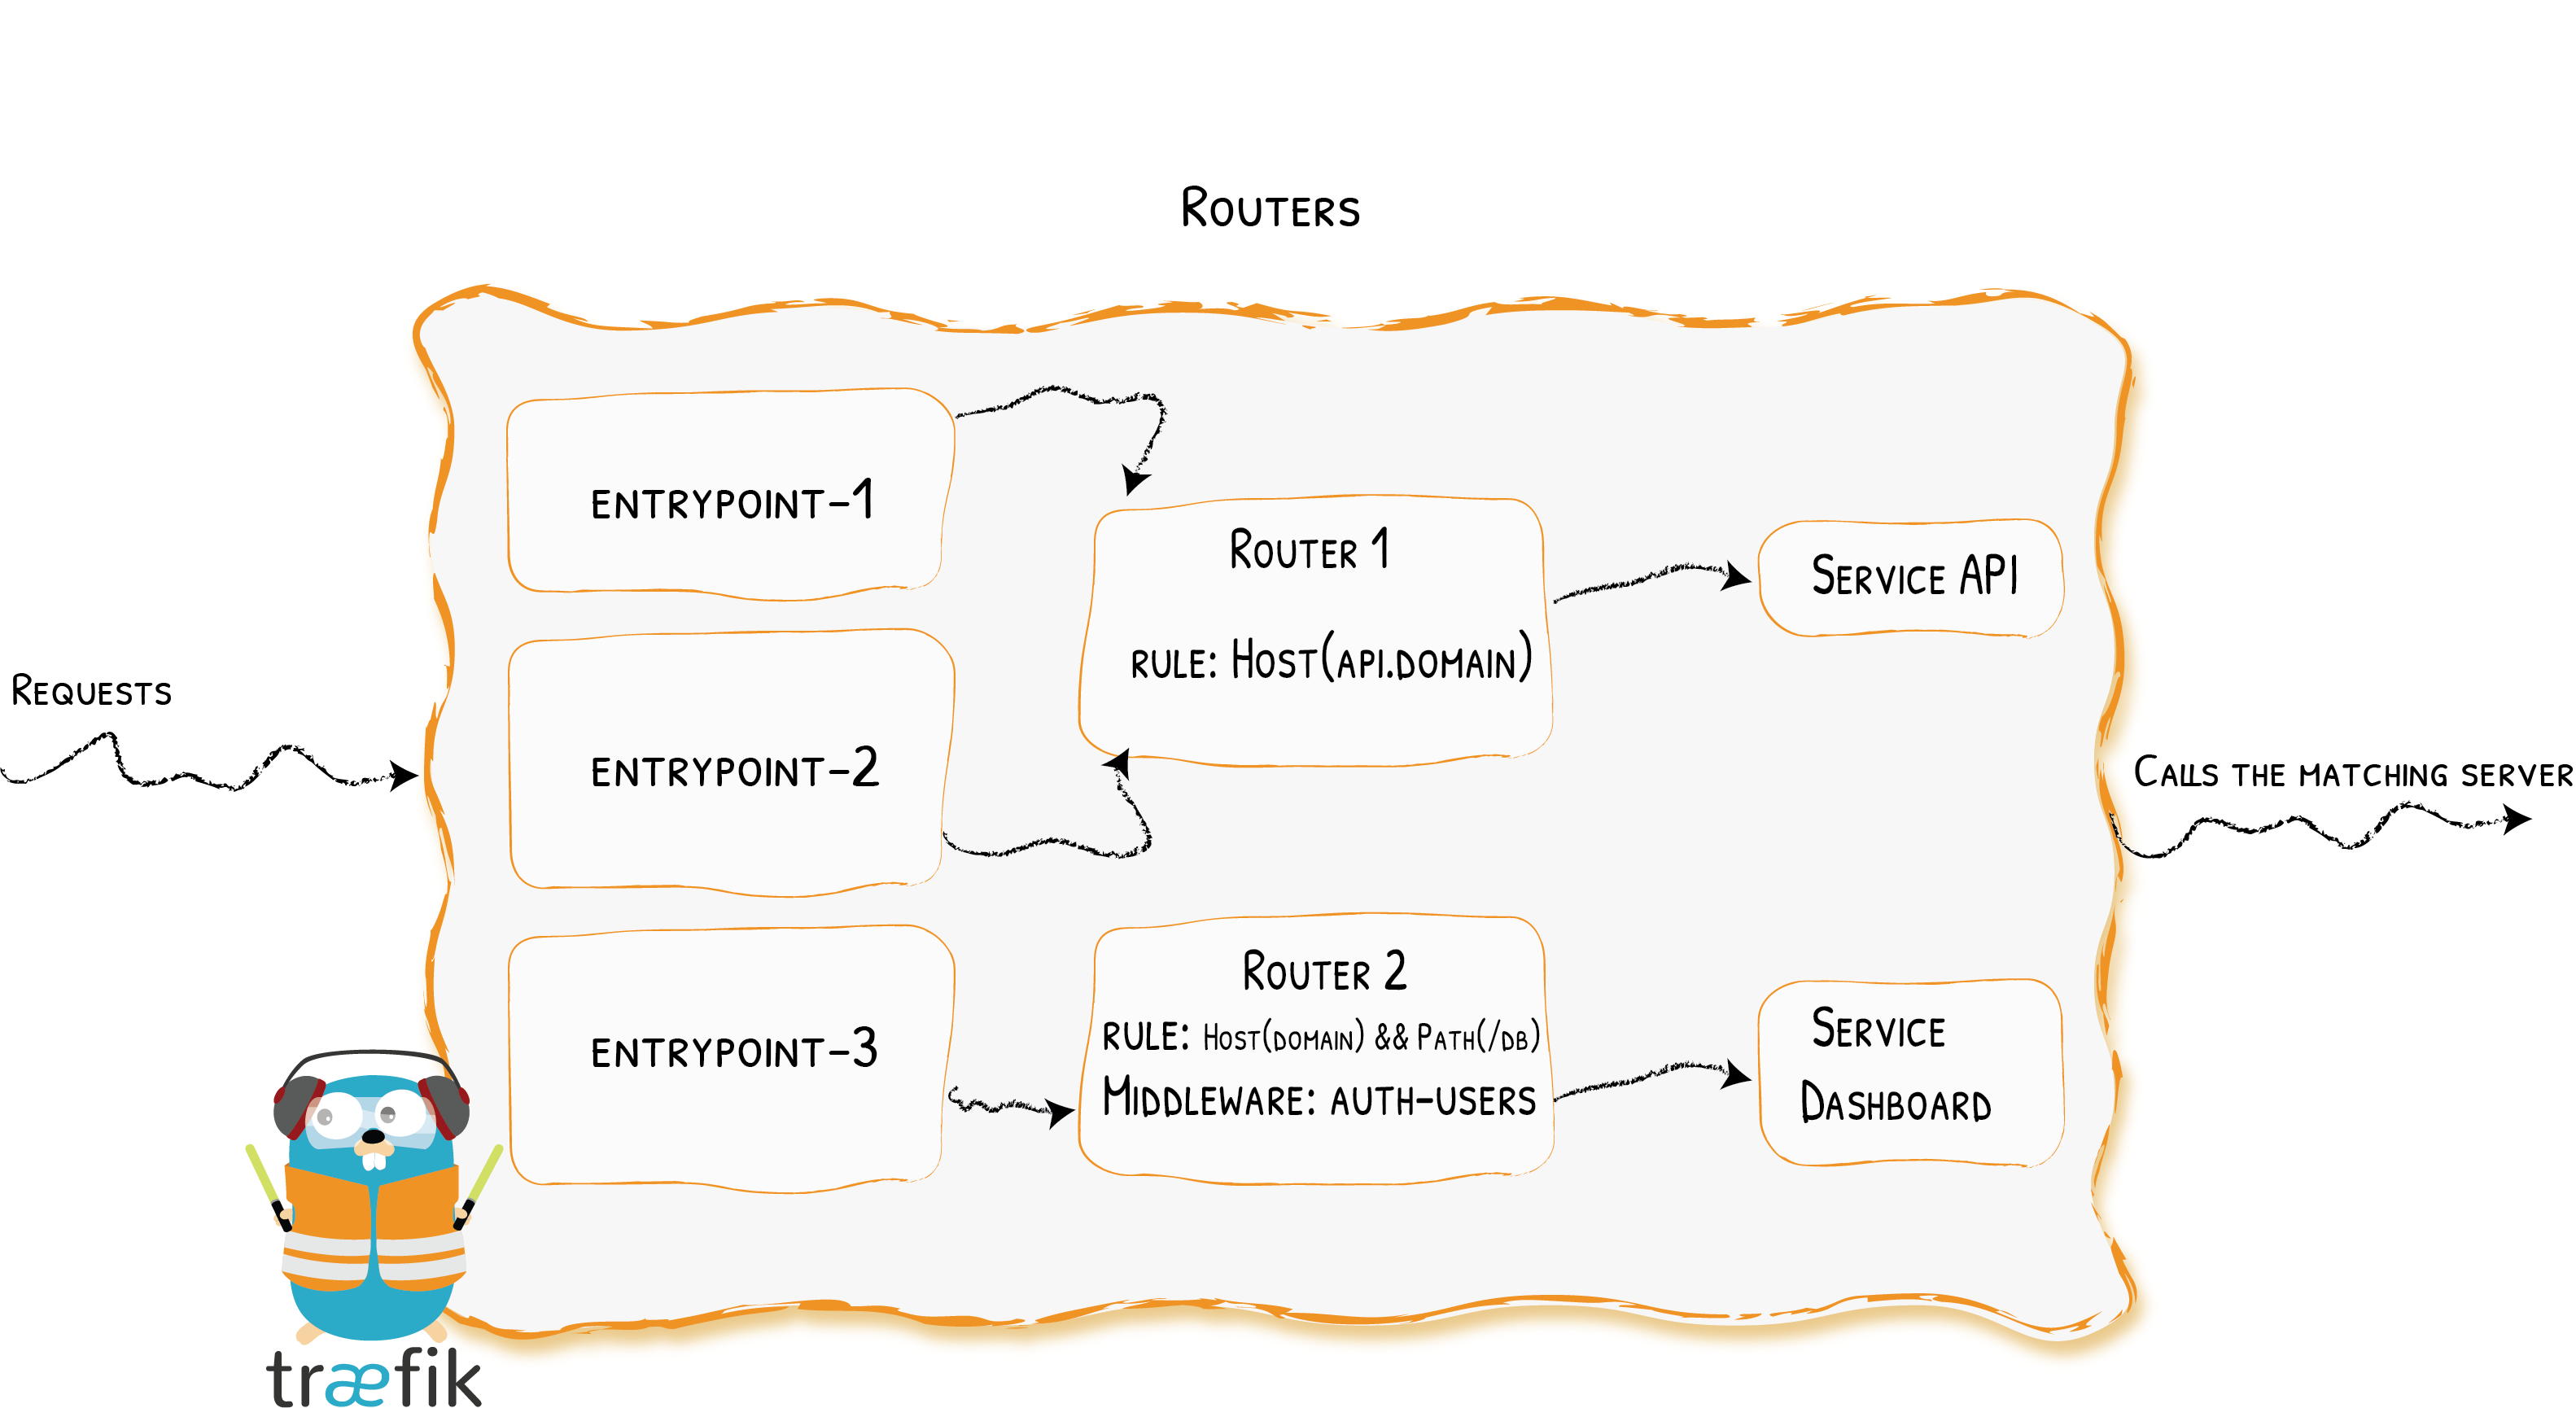
根据Rule分析请求(host, path, headers, ssl, ...)后,将其连接到对应的服务进行处理。在这个过程中,可以使用中间件处理经过的请求
将请求被转发到服务之前对请求做更新或调整。
官方HTTP中间件列表:https://doc.traefik.io/traefik/middlewares/http/overview/#available-http-middlewares
负责配置请求如何到达实际服务,如负载均衡、传输控制协议、镜像流量等
Provider是基础架构组件,它可以是编排器、容器引擎、云提供者或者键值存储等( Traefik支持的Provider ),Traefik通过Provider的API来获取有关路由的信息,检测到变更则动态进行更新。
Traefik实例启动时,在静态配置中定义了Entrypoints入口点(端口号)。路由器分析从入口点传入的请求,如果请求符合指定的规则,路由器会将请求经过中间件处理后再转发到对应的服务进行处理。
安装文档:https://doc.traefik.io/traefik/getting-started/install-traefik/
Traefik默认会在以下路径查找traefik.yml或traefik.toml配置文件:
- /etc/traefik/
- $XDG_CONFIG_HOME/
- $HOME/.config/
- .
也可以指定配置文件进行启动:
traefik --configFile=foo/bar/myconfigfile.yml
静态示例配置:
- YAML: https://raw.githubusercontent.com/traefik/traefik/v2.5/traefik.sample.yml
- TOML: https://raw.githubusercontent.com/traefik/traefik/v2.5/traefik.sample.toml
配置参考文档:
- Entrypoints: https://doc.traefik.io/traefik/routing/entrypoints/
- Routers: https://doc.traefik.io/traefik/routing/routers/
- Services: https://doc.traefik.io/traefik/routing/services/
- 不同Provider: https://doc.traefik.io/traefik/providers/overview/#supported-providers
这里在linux下直接下载v2的二进制版本进行本地测试:https://github.com/traefik/traefik/releases
下载解压出二进制,并下载demo配置文件,默认配置的端口是80,需要以sudo权限启动:
wget https://github.com/traefik/traefik/releases/download/v2.5.3/traefik_v2.5.3_linux_amd64.tar.gz
tar xzvf traefik_v2.5.3_linux_amd64.tar.gz
wget https://raw.githubusercontent.com/traefik/traefik/v2.5/traefik.sample.toml -O traefik.toml
修改traefik.toml静态配置:
开启Dashboard的insecure模式,修改配置文件中的api下的insecure = true Traefik启动后访问: http://localhost:8080/dashboard/#/ 可查看Dashboard
使用指定文件作为Provider的动态配置,直接追加配置:
[providers]
[providers.file]
    filename = "./dconf.toml"
新建动态配置文件dconf.toml:
# http routing section
[http]
[http.routers]
    # Define a connection between requests and services
    [http.routers.myserver]
    rule = "Host(`myserver.local`)"
    # If the rule matches, applies the middleware
    middlewares = ["test-user"]
    # If the rule matches, forward to the myserver service (declared below)
    service = "myserver"

[http.middlewares]
    # Define an authentication mechanism
    [http.middlewares.test-user.basicAuth]
    # 注意这里的basic用户的密码必须使用htpasswd生成,不能直接填明文,这里对应的明文为asd
    users = ["asd:$apr1$KsluegO9$bbuP8Q1X3pLkx8XVRegse/"]

[http.services]
    # Define how to reach an existing service on our infrastructure
    [http.services.myserver.loadBalancer]
    [[http.services.myserver.loadBalancer.servers]]
        url = "http://localhost:8000"
上面的文件动态配置指定了Host为myserver.local的请求经过默认的80端口后,再由中间件进行basic认证,然后转发到myserver服务,myserver服务的后端地址为:http://localhost:8000
启动Traefik实例:sudo ./traefik
启动一个8000端口的服务模拟后端服务: python -m SimpleHTTPServer
通过curl请求Traefik的80端口进行测试:
# 直接curl不满足rule,返回404
curl http://localhost:80
404 page not found

# 添加满足rule的host进行请求,中间件basic认证失败,返回401
curl -H 'host:myserver.local' http://localhost:80
401 Unauthorized

# 添加认证进行请求,成功将80端口的请求路由到了8000端口的服务进行处理并返回结果
curl -H 'host:myserver.local' -u 'asd:asd' http://localhost:80
<!DOCTYPE html PUBLIC "-//W3C//DTD HTML 3.2 Final//EN"><html>
<title>Directory listing for /</title>
<body>
<h2>Directory listing for /</h2>
<hr>
<ul>
<li><a href="dconf.toml">dconf.toml</a>
<li><a href="traefik">traefik</a>
<li><a href="traefik.toml">traefik.toml</a>
<li><a href="x.md">x.md</a>
</ul>
<hr>
</body>
</html>
通过Dashboard右上角使用GitHub账号授权连接Traefik Pilot可以对 Traefik 进行监控和管理,同时拥有公共插件中心。连接操作参考文档:https://doc.traefik.io/traefik-pilot/connecting/
Traefik管理员可以从Traefik Pilot仪表板中的目录浏览插件并将其添加到实例中,每个插件的实际代码都存储并托管在公共GitHub。Traefik Pilot每隔30分钟轮询一次GitHub,以查找符合Traefik插件标准的存储库,并将其添加到其目录中。
要被Traefik Pilot识别,插件的存储库必须满足以下标准:
- Github代码仓库必须添加
traefik-plugin的topic。 - 必须存在有效的
.traefik.yml文件,格式参考文档:https://doc.traefik.io/traefik-pilot/plugins/plugin-dev/#manifest。 - 需要对插件打上版本号tag
使用插件中心的插件时,需要修改静态和动态配置进行插件安装,实际是下载对应插件的源码到本地的plugin-storage路径下,Traefik官方实现了Yaegi解释器,可以动态执行Golang源码,插件代码执行时由Yaegi动态加载执行,无需进行编译链接。
要激活插件,必须在Traefik实例的静态配置中声明它,插件在Traefik启动期间才会被解析加载,加载过程中出现错误,插件将被禁用,添加新插件和修改插件必须重启Traefik实例才能生效。
Traefik启动时,会根据静态配置文件去Pilot插件中心去获取插件代码,对插件下载,校验,解压,然后加载插件源码通过yaegi来执行,先调用插件的CreateConfig函数再调用插件的New函数进行指定配置的插件实例创建。
在插件中心选择一个插件,有对应的安装文档,按执行进行即可,这里安装Response code override插件进行测试:
在静态配置中添加插件:
[experimental.plugins.traefik-plugin-response-code-override]
    moduleName = "github.com/Lepkem/traefik-plugin-response-code-override"
    version = "v0.0.3"
文件动态配置中添加中间件配置:
[http.middlewares.my-traefik-plugin-response-code-override]
  [http.middlewares.my-traefik-plugin-response-code-override.plugin]
    [http.middlewares.my-traefik-plugin-response-code-override.plugin.traefik-plugin-response-code-override]
      # 移除响应头里面的Date
      HeadersToRemove = ["Date"]
      RemoveBody = false
      [http.middlewares.my-traefik-plugin-response-code-override.plugin.traefik-plugin-response-code-override.Overrides]
        # 将200状态码替换为222
        200 = 222
文件动态配置中routers添加该中间件
middlewares = ["test-user", "my-traefik-plugin-response-code-override"]
重启Traefik,curl请求可以看到没有Date信息,200也被替换为了222:
curl -v -H 'host:myserver.local' -u 'asd:asd' http://localhost:80
*   Trying 127.0.0.1:80...
* TCP_NODELAY set
* Connected to localhost (127.0.0.1) port 80 (#0)
* Server auth using Basic with user 'asd'
> GET / HTTP/1.1
> Host:myserver.local
> Authorization: Basic YXNkOmFzZA==
> User-Agent: curl/7.68.0
> Accept: */*
>
* Mark bundle as not supporting multiuse
< HTTP/1.1 222 status code 222
< Content-Length: 376
< Content-Type: text/html; charset=UTF-8
< Server: SimpleHTTP/0.6 Python/2.7.18
< Date: Mon, 11 Oct 2021 09:41:25 GMT
<
<!DOCTYPE html PUBLIC "-//W3C//DTD HTML 3.2 Final//EN"><html>
<title>Directory listing for /</title>
<body>
<h2>Directory listing for /</h2>
<hr>
<ul>
<li><a href="dconf.toml">dconf.toml</a>
<li><a href="plugins-storage/">plugins-storage/</a>
<li><a href="traefik">traefik</a>
<li><a href="traefik.toml">traefik.toml</a>
<li><a href="x.md">x.md</a>
</ul>
<hr>
</body>
</html>
Traefik的HTTP中间件插件只是一个Golang包,提供一个http.Handler来执行请求和响应的特定处理。
插件包必须定义以下导出的Go对象:
type Config struct { ... } 结构体,字段任意。
func CreateConfig() *Config 函数。
func New(ctx context.Context, next http.Handler, config *Config, name string) (http.Handler, error) 函数。
如果插件有任何外部模块依赖项,必须将这些依赖包已vendor的形式放入当前插件的源码路径下以本地源码的方式进行使用,不支持Go mod的方式使用外部依赖。
Traefik提供了开发者模式在本地模式下使用插件,可用于临时测试未托管在GitHub上的插件。Traefik静态配置必须定Golang模块名称。这里需要注意的是,官方文档当前写的是devPlugin的配置方式,在v2上无法识别该字段,需要使用plugins-local的方式。
本地开发者模式的插件代码必须放在./plugins-local目录中,该目录应位于运行Traefik二进制文件的进程的工作目录中。插件的源代码按如下方式组织:
plugins-local
└── src
    └── github.com
        └── axiaoxin
            └── traefikplugindemo
                ├── .git
                ├── go.mod
                ├── go.sum
                ├── header_resp.go
                ├── header_resp_test.go
                ├── README.md
                ├── traefik_dynamic_conf.toml
                ├── traefik_static_conf.toml
                ├── .traefik.yml
                └── vendor
traefikplugindemo是一个自定义中间件插件示例,源码地址:https://github.com/axiaoxin/traefikplugindemo,功能是在返回header中添加 resp:xxx。
header_resp.go:
// Package traefikplugindemo Traefik插件示例
// 给请求响应头添加 resp:xxx
package traefikplugindemo

import (
	"context"
	"net/http"

	"github.com/iancoleman/strcase"
)

// Config the plugin configuration.
type Config struct {
	// resp header值的字符串风格:snake, camel
	ValueStrCase string
	// resp header的默认值
	DefaultValue string
}

// CreateConfig creates the default plugin configuration.
func CreateConfig() *Config {
	return &Config{
		ValueStrCase: "",
		DefaultValue: "",
	}
}

// HeaderResp a plugin.
type HeaderResp struct {
	next http.Handler
	name string
	conf *Config
}

// New created a new plugin.
func New(ctx context.Context, next http.Handler, config *Config, name string) (http.Handler, error) {
	return &HeaderResp{
		next: next,
		name: name,
		conf: config,
	}, nil
}

func (h *HeaderResp) ServeHTTP(rw http.ResponseWriter, req *http.Request) {
	// 默认返回头 resp:axiaoxin
	val := h.conf.DefaultValue
	// 如果请求头带有 x-resp,则返回头 resp:x-resp的值
	if customVal := req.Header.Get("x-resp"); customVal != "" {
		val = customVal
	}

	// 使用外部依赖包,发布插件时需要采用vendor模式
	switch h.conf.ValueStrCase {
	case "camel":
		val = strcase.ToCamel(val)
	case "snake":
		val = strcase.ToSnake(val)
	}

	// 设置返回头
	rw.Header().Add("resp", val)

	// 继续后续请求处理
	h.next.ServeHTTP(rw, req)
}
写好代码后,修改静态配置,添加本地插件:
[experimental.localPlugins.axiaoxin-traefik-plugin-demo]
    moduleName = "github.com/axiaoxin/traefikplugindemo"
动态配置添加中间件,命名为 axiaoxin-middleware:
middlewares = ["test-user", "my-traefik-plugin-response-code-override", "axiaoxin-middleware"]
动态配置中添加中间件的配置,配置项与Config结构体中的字段一一对应:
[http.middlewares.axiaoxin-middleware.plugin.axiaoxin-traefik-plugin-demo]
    ValueStrCase = "snake"
    DefaultValue = "axiaoxin"
重启Traefik,curl请求中通过x-resp设置自定义resp的值:
curl -v -H 'host:myserver.local' -u 'asd:asd' -H 'x-resp:axiaxoin test demo' http://localhost:80
*   Trying 127.0.0.1:80...
* TCP_NODELAY set
* Connected to localhost (127.0.0.1) port 80 (#0)
* Server auth using Basic with user 'asd'
> GET / HTTP/1.1
> Host:myserver.local
> Authorization: Basic YXNkOmFzZA==
> User-Agent: curl/7.68.0
> Accept: */*
> x-resp:axiaxoin test demo
>
* Mark bundle as not supporting multiuse
< HTTP/1.1 502 Bad Gateway
< Resp: axiaxoin_test_demo
< Date: Tue, 12 Oct 2021 04:10:50 GMT
< Content-Length: 11
< Content-Type: text/plain; charset=utf-8
<
本地测试通过,使用go mod vendor将依赖打包到vendor,再打上tag提交到github,在github仓库的about设置添加traefik-plugintopic,等一段时间插件就会被同步到Traefik Pilot的插件中心,如图所示:


