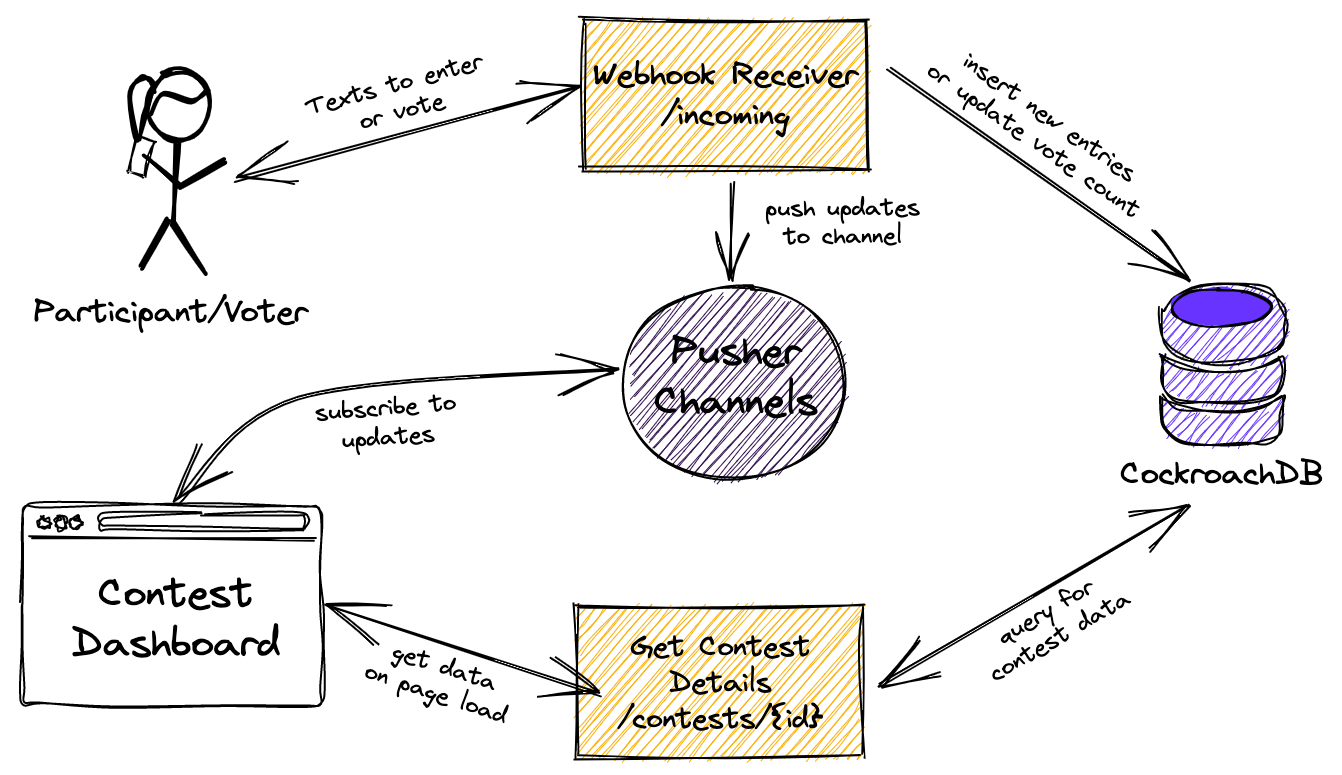
This app consists of a Dashboard displaying the status of the contest and a serverless backend that will facilitate bootstrapping the dashboard and handling updates from SMS messages using websockets.
To enter, text a picture with the contest and name to enter.
To cast a vote, text the context and name of the entry.
- Netlify for Serverless Functions and Hosting
- Next.js for Frontend
- Pusher Channels for Websockets
- Twilio for inbound/outbound SMS
- CockroachDB Serverless for database
- Prisma for connecting to the database
These tables can be created using Prisma Migrate
npx prisma migrate dev --name init
A sql script has also been provided to create the following tables.
- id -
UUID - name -
STRING - description -
STRING - max_votes -
INT(Max number of votes per voter)
- id -
UUID - contest_id -
UUID - name -
STRING - picture - BYTES (1 MB max)
- picture_type -
STRING
- contest_id -
UUID - entry_id -
UUID - voter_id -
STRING(hashed phone number)
-
Save the connection string to the
DATABASE_URLenvironment variable -
Run Prisma Migrate
npx prisma migrate dev --name init
OR Execute the provided script using the SQL client to create the database and tables;
cockroach sql --url [Connection string] --file ./scripts/init_database.sql
- Sign up for a free Twilio Trial Account
- Configure the Messaging Wehook - In the Twilio phone number configuration, set the Messageing > "A Message Comes In" to Webhook with the url
https://{your-netlify-site-name}.app/webhooks/twilioand select HTTP POST. - Note the Auth Token and phone number for the environment variables below.
NOTE This app will only work with verified phone numbers while using a Twilio trial account.
- Create a free Pusher Channels Account
- Create a new Channels app named
ugly-sweater-app - Use the App Keys for the Pusher environment variables below
Option one: One-click deploy
Clicking this button will create a new repo for you that looks like this one, and sets that repo up immediately for deployment on Netlify. You will be prompted for a repo name and to provide the values for the following environment variables:
- Postgres Connection String (
DATABASE_URL), required You can find this in the Connect model in the Cockroach Labs Cloud Console - Twilio Configuration
- Auth Token (
TWILIO_AUTH_TOKEN), required - Phone number (
NEXT_PUBLIC_TWILIO_NUMBER), required
- Auth Token (
- Pusher Channels Configuration
- Applicaiton ID (
PUSHER_APP_ID), required - Secret (
PUSHER_SECRET), required - Key (
NEXT_PUBLIC_PUSHER_KEY), required - Cluster (
NEXT_PUBLIC_PUSHER_CLUSTER), required
- Applicaiton ID (
Option two: Manual clone
You will need to install the Netlify CLI and connect it to your Netlify site to run locally.
- Clone this repo:
git clone https://github.com/aydrian/ugly-sweater-app.git - Navigate to the directory and run
ntl initto connect to Netlify - Add the above environment variables using
ntl env:set [env var] [value] - Run the app locally using
ntl dev - Make any changes and push to your repo to deploy.


