This is a how to guide on the basics of creating an application using QT and AppStudio by ESRI. This guide is focused on map making, customization, and adding features to develop a custom app.
The following items need to be downloaded and/or are required in order to build a custom application on your computer.
- ESRI Account
- ESRI AppStudio
- QT Creator (comes part of the package when AppStudio is downloaded)
- (optional, but recommended) mobile device
This application will not work without an account with ESRI. A standard license is required with ArcGIS in order to access ESRI's app building services.
Navigate to this website to find Appstudio on ESRI's website. Based on your computer, download the accurate version of your computer's platform under the highlighted section in figure 1. There is no need to download AppStudio Player unless you want to visualize your applicaiton on your mobile device in which case you can access the app in iOS or Android. AppStudio software will also allow you to visualize the application on a small screen in its completion form. Note - for this tutorial, Windows x64 is the platform of choice.

Figure 1
There is no need to download QT Creator as it comes with AppStudio. After AppStudio has been downloaded, a quick search in all programs for "AppStudio" will display "AppStudio for Desktop Version" as well as "QT Creator" as seen in figure 2. The necessary components of building an app are complete. Now let's begin with AppStudio to develop our application.

Figure 2
Below are the intial steps in creating the basic elements of the application starting with AppStudio.
- Create a new App (see figure 3)

Figure 3
- Toggle to Starter and click Hello World (Runtime) (see figure 4)
- Name your app on the top right corner under title (for this example, the name of the app is MyMap)
- Click on Create

Figure 4
- Double click the new app in AppStudio and you should have a generic map with basic functions display (see figure 5)
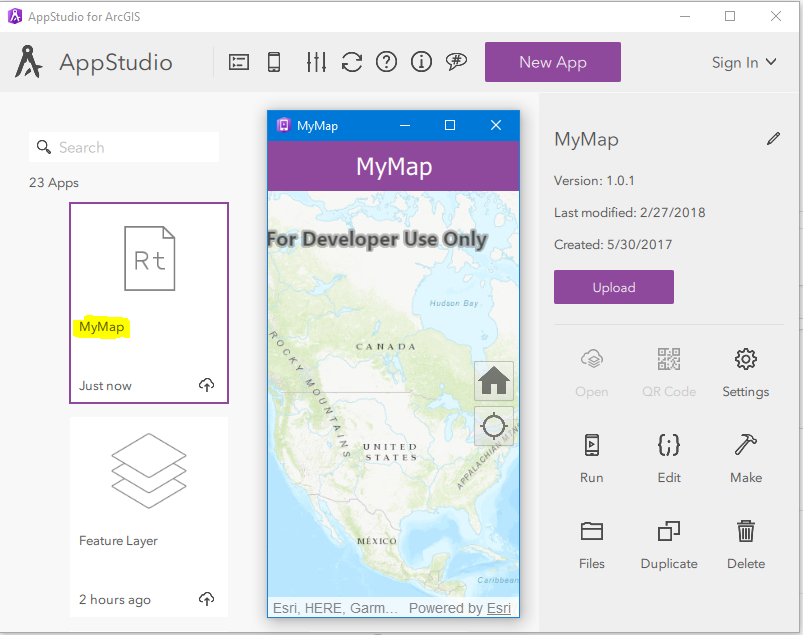

Figure 5
Now you have a basic app to build upon. Lets move this app to QT creator to do some editing and changing so that we can customize our map to our needs and, later on, add feature layers.
To open the app in QT Creator, right click on the application when in AppStudio and click "Edit in QT Creator" (see figure 6).

Figure 6
You are ready to view some coding and work within QT to make changes in the app.
Remember: Any changes made in QT Creator can be directly seen in AppStudio by double clicking the app. Remember to "save all" in QT Creator and refresh your app in AppStudio before you open the application so you can view the changes.
First, lets figure out where our area of study is. Given where you pull the feature layer from, the geographic location is important so that the application does not open with a world view, but rather zoom in where your feature layer is located. The map is in world view so it is essential to include a latidude and longitude in your code as well as zoom level in QT Creator so that the focus of the map in these coordinates.
In order to provide zoom level for your map, change this code to a zoom level that makes sense for your feature layer. The zoom level below for this code is a great distance if you want the United States in view. The lower the number, the closer the zoom level is to the map. Note: All of the script below will be under the headline Map {.
targetScale: 40000000
Next, we want to change our location. This is done with using latitude and longitude coordiates which you can search on google for any given location.
This map will focus on a feature service layer that will be displayed in Idaho. Thus, a good central coordinate of Idaho will work.
Here is the code that specifies location. Change the x and y coordinate to your location of focus.
        ViewpointCenter {
            id: vc
            center: Point {
                x: -12876752
                y: 5490404
                spatialReference: SpatialReference {wkid: 102100}
                }
                targetScale: 10000000
                }
             }
I am also going to change the targetScale to 10000000 so the focus will be on the state of Idaho. The spatialReference refers to the associated coordinate system. By default, this one is Web Mercator auxillary sphere.
Finally, lets play with the basemap so you can customize it to your liking. I want a basemap that is satellite imagery to include labels. There are multiple options to choose from. See this link for a list of basemaps with QML.
            BasemapImageryWithLabelsVector {}
            initialViewpoint: vc
Now that we have changed the map to our liking, it is time to add a feature layer onto your map. We have a good zoom level on Idaho, the basemap is satellite imagery, and the focus is on the state. Double click the app in AppStudio and it should look something like figure 7.

Figure 7
To add a feature layer, it is important to understand the basics of REST services. These online services allow you to pull raster, vector, point, line, or polygon features and add it onto a map using the URL of the REST service. Each layer has a designated number after clicking the REST service which you can see in the URL. After you know what feature you would like to use, add this bit of code to your script.
            FeatureLayer {
                ServiceFeatureTable {
                    url: "https://maps.idwr.idaho.gov/arcgis/rest/services/BP/_Geothermal/MapServer/1"
                }
            }
Notice the URL has a number at the end. That is calling an endpoint to render a specific layer in the multiple services that this REST provides. I am making a map of all the designated geothermal springs in Idaho. After this script has been added, your map should have blue triangle symbols in Idaho such as the image below.

Figure 8
You have added a feature layer to your map! The full block of code should look something like this:
        Map{
            id:map
            BasemapImageryWithLabelsVector{}
            initialViewpoint: ViewpointCenter {
                id:initialViewpoint
                center: Point {
                    x: -12876752
                    y: 5490404
                    spatialReference: SpatialReference {wkid: 102100}
                }
                targetScale: 10000000
            }
            FeatureLayer {
                ServiceFeatureTable {
                    url: "https://maps.idwr.idaho.gov/arcgis/rest/services/BP/_Geothermal/MapServer/1"
                }
            }

        }
Here is the same code, but displayed in QT Creator (figure 9):

Figure 9
Now, your app needs to be uploaded after you are satisfied with the way it looks. Go to AppStudo and when you click on your app, you should see an upload sign which will upload the app in any organization you are part of or as a public app given your preferences. Using a mobile device at this stage might need necessary changes in the script because if you have been working on desktop or a computer for viewing your app, it may be different.
Azad Mohammed - Geospatial Technologies student at UW Tacoma
Copyright 2017 Esri
Licensed under the Apache License, Version 2.0 (the "License");
you may not use this file except in compliance with the License.
You may obtain a copy of the License at
http://www.apache.org/licenses/LICENSE-2.0
Unless required by applicable law or agreed to in writing, software
distributed under the License is distributed on an "AS IS" BASIS,
WITHOUT WARRANTIES OR CONDITIONS OF ANY KIND, either express or implied.
See the License for the specific language governing permissions and
imitations under the License.