Team C T D aspires to connect the dots and move mountains ✨ ✨ ✨
- Sajjad Ali Qadri
- Muhammad Hazzry Bin Shafaruan
- Azizi Azfar Bin Zahari
- Often times when someone realises that he is experiencing heat stroke, it is already too late.
- Necessary on-the-ground information for the ROTA Commander to make informed decisions
- Lag-time between accessing injuries and treating injuries
Our idea aims at tackling these issues by taking advantage of the availability of IOT sensors and IBM's Cloud Services.
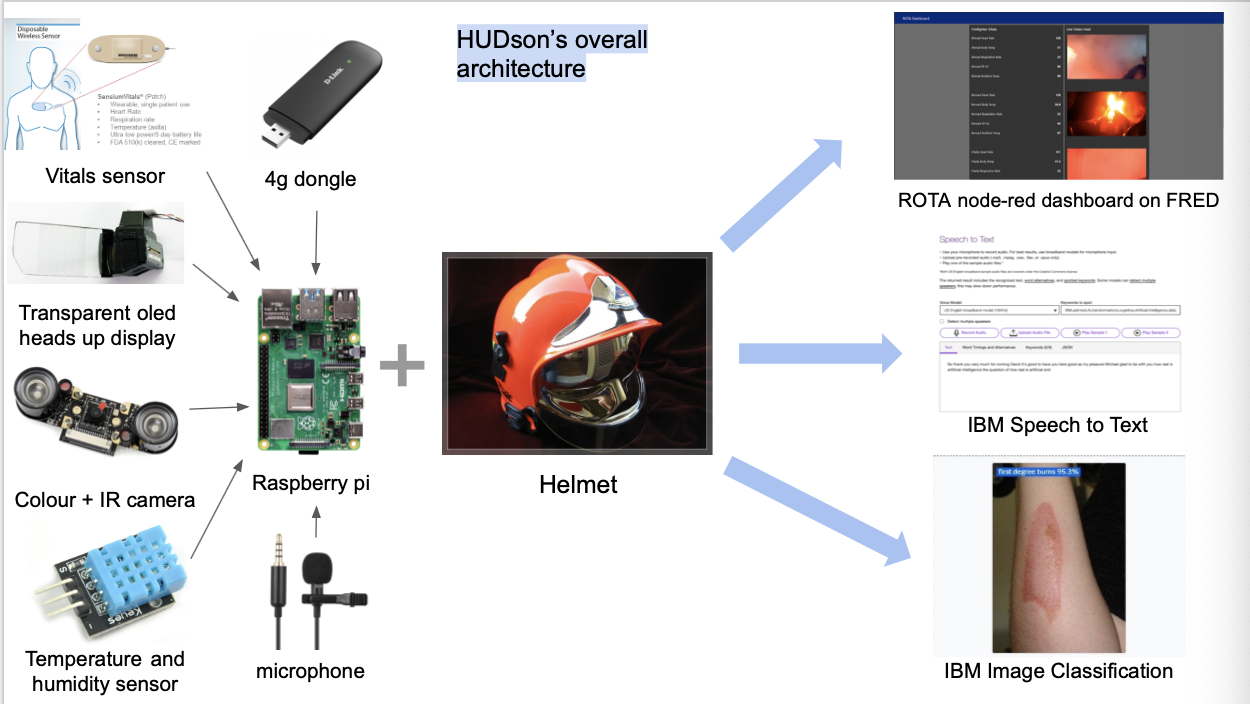
The HUDson is an enhancement to the current bunker gear by integrating a wearable system within it. Sensors that measure the user's vitals such as Temperature (both Ambient and User), Heart Rate, SP02 allows for the commanders to keep track of the user's condition during training and operations.
It also consists of a HUD (Heads Up Display) to provide real-time feeds from these sensors to the user. The system is also connected to the cellular network to provide direct communications between the responders.
Do click below to watch our video, thank you!

The details to our proposed solution can be found here.
Follow the instructions below to setup the project on your local machine:
- Install node red for the machine you’re using using this website: https://nodered.org/docs/getting-started/
- Open command prompt/terminal and type the following commands
npm install node-red-contrib-ui-media
npm install node-red-dashboard
- Then type node-red into terminal and navigate to localhost:1880 on web browser to go to node-red editor
- Click on 3 horizontal bars at top right hand corner to bring up context menu
- Click on import
- Navigate to “node-red items” folder from cloned github repository
- Open node-red flow.txt file, select all and copy to the import panel in node-red editor, then click import flows
- Inside the node-red items folder, right click the “firefighter_ahamad_json.txt”, go to properties and get the full path of the file
- Double click firefighter_ahamad_json.txt node (usually in brown) and paste the path of the file
- Repeat with all other firefighter nodes
- Click on clip1 node (in blue), click Files tab, click the book looking thing, click
Add new…, clickChoose Files, navigate tonode-red itemsfolder from cloned github repository and selectclip_1, click on the upload button next to the x button to upload - Repeat step 11 with
clip2 - clip4nodes - Click Deploy button on top right and go to
localhost:1880/uito see a rough preview of the UI that the ROTA commanders will see
git clonethe repo andcdinto it by running the following command:
git clone https://github.com/cloud-annotations/classification-react.git
cd classification-react- Download the necessary dependencies for the project with the following command:
npm install
Note: You’ll need to have Node 8.10.0 or later on your local development machine. You can use nvm (macOS/Linux) or nvm-windows to easily switch Node versions between different projects.
-
Add TensorFlow.js Model to the App by copying the
model_webdirectory generated from the classification walkthrough and paste it into thepublicfolder of this repo. -
Run the App using the following command:
npm start
Open http://localhost:3000 to view it in the browser.
- Sign up for an IBM Cloud account.
- Download the IBM Cloud CLI.
- Create an instance of the Speech to Text service and get your credentials:
- Go to the Speech to Text page in the IBM Cloud Catalog.
- Log in to your IBM Cloud account.
- Click Create.
- Click Show to view the service credentials.
- Copy the
apikeyvalue. - Copy the
urlvalue.
- In the application folder, create a file called .env
touch .env
- Open the .env file and add the service credentials that you obtained during the setting up of IBM Cloud.
SPEECH_TO_TEXT_IAM_APIKEY={ apikey }
SPEECH_TO_TEXT_URL={ url }
Example .env file that configures the apikey and url for a Speech to Text service instance hosted in the US East region:
SPEECH_TO_TEXT_IAM_APIKEY=X4rbi8vwZmKpXfowaS3GAsA7vdy17Qh7km5D6EzKLHL2
SPEECH_TO_TEXT_URL=https://gateway-wdc.watsonplatform.net/speech-to-text/api
-
Install the necessary dpendencies
npm install -
Run application
npm start -
View the application in a browser at
localhost:3000
- IBM Cloud Annotations for Object Classification
- IBM Speech-To-Text
- IBM Watson Assistant
- IBM Cloud for Node-Red Deployment
- Node-Red
- ReactJS
Powered by IBM


