No magic flux implementation library.
- Less trick
- No method swizzle, No overwrite function
- IDE Readable API(Machine Readable API)
- Debuggable
- ECMAScript6 compatible
- Class syntax
npm install material-flux
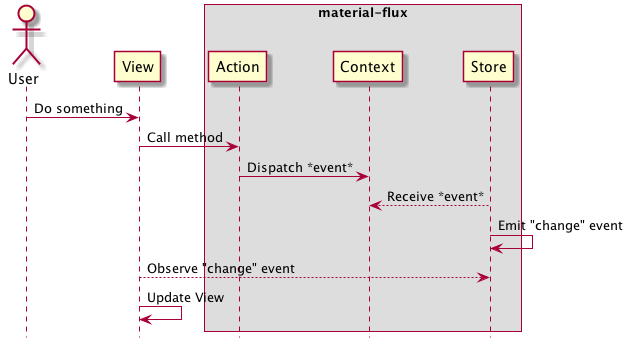
material-flux is consist of Action, Store and Context.
User action -> Action -> Context dispatch -> Store received dispatch
-> Store dispatch "change" event -> View received the "change". -> update view.
Contextprovidedispatchfunction toActions.Contextregister store for dispatched event.Actiondispatch event.Storereceived dispatched event with data.Storedispatch "change" event when update state in the store.
import {Action} from "material-flux"
// it's a like constants
export const keys = {
    // "any key" : "any value"
    "doSomething": "unique value"
};
export default class UserAction extends Action {
    doSomething(data) {
        // pass the `data` to Store's `onHandler`
        // call `onHandler(data);`
        this.dispatch(keys.doSomething, data);
    }
}
When you call action, dispatch store's handler.
import {keys} from "./UserAction.js"
import {Store} from "material-flux"
export default class UserStore extends Store {
   constructor(...args) {
       super(...args);
       this.state = {
           userData: null
       };
       this.register(keys.doSomething, this.onHandler);
   }

   // data is come from Action
   onHandler(data) {
       this.setState({
           userData: data
       });
   }

   // just getter method
   getUserData() {
       return this.state.userData;
   }
}Adds a listener to the end of the listeners array for the "change" event.
listeneris afunction.
Removes a "change" listener.
listeneris afunction.
Removes all "change" listeners.
Return state object that shallowly clone store's state.
Update this.state and emit "change" event.
objectis any object.
How to connect Action and Store?
=> Create connection object. it is called Context in this context.
import UserAction from "./UserAction.js"
import UserStore from "./UserStore.js"
import {Context} from 'material-flux';
export default class UserContext extends Context {
    constructor() {
        super();
        this.userAction = new UserAction(this);
        this.userStore = new UserStore(this);
    }
}How to connect to View like React?
=> Pass an instance of Context to React's Component.
import React from 'react';
import UserContext from './UserContext.js';
import App from './AppComponent.jsx';
var context = new UserContext();
React.render(
    React.createElement(App, { context }),
    document.getElementById('main')
);
AppComponent:
import React from 'react';
export default class AppComponent extends React.Component {
    constructor(...args) {
        super(...args);
        this.userStore = this.props.context.userStore;
        this.state = {
            userData: this.userStore.getUserData()
        };
    }

    _onChange() {
        this.setState({
            userData: this.userStore.getUserData()
        });
    }

    componentDidMount() {
        this.userStore.onChange(this._onChange.bind(this));
    }

    componentWillUnmount() {
        this.userStore.removeAllChangeListeners();
    }

    onClick(event) {
        var { context } = this.props;
        context.userAction.doSomething("clicked");
    }

    render() {
        return (
            <div onClick={this.onClick.bind(this)}>
                userData: {this.state.userData}
            </div>
        );
    }
}If you want to Container Component, use https://github.com/azu/material-flux-container
more examples.
npm test
# it run mocha & npm run test:typing.
- Fork it!
- Create your feature branch:
git checkout -b my-new-feature - Commit your changes:
git commit -am 'Add some feature' - Push to the branch:
git push origin my-new-feature - Submit a pull request :D
MIT
- Flummox
- Andrew Clark acdlite@me.com
