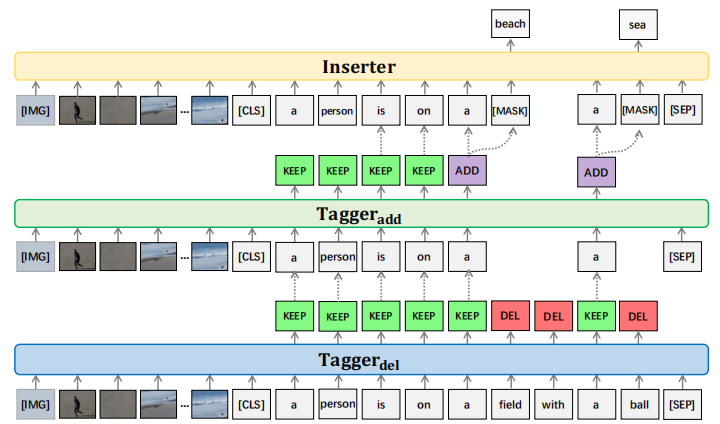
This repository contains the reference code for the ECE model TIger proposed in the paper Explicit Image Caption Editing accpeted to ECCV 2022. Refer to our full paper for detailed intructions and analysis. The dataset and more detailed task information are available in this ECE repository.
If you find this paper helps your research, please kindly consider citing our paper in your publications.
@inproceedings{wang2022explicit,
  title={Explicit Image Caption Editing},
  author={Wang, Zhen and Chen, Long and Ma, Wenbo and Han, Guangxing and Niu, Yulei and Shao, Jian and Xiao, Jun},
  booktitle={Computer Vision--ECCV 2022: 17th European Conference, Tel Aviv, Israel, October 23--27, 2022, Proceedings, Part XXXVI},
  pages={113--129},
  year={2022}
}
Clone the repository and create the tiger conda environment using the conda.yml file:
conda env create -f conda.yml
conda activate tiger
The processed datasets have been placed in the dataset folder, they can also be directly download from here, including the COCO-EE and Flickr30K-EE in train, eval and test splits.
For visual token features, we used the bottom-up features (36 regions for each image) which are extracted by a pre-trained Faster R-CNN.
COCO-EE
Download the pre-computed features file trainval_36.zip (~24.5 GB), unzip the file and rename the 'tsv' file as 'coco_36.tsv', then place it under the datasets/bottom_up/COCO_36 folder, run the 'process_bottom_up_feature.py' to process the feature.
python process_bottom_up_feature.py
Flickr30K-EE
Download the pre-computed features file flickr30k_36.zip (~6.5 GB, code: xlmd), unzip them and place 'flickr30k_36.tsv' under the datasets/bottom_up/Flickr30K_36 folder, run the 'process_bottom_up_feature.py' to process the feature.
python process_bottom_up_feature.py
To reproduce the results in the paper, download the pretrained model file pretrained_tiger (~6 GB) and place them under the pretrained_models/COCOEE and pretrained_models/Flickr30KEE folder, respectively.
To reproduce the results of our model, run:
COCO-EE
python eval.py --from_pretrained_tagger_del pretrained_models/COCOEE/tagger_del.bin --from_pretrained_tagger_add pretrained_models/COCOEE/tagger_add.bin --from_pretrained_inserter pretrained_models/COCOEE/inserter.bin --tasks 1 --batch_size 128 --save_name test_coco_ee --edit_round 5
Flickr30K-EE
python eval.py --from_pretrained_tagger_del pretrained_models/Flickr30KEE/tagger_del.bin --from_pretrained_tagger_add pretrained_models/Flickr30KEE/tagger_add.bin --from_pretrained_inserter pretrained_models/Flickr30KEE/inserter.bin --tasks 4 --batch_size 128 --save_name test_flickr30k_ee --edit_round 5
Under results/, you may find the edited results of all experiments.
Download the pretrained weights of ViLBERT from here (~1 GB) and place it under the pretrained_models/ViLBERT-6-Layer folder.
Run python train.py using the following arguments for different submodules.
Tagger_del
python train.py --tasks 1 --tagger_loss_ratio 1.5
Tagger_add
python train.py --tasks 2 --tagger_loss_ratio 1.5
Inserter
python train.py --tasks 3
Tagger_del
python train.py --tasks 4 --tagger_loss_ratio 1.5
Tagger_add
python train.py --tasks 5 --tagger_loss_ratio 1.5
Inserter
python train.py --tasks 6
Under model_out/, you may also find the trained model of all experiments.
Special thanks to the authors of ViLBERT and bottom-up-attention, and the datasets used in this research project.
