- Build a REST API-based backend system that does this:
- Add endpoint to receive a file of 50,000 users. (Excel file generated on your end)
- Each record of the file has dummy Names, NID, phone number, gender, email
- Validate each record, (as sometimes NID is not valid, phone number is incorrect, etc,) and be keep validation failure.
- Do not store the uploaded list on a disk-based storage
- Add a new endpoint to display the uploaded list with its validation failure for each record. (This endpoint will be used by the front-end to display paginated results)
- Add endpoint to be called in other to commit the list uploaded in a SQL database
I implemented the application using Python's Django REST framework.
The application receives the excel file and checks if there is any malformation in the file (I haven't covered all the edge cases). If everything is correct, the app responds to the client that the file is being processed in the background.
I choose to use Celery as a job queue because it's the most straightforward Job queue in python(opting for bigger things like Kafka can be an overkill ). So on every upload, the excel file is passed to the background job queue for processing and data validation.
When all validations are done, the data is stored in In-memory storage, a Redis instance.
When you call the commit endpoint, the validated data in the Redis instance will be saved in the Database. I choose to use Sqlite to speed up the development.
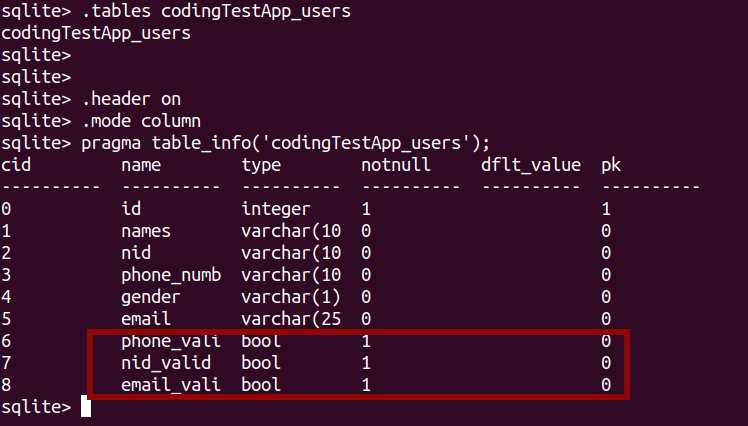
The existing table columns were names, nid, phone_number, gender, email . So, I added phone_valid, nid_valid, email_valid on the table schema. They can be true or false to indicate if they are valid or not.
Here's the database schema screenshoot.

Finally, you can call the savedusers/ endpoint to view the saved users in the database.
Here's the full architecture of the application
.png)
Below is how you can run the application locally for development and test it out.
-
Clone the repository
-
Set Redis instance(for the local environment, you can use a docker container to speed up the development)
docker run --name redis-instance --rm -p 6379:6379 redis
-
Change to
codingTestdirectory and Copy env.example.txt to.envfile.cd codingTest/
cp env.example.txt .env
-
Modify
.envfile to match your environment variables. -
Install the required packages
/!\ : before running the command below, It is advised that you create virtual environment to isolate the application's packages from the rest of other environments in your computer. Here's official docs for virtual environment creation: https://docs.python.org/3/library/venv.html
pip install -r requirements.txt
-
Run the migrations
python manage.py migrate
-
Create Admin user (We will use this user to get Authentication token)
python manage.py createsuperuser
-
Start Job Queue celery worker (You should run this in a seperate terminal)
celery --app codingtest.celery worker -l info
-
Run the application
python manage.py runserver
Now the application is ready to receive requests. You can send a request to the home to see if you get a response to ensure the app is running and responding.
curl 127.0.0.1:8000/api/v1/
You should expect a response that look like this below.
{"status": "ok", "description": "app is running"}
-
Now, Send request to be authenticated
curl -X POST -H "Content-Type: application/json" -d '{"username": "admin", "password": "admin"}' http://localhost:8000/api/v1/token/
You get access token in the response if you provided right credentials.
{"refresh":"eyJhbGciOiJIUzI1NiIsInR5cCI6IkpXVCJ9.eyJ0b2tlbl90eXBlIjoicmVmcmVzaCIsImV4cCI6MTY2NjUyMzEzOSwiaWF0IjoxNjY2NDM2NzM5LCJqdGkiOiI1OGVlODNlMTg0Mjk0OGYwOGI2OWRjZWVjYzJjYmIzYiIsInVzZXJfaWQiOjF9.36N97G9MW7B1cgcuA7osFtYKyAOgoLTkh6fU2Ys8ajQ","access":"eyJhbGciOiJIUzI1NiIsInR5cCI6IkpXVCJ9.eyJ0b2tlbl90eXBlIjoiYWNjZXNzIiwiZXhwIjoxNjY2NDM3MDM5LCJpYXQiOjE2NjY0MzY3MzksImp0aSI6IjkzYjYwMTY5NGMxODRkYWVhYmQ1OWFiZjA1ZTdiOWJmIiwidXNlcl9pZCI6MX0.c7_vXvCXNBAsJAdeiLpBnMzQ-iVx78E0X8QmD9O31l8"} -
Upload the Excel file.
/!\ :Here's an example of column names I used in my Excel example. Make sure the excel column names you will upload matches the one below.
curl -X POST -H "Authorization: Bearer eyJhbGciOiJIUzI1NiIsInR5cCI6IkpXVCJ9.eyJ0b2tlbl90eXBlIjoiYWNjZXNzIiwiZXhwIjoxNjY2NDM3ODk0LCJpYXQiOjE2NjY0Mzc1OTQsImp0aSI6IjA3MzY0NjI1NGI4YTRiYzA5NDE5MDllZmE3MmRiYzZlIiwidXNlcl9pZCI6MX0.qeH4k8ctnJgS8kF0sU6cJoBgyx4ZGUv9LL1MKRa1PFg" -F "usersfile=@/home/pbahati/Downloads/RSSBTemplate.xlsx" 127.0.0.1:8000/api/v1/upload/
You should get the following message
{"status": "ok", "description": " Data uploaded, records are being validated"}If token is invalid or expired. you will get the following error
{"detail":"Given token not valid for any token type","code":"token_not_valid","messages":[{"token_class":"AccessToken","token_type":"access","message":"Token is invalid or expired"}]}If the document have any malformation, you get error response with more details
-
Check/View the recent validated excel data in redis instance.
curl -H "Authorization: Bearer yJhbGciOiJIUzI1NiIsInR5cCI6IkpXVCJ9.eyJ0b2tlbl90eXBlIjoiYWNjZXNzIiwiZXhwIjoxNjY2NDM4MjIyLCJpYXQiOjE2NjY0Mzc5MjIsImp0aSI6ImRkZWFlNTg2MzZkNTQwMzZiYTUxZTEwYWExNjMwYzk5IiwidXNlcl9pZCI6MX0.gYv_Oe8EvcO5hSkFG9-qfPCv8ktnqC_biN0vGMTr-Ts" 127.0.0.1:8000/api/v1/validatedusers/
You should get the response like this bellow
{"status": "ok", "data": [{"names": "Bob Kagabo", "nid": 1199480035534601, "phone_number": 785576983, "gender": "M", "email": "bob@gmail.com", "phone_valid": true, "nid_valid": true, "email_valid": true}, {"names": "Abigale Mutoni", "nid": 1199789036474601, "phone_number": 785575383, "gender": "F", "email": "Abig@gmail.com", "phone_valid": true, "nid_valid": true, "email_valid": true}, {"names": "Chelsey Uwimana", "nid": 323032095901, "phone_number": 733385576983, "gender": "F", "email": "bobby@yahoo", "phone_valid": false, "nid_valid": false, "email_valid": false}, {"names": "Kelly Keza", "nid": 8322832832, "phone_number": 79769832, "gender": "F", "email": "@gamil.com", "phone_valid": false, "nid_valid": false, "email_valid": false}, {"names": "David Rugwiza", "nid": 1939449993838, "phone_number": 784465785, "gender": "M", "email": "david.rugwiza@yahoo.com", "phone_valid": true, "nid_valid": false, "email_valid": true}]} -
Commit users to the database.
curl -X POST -H "Authorization: Bearer eyJhbGciOiJIUzI1NiIsInR5cCI6IkpXVCJ9.eyJ0b2tlbl90eXBlIjoiYWNjZXNzIiwiZXhwIjoxNjY2NDM4MzUzLCJpYXQiOjE2NjY0MzgwNTMsImp0aSI6ImNmNWI5OGM2ODY3YjQ0ODk5NmZiM2UwY2EwZmQ4OTAwIiwidXNlcl9pZCI6MX0.C_c3IszGoQ6ubp2uOtv6MewudkhJOvaUHP7LJ-dmdXU" 127.0.0.1:8000/api/v1/commit/
You should get the response like this bellow
{"status": "ok", "description": "saved to DB"} -
now you can see the data in database
curl -H "Authorization: Bearer eyJhbGciOiJIUzI1NiIsInR5cCI6IkpXVCJ9.eyJ0b2tlbl90eXBlIjoiYWNjZXNzIiwiZXhwIjoxNjY2Mzk5MTMwLCJpYXQiOjE2NjYzOTg4MzAsImp0aSI6IjYxZjc5NjQ3ZDNjNjQ3MDU5MmVkY2E2ZTMzYTcwZGFlIiwidXNlcl9pZCI6MX0.T7HhDir6cn2F6UNzRKehoXP0uKCSCPkvJzmeSfXKzDI" 127.0.0.1:8000/api/v1/savedusers/
