This document is meant as an internal tutorial for Git, and most parts are taken from other pages. No guarantees. For an excellent reference see Scott Chacon's book.
Git is a distributed version-control system for tracking changes in source code during software development.
Possible status of files in a version-controlled folder:
- Untracked: a file that is not version controlled
- Unmodified: a version controlled file without changes
- Modified: a version controlled file with changes
- Staged: a changed or new file to be commited
Their relationships are demonstrated in the figure below: 
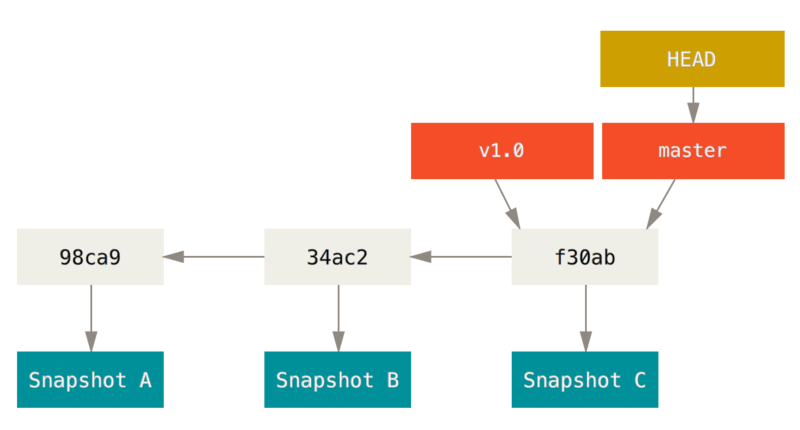
In Git commits are organized into a tree, based on their relationships. As any real tree, a commit tree can also have branches which makes possible the divergence of project, and allows us to separately work on it. The labels associated with parts of the branch are actually lightweight pointers similar to the pointers in C. As a consequence, they can efficiently be moved, renamed or deleted.
- commit hash: an SHA-1 of the commit along with the author’s name, email, the date written, and the commit message (consists of 40 charachters, but usually the first few (6) are enough to identify a commit)
- master branch: customary name of the "main" branch
- tag: a fixed pointer to a specific commit (similar to a branch, but fixed)
- HEAD: the "current branch" the user is looking at

Git needs to know your name and email address, as these are baked into every comment. Based on this, other users know who to turn to in case they have an issue (or they git blame you):
git config --global user.name "John Doe"
git config --global user.email johndoe@example.com
git config --global core.editor vim
# git supports aliases
git config --global alias.co checkoutYou can create a new git repository by typing:
cd /path/to/your/existing/code
git init

# or alternatively
git init <project directory>When you finish a logical chunk of your work, you can create a new commit. There are many options to handcraft a commit, using the main tool git add. Adding a file moves it into the staging are. This means that the file is flagged to be committed in the next commit. You can view the current status of the files using git status
git add filename

# add only parts of a file. The rest is kept unstaged or modified
git add --patch filename

# oops! You've added something that you did not mean to...
git reset <file>
# ...or you can "un-add" all:
git reset

# now, let's see what's up with our files
git statusNow that you managed to perfectly tailor the files in the next commit, you can git commit them:
# typing the following launches your text editor. Here, its vim.
# you can type your commit message there. The first line should
# be a short summary, followed by an empty line and then a more
# verbose description of the changes.
git commit

# only want a short commit message?
git commit -m "Short commit message"

# darn, messed up the commit message, and left a file out...
git add missing_file
git commit --amendAwesome! We have some commits in our project, and we can navigate between them. This way, we can check
what was changed between versions (or commits). The simplest way to print the commit tree is git log:
git log

# or a nicer version with other branches visible, too
git log --all --decorate --graph

# oh, that was a mouthful! Let's alias it!
git config --global alias.longlog=log --all --decorate --graph
# now you can do
git longlog

# ...by the way, what branches exist?
git branch
Care to see how the project looked a few commits ago? That means you need to move your HEAD to the
commit you want to inspect. Git then places the files of that revision of your project in your directory.
git checkout <commit_hash> | <branch_name> | <tag>Let's say that you are working on your master branch. Suddenly, a cool idea strikes you, and you need to try
it immediately. Of course, as an experimental project, you should not commit it in master. You can create a
new branch, do some commits and then merge it into master/delete it/leave it for later:
# checkout the commit where you want to branch off, then:
git checkout -b cool_idea

# or equivalently
git branch cool_idea
git checkout cool_idea

# after you do some commits, you might want to return to master:
git checkout masterWhen a cool idea turns out just fine, you can incorporate it into the master branch. As with every aspect of Git, there
are many possible scenarios for this. In the simplest case, its a breeze. At other times, you need to read about merge conflicts. It is usually a good idea to use git mergetool for this:
git checkout master

git merge cool_idea

# when the merge is succesful, you can delete the branch
# this only deletes the pointer that became unnecessary after the merge
git branch -d cool_ideaYippy! Your project is now completely safe! Or is it? Git stores the snapshost (commits) and other relevant data
in the top directory of your project, in a folder called .git. If you are really insistent of scrubbing the project,
there is no arguing with a good old-fashioned rm -rf .git. This deletes the complete history of your project that
was kept safe by Git. However, you can make use of the distributed nature of Git by pushing your project into
a remote repository. A remote repository can be anywhere: another folder on your machine, a friends PC, or more conveniently
on a server like GitHub/GitLab/BitBucket. These provide additional fancy options such as Continuous Integration or Code Deployment.
When you set up a remote repository (or just remote), your project is copied onto the server with all its files, commits and commit tree. Now, you have the additional task of keeping your local and remote trees synced. Based on whether you are starting a new project on GitHub or want to push an already existing repository, GitHub guides you through the setup process.
The simplest case of working with a remote is when working alone.
- Origin: name of the default remote repository
- Fetching: retrieving the latest commits from a remote without changing your master. The new stuff can be merged into master.
- Pulling: fetching + merging in one step, assuming no merge conflict occur.
- Pushing: updating the remote repository with your changes.
git fetch origin
git merge origin master

# or equivalently
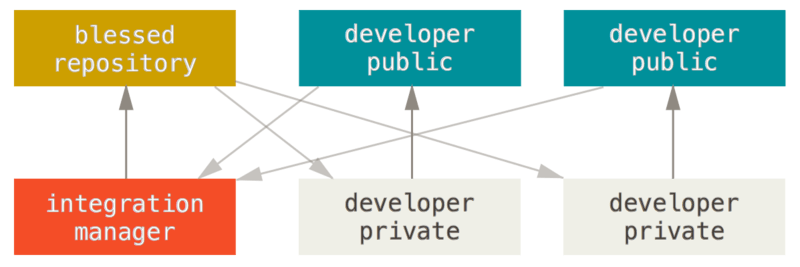
git pull origin masterWhen working in a Team, there are several possible Distributed Workflows. Of course, all Workflows need at least some coordination between the members of the team, so teammates are not interfering with/undoing the changes made by others. For this, it is useful to always perform at least a git fetch before starting to work on something new. We adopt the Integration-Manager Workflow that enables us to track changes and issues to a greater extent than just pushing to a common repository:

TODO: expound this part. Useful link: https://wellfire.co/learn/illustrated-distributed-git-workflow/ Alice and Bob want to collaborate on a project...
- PULLING FROM CANONICAL MASTER
- BRANCHING
- DOING CHANGES
- PUSHING TO DEVELOPER'S MASTER
- PULL REQUESTS
- HANDLING PULL REQUESTS: CODE REVIEW
- UPDATING PULL REQUESTS
- ACCEPTING PULL REQUESTS
- GOTO 1
- Git grants you the superpower of changing history. This way, you can customize the content/order of your commits. With great power, comes great responsiblity! Never modify a commit that is already on the remote, as it makes life a lot more complicated!
- Don’t commit directly to the master or development branches, as this usually circumvents Continous Integration.
- Don’t create one pull request addressing multiple issues. It prevents efficient issue tracking!
- Don’t work on multiple issues in the same branch. If a feature is dropped, it will be difficult to revert changes.